
This is a quick welcome back. It’s been quiet in here due to the post x-mas food coma, but looking forward to the next steps.
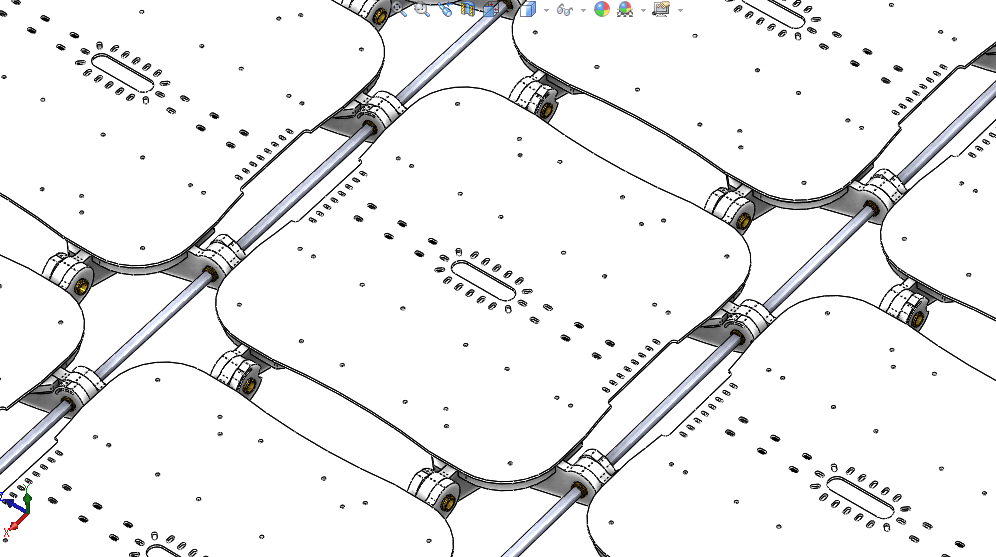
Last time we described the design of our BeastTile, and how they interconnect, both mechanically and electrically. We also gave some examples of what you could build. This week we’re gonna build a few tiles and hope they’ll fit together.
There have been a couple of minor revisions since the last update. Here’s the lowdown.

HOLLOW HINGE BOLTS
For the hinge axles we’ll be using hollow threaded rod, a component commonly used in lighting fittings and also known as ‘nipple’. On a BeastTile, each side has two hinge arms. The threaded nipple will be held captive in a threaded hole in one arm, so no loose fasteners asking to be lost.
Why hollow rods? For larger assemblies, like a flat panel, we can’t rely on the hinges for rigidity. The hollow rods accommodate continuous rod, like tent poles, to be passed through, providing extra support and rigidity.
SWIVEL LEGZ
We want stackable tiles, so we need a way of spacing them apart so the RPIs don’t carry the load of the tile above. We came up with a captive leg attached to the hinge bolts, and can be swung out of the way. The drawings don’t show it, but the legs could be locked in the open/closed position by clamping with a nut. Most importantly, the legs add a terrifying beastly aesthetic.


The Beast stack…

POWER HUB
Here’s the very simple power bay. Two 2.5 mm barrel jacks for power input/output/daisy chaining. Four Aukey 2 x 2.4 A car chargers, which take 12 – 24 VDC supply, providing an impressive 4 x 24 W = 98 W worth of USB power to supply whatever needs it. In the back of our mind is the desire to support devices from 5 V up to 24 V, so the Aukey units provide great flexibility on the input voltage side. The four hubs will be wired with a common live and ground rail and we’ll insulate the live terminals with a heat shrink ‘condom’ over the end of each car charger. Well, that’s the plan.

The car chargers and barrel jacks are mounted (car chargers, glued) onto a simple laser cut faceplate that connects the the tile via two tabs at the top edge and two screws at the bottom. This faceplate forms the standard mechanical interface for any other devices that we might want to house in the tile. We’re thinking battery packs, LED illumination, speakers, you name it.
NETWORK HUB

Last week we mentioned the 8-port switch from Netgear. Well we stripped it out and found a very compact (150 x 100 x 20 mm) PCB, which perfectly inside the BeastTile and works well with the standard faceplate.

The finished tile design

With the detailing done, we’re excited to get building the first versions, and hope for a short list of bugs and snags.
If you have any questions or are interested in real-time updates you can join in here.
Happy New Gear!
If you have questions or just want to say hi, you can hangout with us on gitter.
Check in next week for some real REAL LIFE PROTOTYPES!