

OpenVINO™ is an open-source toolkit developed by Intel for optimizing and deploying AI inferencing. It includes everything needed for developing AI applications, model optimization, and running inferencing on a device. In this guide, we’ll walk you through the process of deploying, tweaking, and testing OpenVINO AI models using the balena platform. Our example project, balena-openvino, is intended to give OpenVINO developers an extensible starting point for managing AI models on the edge, and use the power of balenaCloud to scale to a large fleet of devices.
Quick start
If you have used OpenVINO before, and are already familiar with containers and/or balena, here’s the TL;DR:
- Get a NUC, a USB webcam, and a USB flash drive
- Once your device is ready to go (~15 minutes), browse to http://
:8888 to start running models from Juptyer notebooks
OpenVINO Toolkit Distributions
- There are two versions of the OpenVINO toolkit:the open-source “OpenVINO Toolkit”, which is community-supported, and,
- The “Intel Distribution of OpenVINO Toolkit” which is supported by Intel.
In this guide, we are going to be using the Intel Distribution of the OpenVINO Toolkit, though the same concepts and strategies shown here would apply to the community-supported version as well.
The typical OpenVINO workflow starts with selecting a model, either by preparing your own custom one (typically a lot of work!), using a ready-made one and adjusting it yourself (usually less work) or by downloading a pre-trained model. A popular source of pre-trained models is the Open Model Zoo for OpenVINO. The Zoo contains over 200 neural network models, both public and from Intel, and provides the opportunity to pick the right one for your solution. Types include object detection, classification, image segmentation, handwriting recognition, text to speech, pose estimation, and others.
The next workflow step consists of optimization, which is a transitional stage between training and deployment. In this step you can use the Model Optimizer to adjust and/or convert your model to another format more suitable for your ultimate deployment method. For instance, the optimizer can convert a non-Intel model from the Zoo to the OpenVINO Intermediate Representation format (IR), which is compatible with the OpenVINO Runtime. (The Intel models have already been converted to work with OpenVINO toolkit)
The final stage is deployment, where we run the inference locally or serve the model with the OpenVINO model server, a high-performance system for serving machine learning models. Our project, balena-openvino is based on this model server, with the advantage being that the resulting inference is self-contained and independent.
This enables two scenarios:
* Use as a standalone inference system, on x64 based machines
* Use as inference server, gathering data/images from multiple lower-power client devices
(Image courtesy of Intel)
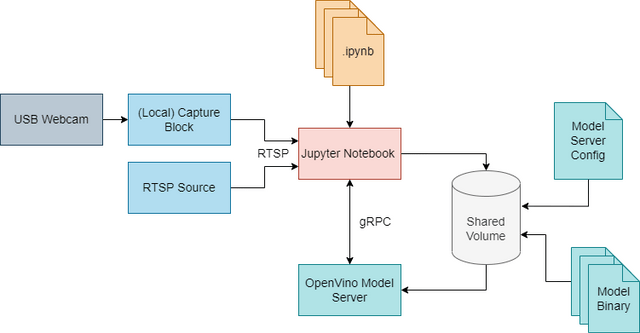
Let’s go into a bit of detail with each component of this architecture.
Capture
One of the most popular low-overhead ways to stream images is using RTSP (Real Time Streaming Protocol), which is the default video input for this project.
To ingest images, connect a USB camera directly to your NUC and the video-capture block will stream the images over a (local) RTSP connection. This project includes a fork of the video-capture block, modified to support x64 devices.
You could also run the capture block on a separate device, such as a Raspberry Pi connected to a Pi Camera or a network (IP) camera. As long as your source exposes an RTSP endpoint, it can be used as an image source for this setup. While technically possible, we don’t have any examples for multi-cam and network camera setups yet. In addition, you can directly load images or videos directly from the filesystem and run inference on those.
Model Server
The OpenVINO Model Server is the beating heart of this project. It includes the OpenVINO Inference Engine and adds a few more features that make it particularly useful for our use-case.
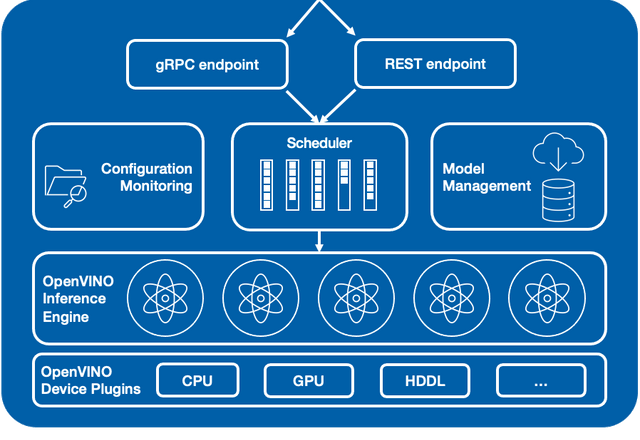
The model server encapsulates all the packages needed for inference and model execution and Device Plugins to talk to the device you want to run inference on (CPU, GPU or AI Accelerator), and exposes either a gRPC or REST endpoint. This means you simply need to feed it the model input, in this case images, but could be anything your model is trained to accept, and wait for an inference result. The scheduling is done automatically, so it’s able to accept and respond to requests to multiple models at the same time.
The Configuration Monitoring and Model Management parts allow us to dynamically load new models and change the configuration file on the fly.
Both of these features, running multiple models at the same time, and the dynamic loading of models enable very powerful features for embedded and edge devices. Think of a robot that might need to do segmentation at some point, and then pull up an object detection model in another context.
How to use
Hardware requirements
For this guide, you’ll need:
* A USB webcam
* An x86 device such as an Intel NUC (6th gen or later can take advantage of OpenVINO optimizations), Linux-friendly laptops, x86 single board computer, etc.
Run an example model
The repository contains everything you need to get started with OpenVINO on the edge. The docker-compose.yaml file comes pre-configured with OVMS, a local RTSP streamer for USB webcams, Jupyter Notebook, and two example models, one for object detection and one for face recognition. These instructions assume that you have some experience with machine learning and Jupyter notebooks.
- Connect a USB webcam to your device.
-
When prompted for a default device type, choose one that is compatible with your x86 device. If you are using an Intel NUC, choose “Intel NUC”. If you are using a different x86 device, choose “Generic x86_64 (GPT)”.
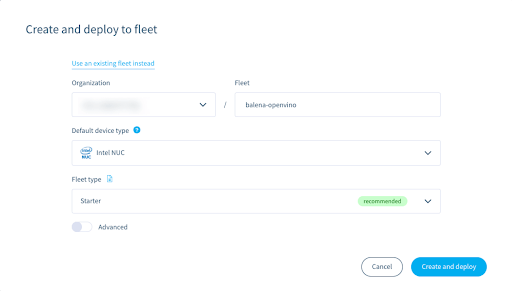
-
From your newly created fleet, choose to Add a device and follow the normal provisioning prompts & process.

-
After ~10 minutes your device & application will be ready to go. And you should see a set of services (containers) running:

-
Navigate to http://
:8888. You should be greeted by the Jupyter environment.
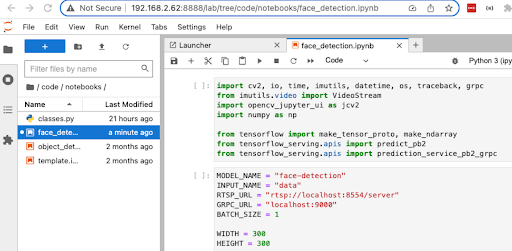
-
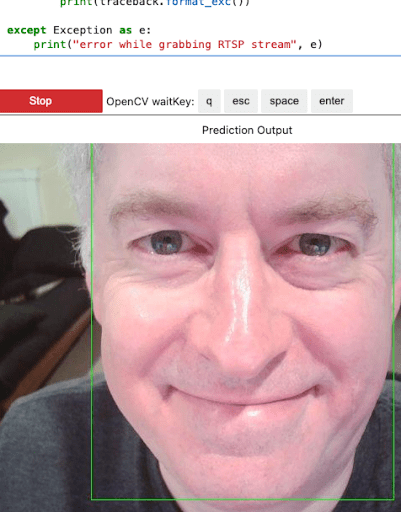
You can then run ▶▶ the included demos such as face_detection, or add your own. If you run face_detection, scroll down to see yourself in the Jupyter notebook.
For more information on using the demos, please see the project repository.
What’s next?
As you can see, the Intel OpenVINO platform is a very powerful yet easy to use framework for AI applications.This project is only a start that you can build on and include more features and capabilities, train and deploy your own models, or even modify the project to pull in more of the Open Model Zoo demos.
It’s also important to reiterate that although we are experimenting with just one NUC on our desk, this process is scalable to any number of devices. The deployment of the container and deployment of new models can be done in bulk, making it easy to update an entire fleet of edge AI devices.
And as always, we’d love to hear from you if you give this a try. Let us know in the comments.