
In this guide, we’ll walk you through the process from start to finish and show you how to deploy an AI application using an Intel NUC and the Intel Distribution of OpenVINO Toolkit, fully containerized and ready to scale to any number of devices with balenaCloud.
Developers getting ready to begin AI projects have no shortage of options when it comes to platforms, frameworks, models, and sample applications. There are so many in fact, that it can be overwhelming to even know where to begin! With this guide, we hope to remove much of that friction so that edge developers can get going quickly.
We’ll start by going through some background information in the first sections of this guide. If you’re already familiar with OpenVINO, please skip ahead to the build steps.
What is the Intel Distribution of OpenVINO Toolkit?
Before we dive into building and pushing containers, let’s start off with a quick recap of what the Intel Distribution of OpenVINO Toolkit is, since it is going to be at the heart of our project. According to Intel’s OpenVINO website, OpenVINO is a set of tools and utilities that allow you to “optimize, tune, and run comprehensive AI inference” on trained neural networks. It includes everything needed for developing AI applications, model optimization, and running inferencing on a device.
There are actually two versions of the toolkit:
- the open-source “OpenVINO Toolkit”, which is community-supported, and,
- the “Intel Distribution of OpenVINO Toolkit” which is supported by Intel.
In this article, we are going to be using the Intel Distribution of OpenVINO Toolkit, though the same concepts and strategies shown here would apply to the community-supported version, as well.
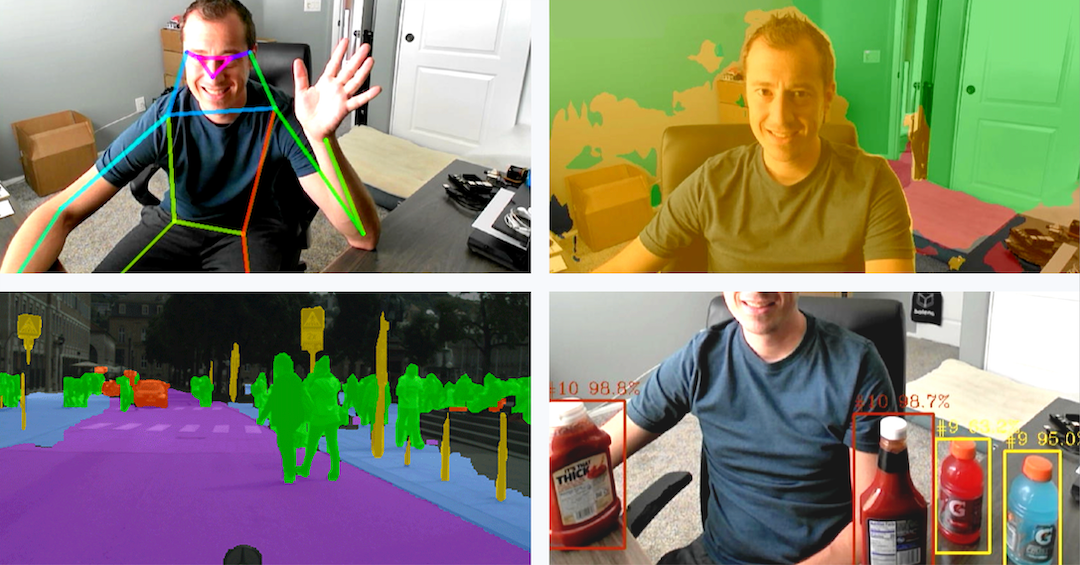
Some of the most common use cases or applications that can be built with the OpenVINO Toolkit (either version) are object detection, face recognition, human pose estimation, colorization, semantic segmentation, classification, and action recognition. You can use the Toolkit to build your own version of any of these, or, you can get started quickly with ready-made sample applications in the Open Model Zoo.
What is the Open Model Zoo?
The Open Model Zoo is a series of pre-built applications (demos) and pre-trained models that you can use to rapidly test, build on top of, and deploy AI projects. The Open Model Zoo has sample applications covering a wide variety of topics such as computer vision, audio recognition and classification, language, speech, and text, and more. Many of the applications can be run with different underlying models as well.
For example, in this tutorial we are going to start off with an object detection sample application that uses a model trained on detecting people, but then we will switch to a model trained on detecting retail products, and we’ll see if we can detect ketchup instead!
What Hardware is Supported?
One of the other great features of OpenVINO is it’s flexible use of hardware. The list of official supported hardware is located here, and you can see from that document that processors (CPUs) are supported from the Intel Atom range, up into the Core processors, and all the way to the high-end Xeon server platforms.
Beyond using a supported CPU, there are also GPU’s and VPU’s that are supported as well. So, if your device has a supported Intel HD Graphics, Iris Graphics, or Xe graphics integrated, you might be able to speed up inferencing by running your application on the GPU instead of the CPU. If you have an Intel Neural Compute Stick 2 with Movidius accelerator, that can also be leveraged for high-speed inferencing.
There are lots of compatible devices, and getting started, even just using your CPU, is very easy. If your application isn’t achieving a high frame rate and you want to increase performance, you can simply upgrade to higher performing hardware and your code will run exactly the same, with no need to re-architect your application.
Let’s get everything ready
Hardware Requirements
- Intel NUC and power supply (see note below)
- Monitor, Mouse, Keyboard
- USB Webcam
Caution: We are going to overwrite the NUC’s hard drive, and you will lose any data, operating system such as Windows, and anything else on your NUC!
We’re going to use an Intel NUC for this tutorial (Note: the 6th through 10th generation Intel NUC’s are supported, with support for the 11th-gen NUC coming soon), but other 64-bit x86-architecture devices such as laptops, small form factor PC’s, or even x86 single board computers like the UP Board will likely work, though are untested. If you do try one of those out, let us know in the comments or on our Forums so we know!
Software requirements
You have two choices to deploy this project onto the target NUC. You can either use our “Deploy with balena” button, which is a bit simpler as it will automatically start building the necessary containers in the cloud as soon as click the blue button, or you can git clone this repository and then do a balena push to manually begin the container builds using balenaCLI.
Both options are fully described below, so simply choose the one that you prefer.
Either method you choose will require a way to flash the OS image, so you’ll want a tool like balenaEtcher.
Option 1 – “Deploy with balena” button
This is the quickest way to get started, as it requires no tooling to be installed on your development machine and everything is done in the cloud. Start by simply clicking this blue button, and then continue following along.

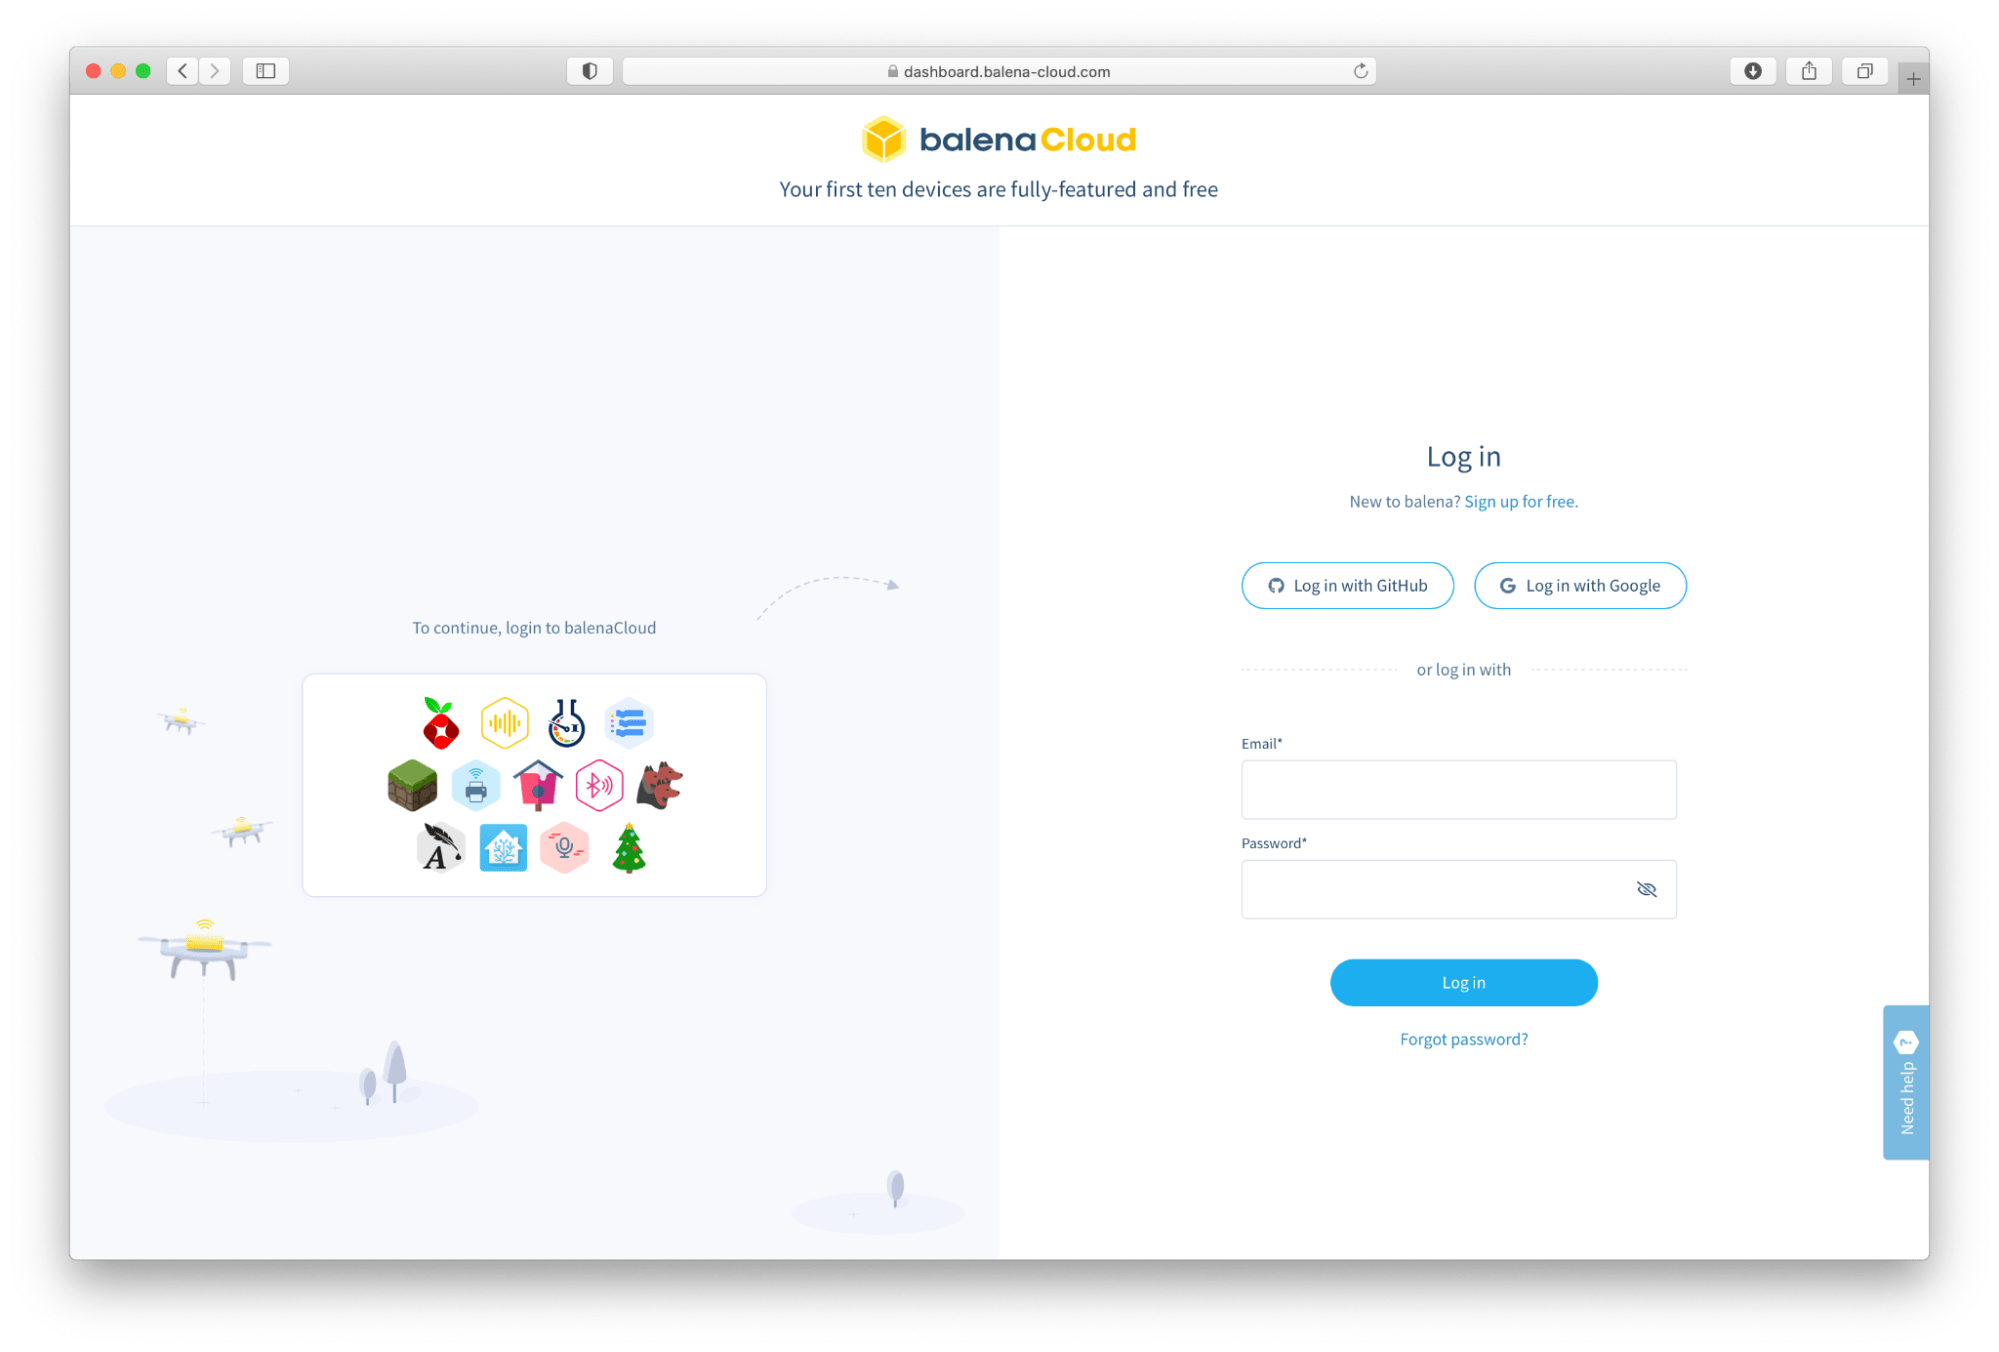
If you don’t already have a balenaCloud account, you will need to create one, or otherwise you can log in if needed:
Once logged in, you the process of creating an Application starts. You can alter the name, but be sure to select “Intel NUC” from the drop-down menu of device types, or “generic_x86-64” if you are testing out another device type:

You come to a Summary page, and after just a moment you will see the build beginning, indicated by the spinning circle on the right in the “Releases” section. This shows that the containers are being generated, in the cloud, getting ready to be deployed to your device. This should take about 10 minutes, so we’ll go complete some other tasks in the meantime.

While that is occurring, let’s go ahead and setup the NUC. In the Devices pane in the middle, click the blue “Add device” button. This will give us a pop-up modal with a few options. Let’s double check that “Intel NUC” is selected for the device type, and for the purposes of this tutorial we can choose a Development image, and select WiFi + Ethernet. Input your local WiFi credentials, and click the blue “Download balenaOS” at the bottom:

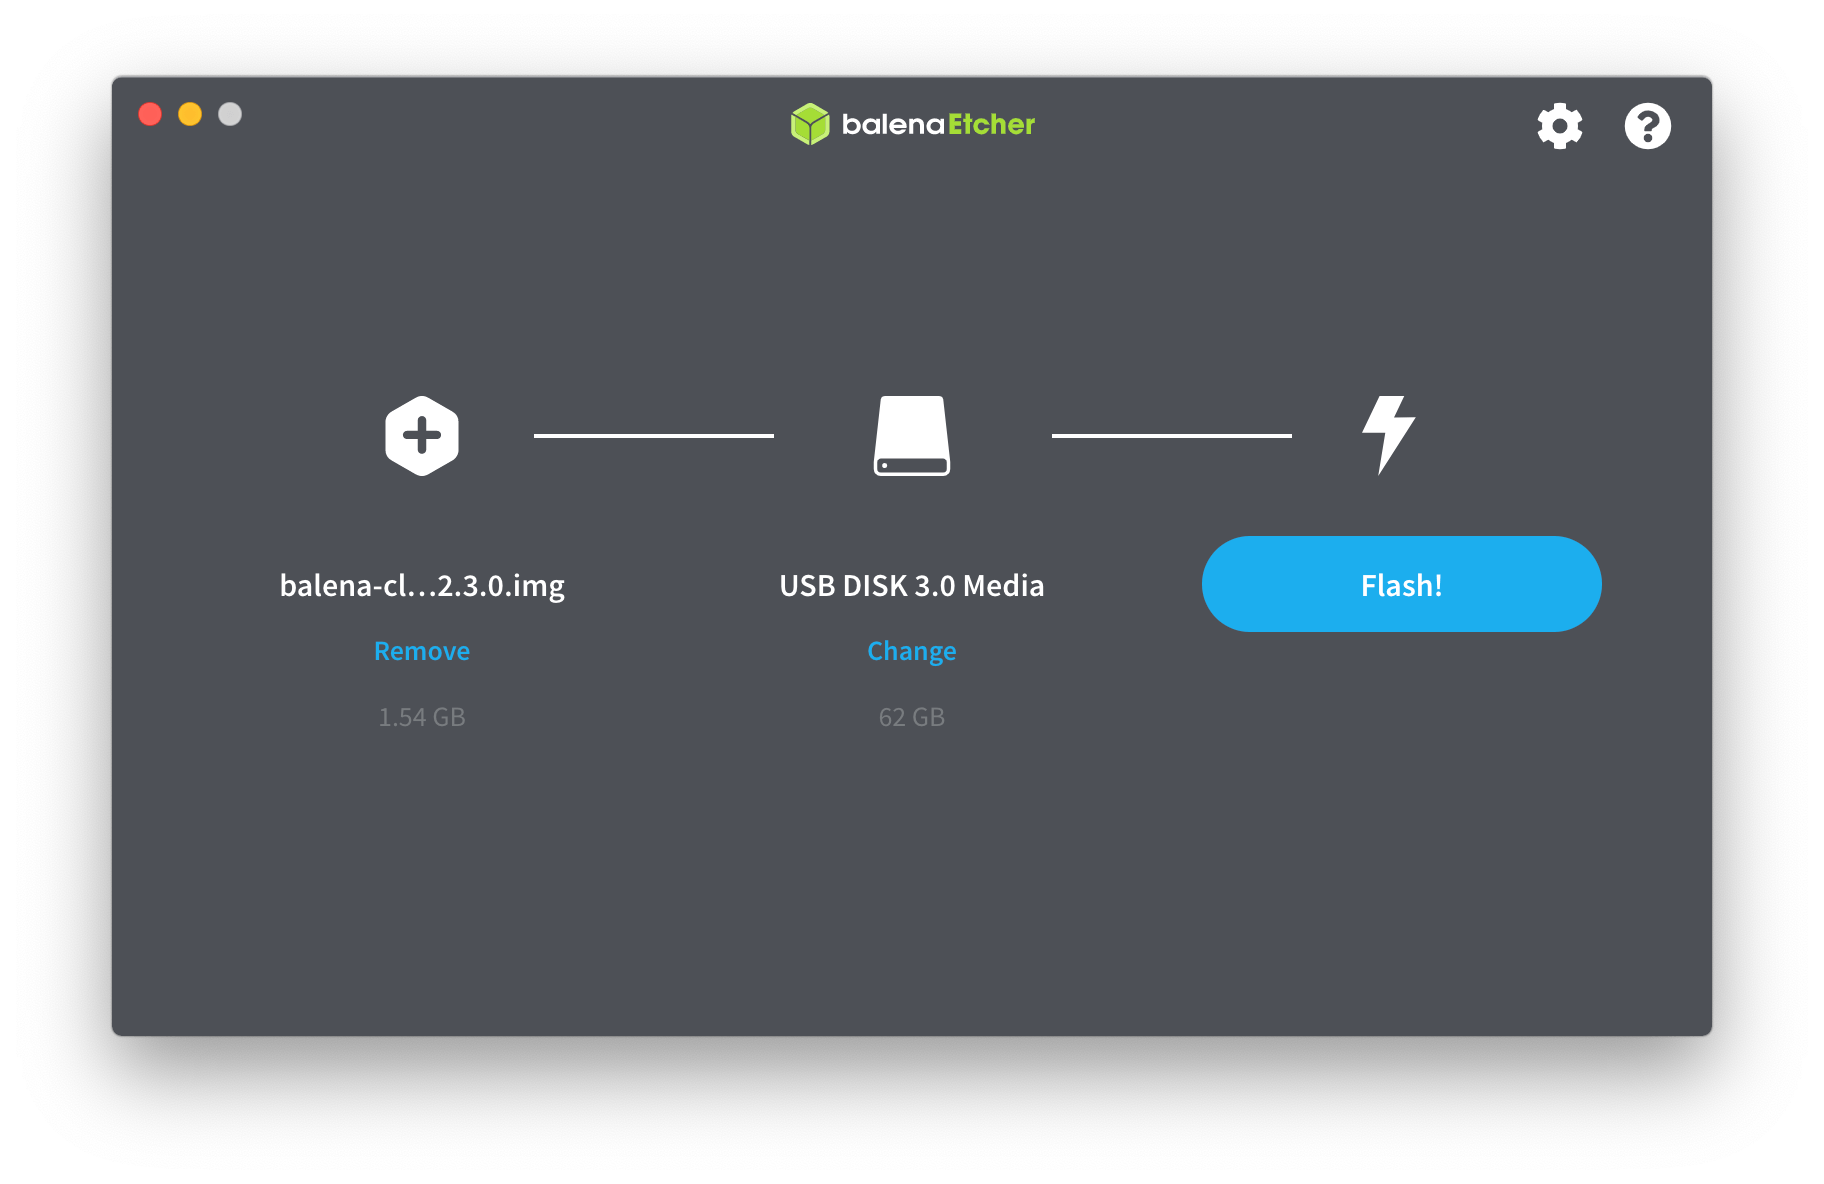
Once the download is complete, we’ll need to flash the image to a USB stick, and then boot the NUC from it. To flash the image to a USB stick, we can of course use Etcher:
After the flash is completed, remove the USB stick from your computer and insert it into your NUC. Now, at this point, a word of caution is in order:
We are about to completely overwrite the contents of your NUC with a whole new operating system (balenaOS), and this is going to erase and destroy anything on your NUC. That includes any data, your existing Microsoft Windows or other operating system, and any other contents you might have on it.
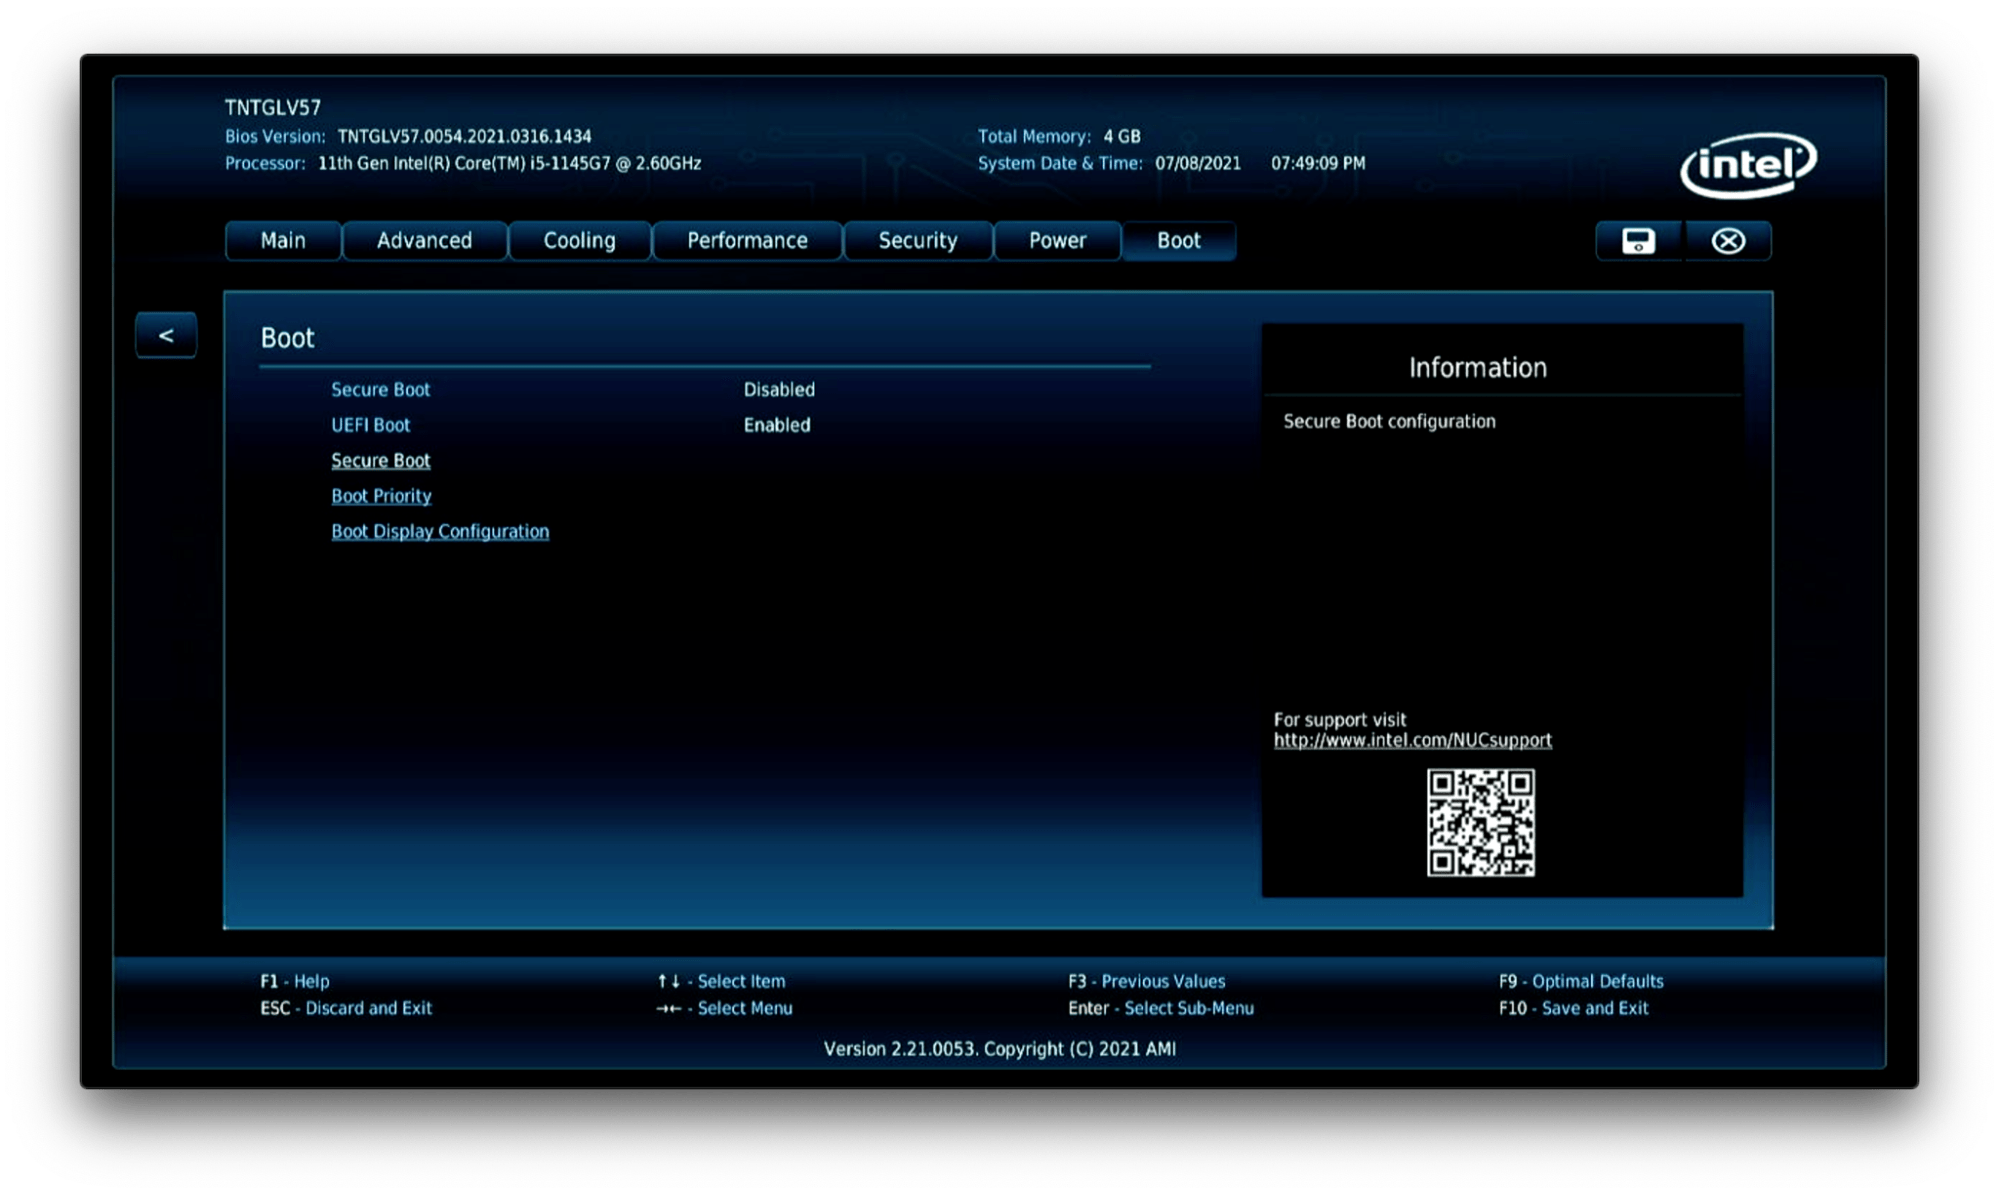
When you are ready, attach your monitor, keyboard, mouse, and USB webcam, and power on your NUC. If your NUC doesn’t automatically boot from USB prior to it’s hard drive, you might need to change the boot order or allow booting from USB in the UEFI BIOS. For example, my NUC needs Secure Boot disabled and then I can boot from USB:
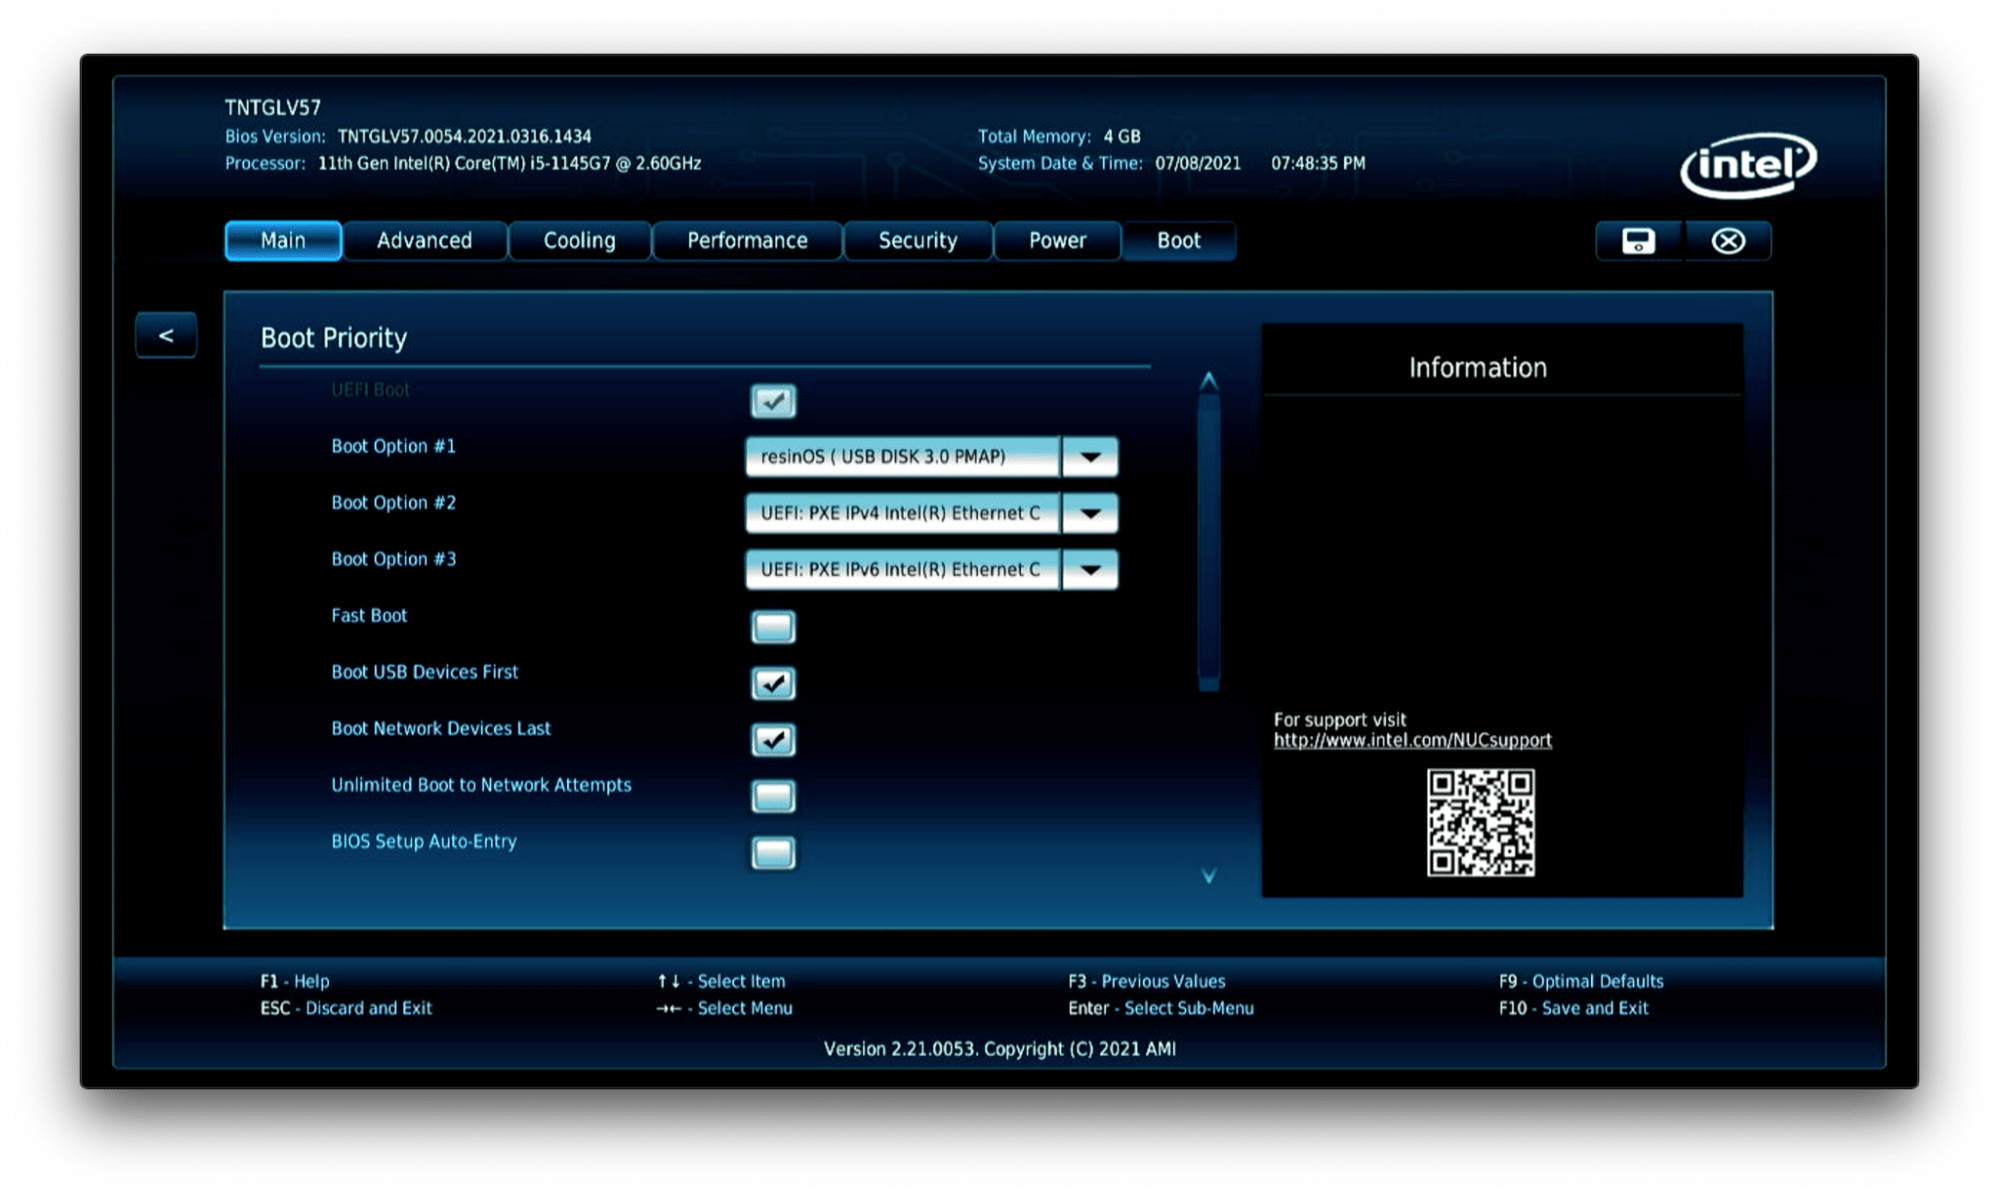
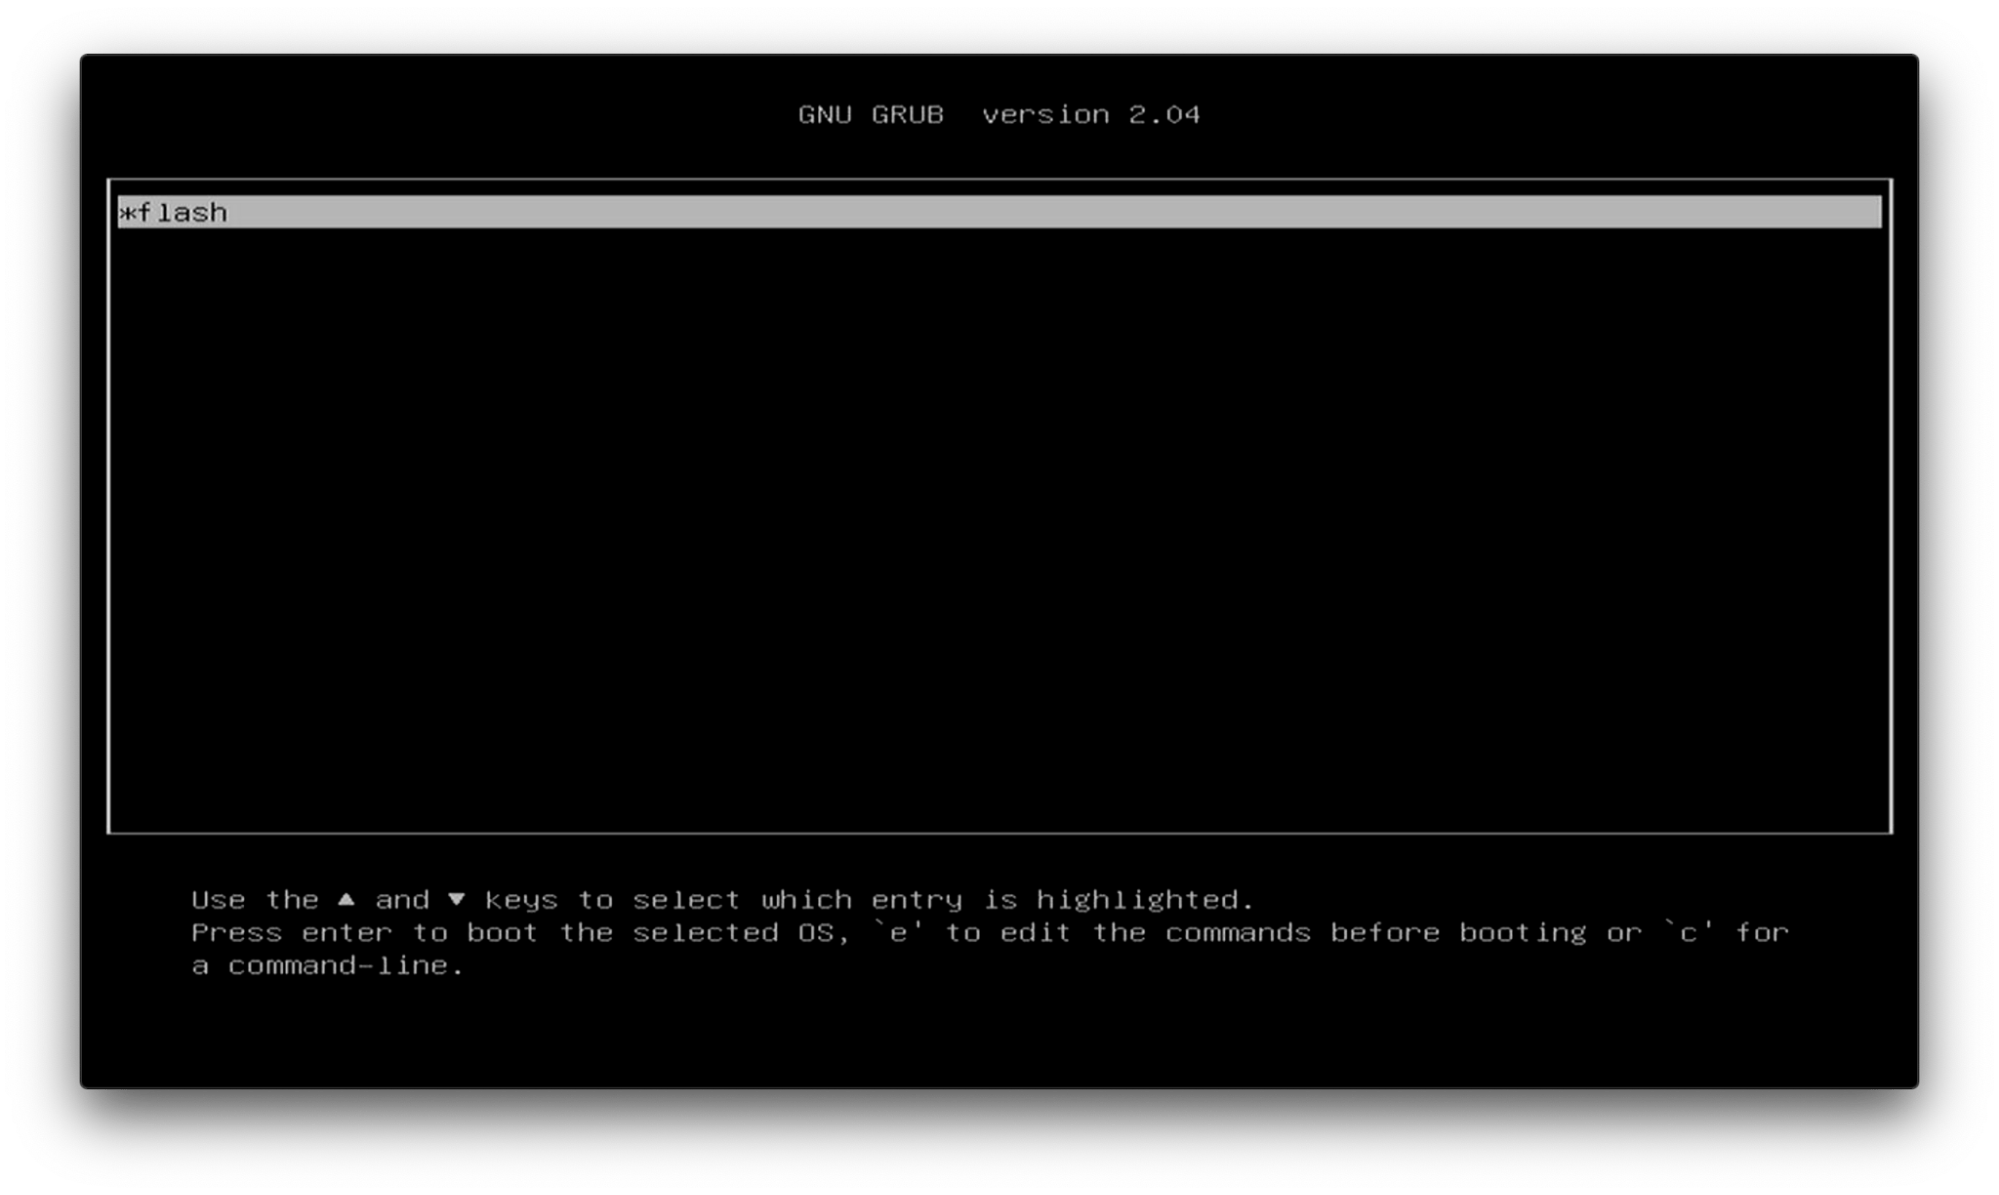
When the NUC boots from USB, you will see the “flash” process get booted, and the contents of the USB stick will be transferred over to the NUC’s internal storage.
After a few moments, you will notice the NUC will automatically power itself off. This indicates the transfer from the USB stick to the hard drive is complete. Remove the USB stick, otherwise you will just continue to overwrite the drive again, and then power it back on. After a few moments, the NUC will boot and register itself with balenaCloud, and appear in your Dashboard:

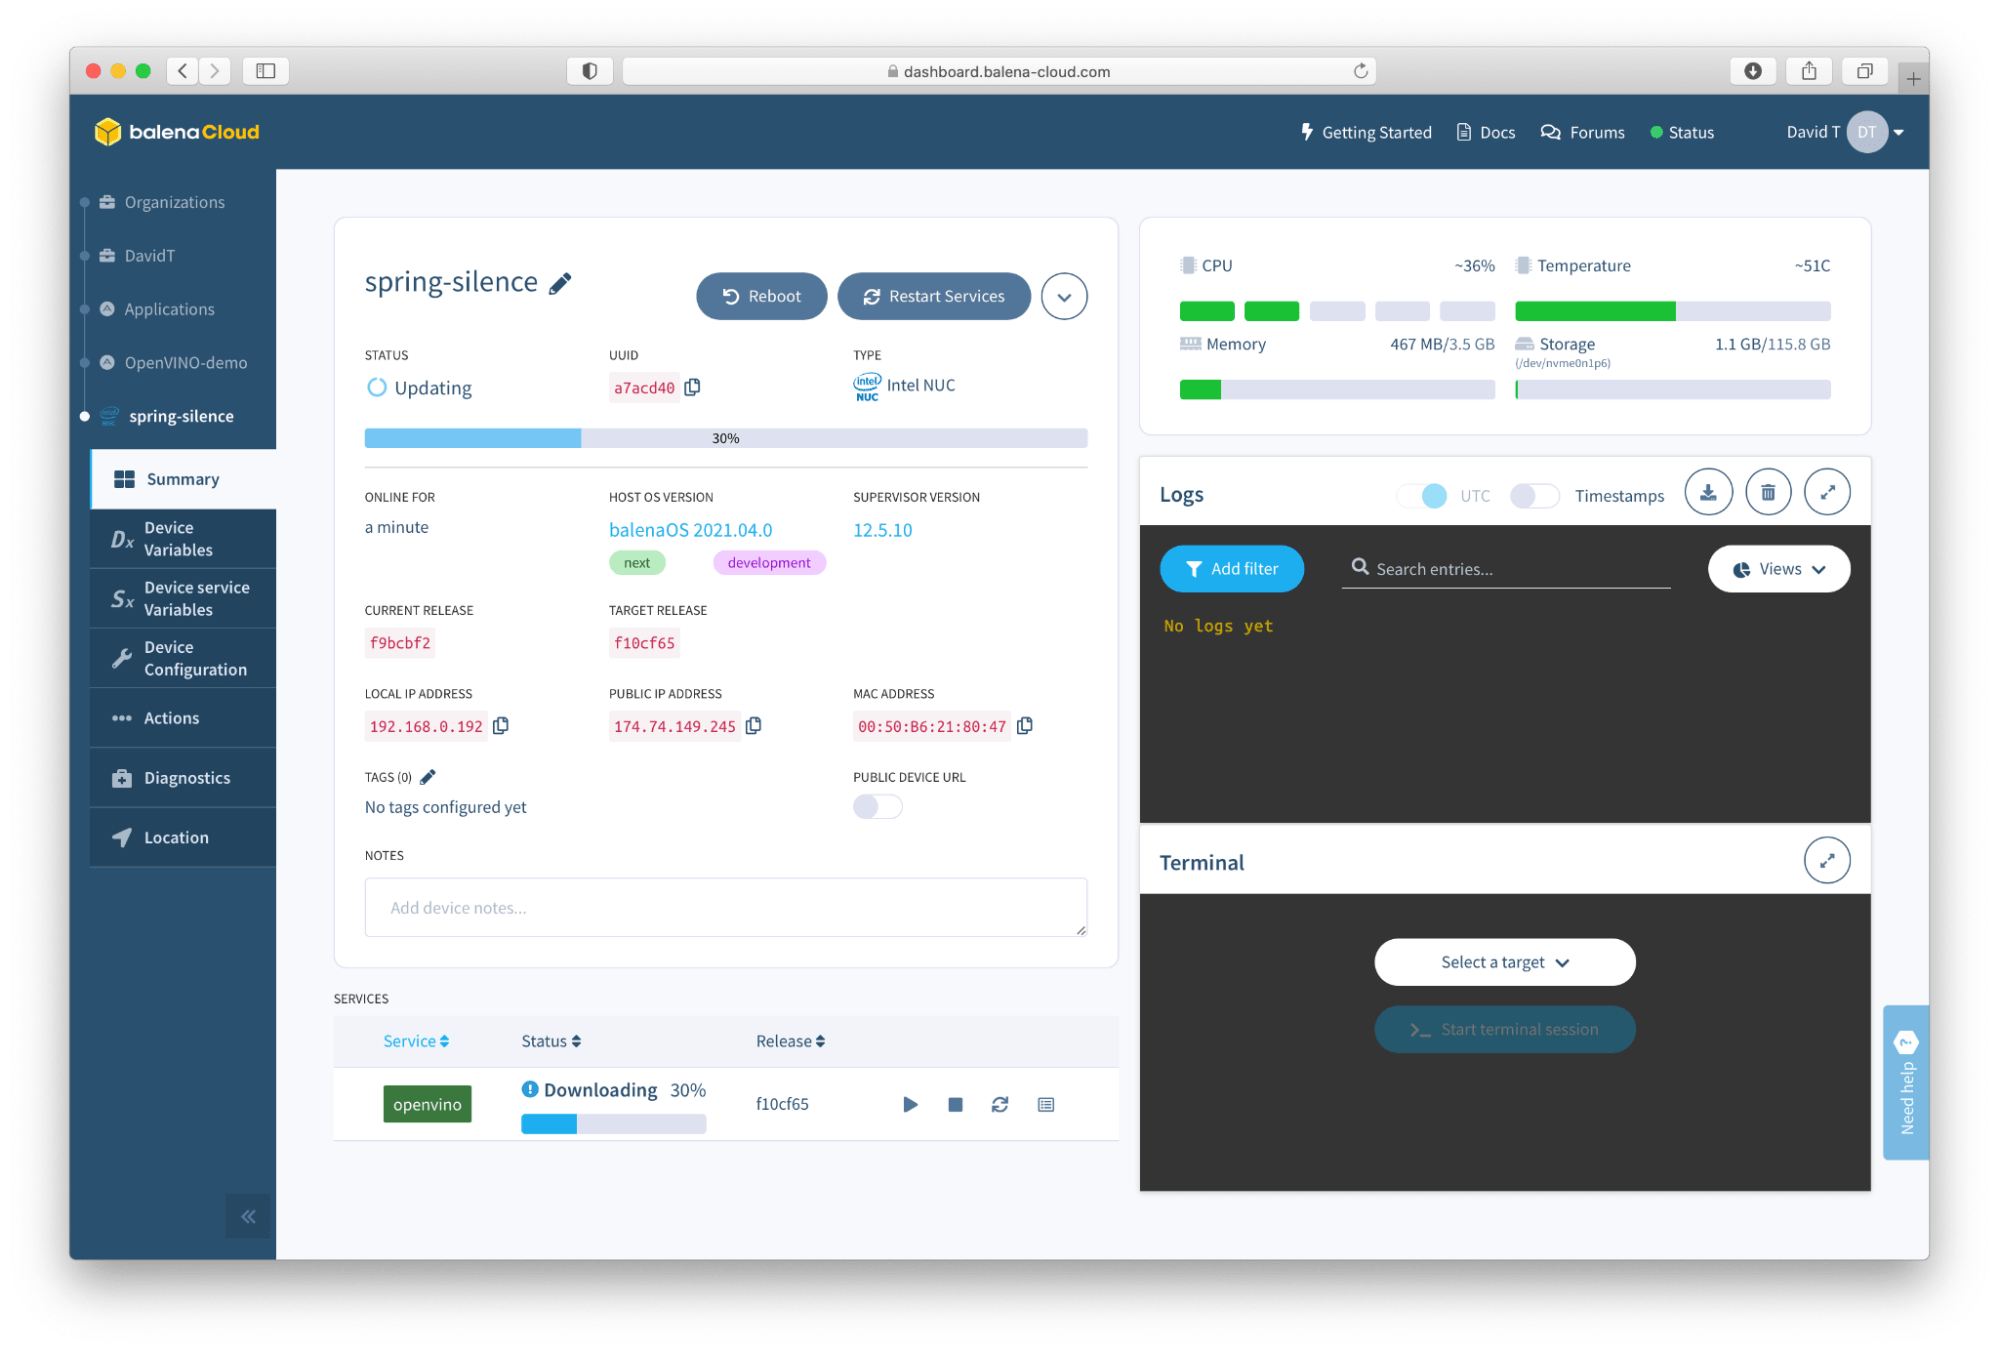
While we were performing these steps to get the NUC ready, the containers that we started building in the cloud finished and are now ready for download. If you were quick to get your USB stick flashed and your NUC is online prior to the containers finishing their build, that’s ok, your device will just download them as soon as they are ready. You can see that mine finished because the “Releases” pane no longer has the spinning circle, indicating activity. If you click on the name of the device, (spring-silence in my case), you are brought to the Device Details page, and you can watch the progress of the containers downloading:
Once the download finishes, it’s time to move to the next section (skipping over Option 2). Jump down to “It’s AI time!” and continue on.
Option 2 – Use the balena CLI
This method is not quite as fast as the first option, but you can see more of what is going on under the hood, and will be needed if you plan on building your own applications later. For this option, the very first thing we need to do is login to balenaCloud and create an Application by clicking the blue button at the top left. In the modal that pops up, you can name your application anything you like, but make note of it, as we’re going to need it later! You can see in this one, I am naming the application OpenVINO-demo:
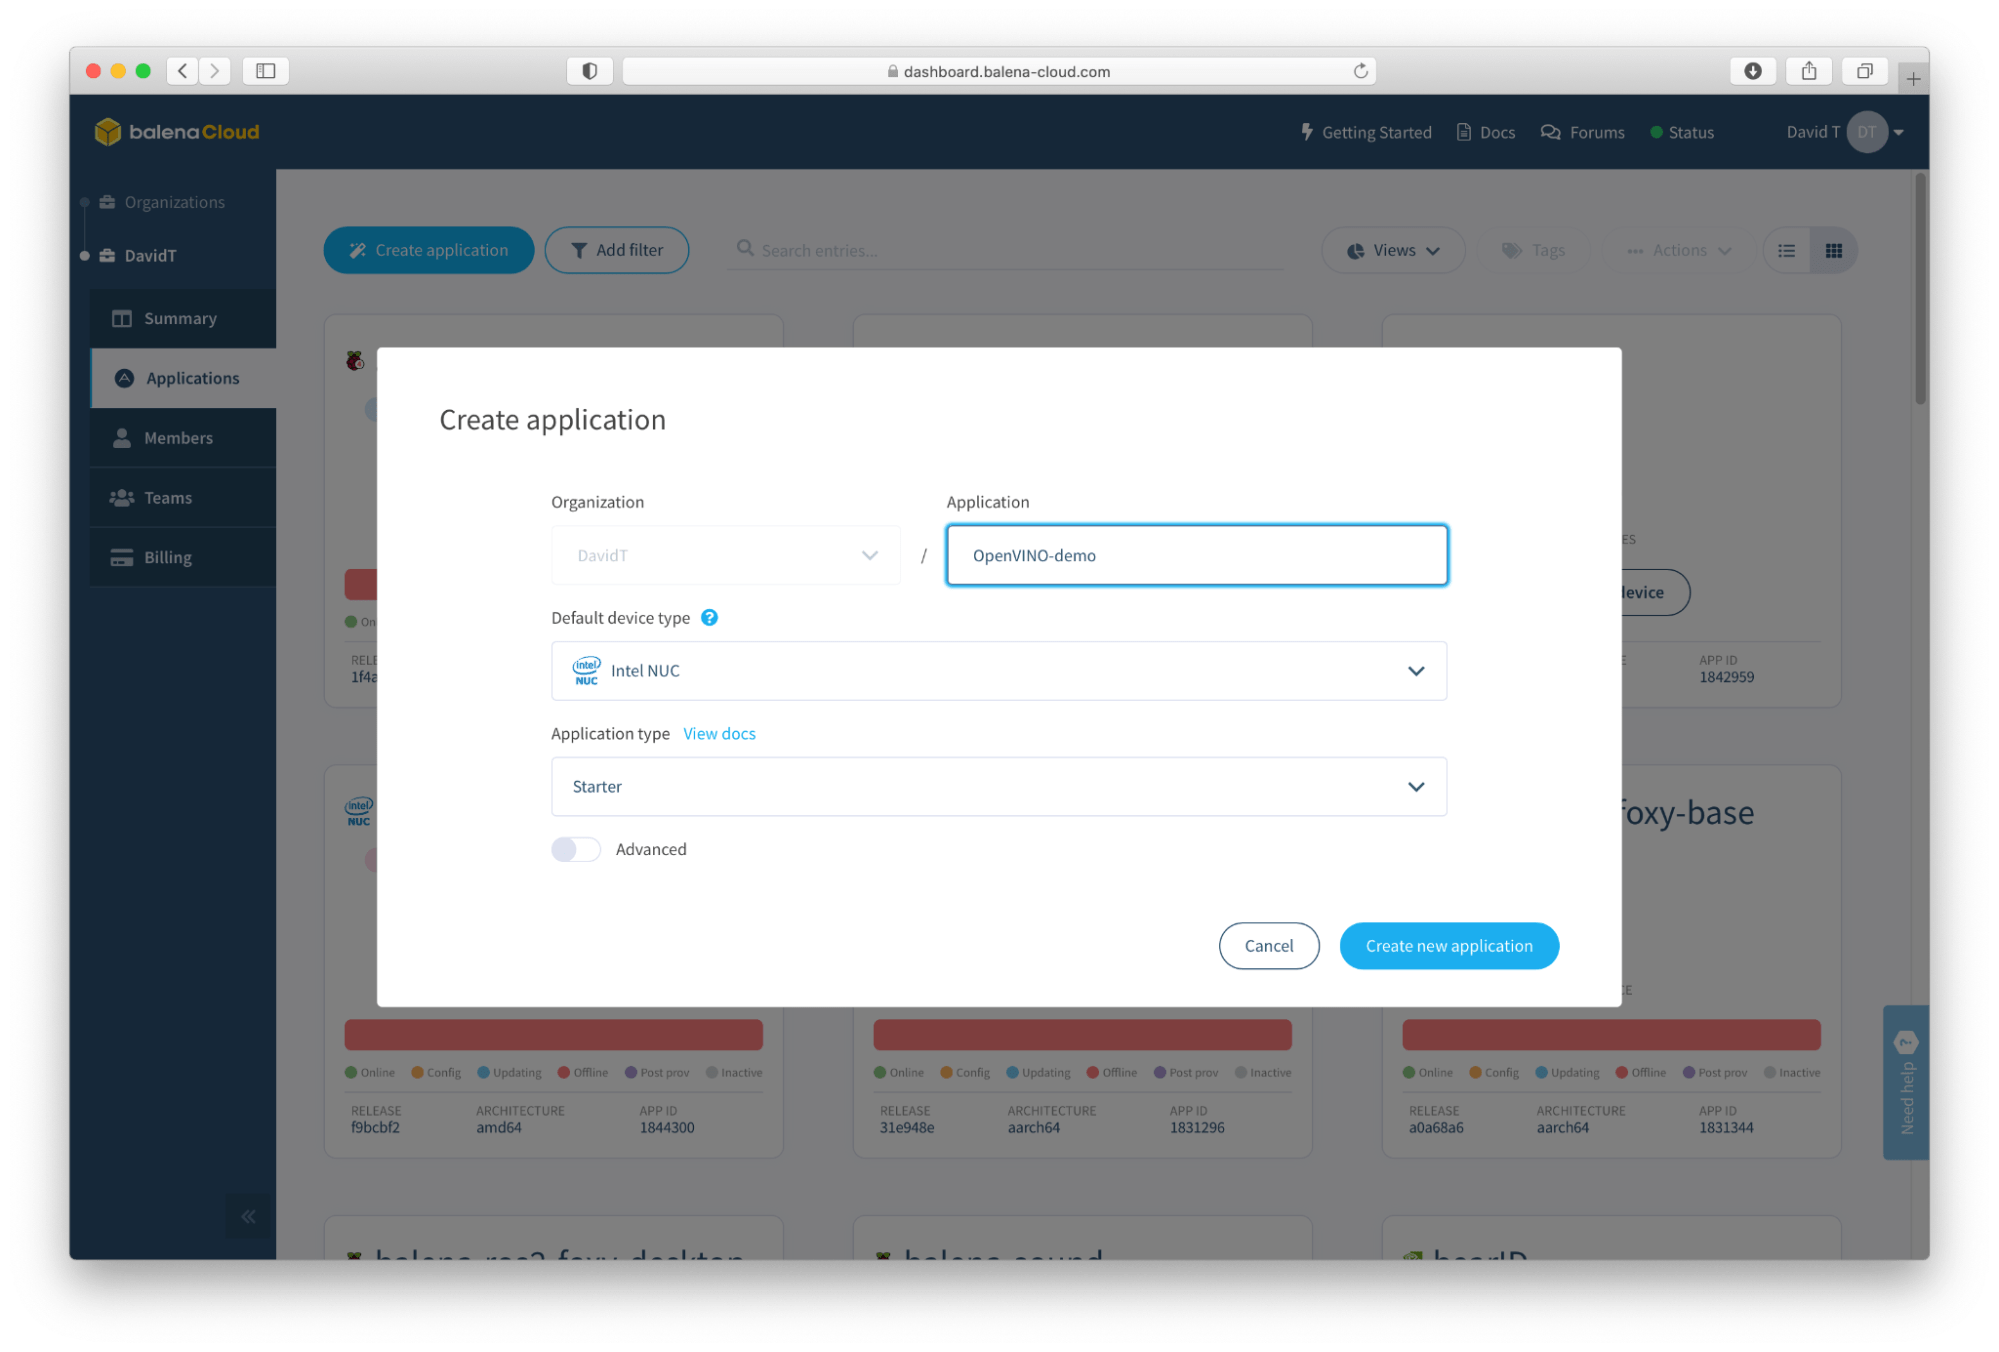
From the “Default Device Type” drop-down menu, select Intel NUC, or you can choose “generic x86_64” if you are using some other type of hardware. Confirm your choice with the blue “Create new application” button, and you will come to the Summary page:
That blue “Add device” button is our next destination, go ahead and click it. This will give us a pop-up modal with a few options. Let’s double check that “Intel NUC” is selected for the device type, and for the purposes of this tutorial we can choose a Development image, and select WiFi + Ethernet. Input your local WiFi credentials, and click the blue “Download balenaOS” at the bottom:
Once the download is complete, we’ll need to flash the image to a USB stick, and then boot the NUC from it. To flash the image to a USB stick, we can of course use Etcher:
After the flash is completed, remove the USB stick from your computer and insert it into your NUC. Now, at this point, another word of caution is in order.
We are about to completely overwrite the contents of your NUC with a whole new operating system (balenaOS), and this is going to erase and destroy anything on your NUC. That includes any data, your existing Microsoft Windows or other operating system, and any other contents you might have on it.
When you are ready, attach your monitor, keyboard, mouse, and USB webcam, and power on your NUC. If your NUC doesn’t automatically boot from USB prior to it’s hard drive, you might need to change the boot order or allow booting from USB in the UEFI BIOS. For example, my NUC needs Secure Boot disabled and then I can boot from USB:
When the NUC boots from USB, you will see the “flash” process get booted, and the contents of the USB stick will be transferred over to the NUC’s internal storage.
After a few moments, you will notice the NUC will automatically power itself off. This indicates the transfer from the USB stick to the hard drive is complete. Remove the USB stick, otherwise you will just continue to overwrite the drive again, and then power it back on. After a few moments, the NUC will boot and register itself with balenaCloud, and appear in your Dashboard:
At this point our NUC is ready, but we don’t have any containers built or deployed yet, so let’s get to work on that! We will start by installing the balena CLI, which will allow us to perform builds and interact with devices. You’ll want to follow these installation instructions, depending upon your operating system, and once that is completed we can proceed. I am going to use an Ubuntu VM for development, but you can also install balena CLI on Mac and Windows as well.
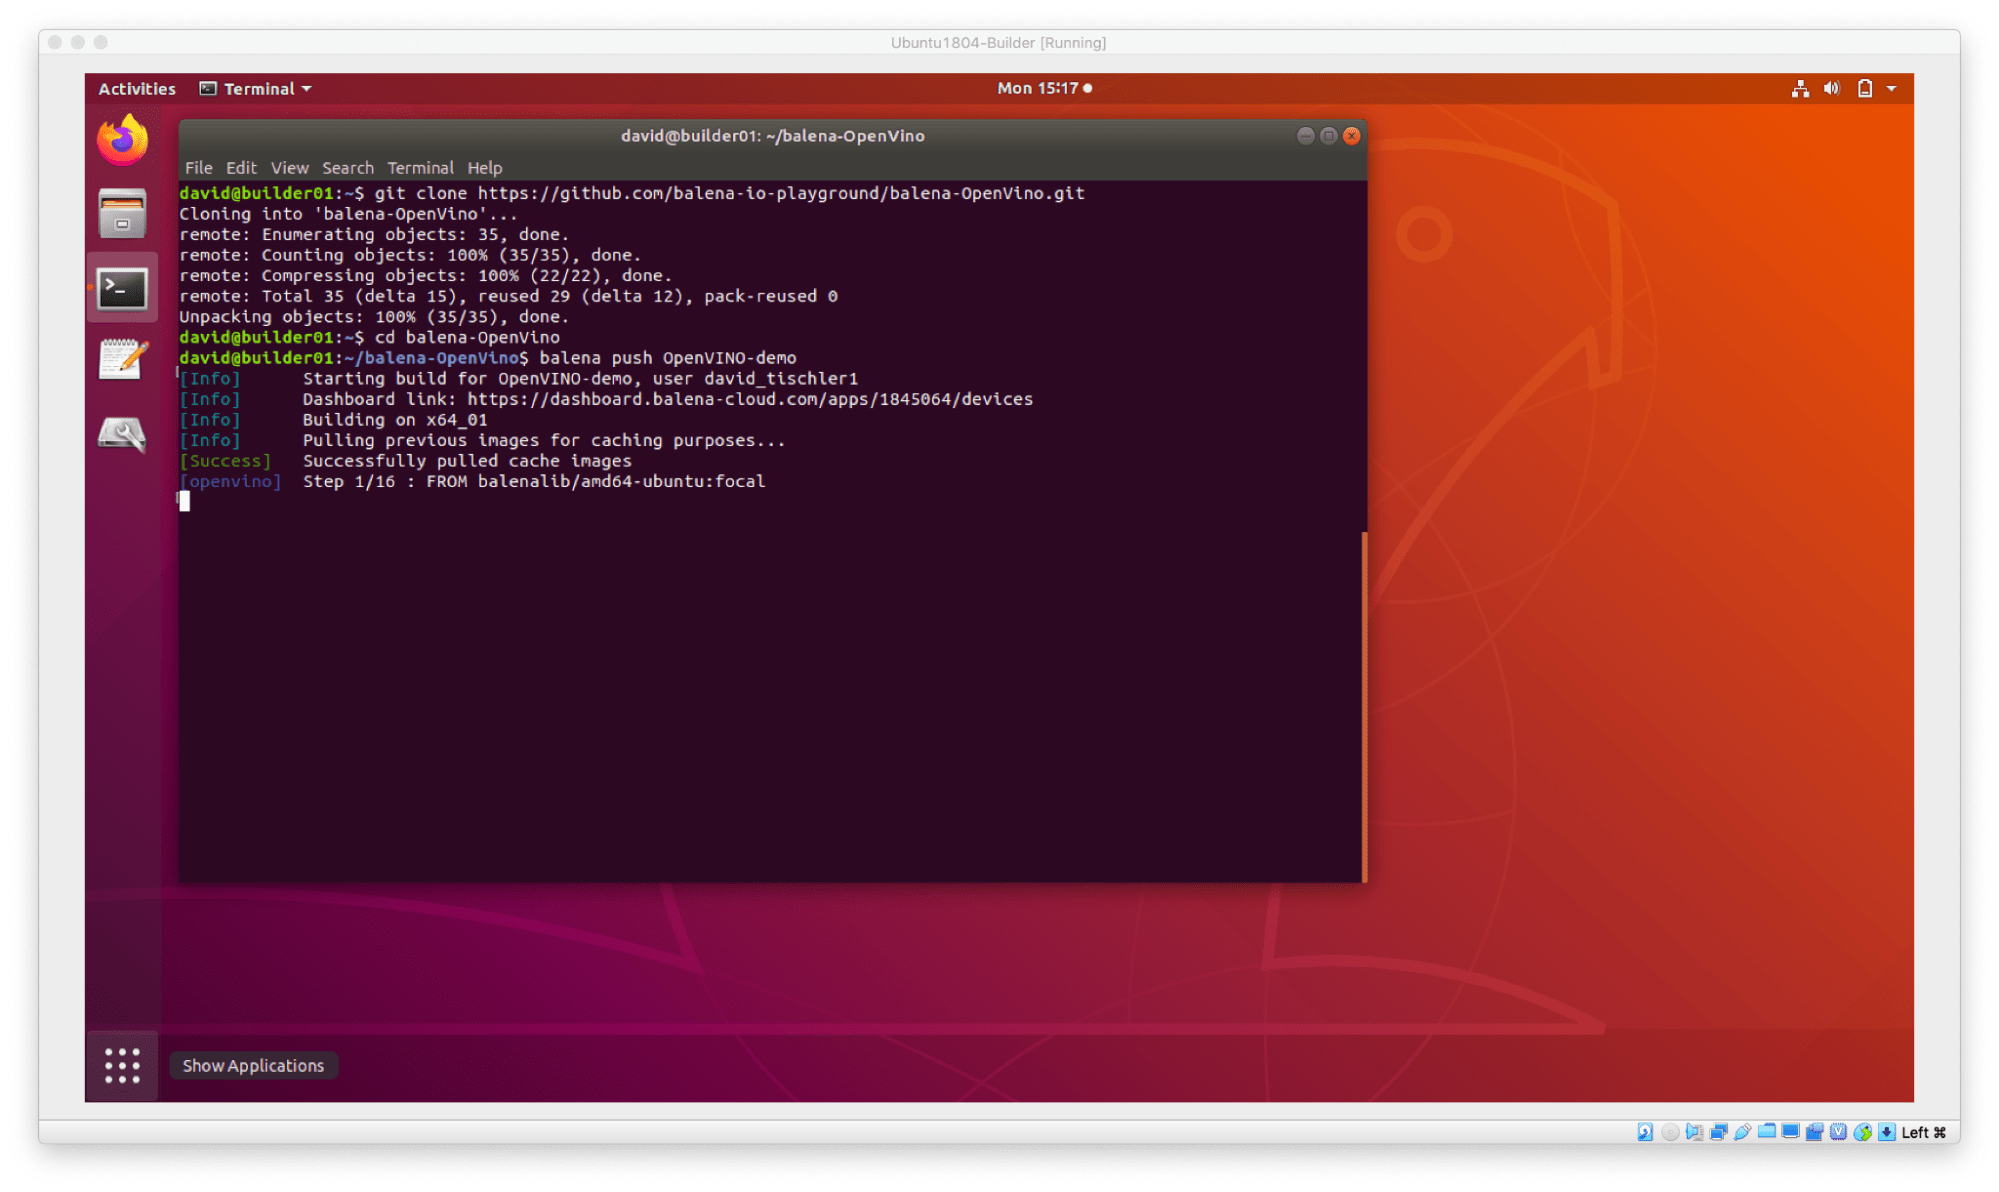
So, with the With the CLI installed by following those instructions, the first thing we need to do is clone this GitHub repository:
git clone https://github.com/balena-io-playground/balena-OpenVino/
Once complete, change down into that directory:
cd balena-OpenVino
You can take a look at the files in this directory, and the openvino sub-folder if you are curious, but don’t make any changes to them until after the end of the tutorial. 🙂
Now, we can do what we call a “balena push” which is a process that gathers up the contents of a directory, parses any included Dockerfiles, and sends them up to the cloud to be built on our build machines. At the end of that process, those containers are delivered to all of the devices in an Application (essentially the fleet of NUC’s or other device types, no matter where they are located). The orchestration is carried out by balenaCloud, and devices run the containers (workload) they are sent. So, go ahead and run the following command:
balena push TheApplicationNameYouCreatedEarlier
(told you we would need that!)
You should see the build start, and the logs will allow you to watch the progress as the Dockerfile (or Docker Compose in this case) is parsed and built.
The OpenVINO installation is a few gigabytes in size, so this might take a short while to complete. At the end of the process, you should get Charlie the Unicorn, with a summary of the build (looks like mine too 6 minutes, and weighed in at 2.6gb.
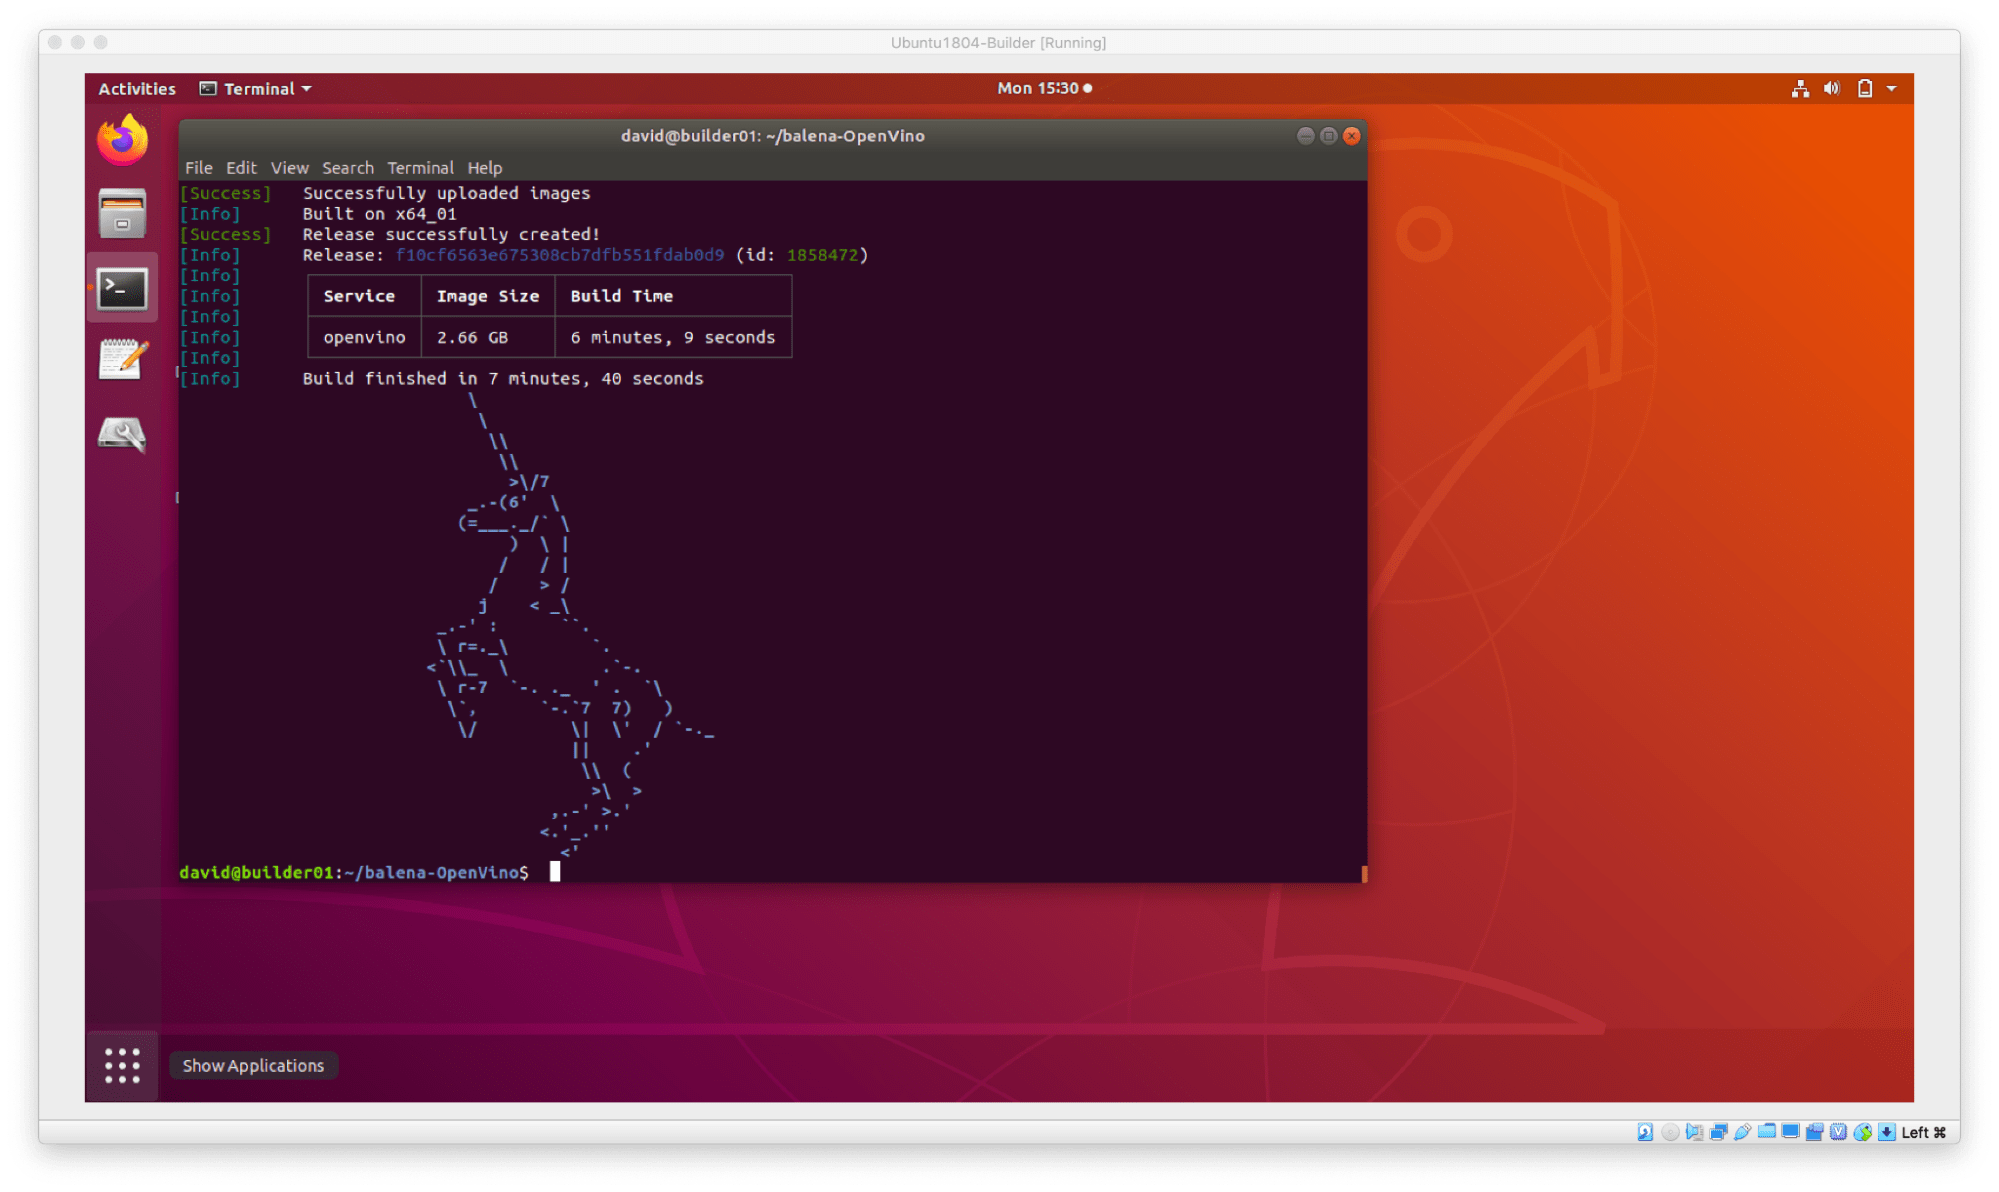
Now that the build is finished, let’s head back to the balenaCloud dashboard, and we should notice that our NUC has been notified that the container is ready, and it should have started downloading it:
Once the download finishes, it’s time to move to the next section.
It’s AI time!
We are getting closer, but we need a few last items in place before we can see ourselves identified by our NUC, hopefully as a human. If you chose Option 1 and deployed your project with the “deploy with balena” button, you didn’t get a chance to see this, but for those of you who went with Option 2 and took a peek at the GitHub repo that you cloned, you may have noticed that the last line in the start.sh file is what launches the application, and it is looks like:
python3 /opt/intel/openvino_2021.4.582/deployment_tools/open_model_zoo/demos/$DEMO/python/$DEMO.py -i /dev/video0 -m /opt/intel/openvino_2021.4.582/deployment_tools/open_model_zoo/demos/models/intel/$MODEL/FP16/$MODEL.xml -at $ARCHITECTURE_TYPE -d CPU
The use of $DEMO, $MODEL, and $ARCHITECTURE_TYPE here are what we call Device Variables, and they can be manipulated by using the balenaCloud Dashboard to provide values that will replace the variable. This is interesting because it will allow us to alter the sample application that is running on the device, right from the balenaCloud dashboard!
If you take a peek at the Dockerfile in the openvino directory, you will notice we use the Intel Model Downloader to place a few ready-made models on the device. There are many more available, and you can read about them in detail on the OpenVINO Open Model Zoo GitHub repo here.
For now though, knowing that these are the models we have available to us, let’s take a look at how to manipulate them. For this demonstration, I have actually pre-loaded the variables and some data for us, as you can see by clicking on ‘Variables’ on the left:

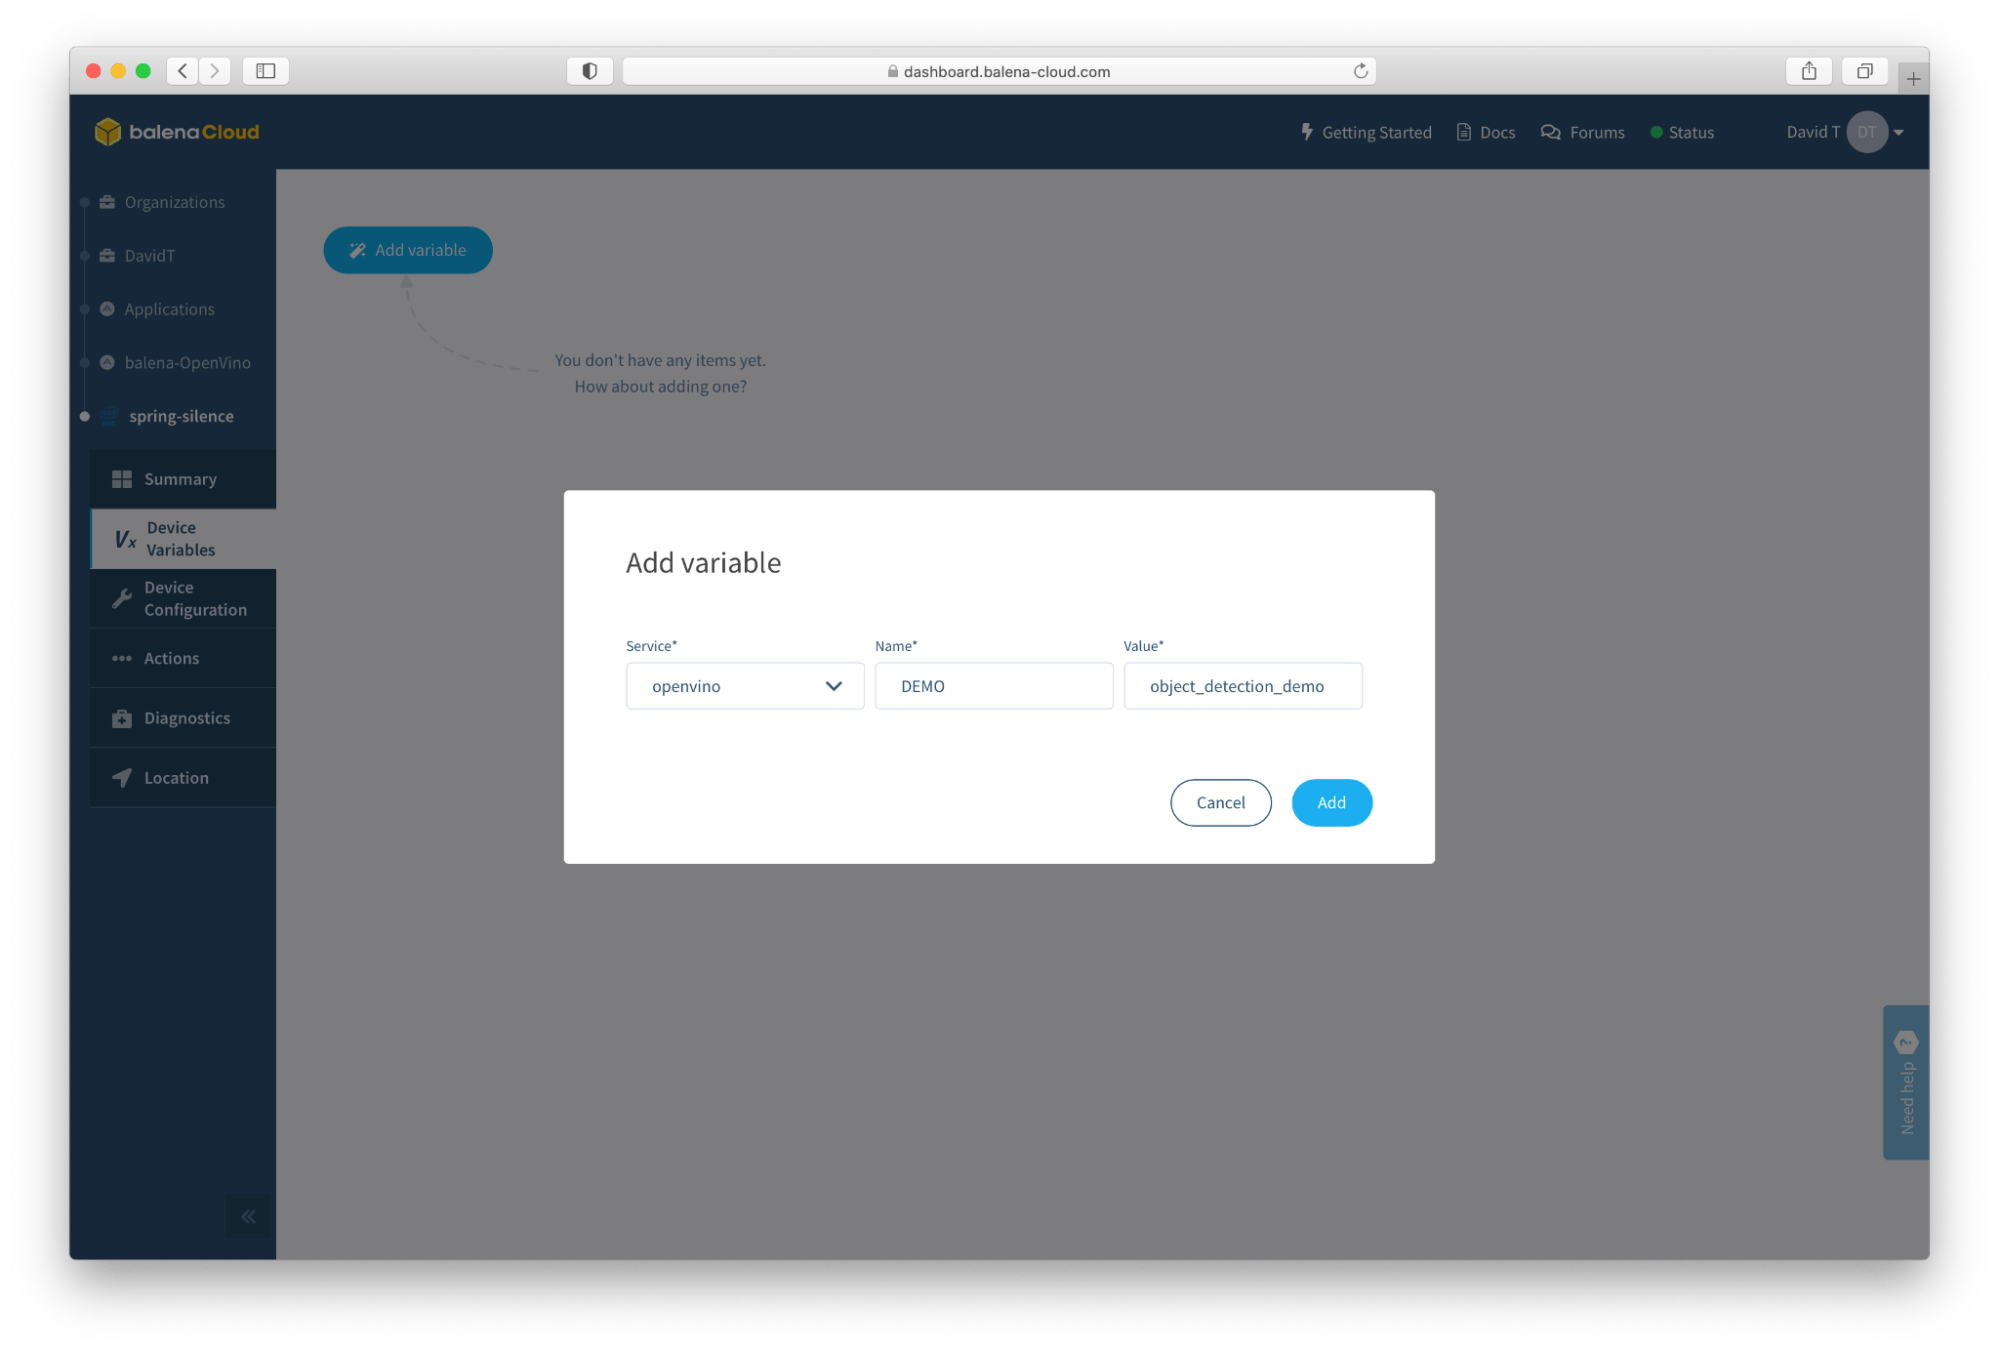
However, if for any reason they are not preloaded, or you’d like to get a feel for the process of adding them, simply click the small “trash can” icon next to them and they will be removed. Once they are removed, you can easily re-add them back by clicking on the blue “Add variable” button:

The openvino service should already be selected, but if not, choose it from the drop-down menu. In the “Name” field, type in DEMO and in the Value field type in object_detection_demo (make note of those underscores) and then click “Add”. This will tell the container we’d like to run the Object Detection application, which is already included in the container.
Next, we need to add a second variable, so click the blue “Add variable” button again and this time type in MODEL for the Name, and pedestrian-detection-adas-0002 for the Value (be sure “openvino” is selected from the Service drop-down again). Finally, we need to add a third variable, and by now you know what to do: Click the “Add variable button, and input ARCHITECTURE_TYPE for the Name and ssd for the Value.
After a moment or two, the NUC will read in these values from the balenaCloud dashboard, and start the appropriate demo, using the defined model and architecture. What this means is, we should be able to use object detection to identify pedestrians (humans). Sure enough, mine looks like this:
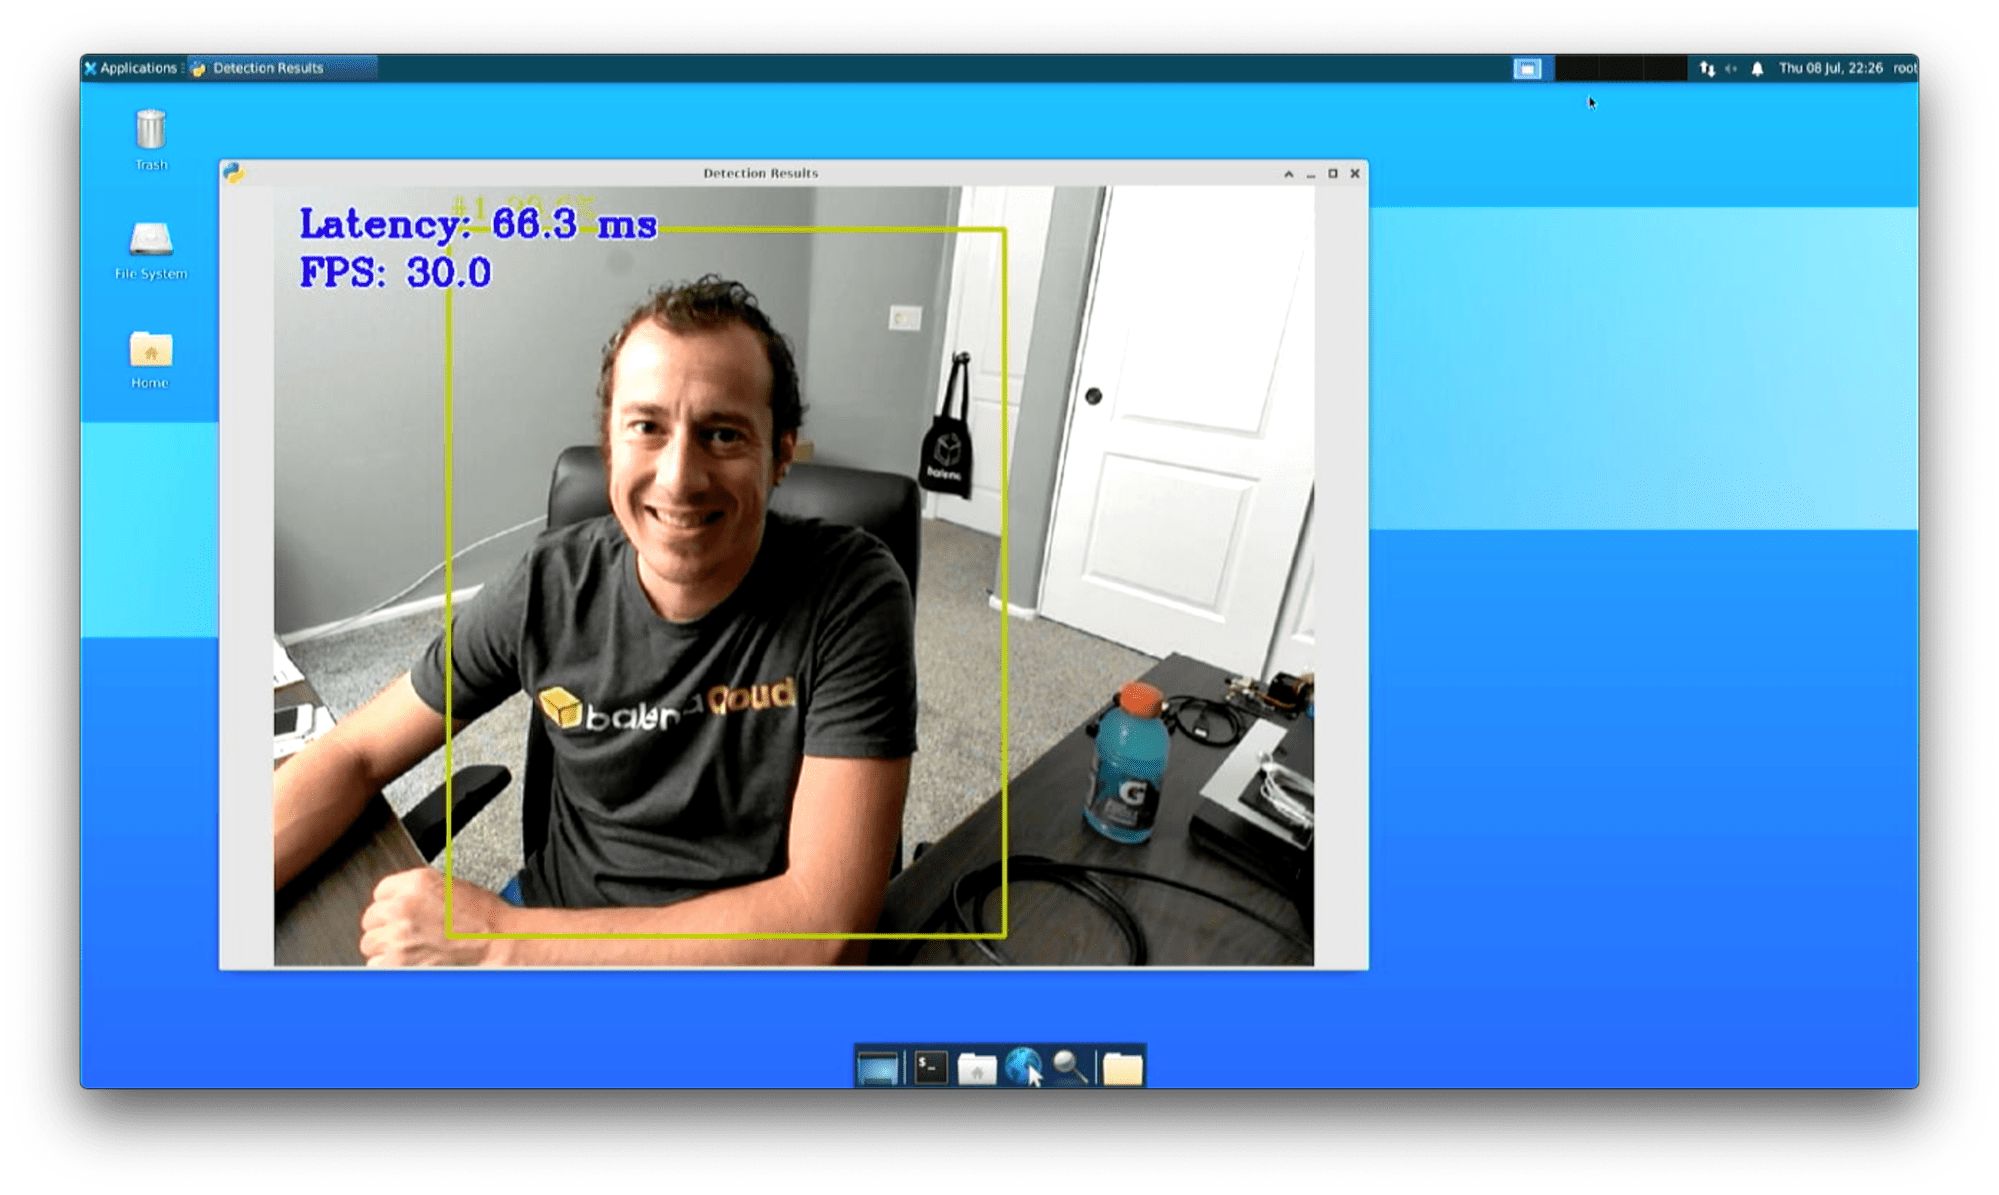
So, we have successfully deployed our Intel OpenVINO AI container! Granted, aiming a camera at myself on my desk isn’t that interesting, but you can begin crafting your applications around this, incorporating things like alerting, anomaly detection, gaze estimation, etc.
And let’s also keep in mind that this NUC is here on my desk, but using balenaCloud, this NUC could be located anywhere. Even better, many NUC’s (or other device types) making up a fleet, can all be managed in this same way. We can push new containers, or in this case AI capabilities, over the air to the devices no matter where they are.
But we’re not done yet, we have more to explore, so let’s continue on.
Changing what we detect
At the moment, we are running Object Detection and specifically looking for humans (pedestrians to be exact, as this model was trained for the purposes of autonomous vehicle and smart city use-cases). But, object detection could be used in many places. Environmental and wildlife monitoring, industrial and machinery position detection, assembly line and product quality assurance, safety wear such as masks or goggle detection, and many more uses exist. Another emerging field is “smart retail”, and the Open Model Zoo includes a sample model that can detect about a dozen or so grocery items, meant to demonstrate automated buyer check-out and purchase processes.
Let’s give it a try. In balenaCloud, on the left, click on “Device Variables” again, and click the pencil next to MODEL. Remove pedestrian-detection-adas-0002 and instead replace it with product-detection-0001, then click “Save”.

It will take a moment for the container to read in the new value and restart, but you should fairly quickly notice the display restart and your new model is loaded and running. As you can see in the next screenshot, the model has no idea what I am, but, it picked up a few ketchup bottles and some Gatorade I just so happened to have in the pantry!

As you can see, switching models is easy, and using this methodology you could construct a pipeline that allows you to continually improve and re-deploy models to your fleet of devices, so that as your training and models improve, your devices “get smarter”.
Let’s keep going though, as there are still more sample applications to investigate. Once again in balenaCloud, on the left, click on “Device Variables”, and this time we are going to edit all three of the variables. First, click the pencil next to DEMO, and change the value from object_detection_demo to human_pose_estimation_demo, and click Save. For MODEL, change it from product-detection-0001 to human-pose-estimation-0001, and finally for ARCHITECTURE_TYPE change it from ssd to openpose (note again that Demo uses underscores, but Model uses dashes).
Once those variables have all been set, the device will take a moment to restart the containers again, and this time when the display comes back up you will no longer be detecting ketchup, but instead be estimating the coordinates of facial landmarks, arms, elbows, torsos, and legs!
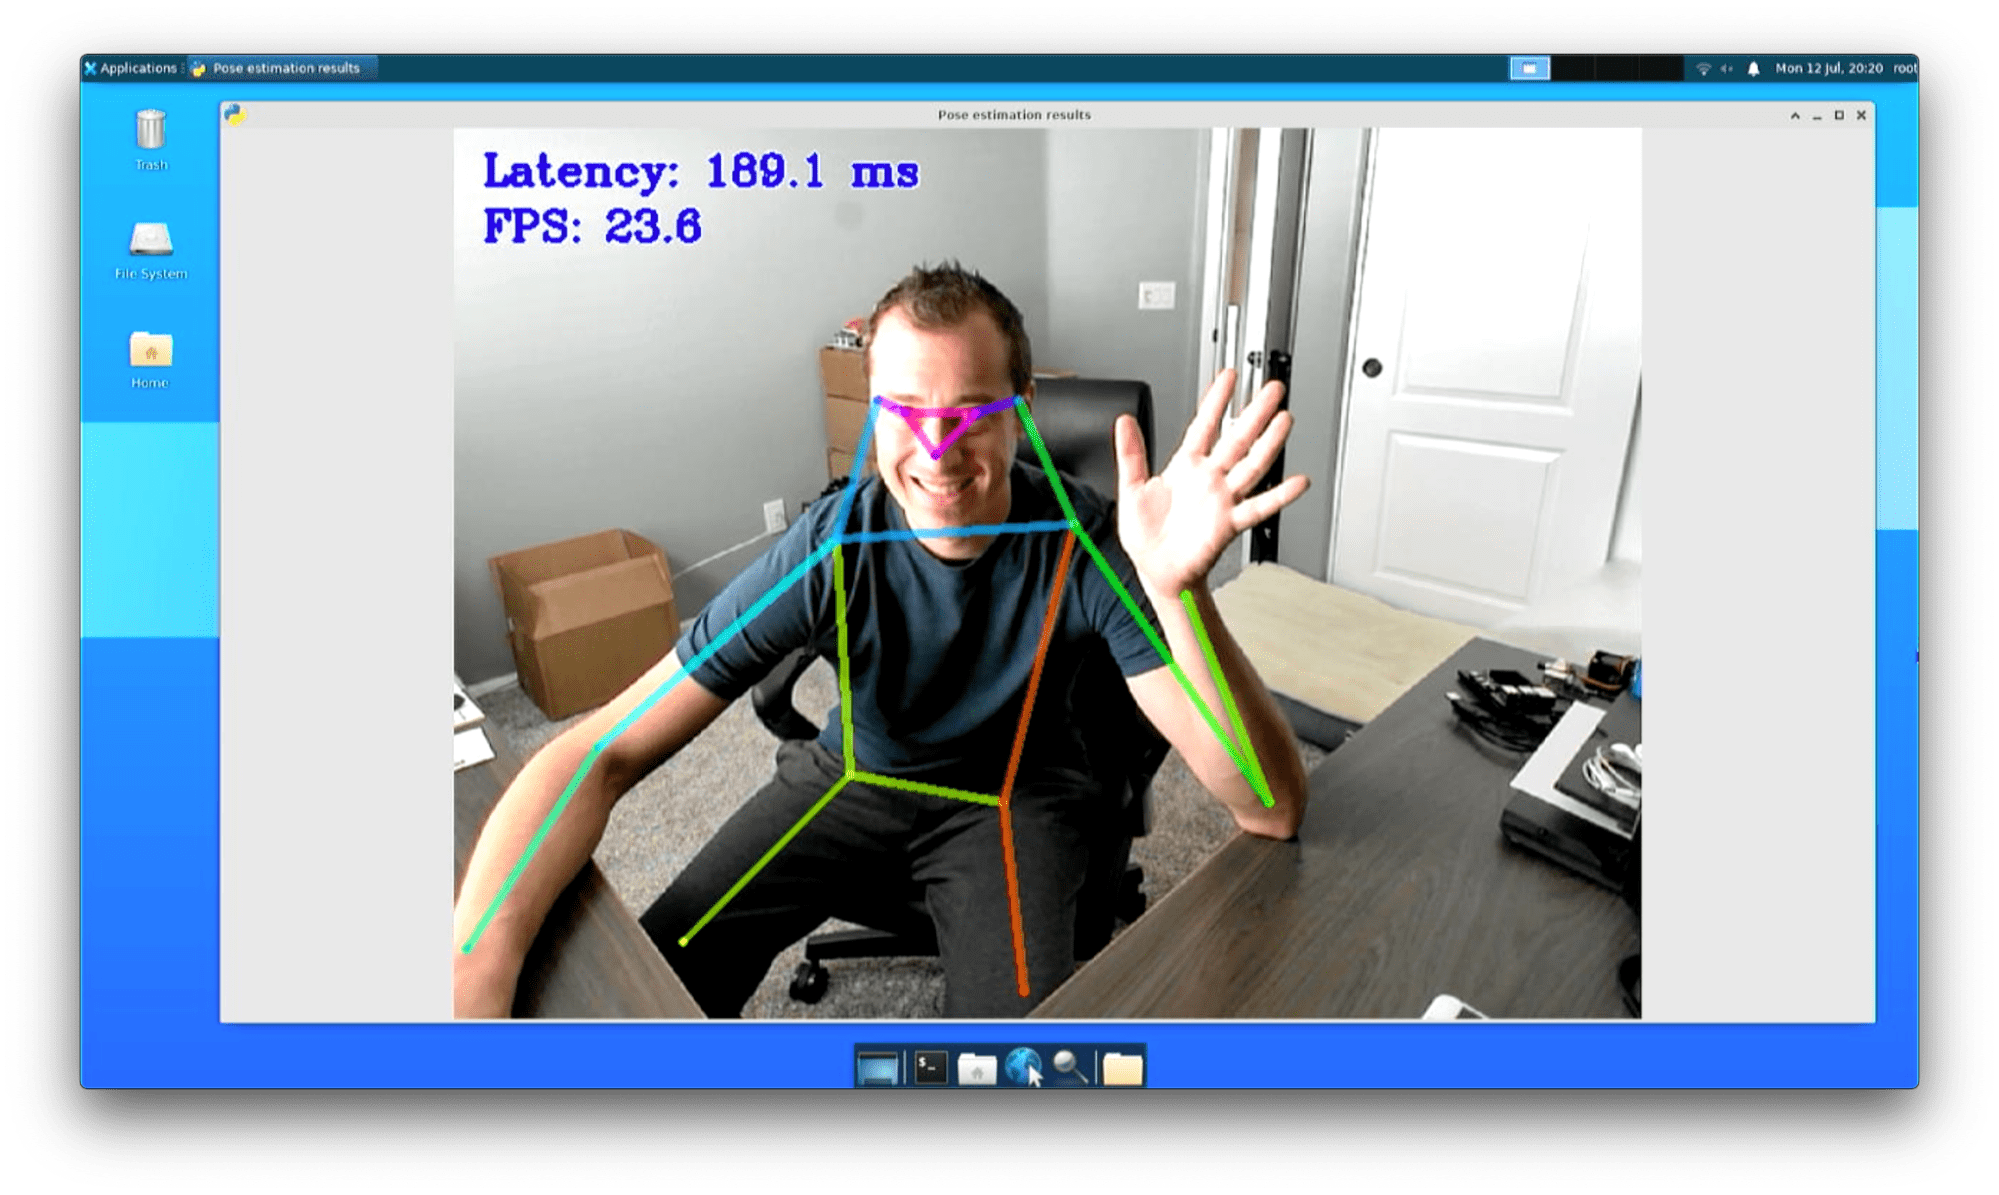
So, we have changed the actual computer vision application that we are running, right from the balenaCloud dashboard. As mentioned earlier, you could build on top of this to then include other features and functionality above and beyond the pose estimation itself (alerting, anomaly, quantity detection, etc).
Before we wrap up, let’s explore one last common use case for computer vision applications, semantic segmentation. This is used quite often in autonomous driving domains, giving computers a sense of the surrounding environment. Segmentation will attempt to separate out objects and features, by detecting the edges of objects in view of the camera. In the automotive example, you could think of this as determining where the road is located, and where the road ends and sidewalk begins. Or, where the sidewalk ends, and instead becomes a building. It looks similar to this in practice:

Of course, with the camera pointed at me, we won’t get quite the same results, but let’s see what happens. As usual, in balenaCloud, click on “Device Variables” on the left, and we are once again going to swap out the values here. Change the DEMO to segmentation_demo, change the MODEL to semantic-segmentation-adas-0001, and change the ARCHITECTURE_TYPE to segmentation. As before, once the containers are updated, the display will refresh, and this time you should see something similar to this:

If I were to perhaps move the NUC to a place with a view of the road, we could maybe get a more useful segmentation. But there is a more interesting talking point here, which is that this demo and model are not performing well on this basic NUC, and this is where upgrading to a faster processor, bigger processor with more cores like a Xeon, or making a switch to the GPU or a Neural Compute Stick 2 USB accelerator could help get us higher performance and lower latency. However, with OpenVINO’s scalability, nothing about the application itself would need to be changed; we just alter our launch script to place the workload on the GPU or NCS stick (-d GPU or -d MYRIAD).
What’s next?
As you can see, the Intel OpenVINO platform is a very powerful, yet easy to use framework for AI applications. We’ve shown three distinct computer vision sample applications running on our NUC, and even altered the underlying model to help the NUC identify varying items in the camera frame. This project is only a start of course, and you can build on top of it and include more features and capabilities, train and deploy your own models, or even modify the project to pull in more of the Open Model Zoo demos (there are lots more of them, located here.
It’s also important to re-iterate that although we are experimenting with just one NUC on our desk, this process is scalable to any number of devices. The deployment of the container, Device Variable updates, and deployment of new models can be done in bulk, making it easy to update an entire fleet of Edge AI devices.
And as always, we’d love to hear from you if you give this a try. Let us know in the comments, on any of our social media channels, or come tell us about it on IoT Happy Hour, our weekly live-stream on YouTube!
Set up a balenaCloud account: Go to the balenaCloud website (The container-based platform for deploying IoT fleets – Balena) and create an account if you don’t have one already. Follow the instructions to set up your application and device.
Create a balenaCloud application: Once you have an account, create a new application in balenaCloud. Choose the appropriate device type that matches your edge device (e.g., Raspberry Pi, Intel NUC).
Set up your edge device: Install the balenaOS image on your edge device according to the instructions provided by balenaCloud. Make sure your device is connected to the internet and is accessible through balenaCloud.
Create a Dockerfile: Create a Dockerfile in the root directory of your project. The Dockerfile specifies the container environment for your edge device. Here’s a sample Dockerfile to get you started:
Replace
<device-type>with the appropriate device type (e.g., raspberrypi3, intel-nuc).<required-packages>should include any dependencies your application needs, such as OpenVINO and its dependencies.Configure balenaCloud environment variables: In your balenaCloud application dashboard, go to the “Environment Variables“ section. Add the necessary environment variables for OpenVINO, such as
INTEL_OPENVINO_DIRandLD_LIBRARY_PATH. Set their values according to your device’s configuration.Deploy the application: Push your project to balenaCloud using the balena CLI or the balenaCloud dashboard. This will build and deploy your Docker container to your edge device.
Test the application: Once the deployment is complete, your edge device should start running the containerized application. Monitor the logs in the balenaCloud dashboard to ensure everything is working correctly.