

Learn how to run OpenDataCam on balenaCloud, which adds a number of features to make managing a device (or a fleet of dozens) easy. This guide features deployment, remote configuration, how to use the built-in VPN, a public URL, and monitoring device diagnostics.
What is OpenDataCam?
OpenDataCam is an open source project, by move Lab, that tracks moving objects with live video analysis using CUDA GPU-enabled hardware. Out of the box, it’s optimized for detecting and counting vehicle traffic– but is not limited to that! All of its processing is done locally, with no visual data saved or sent through the cloud, keeping bandwidth low and easing privacy concerns.
It’s well-suited to counting objects and you can specify which part of the frame can be used to count these objects, all while accessing the resulting data via file downloads or a built in API.
OpenDataCam is optimized for use on the NVIDIA Jetson series of devices, and in this tutorial we will use the low-cost Jetson Nano as an example. While this open source software project has many use cases and includes powerful features, it is designated as “very alpha” by the authors, so be aware that it may not work for every use case.
However, after testing for many weeks we have found it to be stable and a great starting point for those looking to learn about video analysis, machine learning, or an interest in extending a well-documented AI project to suit their own needs.
Let’s get to the guide!
A brief overview
Before we describe how OpenDataCam works, you may want to check out this post which contains an excellent overview of the software layers typically used by AI algorithms running on a GPU. OpenDataCam uses essentially the same layers, but instead of having everything “baked in” to the base image, we’re going to build some of them manually in our Dockerfile.
Our video analysis starts with the video source itself, which can be a USB webcam, IP camera, or prerecorded video file (more about how to select the input source is below). That video stream is read by a neural network framework called Darknet, which utilizes a real-time object detection system known as YOLO. The data from Darknet is transferred to the OpenDataCam Node.js app as a JSONStream, where the counter logic and database connection are located. The same app also contains a next.js web server that allows for viewing of the proxied video stream in a browser as well as handling of the API requests. This image provides a very good high level summary of how OpenDataCam works.
Hardware required
For this tutorial, you will need the following:
- Jetson Nano Developer Kit
- Software to flash an SD card (such as balenaEtcher)
- A free balenaCloud account to setup and manage the Jetson Nano
- A DC barrel jack power supply with 5.5mm OD / 2.1mm ID / 9.5mm length, center pin positive that can supply up to 5V⎓4A (AliExpress, Adafruit)
- A motherboard jumper to short J48 on the Jetson Nano
Highly Recommended: A 40×40mm four pin fan for the Nano’s heatsink, as the unit can get quite warm and potentially unstable under high temperatures.
Optional: The Jetson Nano does not have onboard WiFi, so you can also get a WiFi USB dongle for extra convenience (Amazon, Ali Express), or even use the Nano’s M.2 slot to install a WiFi card (Amazon).
Power supply considerations
Note that a typical 5V/2A power adapter plugged into the developer kit’s Micro-USB might not provide as much current as the board will need when running stressful workloads in the default 10W power mode. If your board is unexpectedly shutting down, it’s a likely sign of power starvation.
To be on the safe side, you can provide 5V/4A by using a DC barrel jack power supply. You’ll need to fit a jumper to J48 header on the baseboard in order to enable DC power supply usage. For a more detailed explanation on this please check out this reference guide by Nvidia.
Software setup
For the software, you will need:
- A free balenaCloud account (sign up here) to setup and manage the Jetson Nano
- Software to flash an SD card (such as balenaEtcher)
Once you’ve created your balenaCloud account, and are logged in, click the ‘deploy with balena’ below:
Select ‘Nvidia Jetson Nano SD-CARD (NEW)’ as device type, and ‘Create and deploy’ (This project also supports the Jetson TX2 and the Jeston Xavier). Note: you can name the application whatever you choose to. We provide the repo name as a default.
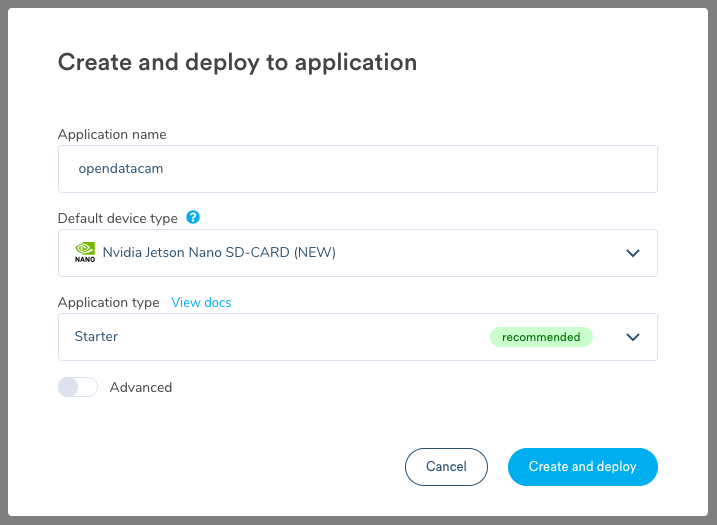
At this point, balenaCloud is automatically copying all the software for OpenDataCam from the GitHub repo to your application in the background. If you’re already familiar with balenaCloud you can deploy the code with the CLI instead.

Add a device and download the balenaOS disk image
Next, add your device to the application by flashing your SD card. Within the application, select on the upper left corner ‘Add device.’ If your device has WiFi capability that you wish to utilize, be sure to select ‘Wifi + Ethernet’ to set up the wireless network. Enter your WiFi SSID and password – this injects the details into the downloaded OS so that the device will automatically link up to the WiFi when it starts up.
Flash the SD card and boot the device
Once the disk image is downloaded, you need to flash it into an SD card. We recommend using balenaEtcher to do so. Finally, insert the SD card into the board slot, connect the ethernet cable or WiFi dongle, and power up the device. The SD card slot is a bit tricky to find on the Jetson Nano:

After a few minutes you should see the device appear in your dashboard:

Once online, you can click on the device name to see its dashboard. The initial setup of OpenDataCam may take a while; approximately 15 minutes to build, followed by a ~5GB download. Subsequent updates should take less time because we utilize deltas to minimize the device’s bandwidth usage. You can see the status of the build by clicking on the link next to “Building release” or from the “Releases” tab on the left of the application’s page.
When the download is complete, you should see the application’s two containers in a running state:
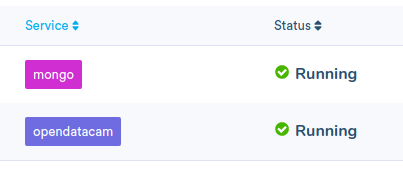
You are now ready to start using OpenDataCam!
Using OpenDataCam
The first step is to set up your video input. You can use a camera plugged into the Jetson Nano’s USB port (the default setting) or an IP camera whose stream is accessible to your device (i.e. on the same network or available over the internet).
Settings for OpenDataCam, such as video input source, are saved in the config.json file in the /var/local/opendatacam folder. This file is symlinked to a persistent named volume, so any edits you make will be saved even if the container restarts. See this page for all of the customizations you can make to the config.json file.
We’ve made a few of the popular settings from the config.json file available as device variables which you can easily change using the balenaCloud dashboard. After selecting a device from the application’s list, click on the “D(x) Device Variables” box on the left of the dashboard, and then the “+ Add variable” button to add a variable. (For more details about using variables, see this doc.) Any variable you set will update the corresponding value in the config.json file. Every time you edit a variable, the container will restart and use the new value from config.json.

To change the video input to an IP camera or stream, you can add a device variable via the dashboard named VIDEO_INPUT with a value of remote_cam. To switch back to a USB camera, change its value to usbcam. If you set a VIDEO_INPUT value of remote_cam you will also need to set an INPUT_REMOTE_CAM variable to the IP or full URL of your video stream. For example, rtsp://192.168.1.168/0.
If you are using a USB camera and it does not show up as the default (/dev/video0), then you can change the device name with the INPUT_USBCAM variable. The default value is v4l2src device=/dev/video0 ! video/x-raw, framerate=30/1, width=640, height=360 ! videoconvert ! appsink but you can set the variable to a variation of this value with a different value for device=. For instance, if the camera you want to use is /dev/video1 then enter this for the INPUT_USBCAM variable: v4l2src device=/dev/video1 ! video/x-raw, framerate=30/1, width=640, height=360 ! videoconvert ! appsink.
You can also use a prerecorded video file as the input by setting the VIDEO_INPUT to file and then setting the value for the variable VIDEO_FILE to the path of the video. You may want to store videos in a persistent folder such as /data/odc (which was specified in the docker-compose file) so they do not get deleted if the container restarts.
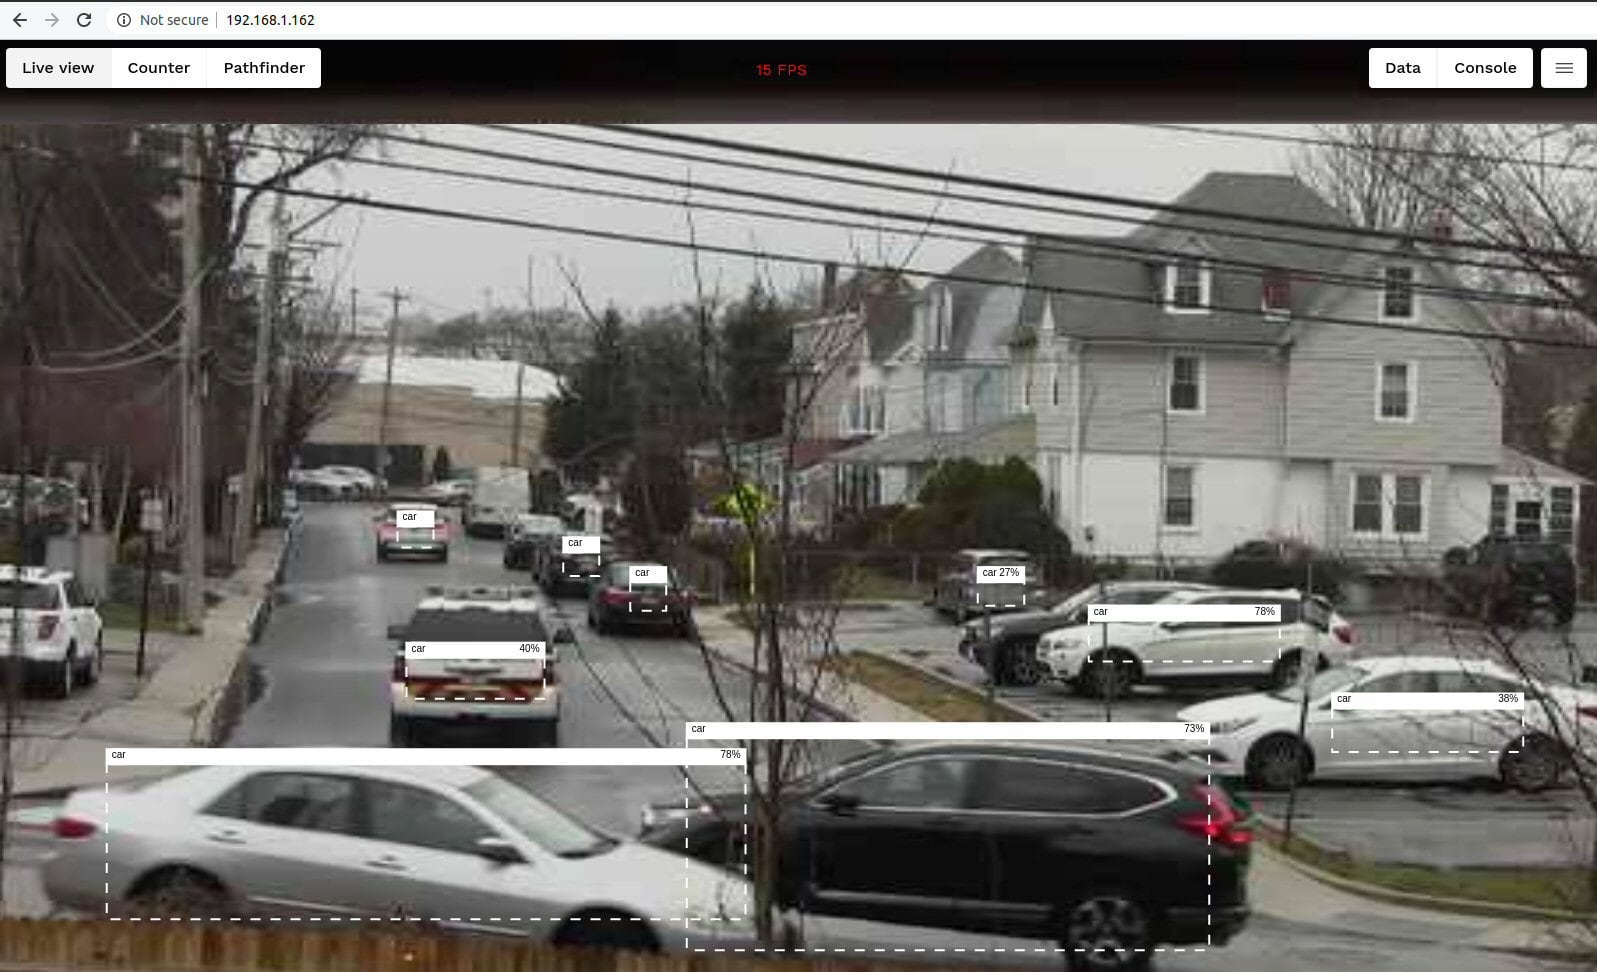
Once you have the configuration set, you can access the OpenDataCam UI by browsing to the local IP shown in the dashboard using port 8080. In the example below, the IP address is 192.168.1.162 (which you can copy to the clipboard by clicking the icon to the right of the address) so you can browse the OpenDataCam web interface at https://192.168.1.162:8080. (Note that you need to add that port number :8080 to the end of the URL!)

If all is well, there should just be a brief delay as the system initializes and starts processing the video.
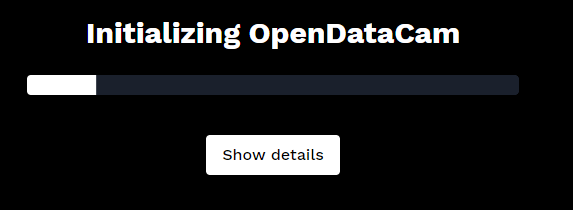
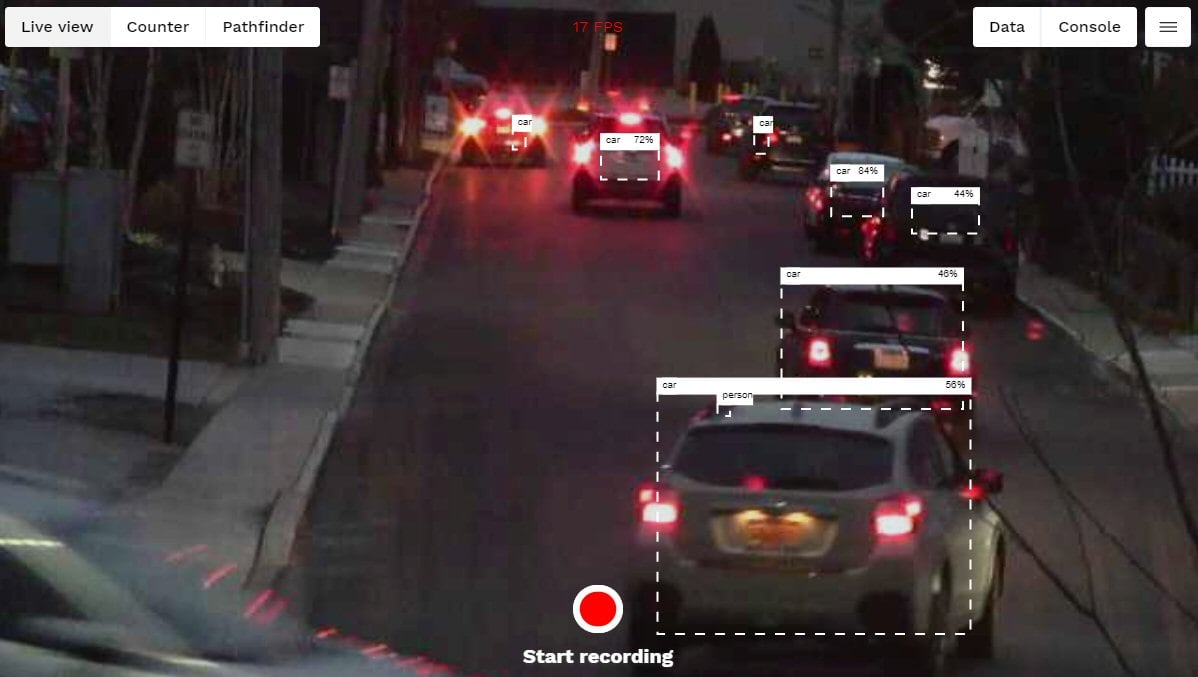
After a few seconds, you should see the main screen including your video source.
By default, OpenDataCam will track all the classes its neural network is trained to track which in our case is the COCO dataset by YOLO, listed here.
Modifying the project
There are three modes of the main screen, selectable via the buttons in the upper left:
Live view (aka “tracker”): the default screen that displays detected objects as rectangular overlays on the video stream.
Counter: On this view you can draw one or more lines on the screen and the system will count how many detected objects cross through the line. You can name each line and it will be assigned a unique color.
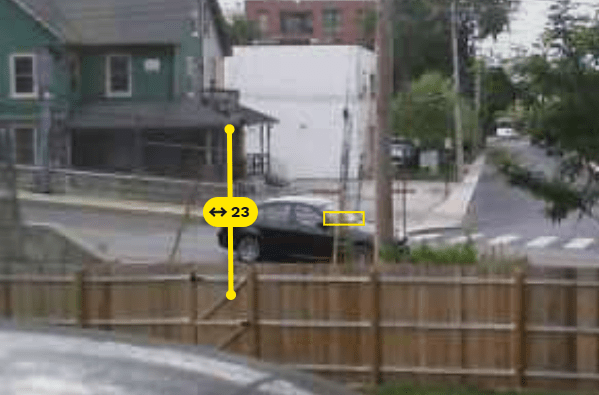
In the latest version, you can click on the arrow in the line to specify if you want to count objects in one or both directions.
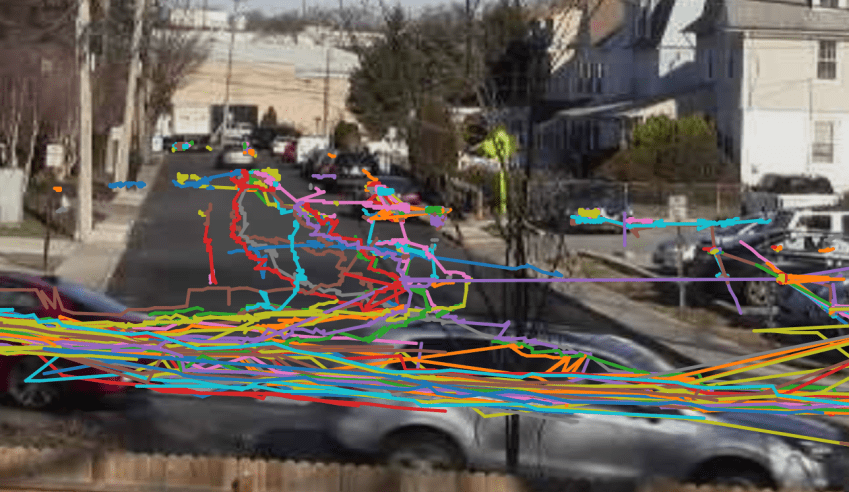
Pathfinder: The system will draw a line for the path of each detected object, assigning a different color from a list of rotating path colors.
You can export all of the counter and tracker data as a json file or through the built in API. Data is only captured when you are in recording mode, which you can initiate by clicking the “start recording” button in the bottom center of the screen.
During recording, you can click on a line to see what has been detected passing through it so far.

You may be expecting this recording mode to create and save video files, but during recording OpenDataCam is only saving the detection data and related coordinates, not the actual video stream. The “recordings” you capture are available by clicking the “data” button on the upper right (the data screen will be blank if you haven’t made any recordings). The data screen is also where you can download the tracker and counter files for each recording.

OpenDataCam data
Each data recording has a unique ID and produces two distinct sets of data. The counter data includes screen coordinate information for all of the drawn lines, as well as a total and detail lines for all items tracked. (Counter data is only present in a recording if you have defined one or more counter lines) Here is a summary of the data provided by the counter:
- The start and end date of the recording as well as the recording ID.
- The name and color of the counter line, as well as its screen coordinates
- A summary of objects tracked by object type
- The frame number, object ID and type for each object that triggered the counter
- The bearing and counting direction for each object
The tracker data is even more detailed (and as a result, much larger in file size) with each frame of video receiving an ID and full object detection detail. Here’s a summary of that data:
- The start and end date of the recording as well as the recording ID.
- A list of objects detected in each frame
- Each object includes an ID, full coordinates, bearing, confidence and type
Since you can use the API to start and stop the recordings, as well as access a list of recordings, you could conceivably create a very functional standalone data analysis system. You can test the API commands using curl from a computer on the same network. For instance, curl https://192.168.1.162:8080/status will provide the current status of your OpenDataCam application. (Assuming the local IP of your device is 192.168.1.162)
If you enable the public URL in the balenaCloud dashboard, you could access this data from anywhere using balenaCloud’s built in VPN. (Note that OpenDataCam has no built-in security, so if you do enable the public URL, you probably should not publicize it!) In this case you would have to modify the port mapping in the docker-compose file and map 80 to 8080, then re-push the whole application using the CLI.
Until next time
OpenDataCam is in active development and improvements/new features are likely forthcoming. Check out their website and github repository for updates. With such a versatile tool, there are many ways it can be modified and extended.
Watch our recent IoT Happy Hour livestream to see an OpenDataCam example. Watch the full episode here.
For those interested in the AI aspect, you could use custom trained weights or modify the neural network altogether. Others may want to modify or enhance the database. You could easily create a fleet of these devices (your first 10 devices on balenaCloud are free!) all feeding their data into a custom cloud-based database for analysis.
Let us know about your OpenDataCam experience; we’re eager to hear what objects you end up analyzing! Share what you build and learn with us on Twitter, Instagram, or on our Forums.