
This is the first post in a series on best practices and tools for open-sourcing a project, based on our experience with Etcher and other such projects. We’ll be covering topics including documentation, code quality, community building, error tracking, and so forth. Let us know if there is anything you would like to see!
Documentation
Documentation is key to a successful open source project. It clearly outlines the scope of the proposed approach and helps developers validate that they are indeed writing for the right solution. Good documentation sends the message that the developers intend their code to be used by others and to keep it healthy.
This blog post discusses one of the most valuable documentation related tools under our belt: JSDoc.
Introduction to JSDoc
JSDoc is a documentation generator for JavaScript, similar to JavaDoc for Java, or Doxygen for a wide variety of programming languages such as C, C++, Python, Fortran, and more. In a nutshell, JSDoc allows you to place specially-formatted comments above constructs, called annotations, to document their intention and interface. For example:
“`javascript
/*
* @summary Supported types
* @type String[]
* @constant
* @private
/
const VALID_TYPES = [
‘string’,
‘number’,
‘boolean’
];
/**
@summary Check if a type is a valid type
@function
@public
@param {String} type – type
@returns {Boolean} whether the type is valid
@example
if (type.isValidType(‘string’)) {
console.log(‘”string” is a valid type’);
}
*/
exports.isValidType = .partial(.includes, VALID_TYPES);
“`
We make use of JSDoc heavily at resin.io to aid development and
documentation. This post aims to describe how we use JSDoc and what we strive to get out of it.
Why did we adopt it?
JavaScript projects that make use of annotation comments are rare. There are notable exceptions such as Angular.js and Lodash, but it’s not common in the ecosystem, especially on projects that are not strictly re-usable modules. This is a shame, since we’ve discovered that annotations are crucial for us to deliver high quality maintainable software.
Documentation Driven Development
The clarity and user-friendliness of a piece of code can only be evaluated by seeing it in action. In practice, however, this tends to happen after the code is implemented and coupled to a certain interface. Re-working it takes up valuable time, which often pushes programmers to move on instead of engaging in any refactoring efforts.
We went the extra mile to encourage every developer to write the JSDoc annotations before writing the actual code, since that forces us to think about the API a particular function/class provides before jumping in to write any code. This imposes a reflective phase that solves the majority of simple design problems, such as removing functions without a clear purpose, early on.
In particular, making use of example sections in the annotations allows the developer to experiment with the interface they are planning to expose before diving into its implementation, and therefore provides a fast and cheap design feedback cycle. For this reason, we require every single annotation to include an @example tag, no matter the access type.
Documentation Generation
There is a reason why JSDoc calls itself a “documentation generator.” The main purpose of tools like this is to mitigate the recurrent problem of documentation getting out of sync with the code, by keeping the details on the code itself and generating documentation out of it.
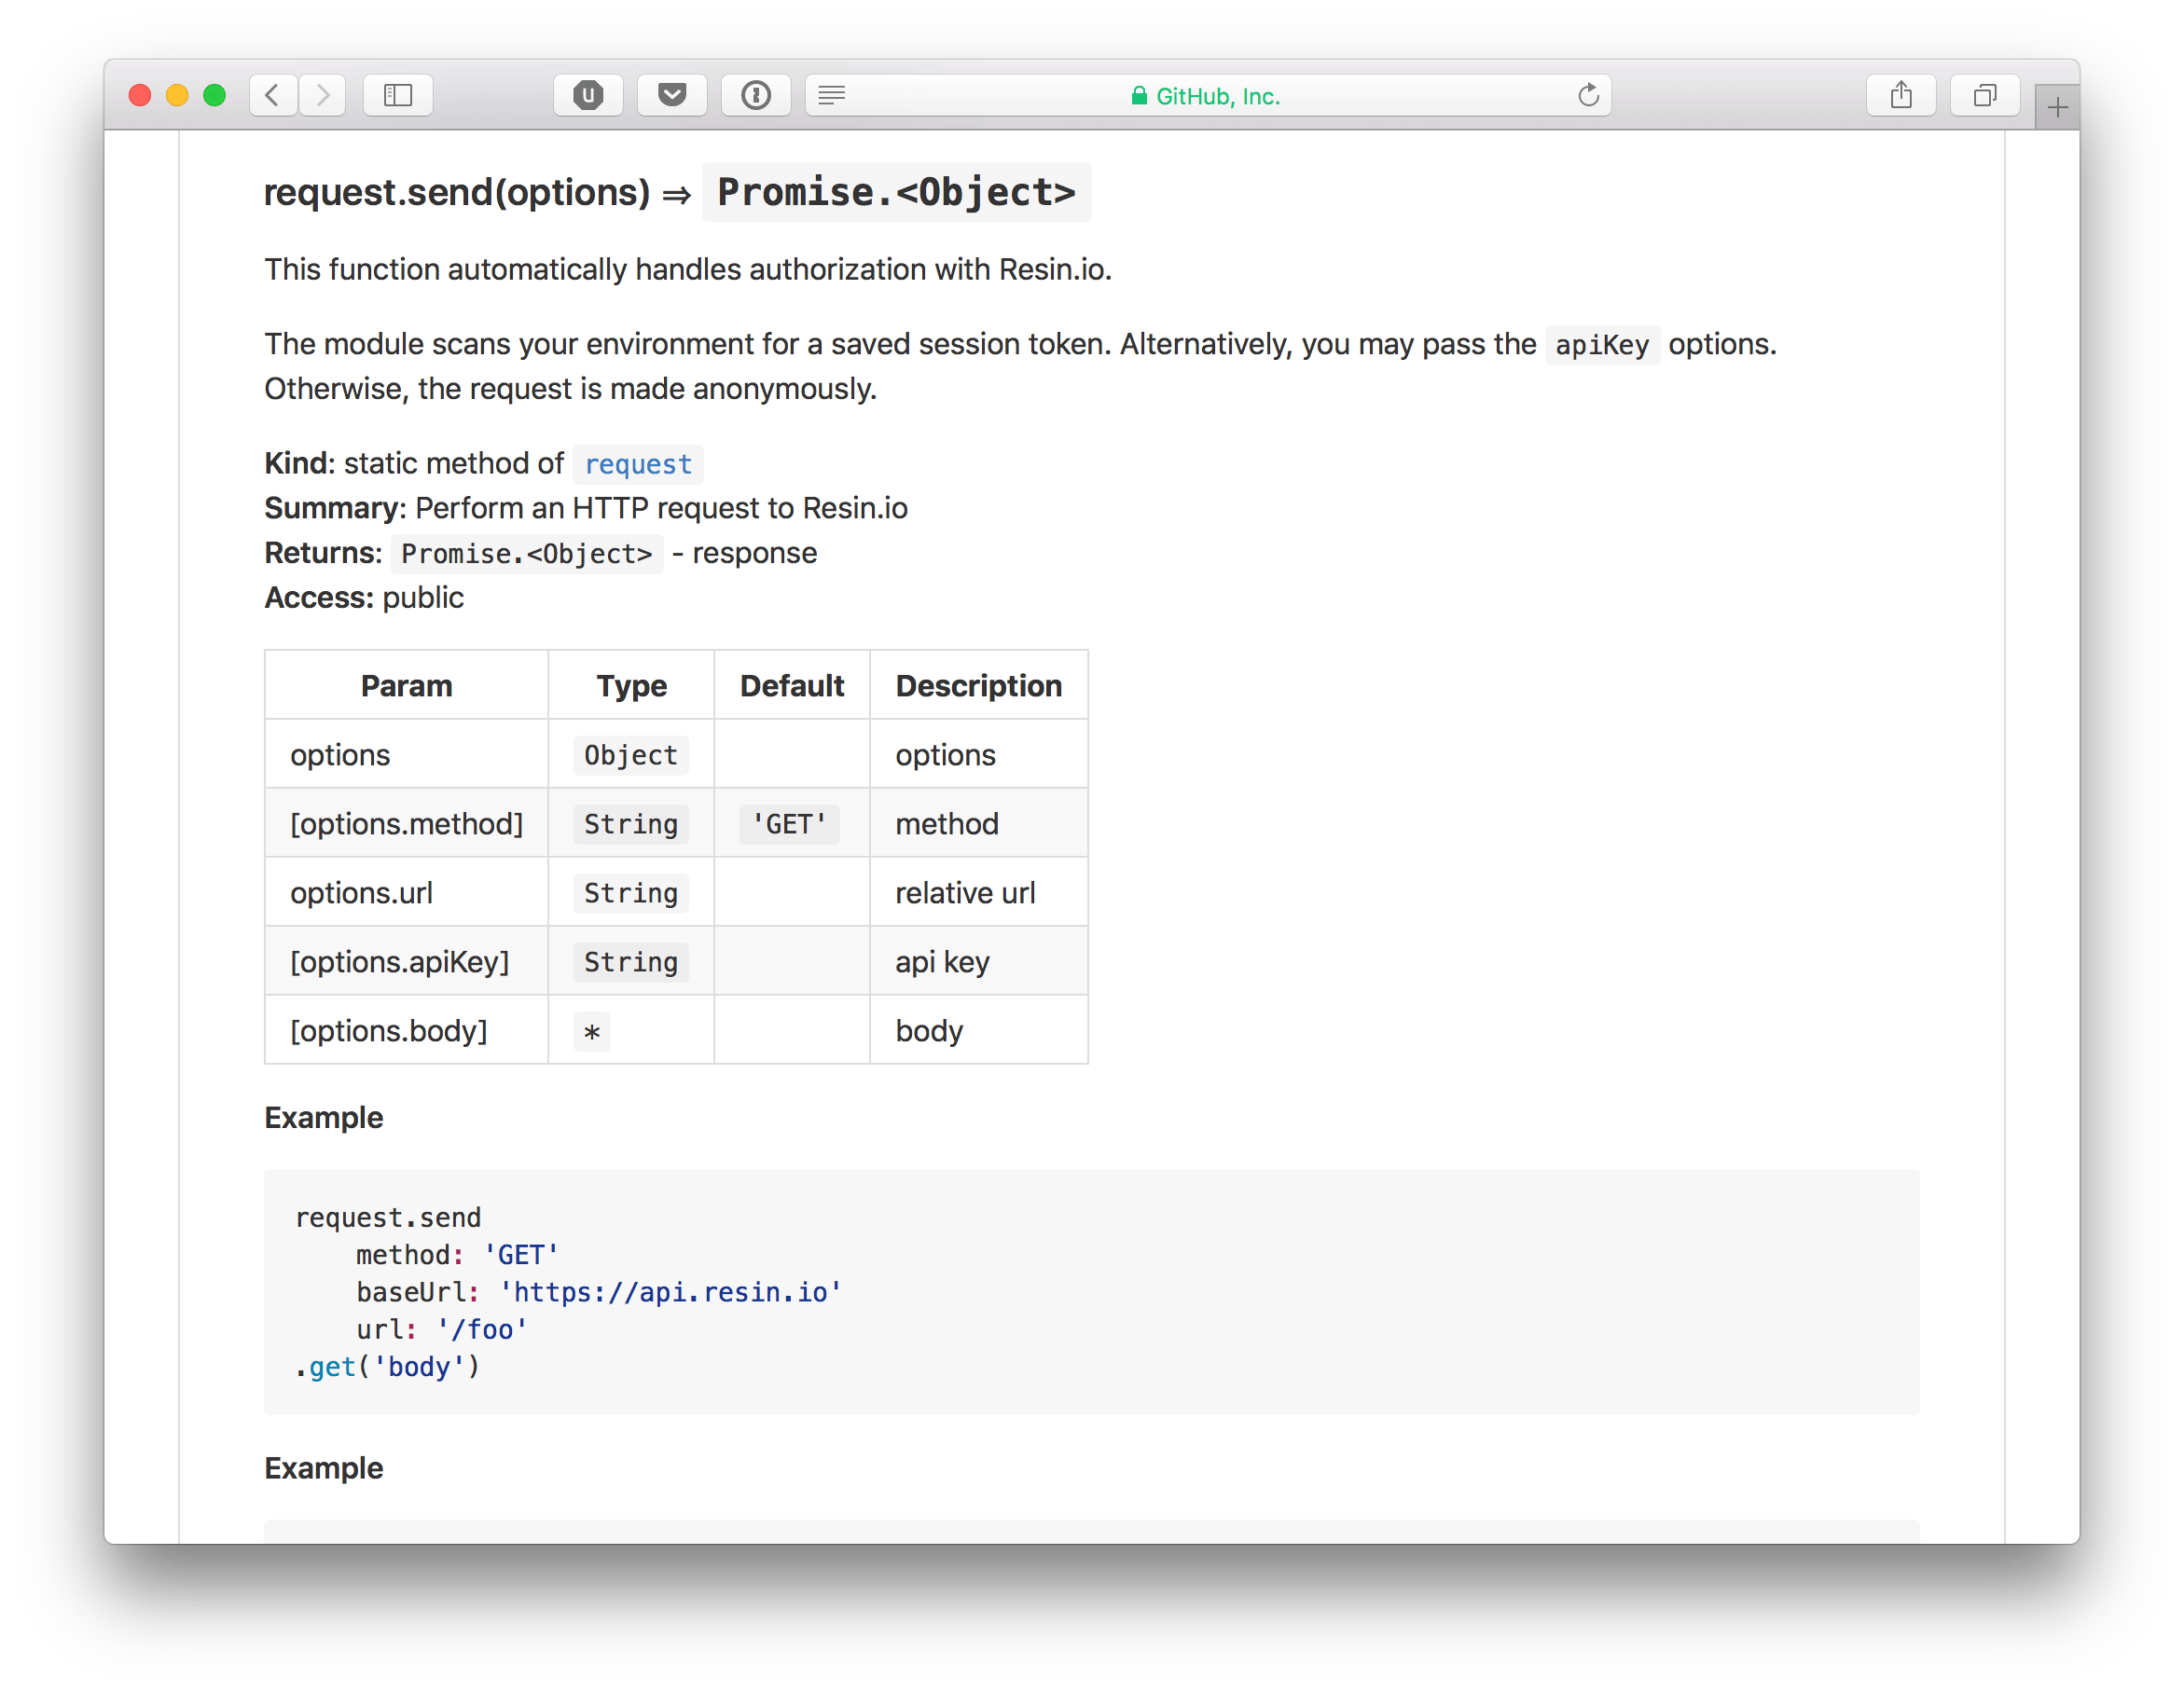
JSDoc generates HTML-based documentation by default, but we found generating Markdown files to be more accessible to the GitHub-like developer audience, given how such services conveniently display these files. For this purpose, we’ve set on a fantastic command-line tool called jsdoc-to-markdown.
You can use it to generate documentation from a set of files to a standalone Markdown file, like we do for our Resin SDK:
sh

jsdoc2md lib/**/*.js > DOCUMENTATION.md
Or you can even inline documentation into your README.md file, like we do for most of our re-usable modules, by creating a template placed somewhere like doc/README.hbs and providing a documentation section like the following one:
“`markdown
Documentation
{{#module name=”
{{>body~}}
{{>member-index~}}
{{>separator~}}
{{>members~}}
{{/module}}
“`
And generating the final README.md with the following command:
sh

jsdoc2md --template doc/README.hbs lib/*.js > README.md
See drivelist for an example of this approach, and make sure to check the JSDoc wiki for advanced usage examples.
Lower Barrier to Entry
Having clear annotations for every single function, class, or constant in the code base makes exploring the project and potentially making a contribution much more accessible, both to resin.io team members, as well as to external community members looking to give back to our open source modules. A good combination of JSDoc annotations and inline comments is a valuable resource for quickly getting up to speed.
For this reason, we encourage every developer to write JSDoc annotations even for private constructs, even though we don’t generate Markdown documentation out of them, since those are often the chunks of code that tend to get undocumented and not well defined, and thus become inaccessible to people not directly involved with the project.
Writing annotations
Getting familiar with the many supported JSDoc tags and how to combine them to create meaningful annotations might not be trivial at first. For this reason, we’ve collected as set of examples for how to annotate common JavaScript constructs.
Annotations take the form of C style multiline comments starting with two asterisks:
javascript

/**

 * ...

 * ...

 * ...

 * ...

 */
If you’re using CoffeeScript, you can write your annotations like this:
“`coffee
*
…
…
…
…
“`
However keep in mind that you’re going to have to compile your code into JavaScript before running any JSDoc-related tool on it.
Public Function
“`javascript
// math.js
/**
@summary Sum two numbers
@function
@public
@param {Number} x – first number
@param {Number} y – second number
@returns {Number} the sum of the two numbers
@example
const result = math.sum(5, 3);
console.log(result);
8
*/
exports.sum = (x, y) => {
return x + y;
};
“`
Private Function
“`javascript
/**
@summary Check if a variable is a string
@function
@private
@param {*} x – variable
@returns {Boolean} whether the variable is a string
@example
if (isString(‘foo’)) {
console.log(‘The variable is a string’);
}
*/
const isString = (x) => {
return typeof x === ‘string’ || x instanceof String;
};
“`
Constant Variable
“`javascript
/**
@summary Default size
@type Number
@constant
@private
*/
const DEFAULT_SIZE = 16;
“`
Object
“`javascript
/**
@summary Exit codes
@namespace EXIT_CODES
@private
*/
const EXIT_CODES = {
/**
@property {Number} SUCCESS
@memberof EXIT_CODES
@description
This exit code is used to represent a successful exit status.
*/
SUCCESS: 0,
/**
@property {Number} ERROR
@memberof EXIT_CODES
@description
This exit code is used to represent an erroneous exit status.
*/
ERROR: 1
};
“`
Optional Parameter
“`javascript
// utils.js
/**
@summary Split a string
@function
@public
@param {String} string – input string
@param {String} [delimiter=’ ‘] – delimiter
@returns {String[]} splitted string
@example
const result = utils.split(‘foo bar baz’);
console.log(result);
[ ‘foo’, ‘bar’, ‘baz’ ]
@example
const result = utils.split(‘helloworld’, ”);
console.log(result);
[ ‘hello’, ‘world’ ]
*/
exports.split = (string, delimiter = ‘ ‘) => {
return string.split(delimiter);
};
“`
Object Parameter
“`javascript
/**
@summary Tail a string
@function
@private
@param {String} string – input string
@param {Object} [options={}] – options
@param {String} [options.delimiter=’\n’] – string delimiter
@param {Number} [options.lines=10] – number of lines to show
@returns {String[]} tailed string
@example
const result = tail(‘foo\nbar\nbaz’, {
delimiter: ‘\n’,
lines: 2
});
console.log(result);
‘bar\nbaz’
*/
const tail = (string, options = {}) => {
options.delimiter = options.delimiter || ‘\n’;
options.lines = options.lines || 10;
return string
.split(delimiter)
.slice(options.lines)
.join(delimiter);
};
“`
Promise
“`javascript
/**
@summary Get a promise that resolves a value
@function
@private
@param {*} value – value
@fulfil {*} – value
@returns {Promise}
@example
resolve(5).then((value) => {
console.log(value);
});
5
*/
const resolve = (value) => {
return Promise.resolve(value);
};
“`
Class
“`javascript
class Person {
/**
@summary Create an instance of Person
@name Person
@class
@public
@param {String} name – person name
@returns {Person} Person instance
@example
const person = new Person(‘Juan Cruz Viotti’);
*/
constructor(name) {
this.name = name;
}
/**
@summary Greet
@method
@public
@example
const person = new Person(‘Juan Cruz Viotti’);
person.greet();
Hi, my name is Juan Cruz Viotti
*/
greet() {
console.log(Hi, my name is ${this.name});
}
}
“`
Conclusion
We use JSDoc for much more than documentation generation. Comment annotations are an integral part of how we design and implement maintainable software, and provide uniformity across our software projects as well as a low barrier of entry for contributions.
As with any development practice, it takes time to master. In order to make the learning curve easier, we recommend using ESLint, which is able to lint JSDoc annotations and make sure its in sync with the actual code. Check the ESLint JSDoc documentation to see how you can tune your .eslintrc.yml to process your annotations.
Happy documenting!