
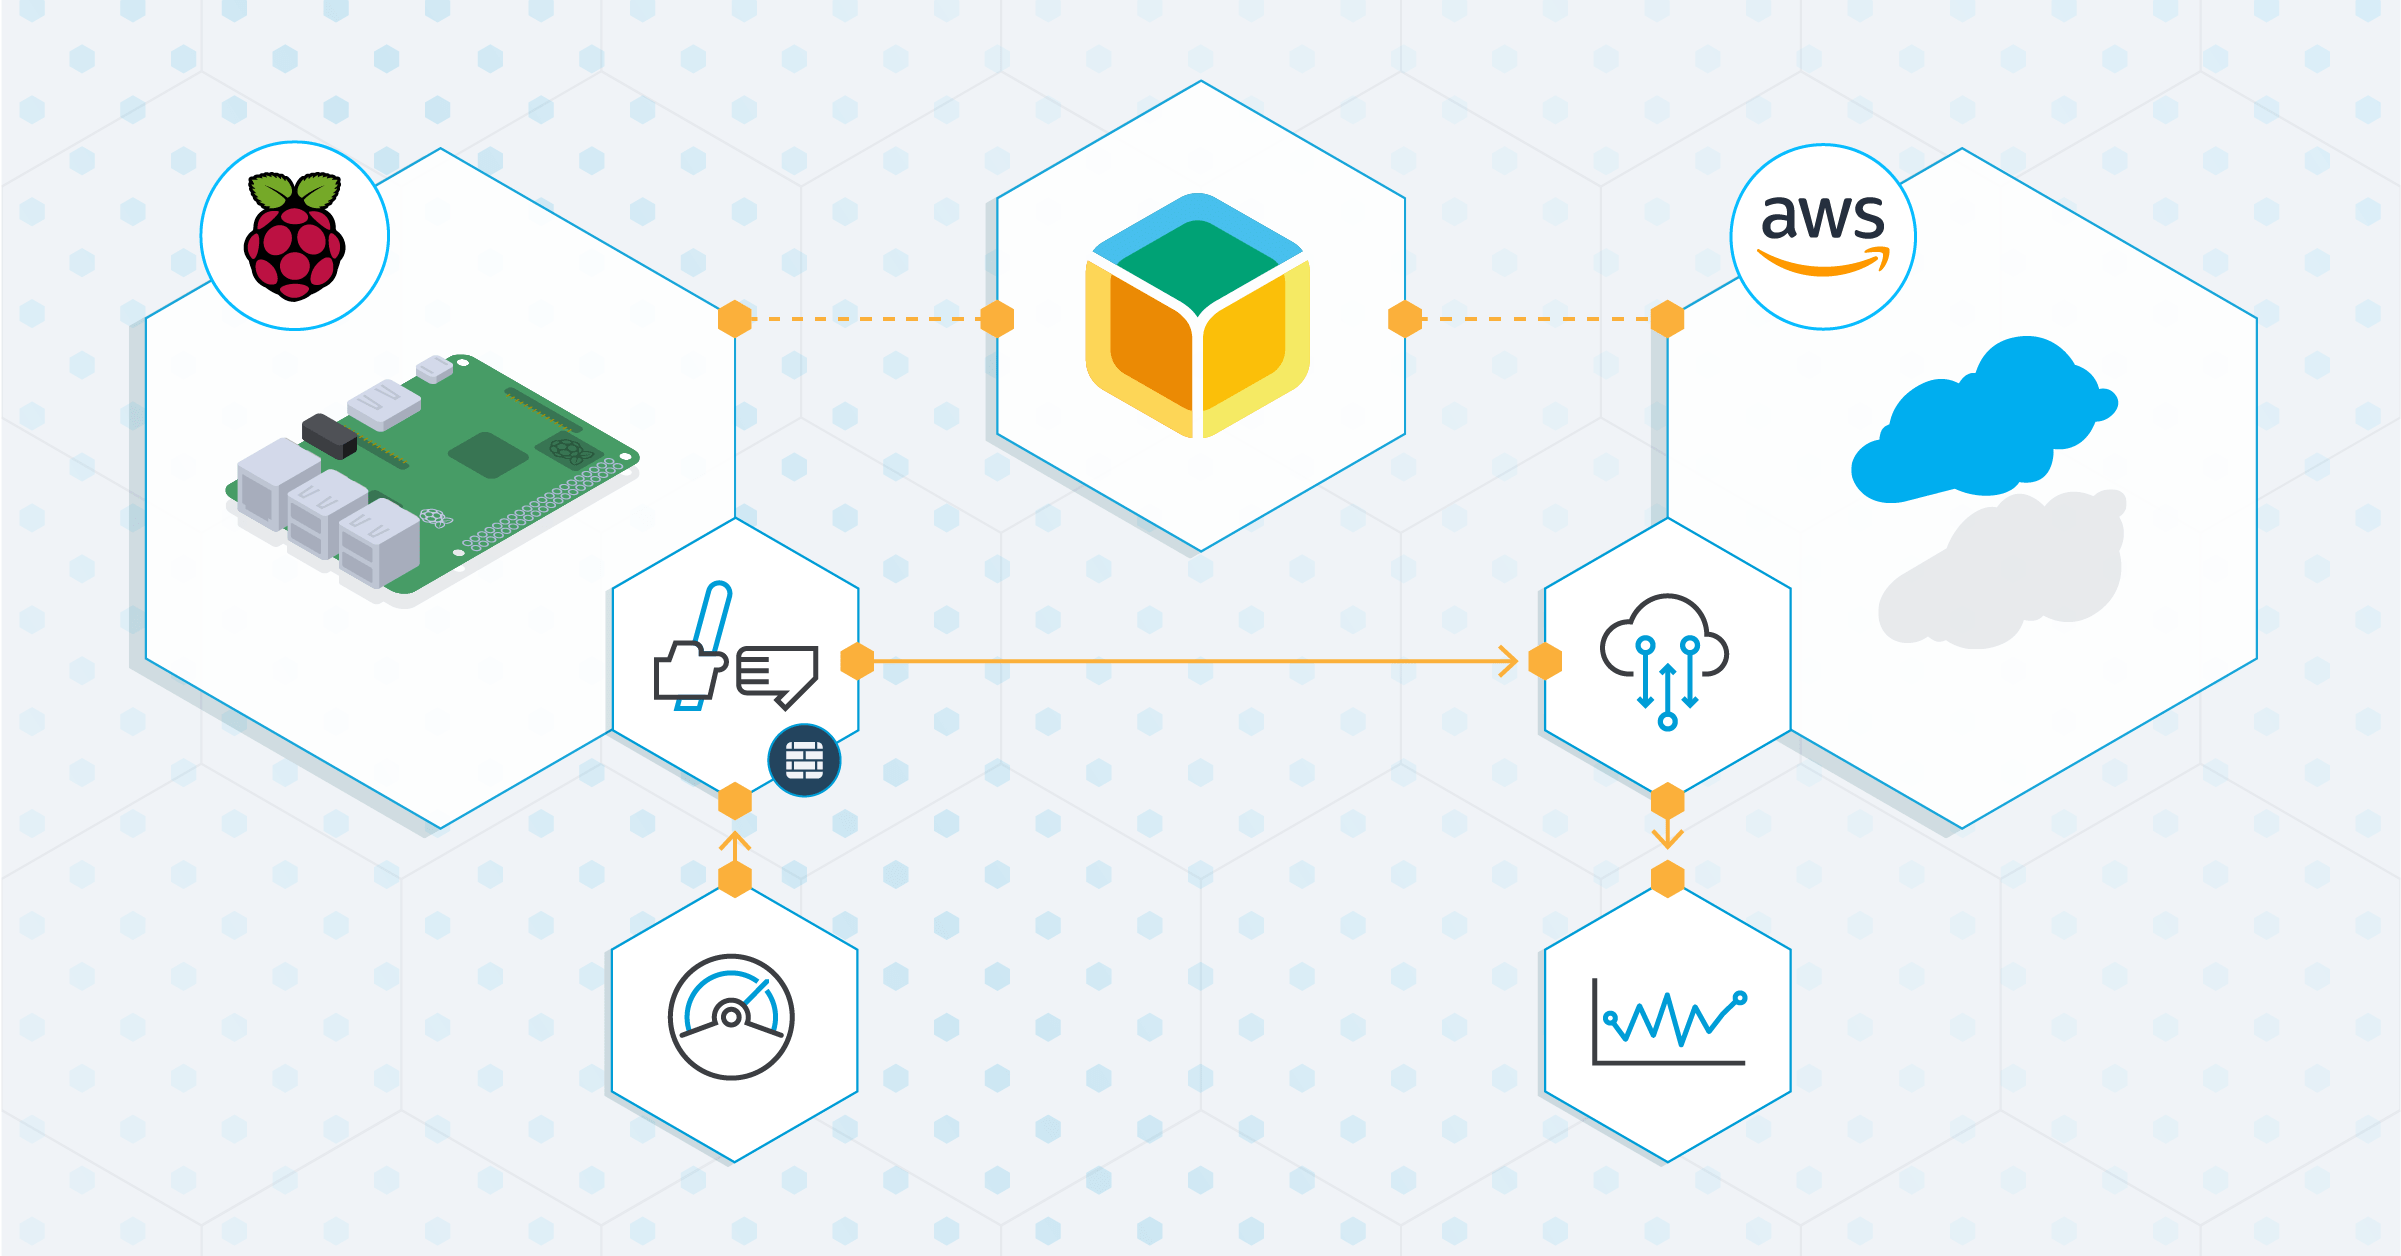
Often customers want to send data from their balena device to a cloud IoT provider like AWS, Azure, or Google Cloud. These providers allow you to register your device to their IoT service and provide public key credentials so you can send the data securely.
Our balenaCloud service already provides backend management for the device, so we created some tools to automate storage and access of the cloud provider’s credentials:
- Cloud functions to automate registration with the IoT provider and store the credentials on balenaCloud
- Cloud Relay block, which packages this automation on the device so you only need to send your data to it, and the block manages the rest including provisioning.
Instead of just talking about it, let’s create a fleet, send some data, and graph it! This tutorial includes these steps:
- Set up a provisioning cloud function (Lambda) and HTTP endpoint on AWS
- Create a fleet with a Cloud Relay block to automate provisioning to AWS IoT Core
- Provision a device and use our example System Metrics block to send metrics data to IoT Core
- Route the data to AWS CloudWatch Metrics for real-time graphing
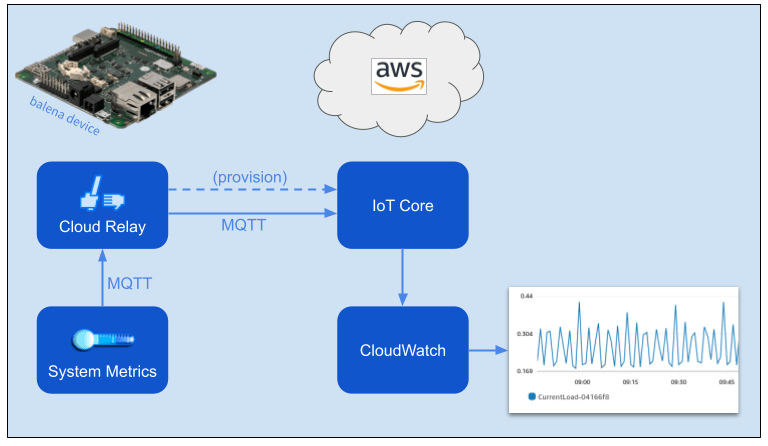
Provisioning Setup
The diagram below shows the flow of information for provisioning. We will provision a device by sending a request to an HTTP endpoint for an AWS cloud (Lambda) function, which registers the device with IoT Core and generates access credentials. The function then provides the credentials to balenaCloud and the device.

Below are the tasks to setup this flow:
- Deploy the Lambda function code that handles a provisioning request for a device
- Configure AWS internal access between the HTTP endpoint, the Lambda function, and IoT Core
- Setup the balena fleet with our HTTP and data endpoints for AWS resources
AWS IoT Setup
The aws-iot-provision repository documentation provides all the tools and instructions you need, including source code for the Lambda function, screenshots and example files. If you’re new to AWS IoT, it also links to straightforward, focused AWS documentation to help you get started.
Follow the instructions for the Setup and Testing section and then the Deploy section. The end result is a functional, tested HTTP endpoint and Lambda function ready to provision a balena device.
Note: Rather work with Azure or Google Cloud? Yes, you can! We have created tools for provisioning with these clouds as well. See the Cloud Provisioning section of the Cloud Relay documentation. The provisioning flow is the same — access an HTTP endpoint for a cloud function and register with the IoT facility. (This tutorial only uses AWS though.)
Fleet Setup
Next let’s create a balena fleet with the metrics and cloud relay containers. Simply click on the Deploy with balena button below, from the cloud-relay-starter repository.
Before you add a device, you must define a couple of balena environment variables on the cloud-relay-starter fleet to direct devices to the AWS endpoints. See the AWS section of the Cloud Relay block documentation for the fleet variables and expected values.
Add Device and Send data
Now that all of the components are in place, you are ready to provision a device and send data to AWS IoT! Go to the cloud-relay-starter fleet you created in the balenaCloud dashboard, and select to add a device. Follow the instructions on how to flash balenaOS. After the device connects to balenaCloud and downloads the fleet containers, it will send a request to the provision endpoint you created in AWS. When that succeeds, the device will start pushing data.
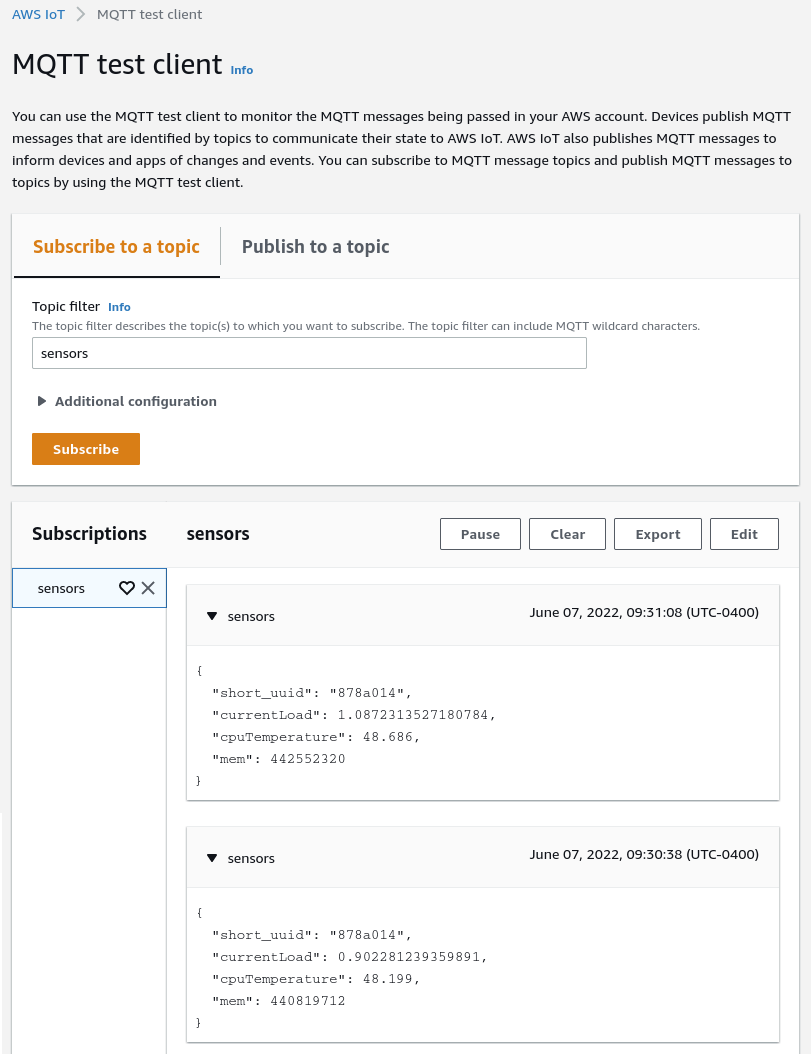
You can verify that data is accepted by AWS IoT with their online MQTT client. The AWS documentation page walks you through it. You should see output like below, which filters on the default sensors topic:
Note: At time of writing (June 2022) the console UI for AWS IoT is being updated. Screenshots reflect the new console experience.
Route Data to CloudWatch and Generate Graph
Now that data is flowing into AWS IoT Core, let’s get to our final goal — a real-time graph of the data received. We will use CloudWatch Metrics, which typically is used to monitor AWS infrastructure, but it also supports creation of custom metrics for the fleet data.
Setup Metrics Routing
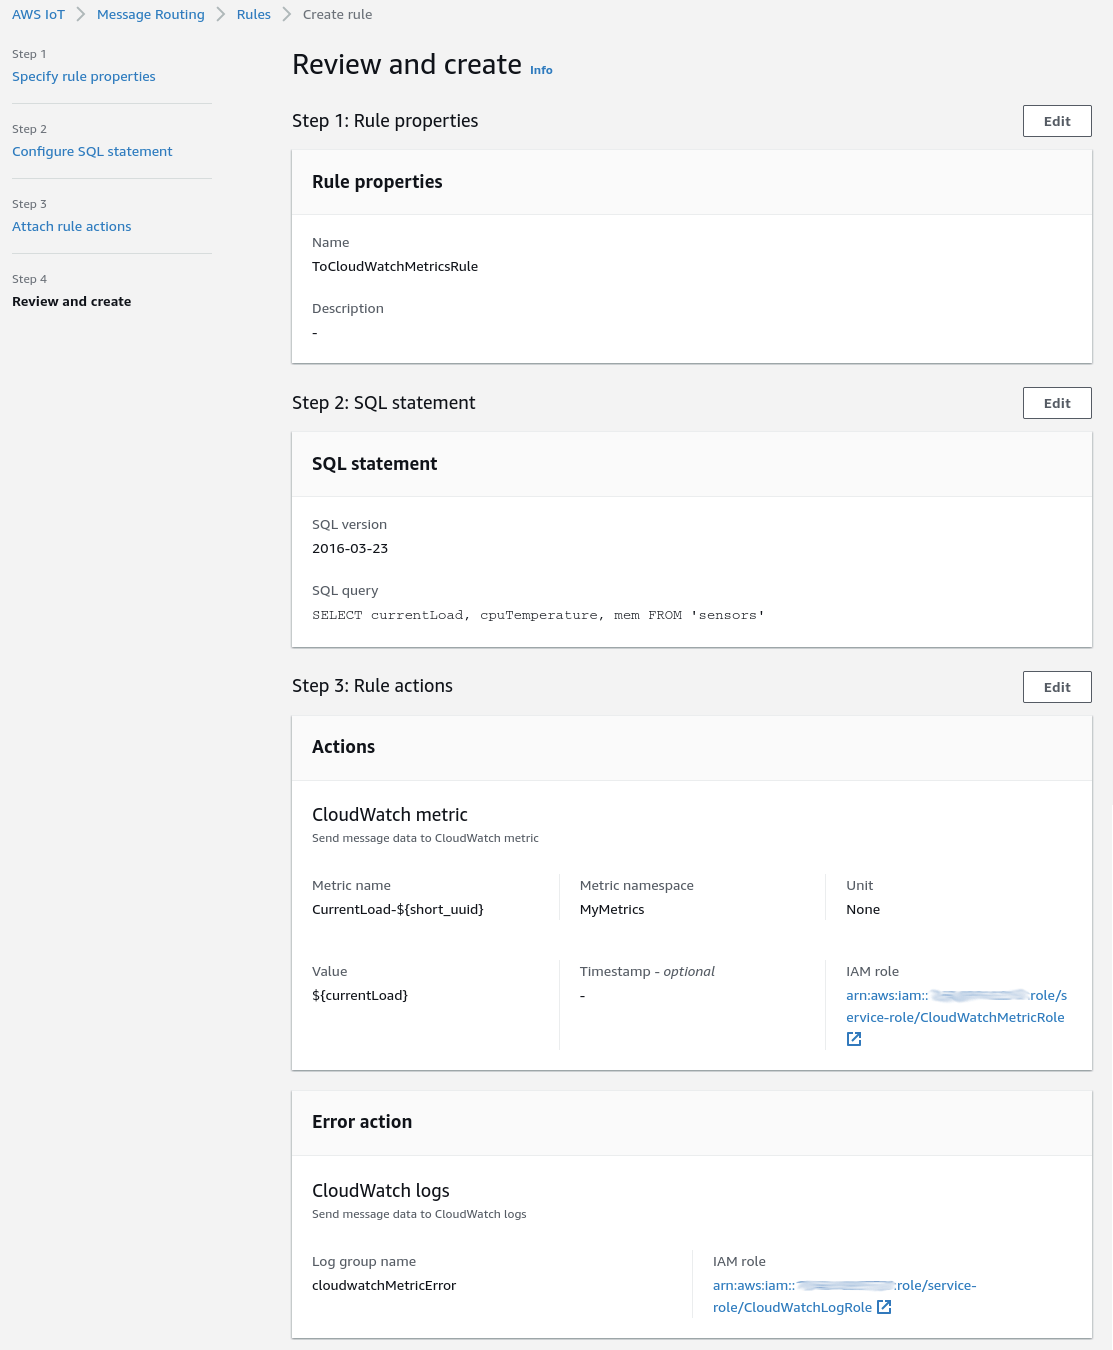
IoT Core includes Rules, which allow you to route data to various AWS capabilities, and Actions that specify what to do with the selected data. We will generate a rule to push data to CloudWatch Metrics, and create an action for the CurrentLoad value.
Select Message Routing -> Rules from the menu bar, and then click Create. Use Name ‘ToCloudWatchMetricsRule’. Use Rule query statement, “SELECT currentLoad, cpuTemperature, mem FROM ‘sensors’” Select Action, ‘CloudWatch metric’.
Configure the action with the values below. The action allows you to subsitute values from the incoming data with the ${value} syntax.
| Property | Value | Notes |
|---|---|---|
| Metric name | CurrentLoad-${short_uuid} |
Device specific currentLoad value |
| Metric namespace | MyMetrics |
Groups together my custom metrics |
| Unit | None |
|
| Value | ${currentLoad} |
|
| Timestamp | N/A | Uses time when the action receives the metric data |
For IAM role, select ‘Create New Role’ and use Name ‘CloudWatchMetricRole’.
Note: If you are using the historical console UI, be sure to select the role in the list after you have created it, and then select ‘Update role’ so “Policy Attached” displays by the role name. See this screenshot.
You also should add a CloudWatch Logs Error action. It helps to identify anything wrong when executing the rule. Create a new CloudWatch Log group to contain the error logs.
When you are ready to create the rule, it should display like the screenshot below.
View graph
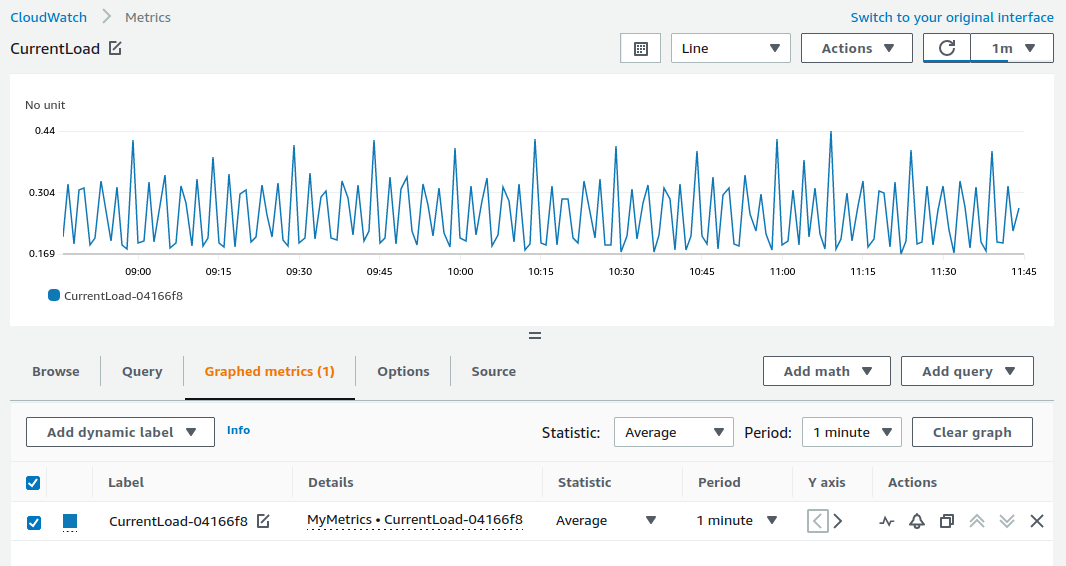
Since data is flowing into the system, once you have created the routing rule, the DeviceMetrics namespace should appear automatically in CloudWatch metrics. Go to AWS CloudWatch and select Metrics -> All metrics from the menubar. Select Custom namespace ‘MyMetrics’, and then ‘Metrics without a dimension’. Select the ‘CurrentLoad-[uuid]’ metric. The graph will appear.
We need to adjust some of the graph settings. Select the ‘Graphed metrics’ tab. For the CurrentLoad-[uuid] line, use Statistic, ‘Average’ and Period, ‘1 minute’. Select the graph refresh interval from the dropdown at top right to 1 minute. As data arrives the graph should fill in similar to the screenshot below.
Congratulations! You’re logging and graphing metric data from a balena device to the AWS cloud.
What’s next?
You can take this setup in several directions depending on your interests. AWS includes many options for routing data from IoT Core to other capabilities, for example:
- CloudWatch Alarms, to notify you when data is out of bounds
- S3 storage for data
Also see the AWS blog post, 7 patterns for IoT data ingestion and visualization for more ideas.
We’ve covered a lot of ground! Fundamentally we leveraged balenaCloud to setup relaying IoT data to AWS without too much effort and without coding. The incremental cost for new devices is nil because they provision automatically at startup. Help us improve these tools with your ideas and feedback from trying this tutorial.
@andrewnhem
Seems like the blog post is not (yet?) available?
@nmaas87 We should be up now. There was a little big of lag with our builder today. Thanks for the shout though!
Perfect thanks!
Hello @Tyren welcome to balena! You can’t access to the blog? Could you please confirm the URL that you can’t access? and your browser? Thanks!