

At Theia Scientific and Volkov Labs, we created the Theiascope™ platform, which includes an application specifically designed for Machine Learning (ML)-enhanced microscopy that makes real-time analysis on any digital microscope possible. For managing our test and production fleets deployed at universities, government laboratories, and commercial scientific facilities, we rely on balenaCloud.
We have a great experience using balenaCloud to deploy Docker containers and enjoy an effortless upgrade process consisting of creating Docker containers using GitHub Actions and pushing new releases in an automated way following our release schedule.
Following containerization best practices, the Theiascope™ platform is separated into containers deployed in host network mode and interacts with each other using TCP and/or UDP ports. The Theia web application running on the Theiascope™ hardware powered by balenaOS deals with massive data, where exporting results can reach gigabytes in size. To prevent caching and delay in transferring files between containers, each container should have access to the same storage.
UPDATE: Check out the example project on balenaHub. It’s now available as a way for the community to try this solution out.
About the solution architecture
The Theia web application consists of multiple Docker images, notably:
- A PostgreSQL database container with an external NVMe SSD.
- A REST API server connects to the PostgreSQL database and exposes an API utilizing a reverse proxy for URL mapping and an additional layer of security.
- A NGINX reverse proxy provides access to REST API and Grafana UI running in a separate container.
Recently, we implemented new functionality to export processed scientific data, which should be available to download from internal networks and balenaCloud. In a network-constrained environment, the API container stores multiple ML models, weight files, and cache, which requires additional storage space.
As a permanent storage, we utilize NVMe SSDs connected to the Theiascope™ hardware via a M.2 socket. Unfortunately, balenaOS does not allow sharing external storage between containers. Scanning thru the community forum, we found two solutions – using journaling or the Network File System (NFS) client/server architecture.
We decided to go with the NFS client/server architecture, as shown in the diagram below.
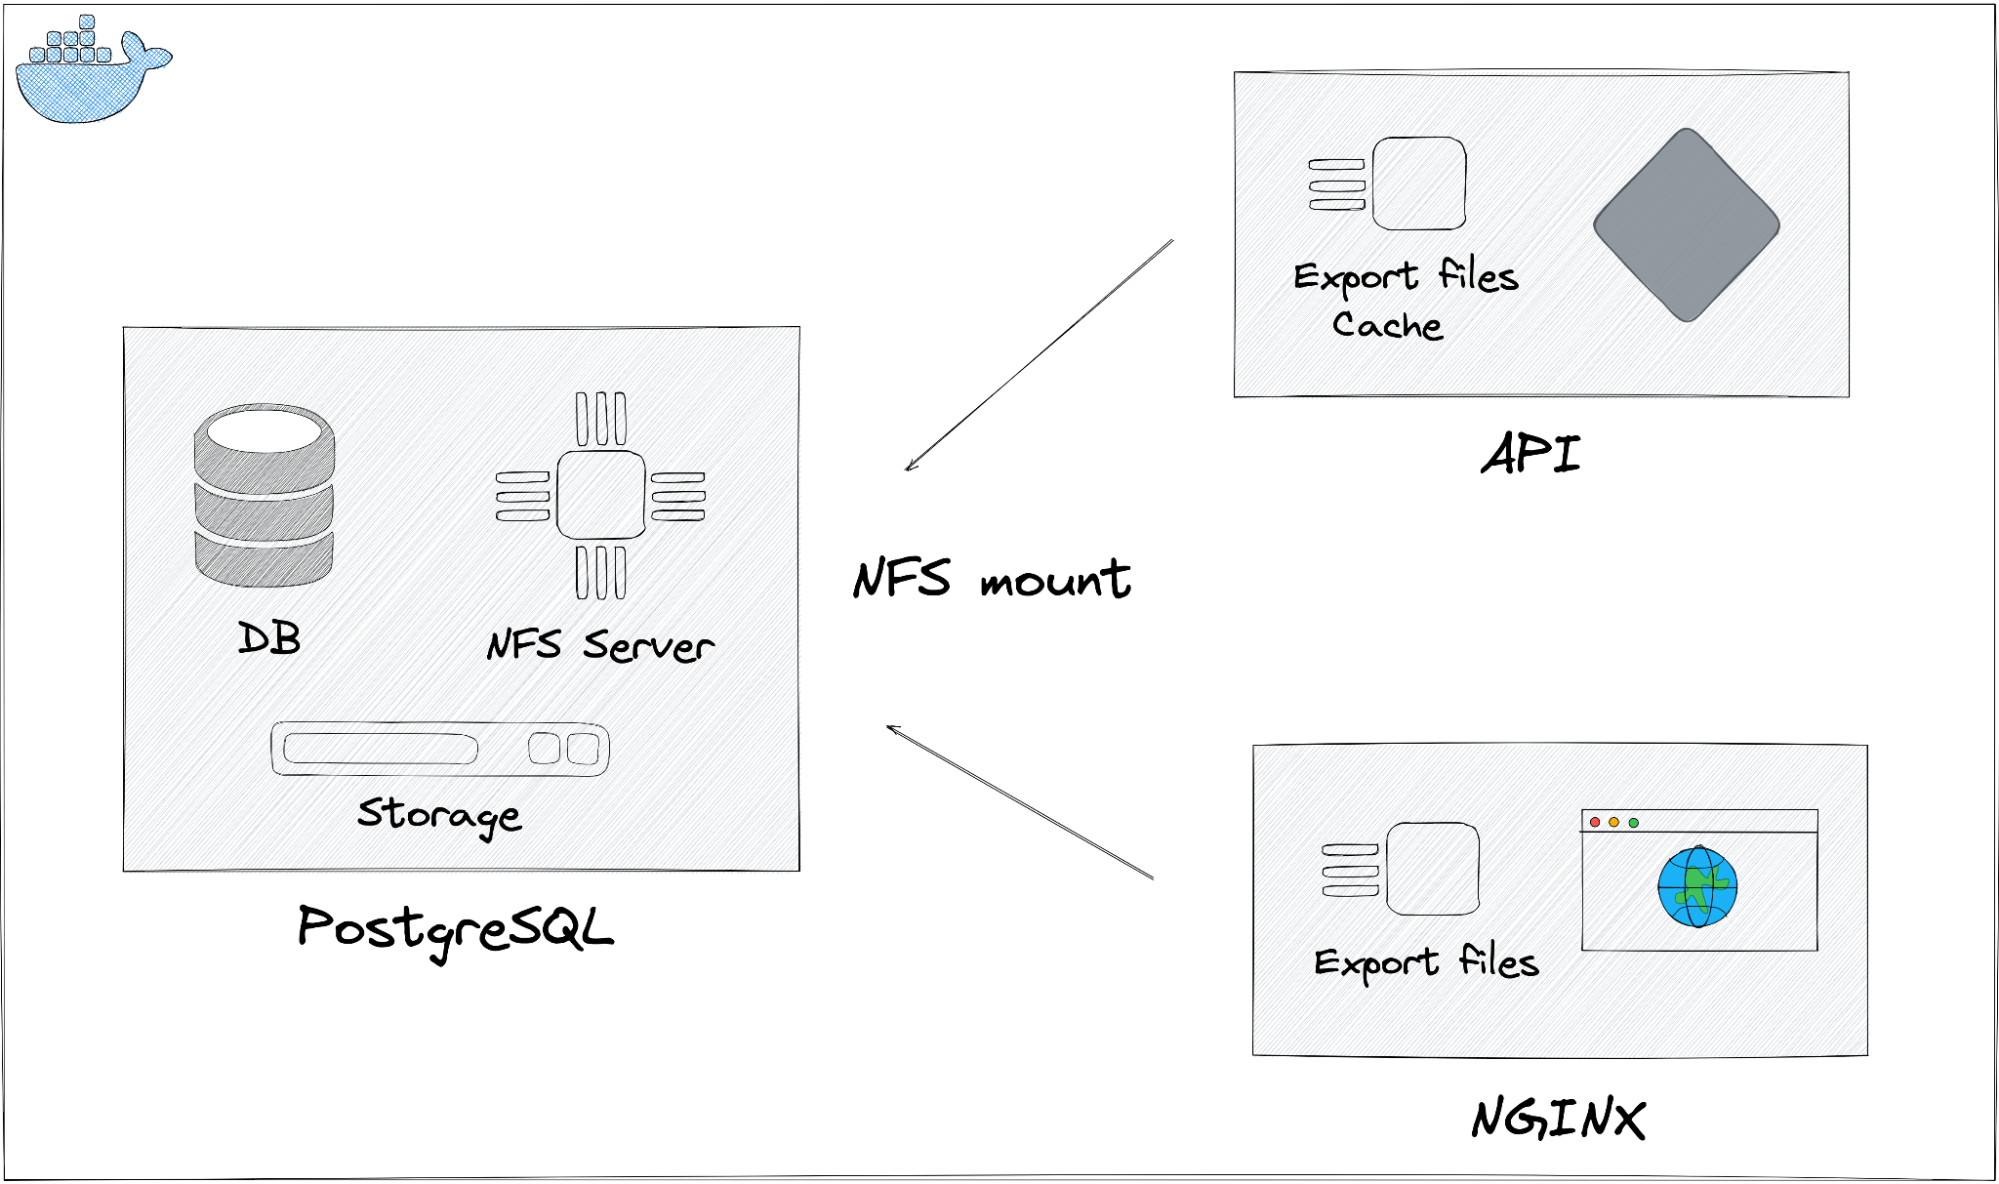
Architecture diagram for NFS Server/Client connecting multiple Docker containers.
From a performance point of view, the PostgreSQL container is an ideal candidate for the NFS server. The NVMe SSD was already connected to the PostgreSQL container following this post on the community forum.
NFS Server
As mentioned, we build all our containers using GitHub Actions. We are using the Timescale base image for the PostgreSQL container, which is based on Alpine Linux. We started experimenting with the most recent version of Alpine Linux and ended using an eight-month-old image. The latest version of nfs-utils is not compatible with the current version of the Linux kernel included with balenaOS for NVIDIA Jetson devices (target deployment hardware).
Here is how the Dockerfile looks:
“`bash
FROM timescale/timescaledb:2.4.2-pg13
Application-specific logic removed
NFS Server
RUN apk update && apk add nfs-utils openrc
RUN rc-update add nfs
Entrypoint
COPY entrypoint.sh /entrypoint.sh
RUN chmod +x /entrypoint.sh
ENTRYPOINT [“/entrypoint.sh”]
CMD [“postgres”]
“`
Looking around the Internet on how to start a NFS server in Docker, you can find various projects utilizing custom scripts developed more than three years ago. In our solution, we are using the OpenRC init system to start a NFS server.
NFSv4 modules are not currently enabled in the current Jetson kernels, thus we are using NFSv3. Our entrypoint script looks like this:
“`bash
!/usr/bin/env bash
Application-specific logic and mounting NVME storage removed
Export NFS Mount
echo “${MOUNT_POINT} *(fsid=0,rw,sync,no_subtree_check,all_squash,anonuid=65534,anongid=65534)” > /etc/exports
Load modules
modprobe nfs
modprobe nfsd
modprobe nfsv3
NFS Server
rm -rf /run/*
mkdir /run/openrc
touch /run/openrc/softlevel
openrc
exec docker-entrypoint.sh “$@”
“`
Before starting the NFS server with RPC (Remote Procedure Call) processes, we manually load all required modules. To load modules and start the server with dependent processes, Some balena-specific labels are needed. More information about labels can be found in balena’s documentation.
To start the NFS server we added three labels:
- io.balena.features.kernel-module to bind mounts from the host OS /lib/modules directory into the container (i.e., /lib/modules:/lib/modules).
- io.balena.features.sysfs to bind mounts from the host OS /sys directory into the container.
- io.balena.features.procfs to bind mounts from the host OS /proc directory into the container.
Our balenaCloud docker-compose file for the PostgreSQL container looks like this:
yml

services:

 postgres:

   container_name: postgres

   image: ghcr.io/POSTGRES-IMAGE:latest

   restart: always

   network_mode: host

   privileged: true

   labels:

     io.balena.features.kernel-modules: "1"

     io.balena.features.sysfs: "1"

     io.balena.features.procfs: "1"

   environment:

     - PGDATA=/mnt/nvme/postgresql/data
Privileged mode is required for both the NFS server and client containers to start the mountd process and mount NFS drives and/or shares. Instead of the Privileged mode to fine grain control you can use Linux Capabilities, but we have not experimented with them at this time.
To verify that the NFS server is running, the portmapper (Open Network Computing Remote Procedure Call service that runs on network nodes that provide other RPC services) can be queried with the command, rpcinfo -p, to find out what services it is providing. An example output with the NFS server running is seen below:
“`bash
rpcinfo -p
program vers proto port service
100000 4 tcp 111
100000 3 tcp 111
100000 2 tcp 111
100000 4 udp 111
100000 3 udp 111
100000 2 udp 111
100024 1 udp 56971
100024 1 tcp 56971
100005 1 udp 64101
100005 1 tcp 57033
100005 2 udp 63895
100005 2 tcp 51037
100005 3 udp 58962
100005 3 tcp 53357
100003 3 tcp 2049
100227 3 tcp 2049
100021 1 udp 61320
100021 3 udp 61320
100021 4 udp 61320
100021 1 tcp 53171
100021 3 tcp 53171
100021 4 tcp 53171
“`
If TCP port 2049 is listed, then the NFS server is properly configured, running, and ready to accept requests from clients.
Exported NFS volumes can be verified using the exportfs command:
“`
exportfs
/mnt/nvme
“`
At this point, we can connect to the NFS server from other Docker containers.
NFS Client
The NGINX images in the Docker repository support various Linux distributions. It was an eye-opener for us that we are using different Linux distributions, and we decided to unify using Alpine Linux for most of the containers for the current release and move entirely to Alpine Linux in future releases. To use Alpine Linux distributions, use nginx:stable-alpine.
Here is how Dockerfile to build the NGINX image looks:
“`bash
FROM nginx:stable-alpine
Application-specific logic removed
NFS
RUN apk add nfs-utils
Entrypoint
COPY entrypoint.sh /entrypoint.sh
RUN chmod +x /entrypoint.sh
ENTRYPOINT [“/entrypoint.sh”]
CMD [“nginx”, “-g”, “daemon off;”]
“`
One of the challenges of running an NFS client was to make sure that the NFS server started before clients tried to mount exported drives. For the Theiascope™ platform and Theia web application, NFS is mission-critical, and we decided to wait indefinitely to make sure that NFS is loaded, trying to mount every 5 seconds.
NGINX entrypoint script looks like this:
“`jsx
!/usr/bin/env sh
Application-specific logic removed
echo “${NFS_HOST}:${NFS_MOUNT_POINT} ${NFS_MOUNT_POINT} nfs hard,nolock 0 0” > /etc/fstab
while ( ! mount | grep “on ${NFS_MOUNT_POINT} type” > /dev/null; ) && [ ! “${TEST}” ]; do
sleep 5
mount ${NFS_MOUNT_POINT}
done
exec /docker-entrypoint.sh “$@”
“`
If the NFS server fails to start, then NGINX will not start, and the whole application will be unavailable. We tried to use different mounting options in the /etc/fstab file, but we found waiting and mounting manually is the most reliable method.
The API image is based on one of Belana’s base images, balenalib/jetson-nano-ubuntu-python:3.8-bionic, which is based on an Ubuntu distribution and requires nfs-common package to be installed to mount NFS drives. We used the same logic of waiting indefinitely to mount the NFS drive for the API image as the NGINX image. As noted earlier, the API image will be migrated to Alpine Linux in future iterations of the application.
Challenges
It took us a lot of trial and error to figure out the complete solution and work out all the limitations. We would like to mention some of the challenges we encountered with deploying the NFS client/server architecture in a Docker environment.
First of all, when we separated the Theiascope™ platform into multiple containers, we used the most popular images. To support the NFS client/server architecture, we decided to stay with Alpine and Ubuntu only to avoid issues with different distributions. Notably, the most popular NGINX image is based on Debian, which has some problems mounting NFS drives. We did not dig deeper, and simply switched to the Alpine based image.
Another challenge is the lack of NFSv4 support in the included kernel for NVIDIA Jetson devices. The latest release of balenaOS for Jetson devices has modules only for NFSv3 and does not support the required features for the nfs-utils package. We are in touch with balena support to discuss possible solutions. Meanwhile, we use an older version of Alpine for the NFS server.
Another issue was after pushing new updates, devices need to be rebooted in order to successfully load NFS components and connect to the server. We are working with balena support to find the root cause of the issue and a solution that allows pushing updates with only a container restart instead of a device reboot.
Conclusion
For a seamless user experience (UX), the Theiascope™ and associated Theia web application utilizes Grafana. Using the NFS server, all Docker containers use the same volume, and we can effortlessly monitor overall disk usage using the REST API. Users can see the current state of the system resource and free disk space on the home dashboard in Grafana.
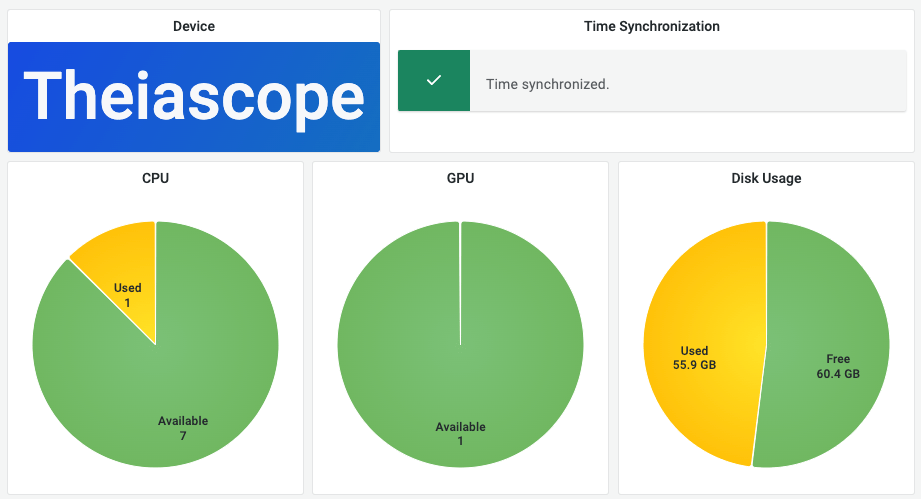
All information about the IoT device is displayed on the Home dashboard in Grafana.
One of the additional benefits of choosing the NFS client/server architecture was the ability to connect to external NFS servers for future customers. Simply by overriding environment variables for each container using balenaCloud fleet and device variables, NFS clients can connect to any external NFS server.
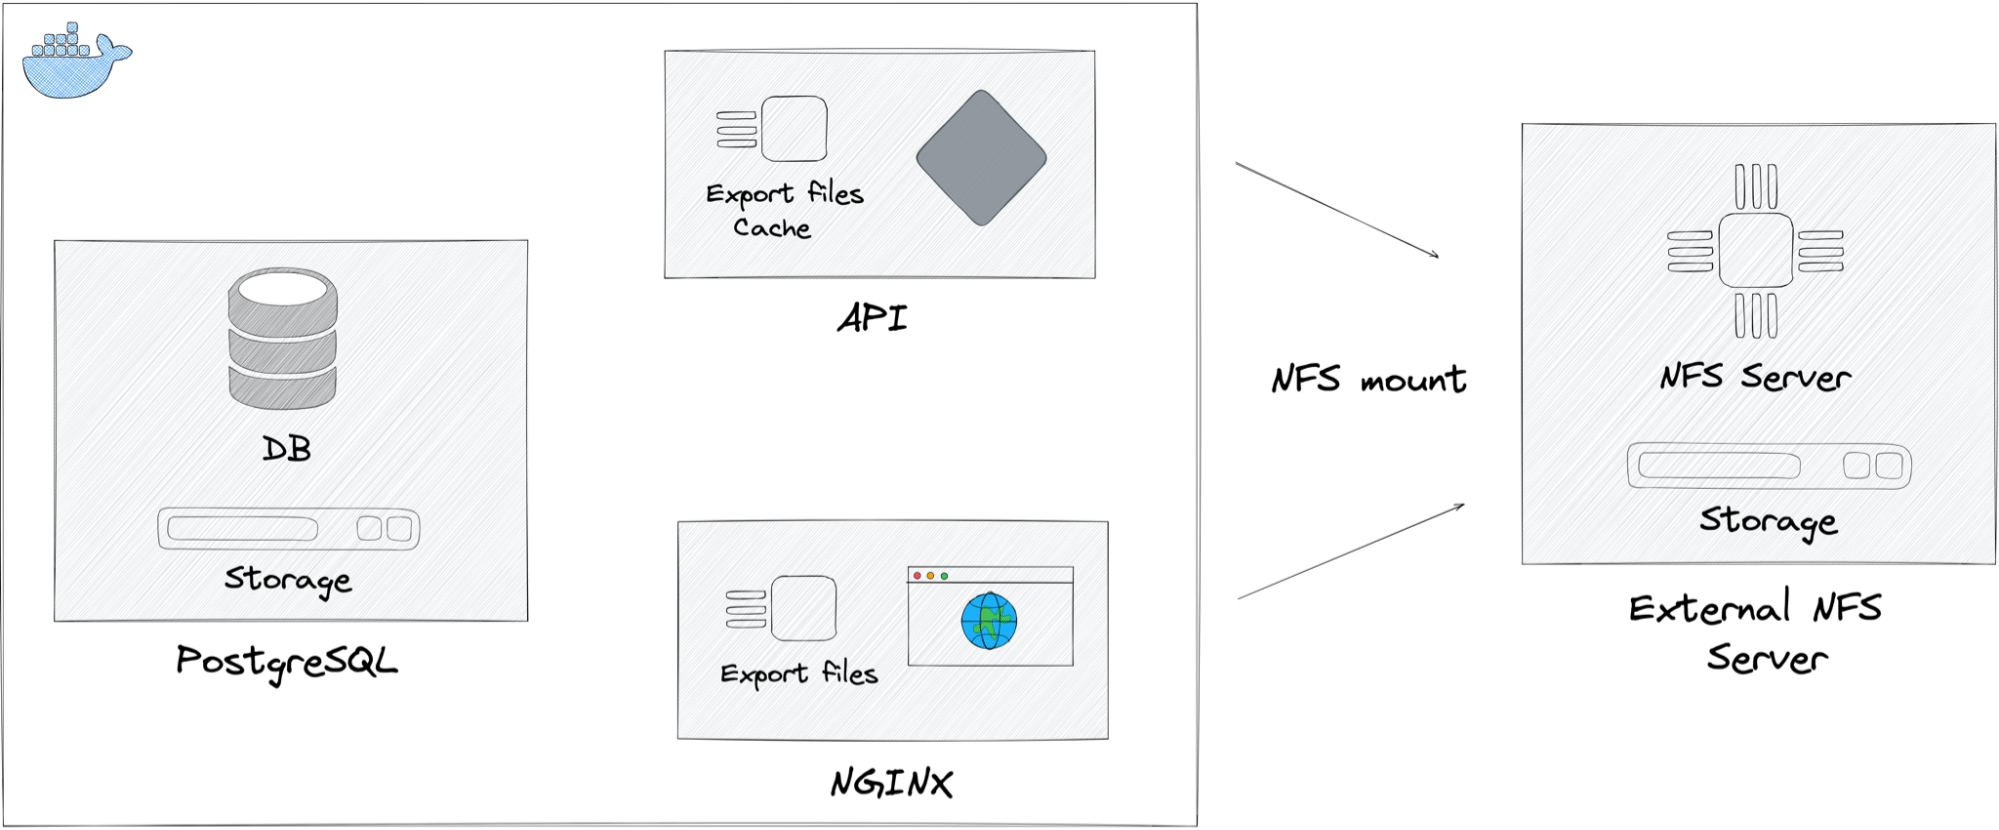
Architecture diagram for using external NFS service.
We are still experimenting with this solution and appreciate the opportunity to share our experience with the balena community. We look forward to any feedback.
UPDATE: You can now try this project for yourself via balenaHub.
@ts-cfield, thanks for this blog contribution!
Very interesting to see the OpenRC init system approach. Would you be able to share the
docker-entrypoint.shscript too? It looks like there is a Dockerfile → entrypoint.sh → docker-entrypoint.sh, and I suspect the docker-entrypoint.sh contains start processes and maybe an OpenRC configuration? This would be helpful to allow it to be replicable.Ideally a little GitHub repo example would be fantastic! It would mean that the community can also help with some of the questions and issues you mentioned. I suspect the NGINX container not starting if the server isn’t ready is because it has a reverse proxy pointing to the server? This is a common issue in NGINX and overcome by the rather odd step of storing the proxy address in a variable and then passing the variable to the proxy_pass:
Of course that may not be any help at all, I am taking a best guess based on the description. A mini repo would be really great, I would love to experiment with the OpenRC process.
Hello @maggie0002,
Thank you for the comment. Script
docker-entrypoint.shis specific to the TimescaleDB and was not modified.OpenRC does not require any configuration after initial setup. I want to mention that removing previous
runfiles is crucial to restarting docker containers.We can look into creating a repository if there is an interest from the community. All steps and configurations are mentioned in the article and nothing else should be required to reproduce.
Ahh yes, I see the
rc-updateentry now. I thought OpenRC used the run directories/service files like systemd or s6.I think it could be useful to have a repo, if you are able to put the initial code up I would happily chip in by adding a pull request with some of the Balena elements (.yml files, workflows etc.) and then can push it to the Balena Hub. I was thinking something that simply exposes a volume. My hope is to get a few different approaches available to experiment with (I see from the link in your blog post you found one of my earlier ones). I will then try and get some benchmarks, and may delve in to GlusterFS too. I think there is a bunch of potential use cases, the one high up on my list has been exposing of the content from a device to allow hot reload of compiled languages for live development on a device. A repo would open a door for different contributions and evolutions, and I would happily work off an open repository so we can all fork and edit the evolutions as suits the different projects.
Hello @maggie0002,
We created a repo and balenaHub project to demonstrate how to create a NFS Server and Client based on PostgreSQL and NGINX Alpine images: balenaHub: an easier way to find and publish fleets, projects, and blocks for edge devices. You are welcome to fork and experiment. GitHub repository: GitHub – VolkovLabs/balena-nfs: Balena NFS Server and Client Project.
Also, we added our new Grafana Application, which communicates with Supervisor API and allows to display device information, see logs in real-time and manage containers. I thought it would be interested for you to look at as it’s similar to your
balena-device-uiproject.I would love to take a look at your benchmarks and will check GlusterFS.
There is a wealth of stuff I want to try here. The Grafana Application is very interesting too and will be sharing it with others! I will be sure to come back here once I have had a chance to test it all out.
Hello @maggie0002, we released an updated version of the
balena-nfsproject supporting NFS version 4: Release Balena NFS 1.1.0 · VolkovLabs/balena-nfs · GitHub. Please let us know if you have any questions.Nice! I haven’t really read up on the pros of v4 over 3. I think that the default behaviour for sync/async changed though. Not that it impacts your project as you specify sync and as its database related makes sense. For my use cases where there are lots of little files, and data corruption wouldn’t be the end of the world (and is rare) the async has a big performance boost.
I still haven’t got around to giving it a whirl, but I think it is going to be the base for the development environment on the balena-device-ui, so certainly going to.