
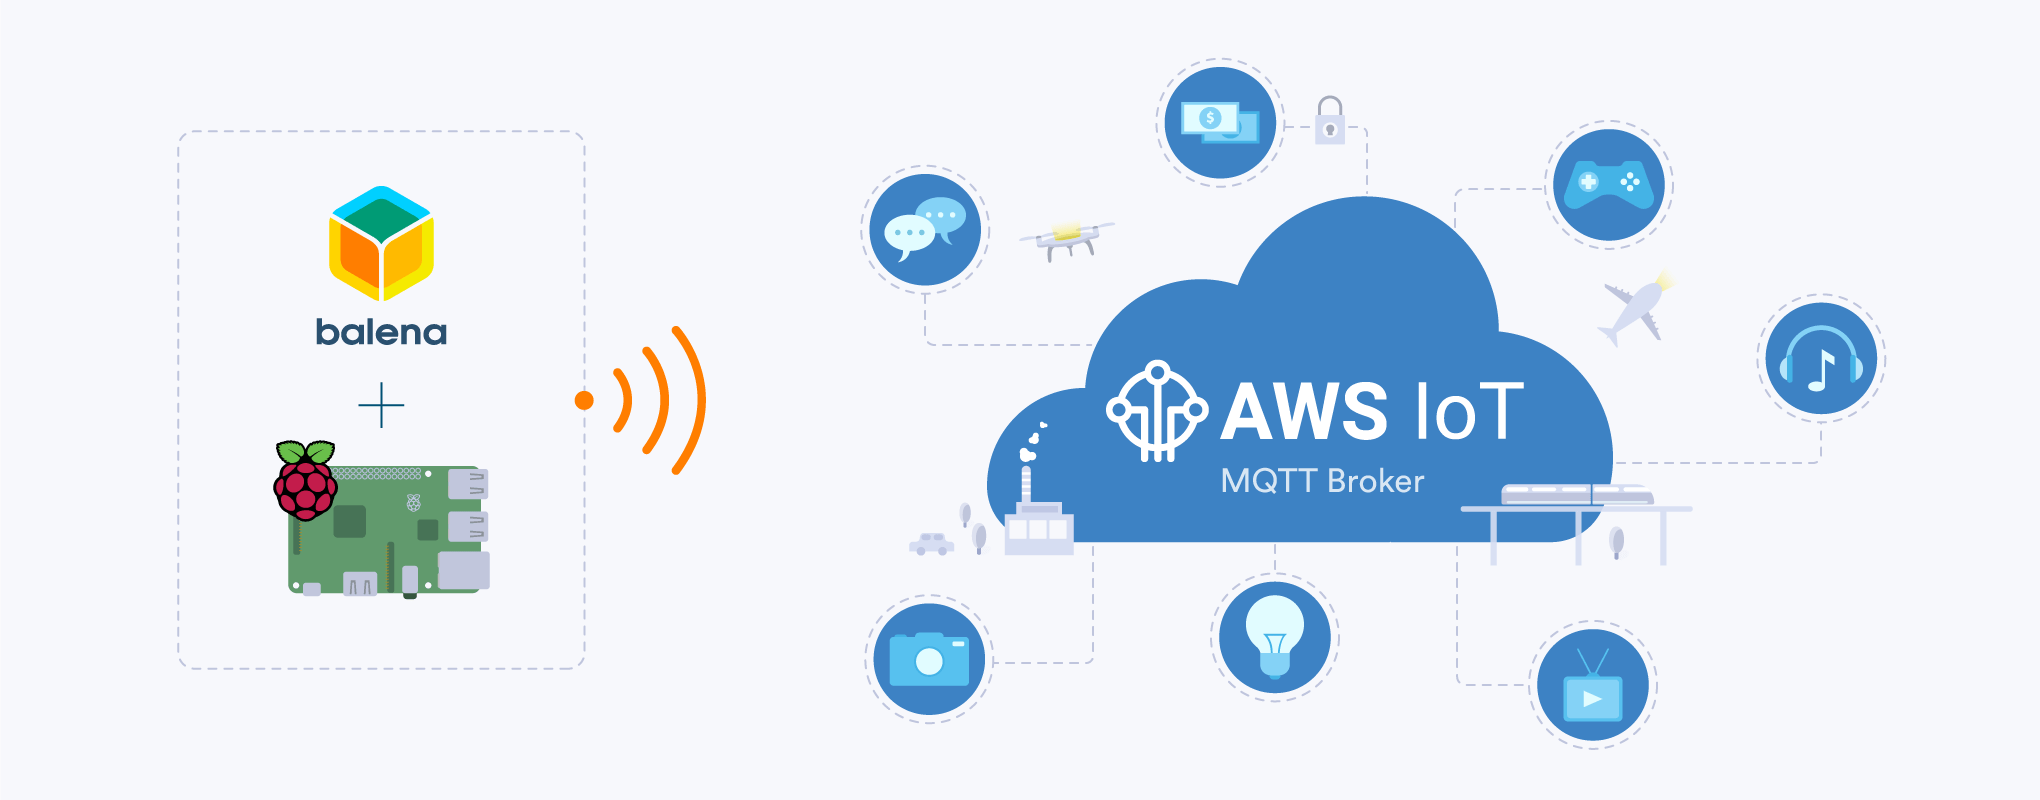
When developing an IoT project, there are many things to take into account, from choosing the hardware and software to the infrastructure where you will host all the sensor data. Gladly managing a device fleet with balenaCloud is as easy as typing git push. The next step is to think about how the devices should behave, are they going to be sending sensor data, receiving instructions to control transducers, or simply communicating with other devices. That is when AWS IoT comes into play.
The Amazon Web Services Internet-of-Things (AWS IoT) service enables bi-directional communication between Internet-connected things, such as sensors, embedded devices, or appliances, and other services on the AWS cloud, such as cloud servers, databases, analytics and more.
In this article, we will go through the steps to setup a basic MQTT broker on AWS IoT and configure a Raspberry Pi to communicate with it. In the end, you will have your device sending and receiving messages from the cloud service and a simple python boilerplate code that you can modify to fit your needs.
Let’s go!
Amazon AWS IoT
Creating an IoT Thing
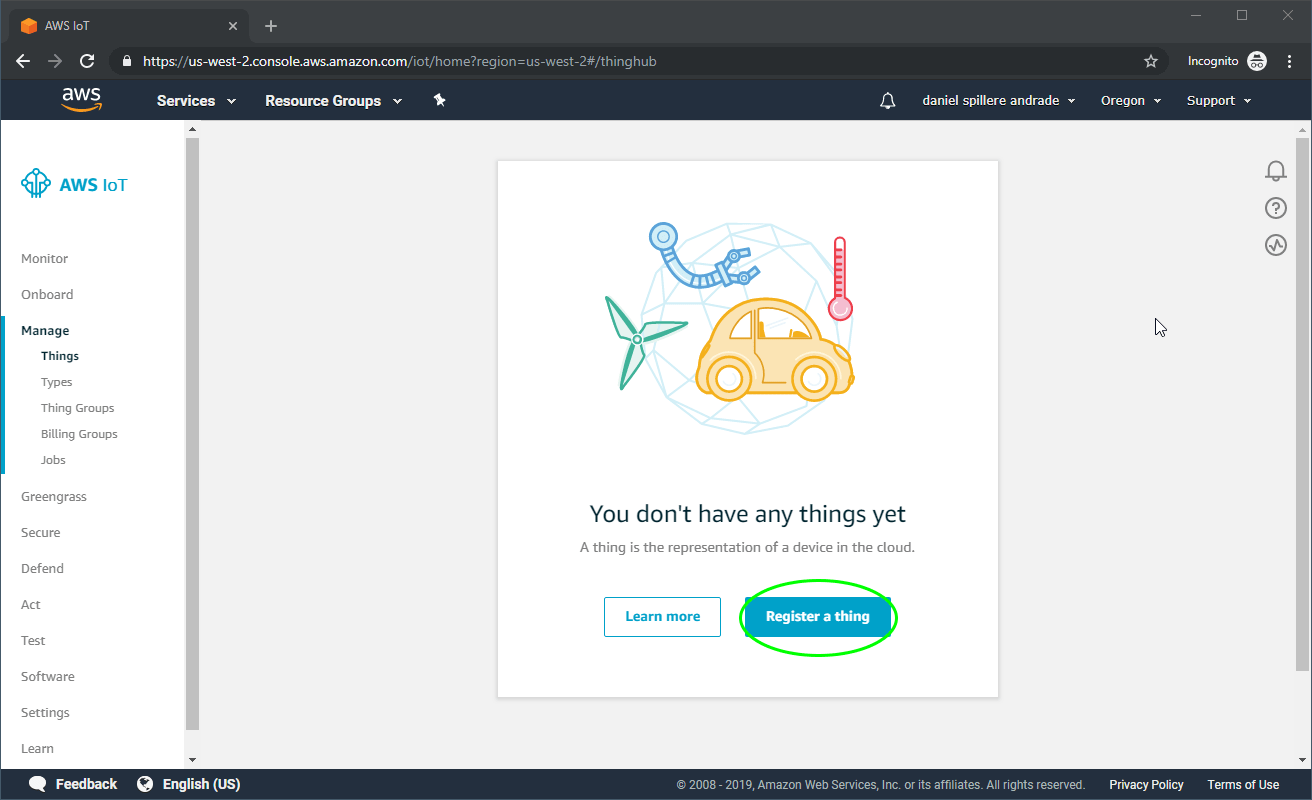
The first step of setting up a new device that will submit data to AWS IoT is to login to your https://aws.amazon.com account, navigate to IoT Core service on the dashboard and go to Manage and Things.
On the Things dashboard, go ahead and register a thing, then on the next page select Create a single thing.

A ‘thing’ is a new device that will connect and communicate with the MQTT broker. For this example project, we will create a thing called balena_project. All you need to do is to insert the name and click Next.

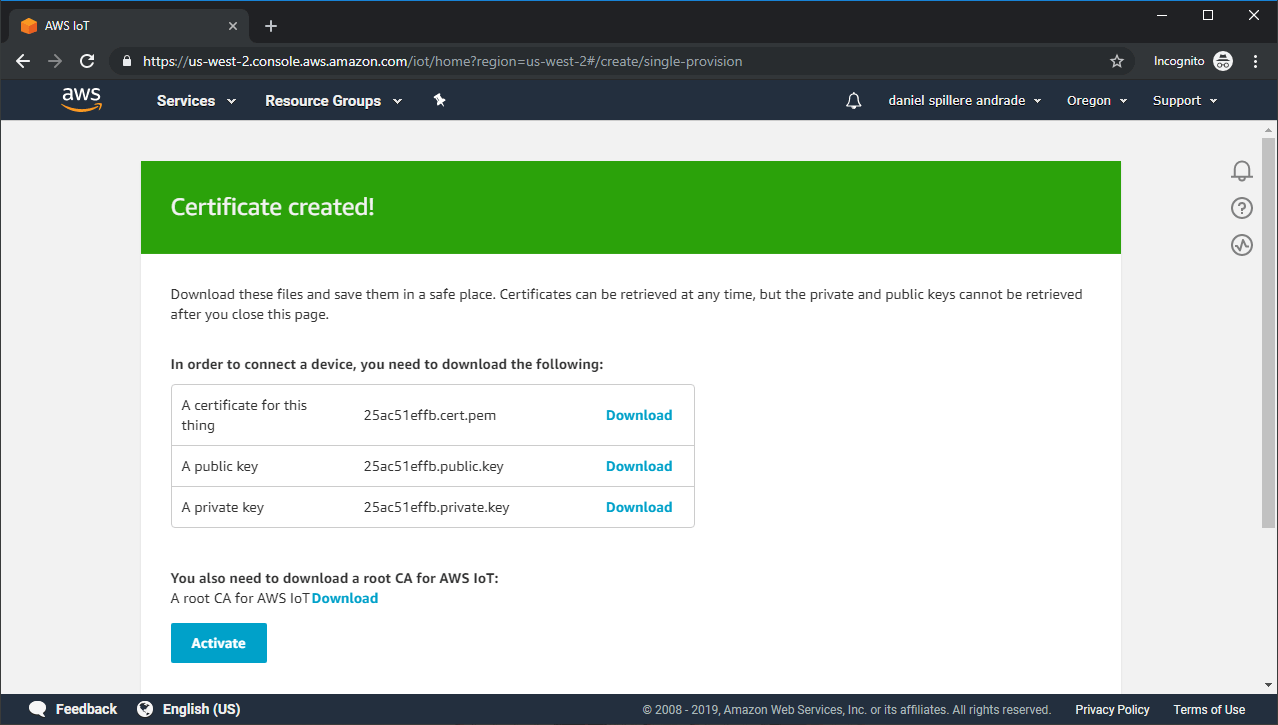
Each device or thing, must have its own certificates that will be used to authenticate with AWS IoT, so let’s use the One-click certificate creation option.
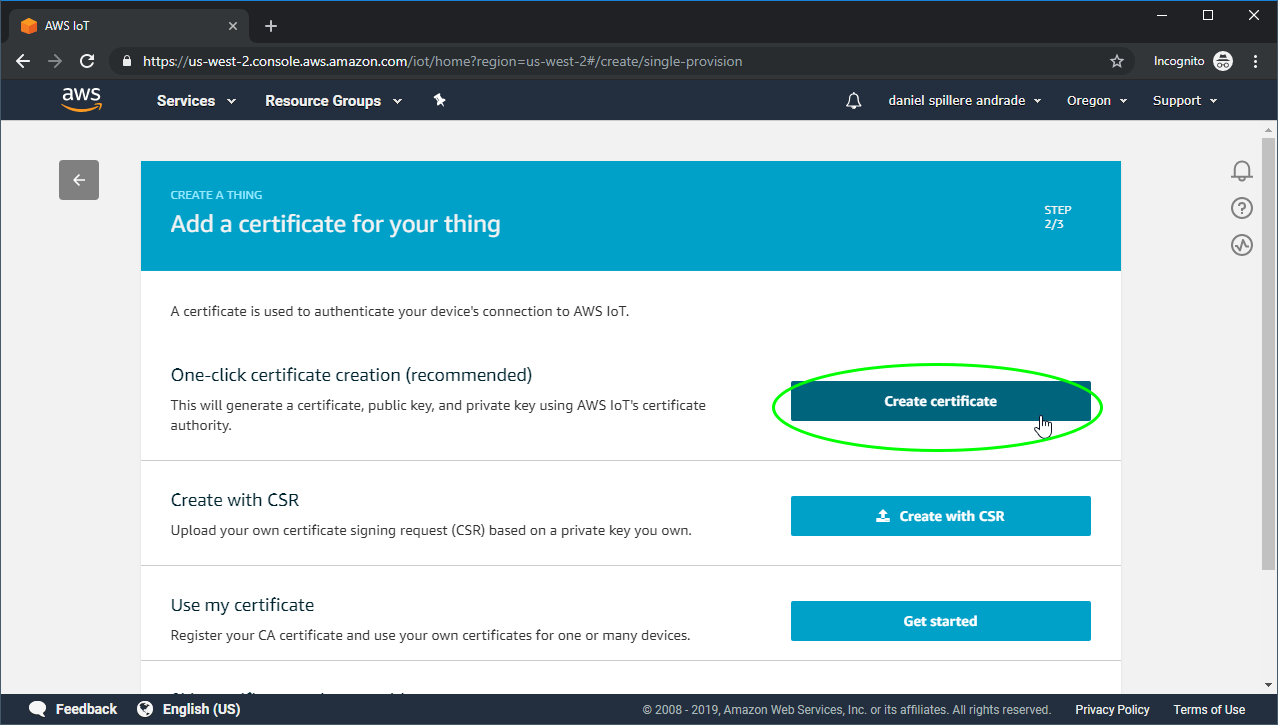
In order to authenticate with the service, you will first need to download all four certificates from the dashboard to your computer (make sure you also download the root CA for AWS IoT).
Create a policy
Now it’s time to create some policies to allow our devices to communicate with the platform. Go back to the IoT Core, open Secure -> Policies and click on Create a policy.

For this project we will create a policy called balena_control_policy, and add the statement as shown below:
| Action | iot:* |
| Resource ARN | * |
| Effect | Allow |

The next step is to go to Secure -> Certificates. Select the recently created certificate and attach both the thing and policy to it.
The policy we previously created enables all devices (things) to connect to our AWS IoT broker, but for security reasons, when you add the thing to the certificate, it guarantees that only those with matching security keys will be able to connect to the server.

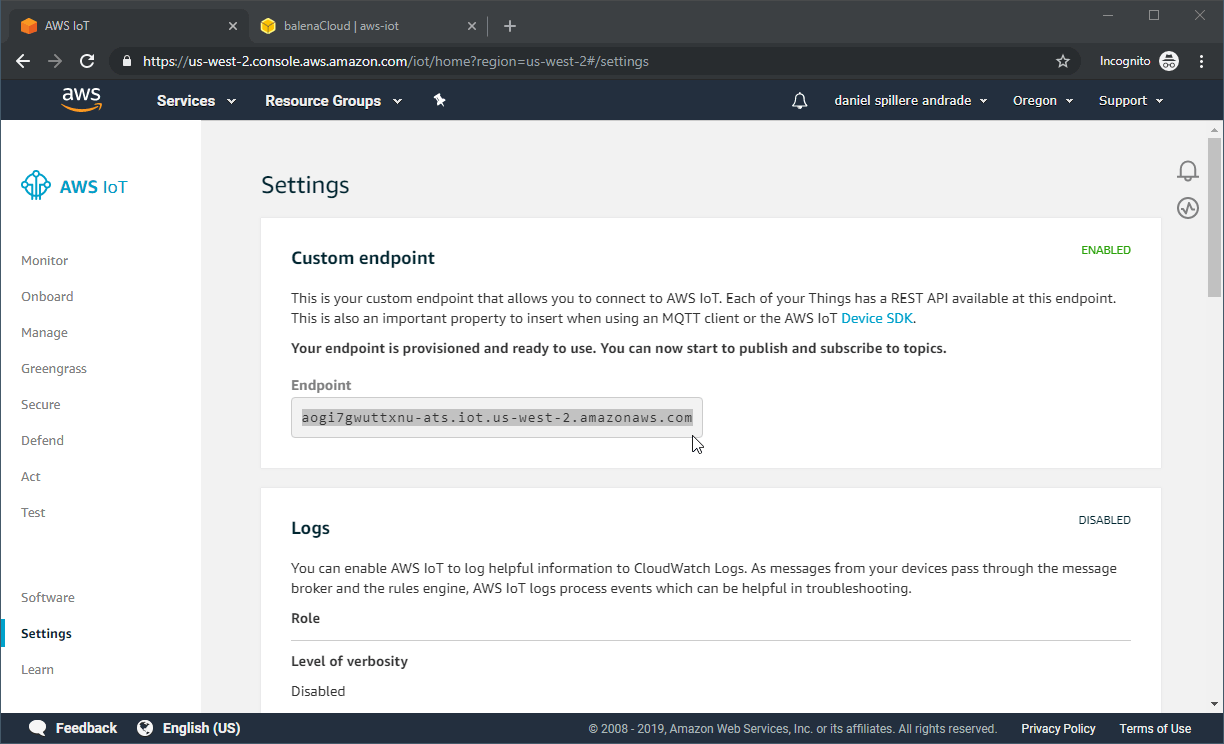
The last step in configuring the AWS IoT is to get the endpoint URL to connect to the service. Simply go to AWS IoT and click on Settings. There you will find the endpoint. Save it as we will need it later on.
At this point everything is ready on the AWS side, so let’s go ahead and configure our device to communicate with it using balenaCloud.
Flashing the Raspberry Pi and deploying code
UPDATED, 13 Jan 2021: Use the Deploy with balena to automatically create the application on your balenaCloud account.

You’ll still want to use the instructions below to add a device to your application, download the OS image, flash it to your SD card, and boot the device.
Back to explaining the CLI method…
Step 1 – Set up the balenaCloud application
If you don’t have one already, sign up for a balenaCloud account. The first thing we need to do is to create a new application, for that click on Create application, give it a name and select a device type (on this example we will create a project called aws-iot to run on a Raspberry Pi 3).
With the application created, click on Add device and select the latest recommended balenaOS version, choose the network connection you desire, setup its credentials and download the balenaOS to your computer.

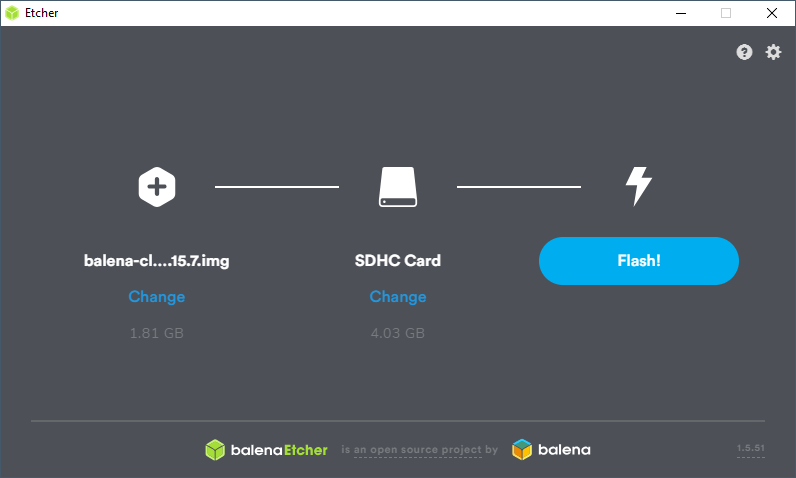
Step 2 – Flash your device
Use balenaEtcher to flash your Raspberry Pi with the downloaded OS image from the previous section. Insert the SD card into your computer, select the balenaOS image file, select the SD Card and click Flash!.
After flashing is done, insert the SD card into your device and turn it on. After a few seconds, it should connect to the internet and show up on the balenaCloud dashboard.

Step 3 – Push the app code
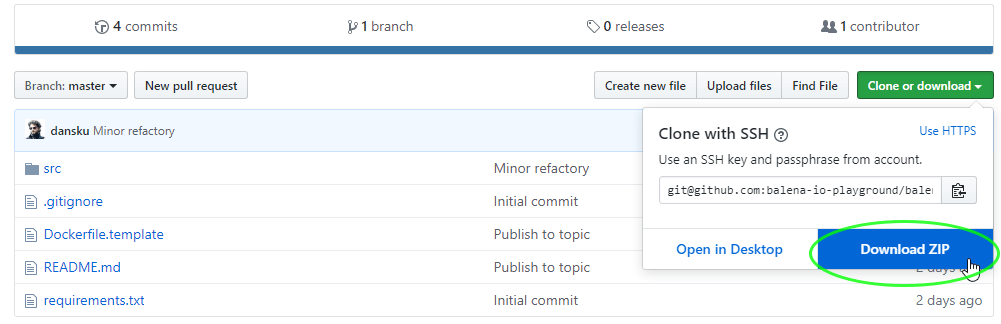
Once your device is showing up on the dashboard, it is time to push the code to balenaCloud, after which it will automatically distribute it to all of the devices in your application. For that, we will download the source code from GitHub and push the project to the device using the balena CLI tools. I’ve summarised the process for this below, but if you need more information we have a detailed deployment guide available in our docs.
First of all, download the app from the GitHub project repository, and clone or download it to your computer.
Then, after installing the balena CLI tools on your computer, from the project directory, execute balena push <appName> where <appName> is the name of the application you created within the balenaCloud dashboard earlier. For this example project, we will use then balena push aws-iot.
If all went well you’ll see the balena unicorn mascot and the code you’ve just pushed will automatically be distributed to the devices in your application.
With your hardware provisioned and the code deployed, it’s time to configure the device so it can connect to the Amazon servers.
Converting the certificates to base64
When configuring your device to communicate with AWS IoT, each device must contain its own certificates. The issue with the certificate files is that you can’t and shouldn’t add them to the project directory as it would create a security issue for the whole project. Instead, we will deploy all the devices with the same source-code and configure individual certificates from the balenaCloud dashboard, making use of environment variables.
The method we will apply is to convert the cert files we previously downloaded into base64 strings and paste them into our device’s variables.
You can generate the base64 encoded files from the terminal with: openssl base64 -in <in file> -out <out file>
For this project, you will need to convert the root CA root-CA.crt, the thing certificate xxx.cert.pem and the private key xxx.private.key. Then you will paste the content of the files into our balenaDash environment variables as described in the next session.
Add Environment Variables
To add the environment variables for the device, on the device dashboard page, go to D(x) Device Variables and add the following variables with the values from the conversion in the previous step.
| ENV VAR | Value |
|---|---|
| AWS_ENDPOINT | data.iot.us-west-2.amazonaws.com |
| AWS_PRIVATE_CERT | Base64 string of xxx.private.key |
| AWS_ROOT_CERT | Base64 string of root-CA.crt |
| AWS_THING_CERT | Base64 string of xxx.cert.pem |
Update 24.12.2019: Fixed typo for the AWS_PRIVATE_CERT and AWS_THING_CERT environment variables values
You should now have something similar to:

Test It!
At this stage, everything should be working and our device should be communicating with the AWS IoT MQTT Broker.
If you check the source code of the example project main.py,
you can check that the device subscribes to a topic called balena/payload_test and runs the callback function payload_report every time it receives a message, which then prints the received message on the screen.
On the AWS IoT dashboard, go to the Test section and on Publish, add the desired topic balena/payload_test and click Publish to topic. As soon as you click on the button, our device’s console log (on the right) will display the received message.
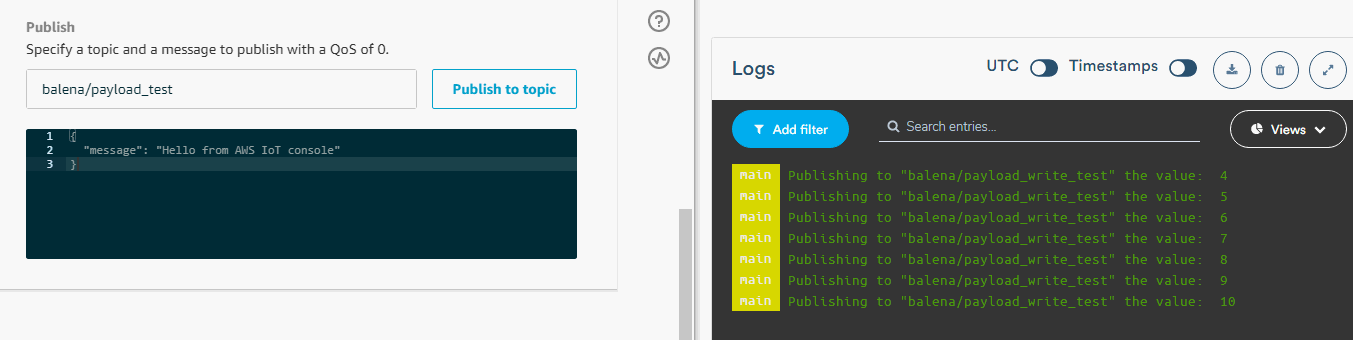
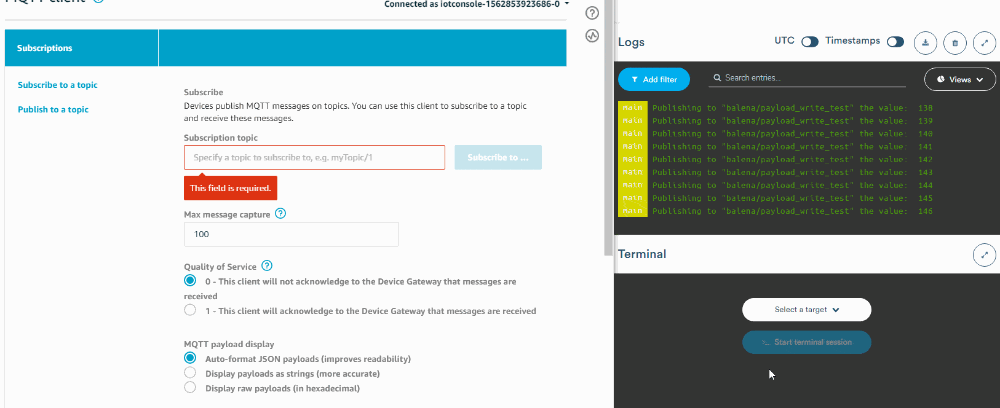
The sample code that we are running on the device automatically starts submitting an incremental value to the balena/payload_write_test topic. So to test if Amazon is receiving the information, click on Subscribe to a topic and enter balena/payload_write_test. The topic will then show on the dashboard menu and every time a device publishes to that topic, the message with a timestamp will be displayed on the page.
Conclusion
In this post, we’ve worked on setting up a Raspberry Pi device to communicate with an MQTT Broker hosted on AWS IoT. From there, you can expand the example python program and start building your own application, scaling from one to hundreds of devices if desired. Thanks for taking the time to check out our guide, and we would love to hear what are you building with balena and AWS IoT.
You can always find us on the forums at https://forums.balena.io, on Twitter @balena_io, on Instagram @balena_io or on Facebook.
