
Scaling an industrial IoT project across multiple sites can be a challenging task. The most repeated question we get is how to digitize a factory, followed by how to scale from one to multiple sites. Balena’s mission is to reduce the friction for device owners who need to manage massive amounts of devices. Find here how to expand your industrial deployment with IIoT edge gateways managed by balena and the HiveMQ advanced features.
In the previous blogpost we explained step-by-step how to deploy an Industrial IoT edge gateway to digitize a factory. The solution provided works for one unique site with the Industrial edge gateway running the MING stack (MQTT, InfluxDB, NodeRED and Grafana) and HiveMQ on balena, however the system is already prepared to scale to multiple sites. It’s as simple as you changing the configuration through balenaCloud Device Variables and utilizing the HiveMQ bridge extension feature.
In this blogpost we are going to share how to deploy multiple Industrial edge gateways in multiple factories. The goal will be to have real-time insights into all of the factories and a single source of truth in one place. This is why we are going to use the HiveMQ cloud MQTT broker – to unify all of the data, ready to be consumed by any service from the industry. This is meant to be a reference architecture to enable anyone to learn how to scale from one to multiple industrial sites, in just a few clicks.
The Industrial Edge Gateway for multiple sites
In this example, we are going to expand our IIoT project from a German factory located near Munich to another factory near Barcelona.
Scaling an industrial project with Modbus and OPC UA sensors across multiple sites and factories can be challenging. Industrial edge gateways can help to simplify this process by providing a centralized point of control and communication on the edge, as well as a unified namespace for devices and data. Furthermore we are going to take advantage of the HiveMQ bridge extension features on the Industrial edge gateway.
To expand from one plant floor to multiple ones using the same Industrial edge gateway reference architecture, we are going to use the HiveMQ MQTT broker cloud solution bridged with the HiveMQ edge broker. With all the data from the different factories collected on a central MQTT broker we will use a cloud dashboard solution to visualize all the data coming from multiple sites.
To connect the HiveMQ cloud MQTT broker with the HiveMQ edge broker we are going to use balenaCloud device variables which will be interpreted by a script that will update the XML configuration file. This will allow us to connect the local broker with the HiveMQ cloud instance. Below you can see the variables needed to connect them.
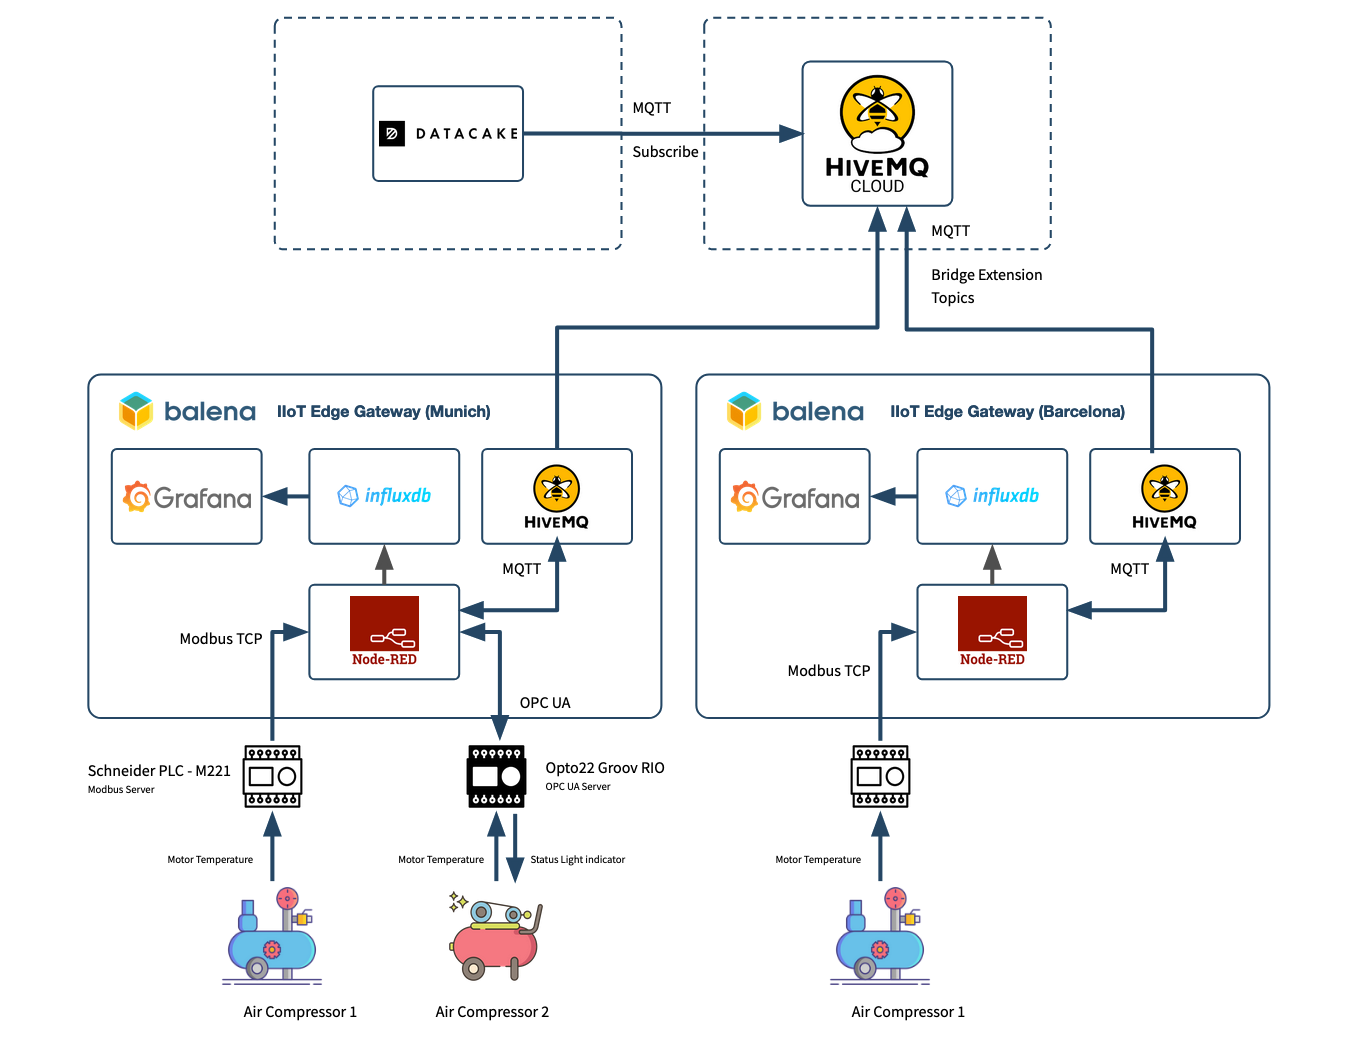
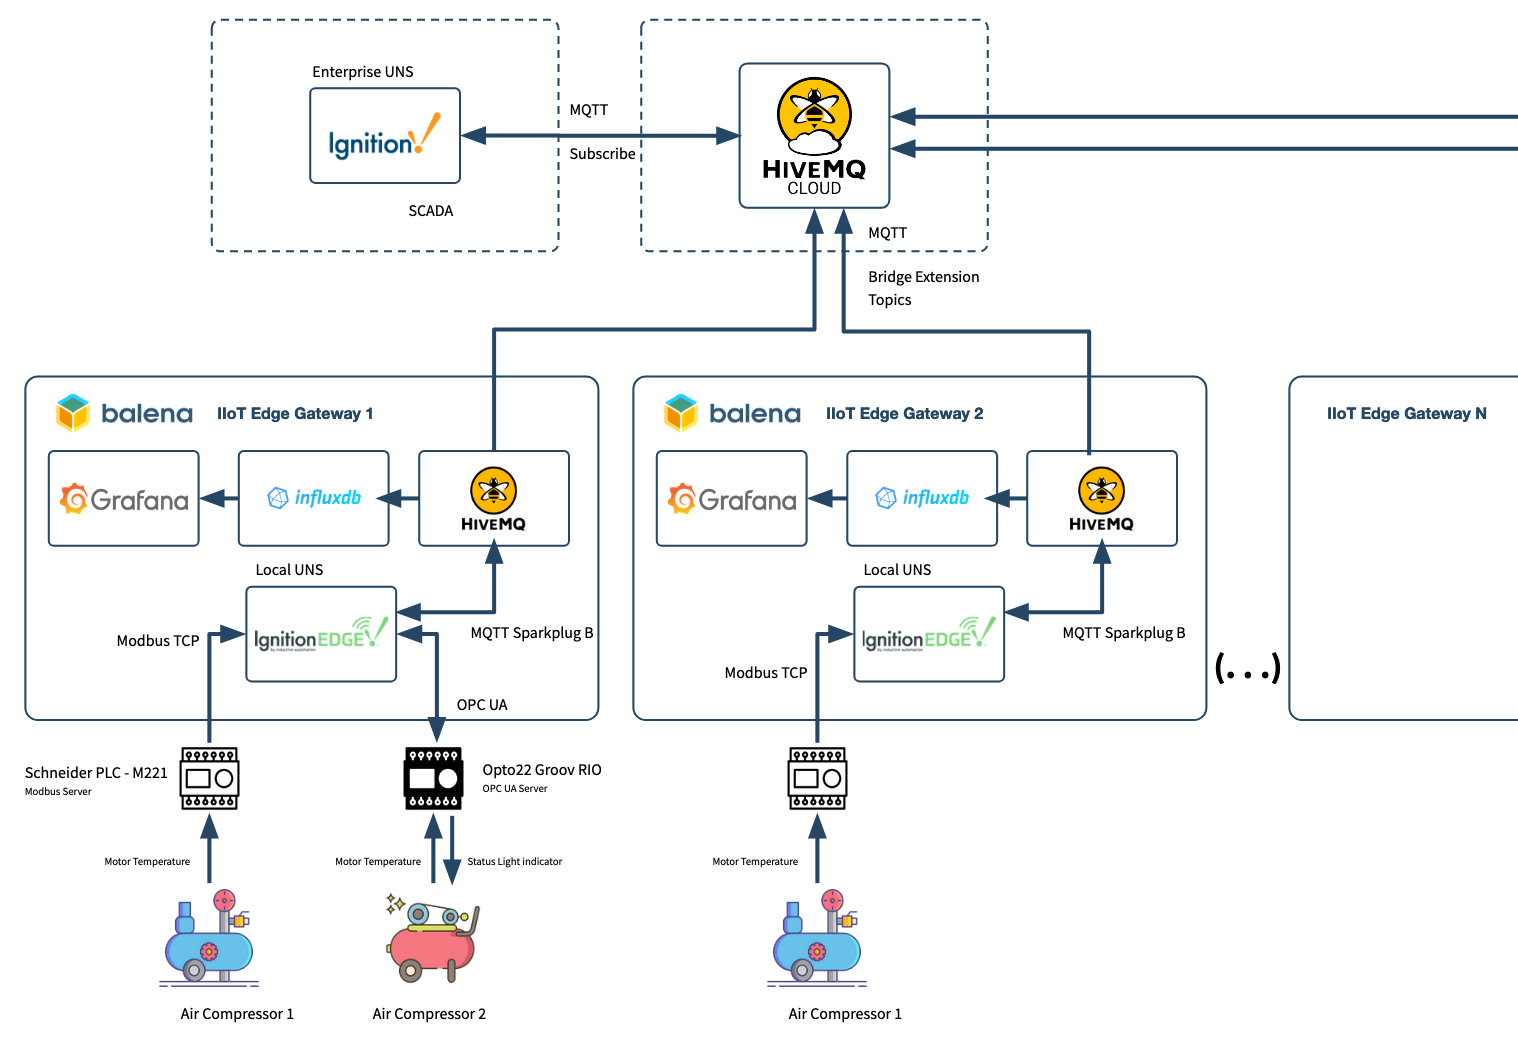
Here is the diagram of the application that we are going to deploy step-by-step:
How does the HiveMQ bridge extension work?
The Bridge Extension allows you to map MQTT topics with data that you’d like to transmit from the IIoT edge Gateway broker to the centralized cloud MQTT broker. This is accomplished by defining the source and destination topics using wildcards, variables and credentials on an XML configuration file.
The Bridge Extension is particularly useful for Industrial IoT deployments that span multiple sites, as it allows for centralized communication and data exchange between devices and brokers located in different locations.
As you can see on the previous diagram, data is published from each site through the HiveMQ local MQTT broker on the gateway to a centralized HiveMQ Cloud MQTT using the Bridge Extension. While the Bridge has additional features, in this article we are going to focus on using it to bridge MQTT data from Edge to Cloud. And the data is going to be upstreamed to the cloud, just sending the data to the local broker.
To reduce the friction of configuring the HiveMQ Bridge Extension, you will not need to modify any XML configuration files; instead you can do it by modifying balenaCloud Device Variables. Continue reading to discover how.
The Unified Namespace
In order to make the data transmitted from each site usable in a way that makes sense across the entire enterprise, you need to transmit it into a common data model that represents the structure of your business. One way to achieve that is through the Unified Namespace (UNS).
The Unified Namespace is a concept coined by Walker Reynolds. The main goal of the UNS is to connect all the different layers of the manufacturing stack in a single semantic hierarchy. A single semantic hierarchy is a way of organizing concepts into a hierarchical structure based on their top-down level of abstraction relationships. The more general concepts go at the top and more specific and the narrower concepts at the bottom.
As a result, the Unified Namespace is structured in a hierarchical way that is easy to navigate and allows users to view the structure and events of the business in one place. Furthermore it provides a single source of truth for the current state of the devices and business. Finally, the UNS allows different software systems to work together and share data in a standardized and easy way as it uses MQTT topics as a communication protocol.
You can think of the Unified Namespace as a file share that provides access to all events and data in a topical hierarchy structure that organizes the business by function, location, and other relevant criteria. This structure becomes the single source of truth for the whole business, containing the data from the current state of all sensors.
How to create a Unified Namespace with ISA95 and ISA88
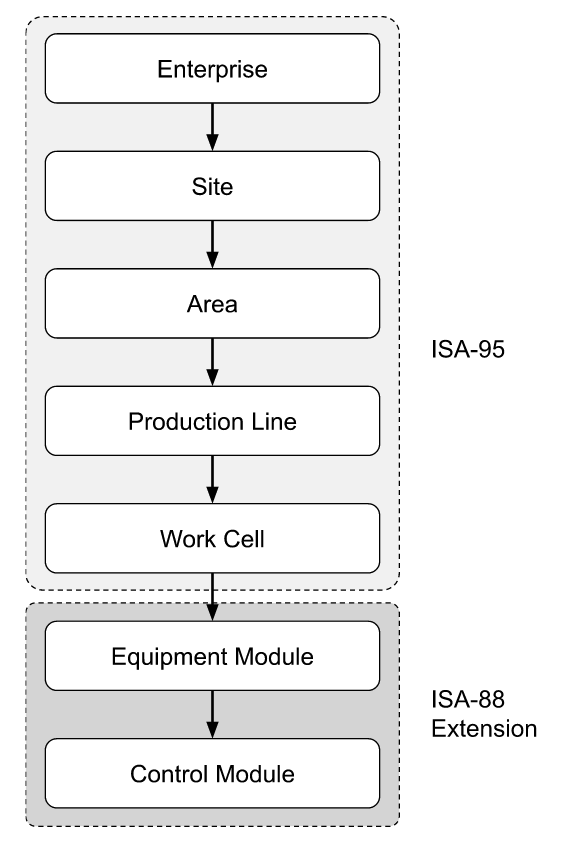
To create a UNS, you need to use the ISA 95 asset model as the basis for your common data model. The ISA-95 equipment model is a hierarchy of various logical entities, corresponding to physical assets or logical relationships, that are used to model aspects of a plant-floor.
The general structure of the ISA-95 equipment model is shown in the following diagram:
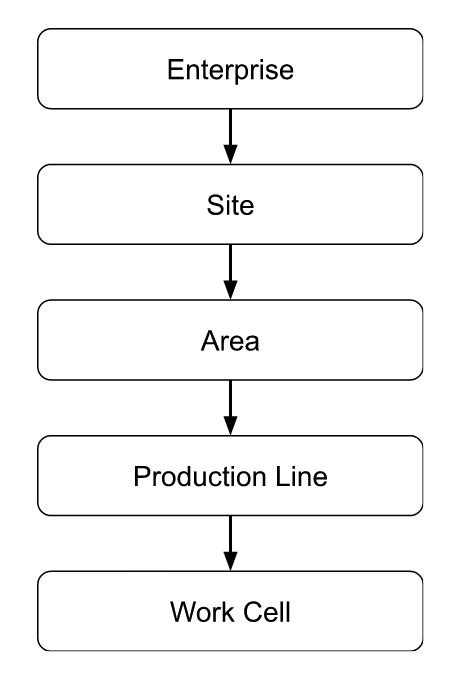
In order to create a UNS structure you will need to map the structure of your organization based on the above ISA 95 model.
Since we need to further differentiate between Compressor 1 and Compressor 2 on the Munich plant, we can extend the ISA 95 Model with the ISA-88 model which allows our hierarchy to be more granular as shown below:
For purposes of this reference architecture, we are going to use the ISA-95 and ISA-88 models to create a hierarchy for a manufacturing enterprise that has multiple bottling plants, one in Munich and another one in Barcelona. Each bottling plant has a Bottling Area, Production Line, IIoT Gateway and Compressors.
Find below how we use the ISA-95 and ISA-88 for a bottling plant in Munich:
Enterprise => HiveMQ_Balena_Enterprise;

    Site => Munich

        Area => Bottling_Area

            Production Line => Line_1

                Work Cell => IIoT_Gateway

                    Equipment_Module => Compressor_1 or Compressor_2
Hence your UNS topic structure will be:
HiveMQ_Balena_Enterprise / Munich / Bottling_Area / Line_1 / IIoT_Gateway_1 / Compressor_1
HiveMQ_Balena_Enterprise / Munich / Bottling_Area / Line_1 / IIoT_Gateway_1 / Compressor_2
and
HiveMQ_Balena_Enterprise / Barcelona / Bottling_Area / Line_1 / IIoT_Gateway_1 / Compressor_1
In the next blogpost (the part 3) of the Industrial IoT edge gateway series with HiveMQ, we are going to explain how to use MQTT Sparkplug B to send the data using the UNS payload through the MQTT protocol.
Deploy the gateway in the next factory
To reproduce the IIoT edge gateway deployment described in the previous chapter, follow the instructions on the previous blogpost about how to deploy an industrial IoT edge gateway using balena and HiveMQ.
Once your IIoT edge gateways are up and running proceed to the next section.
Create a HiveMQ Cloud account
As mentioned above, to centralize the data from multiple Industrial Edge Gateways we will use a MQTT Cloud broker.
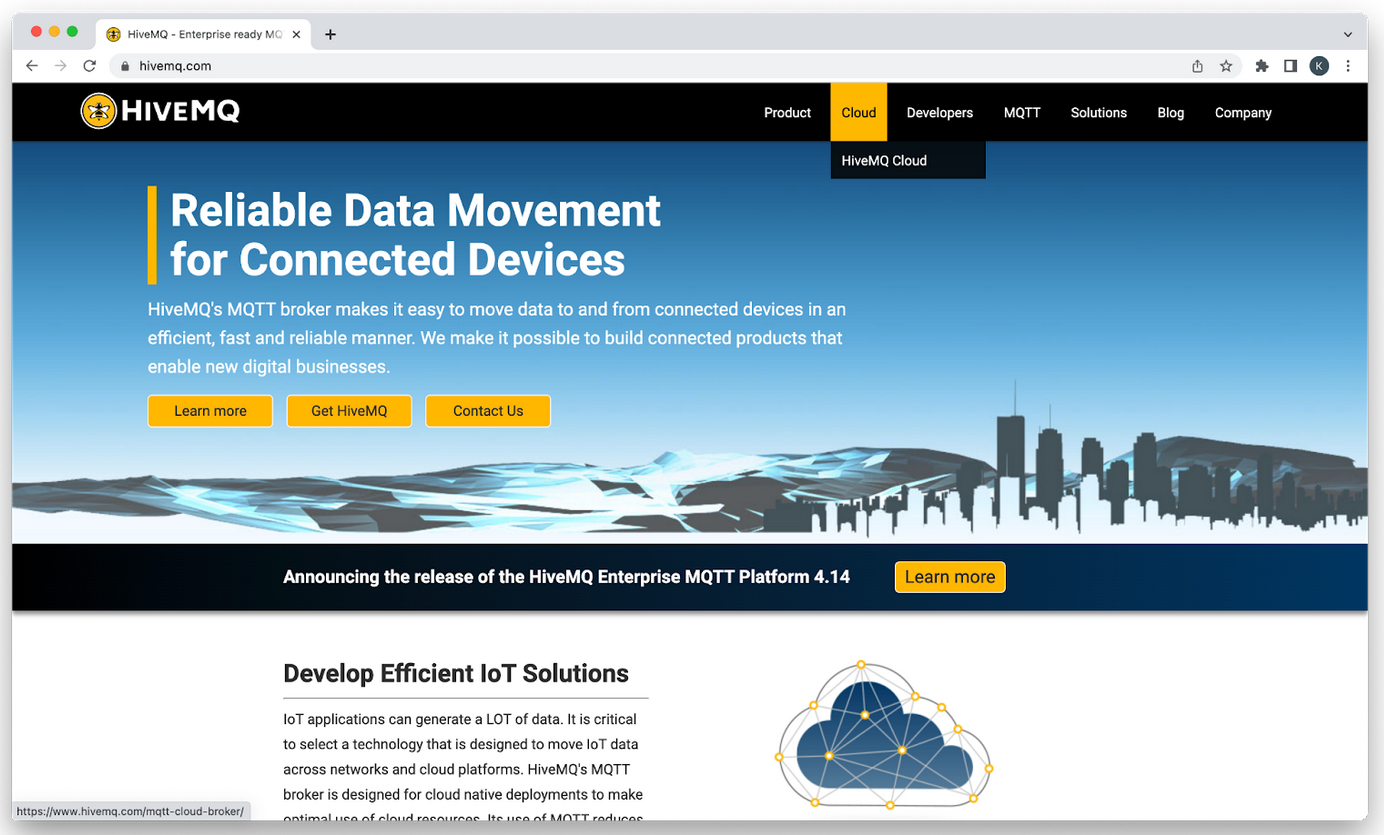
To deploy a MQTT broker in the cloud, you can use HiveMQ Cloud, a free and fully managed MQTT broker service. Go to the HiveMQ website and select Cloud on the menu, and then click on HiveMQ Cloud in order to access the HiveMQ Cloud Portal.
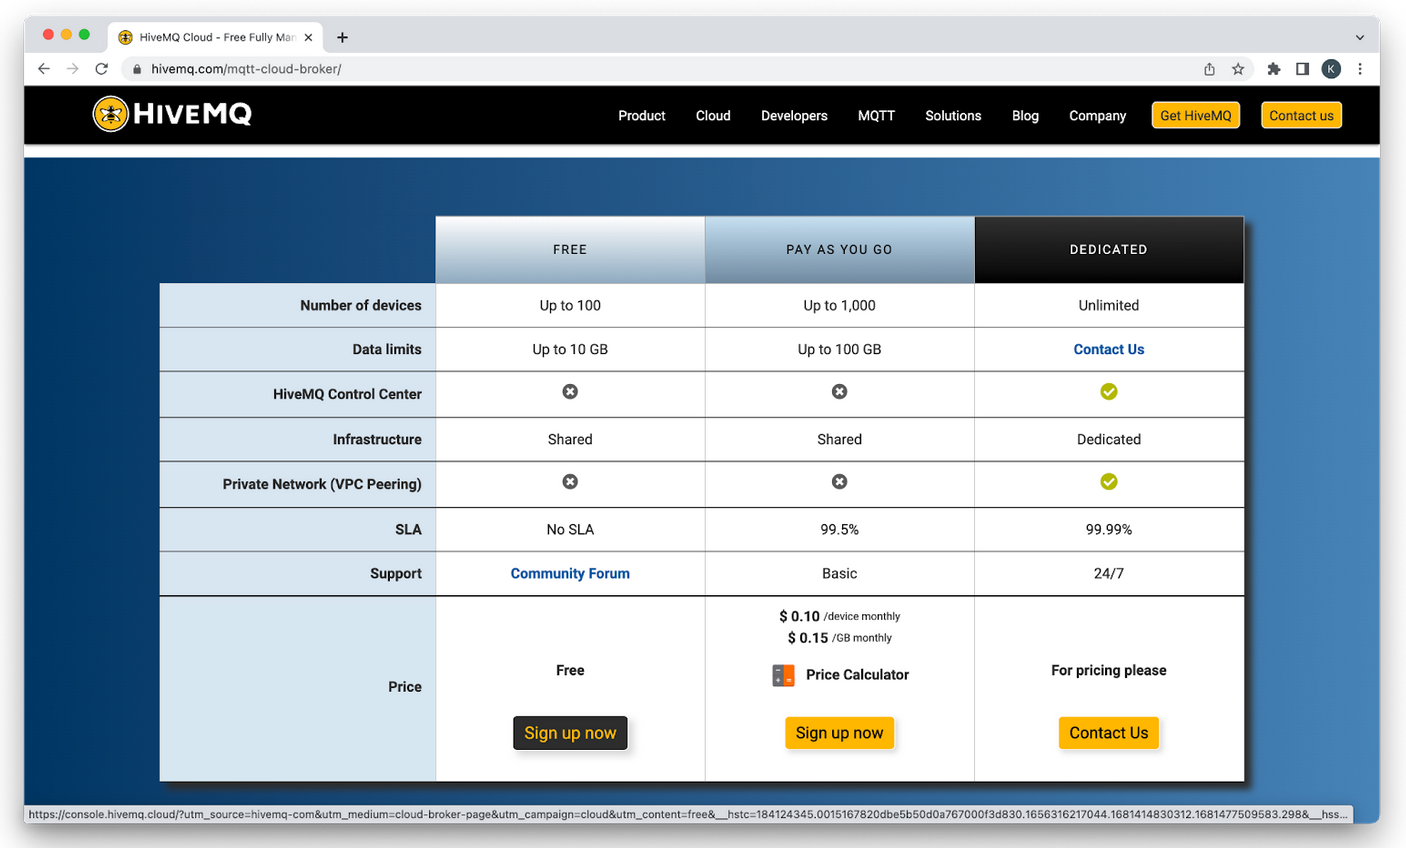
When the HiveMQ Cloud page is open, scroll down to the options table and sign up for the free version which allows you to connect up to 100 MQTT clients.
Click on “Sign up now” and follow the few simple steps to create your account and verify your email. During the initial setup, you will be asked to choose between Azure and AWS for hosting your broker cluster, feel free to select either of the two. The MQTT broker cluster for your project will automatically be created when you’ve successfully created your account.
Now set up the credentials to allow MQTT clients to connect to your MQTT broker, and select appropriate permissions.
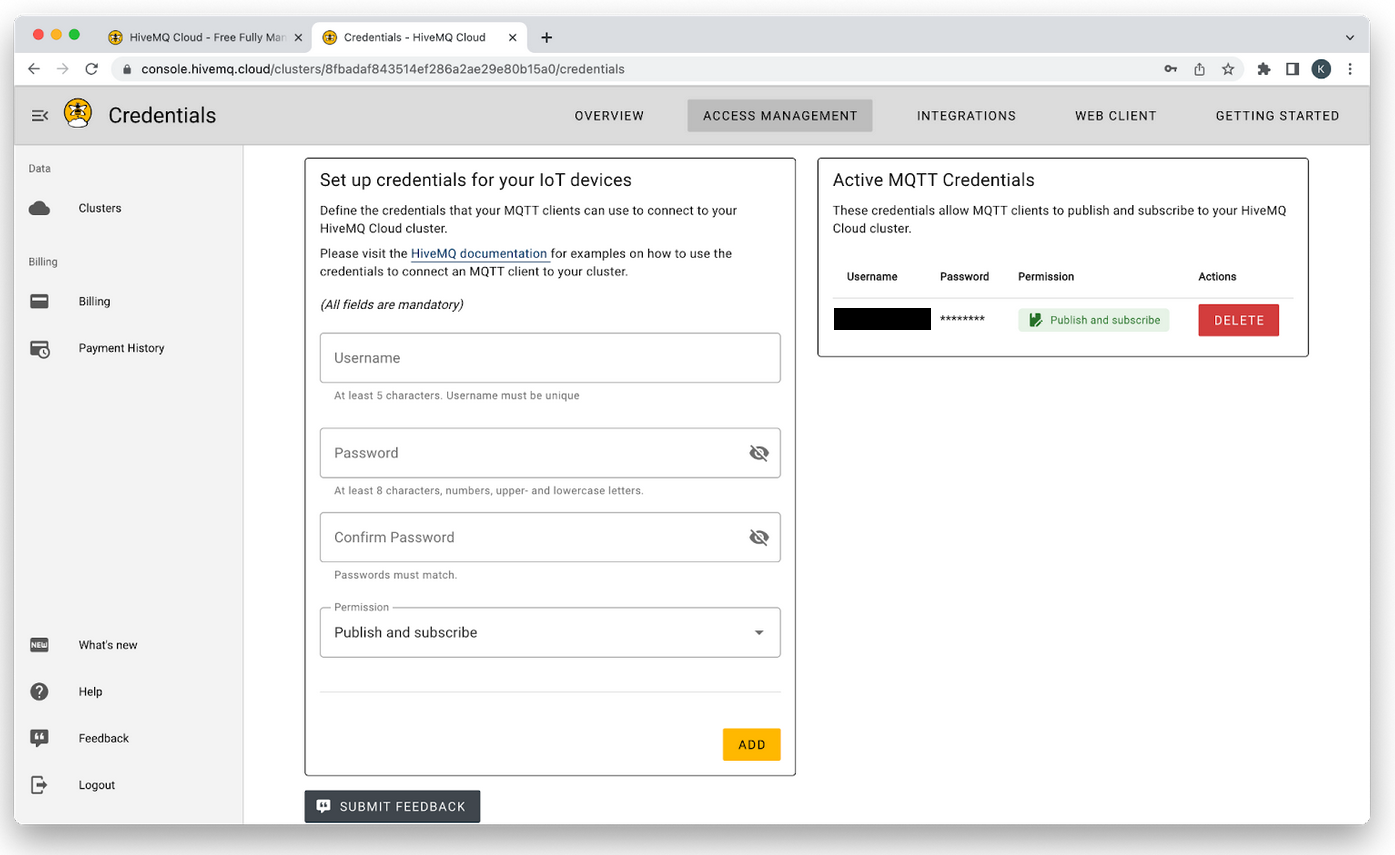
After defining your MQTT broker username and password, click on ADD.
Clicking on Clusters will provide the list of your MQTT broker clusters, the free version allows you to create a maximum of two MQTT servers.
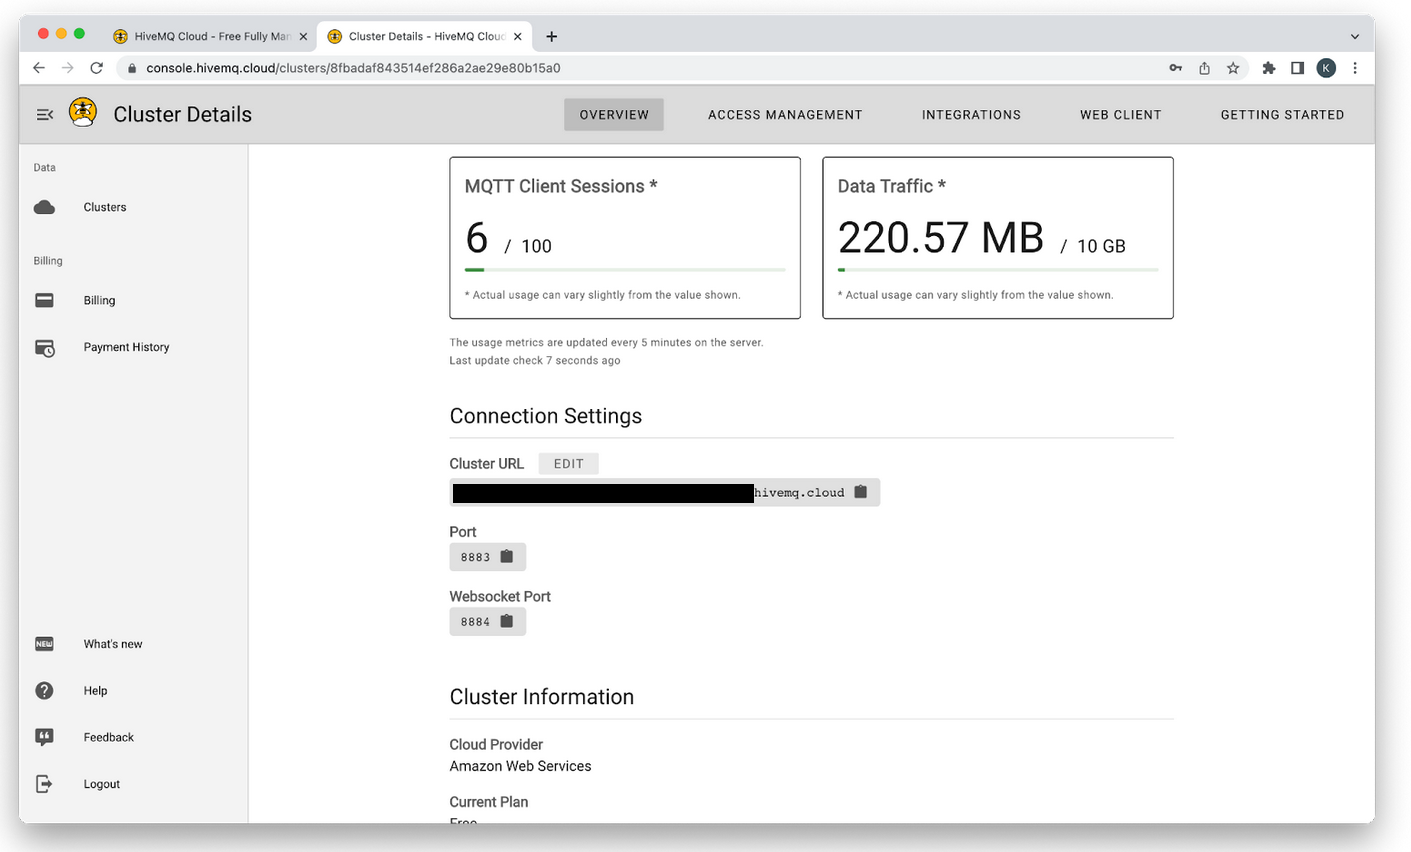
To get the MQTT broker connection details that you need to create a bridge connection form the broker at the edge and forward all the data, click on Manage Cluster on the broker you wish to connect to.
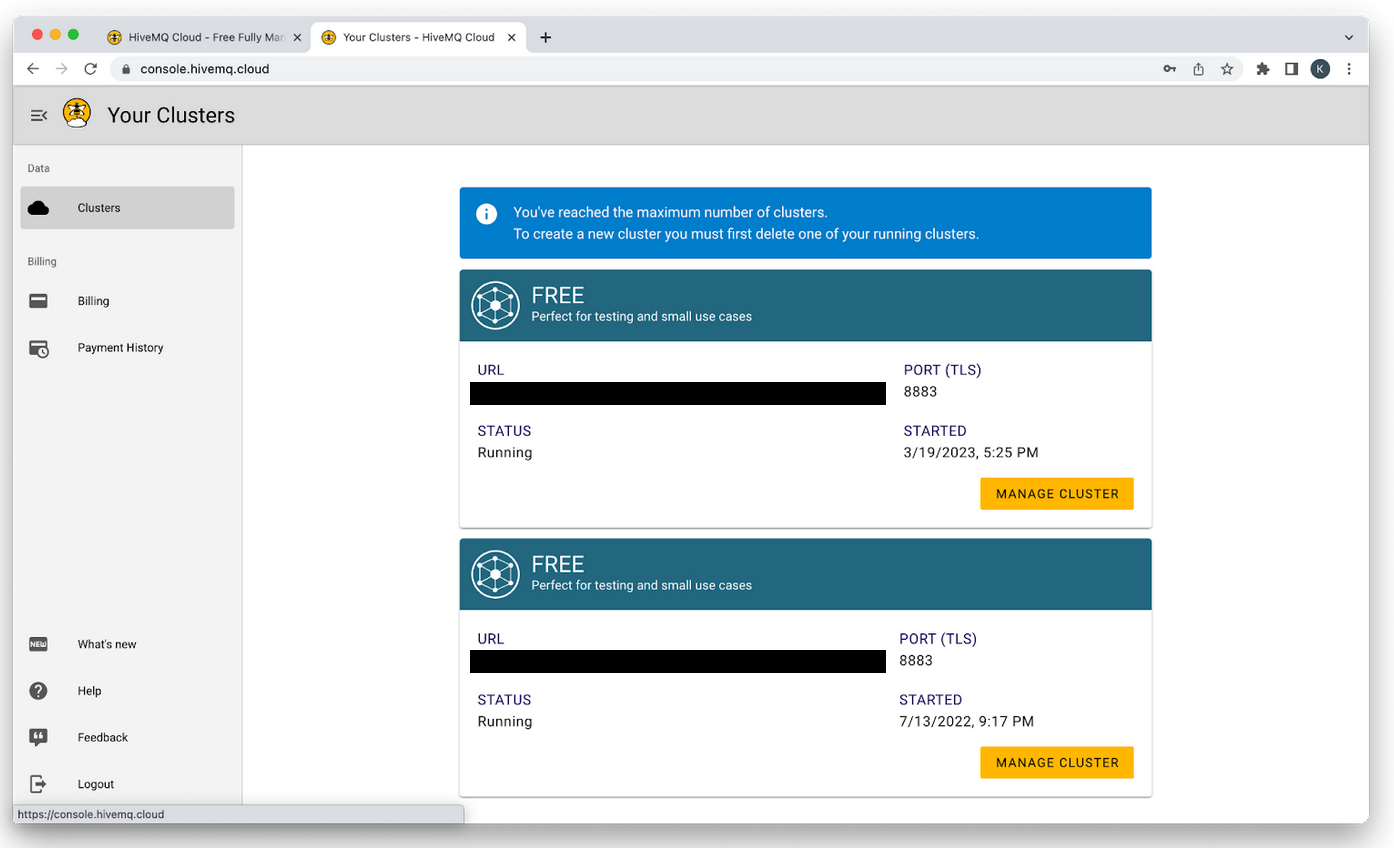
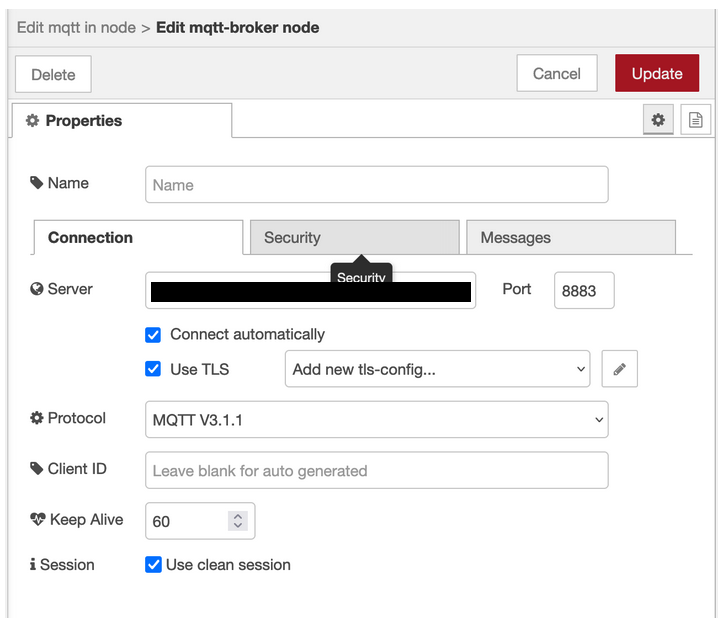
This will take you to a page with connection details that include the Cluster URL and Port Number. You will notice that HiveMQ Cloud uses an SSL encrypted channel at port 8883 by default.
Copy the broker connection details, such as the URL and the port, and take note of your username and password as you’ll need to enter these on your balenaCloud dashboard to enable the bridge connection.
Enable the HiveMQ bridge extension on the edge gateways
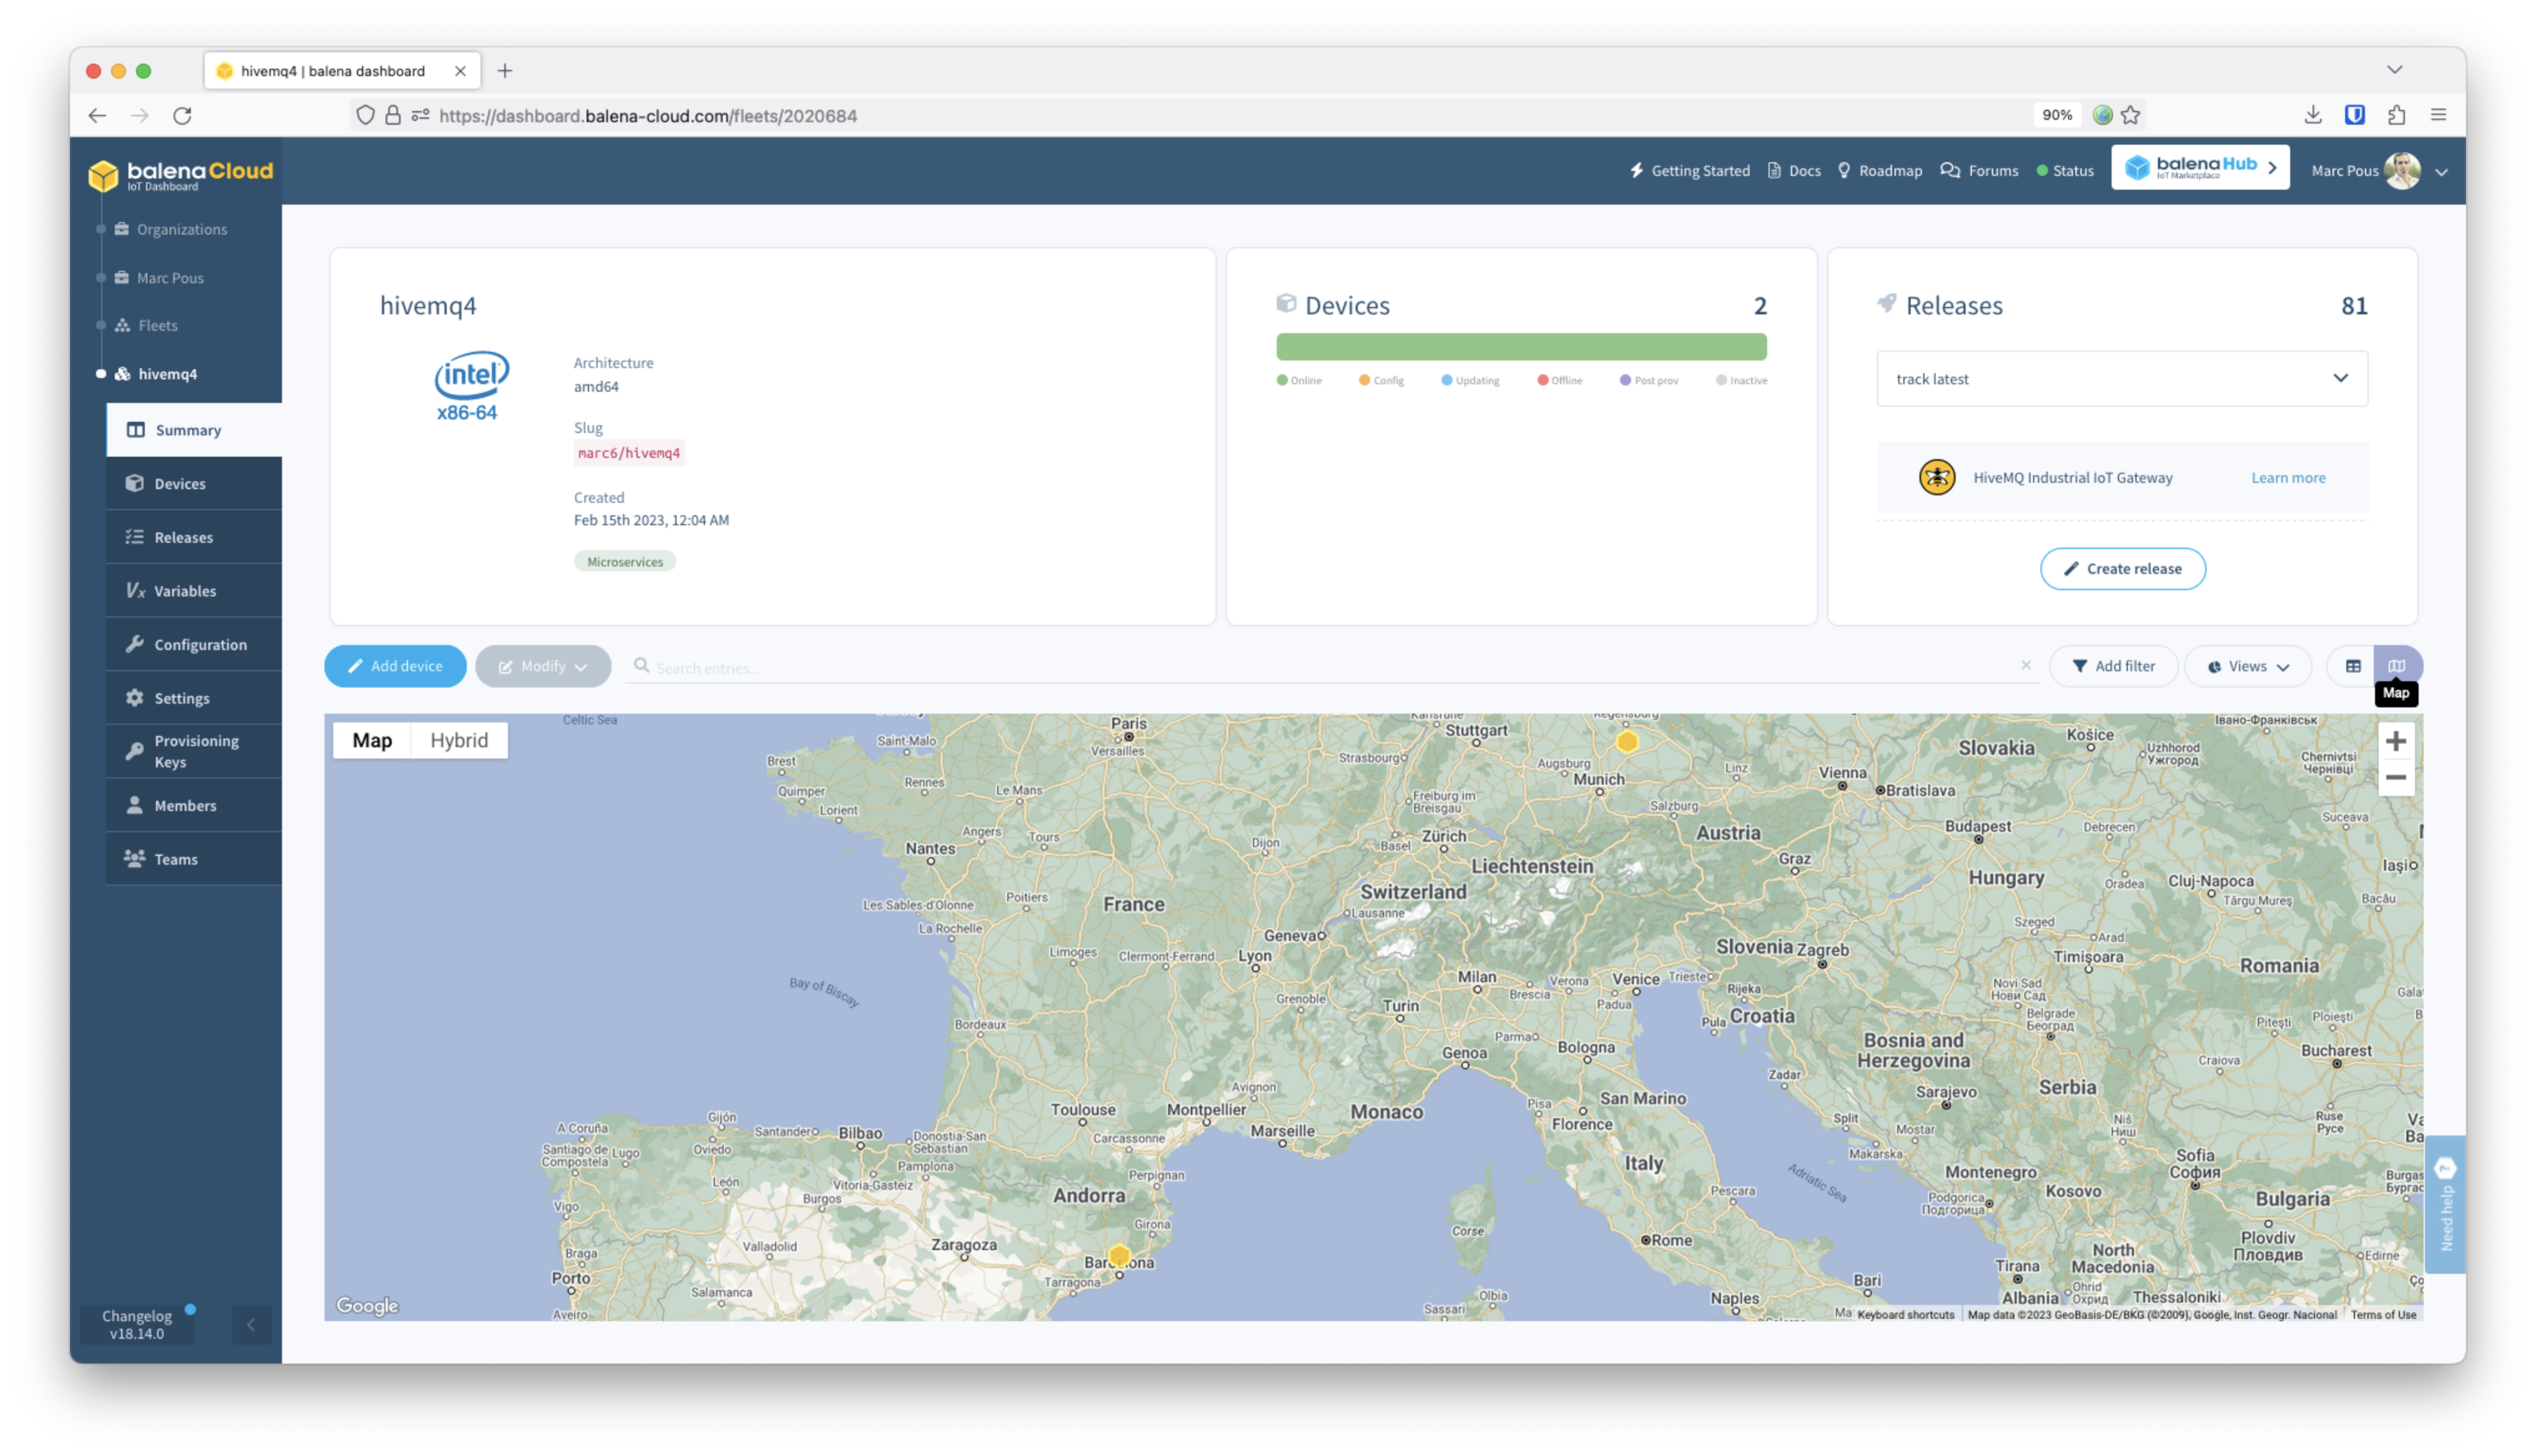
To enable the bridge, go to balenaCoud to access your Gateway device. Click on it to access the device summary and then select Device Variables on the sidebar.
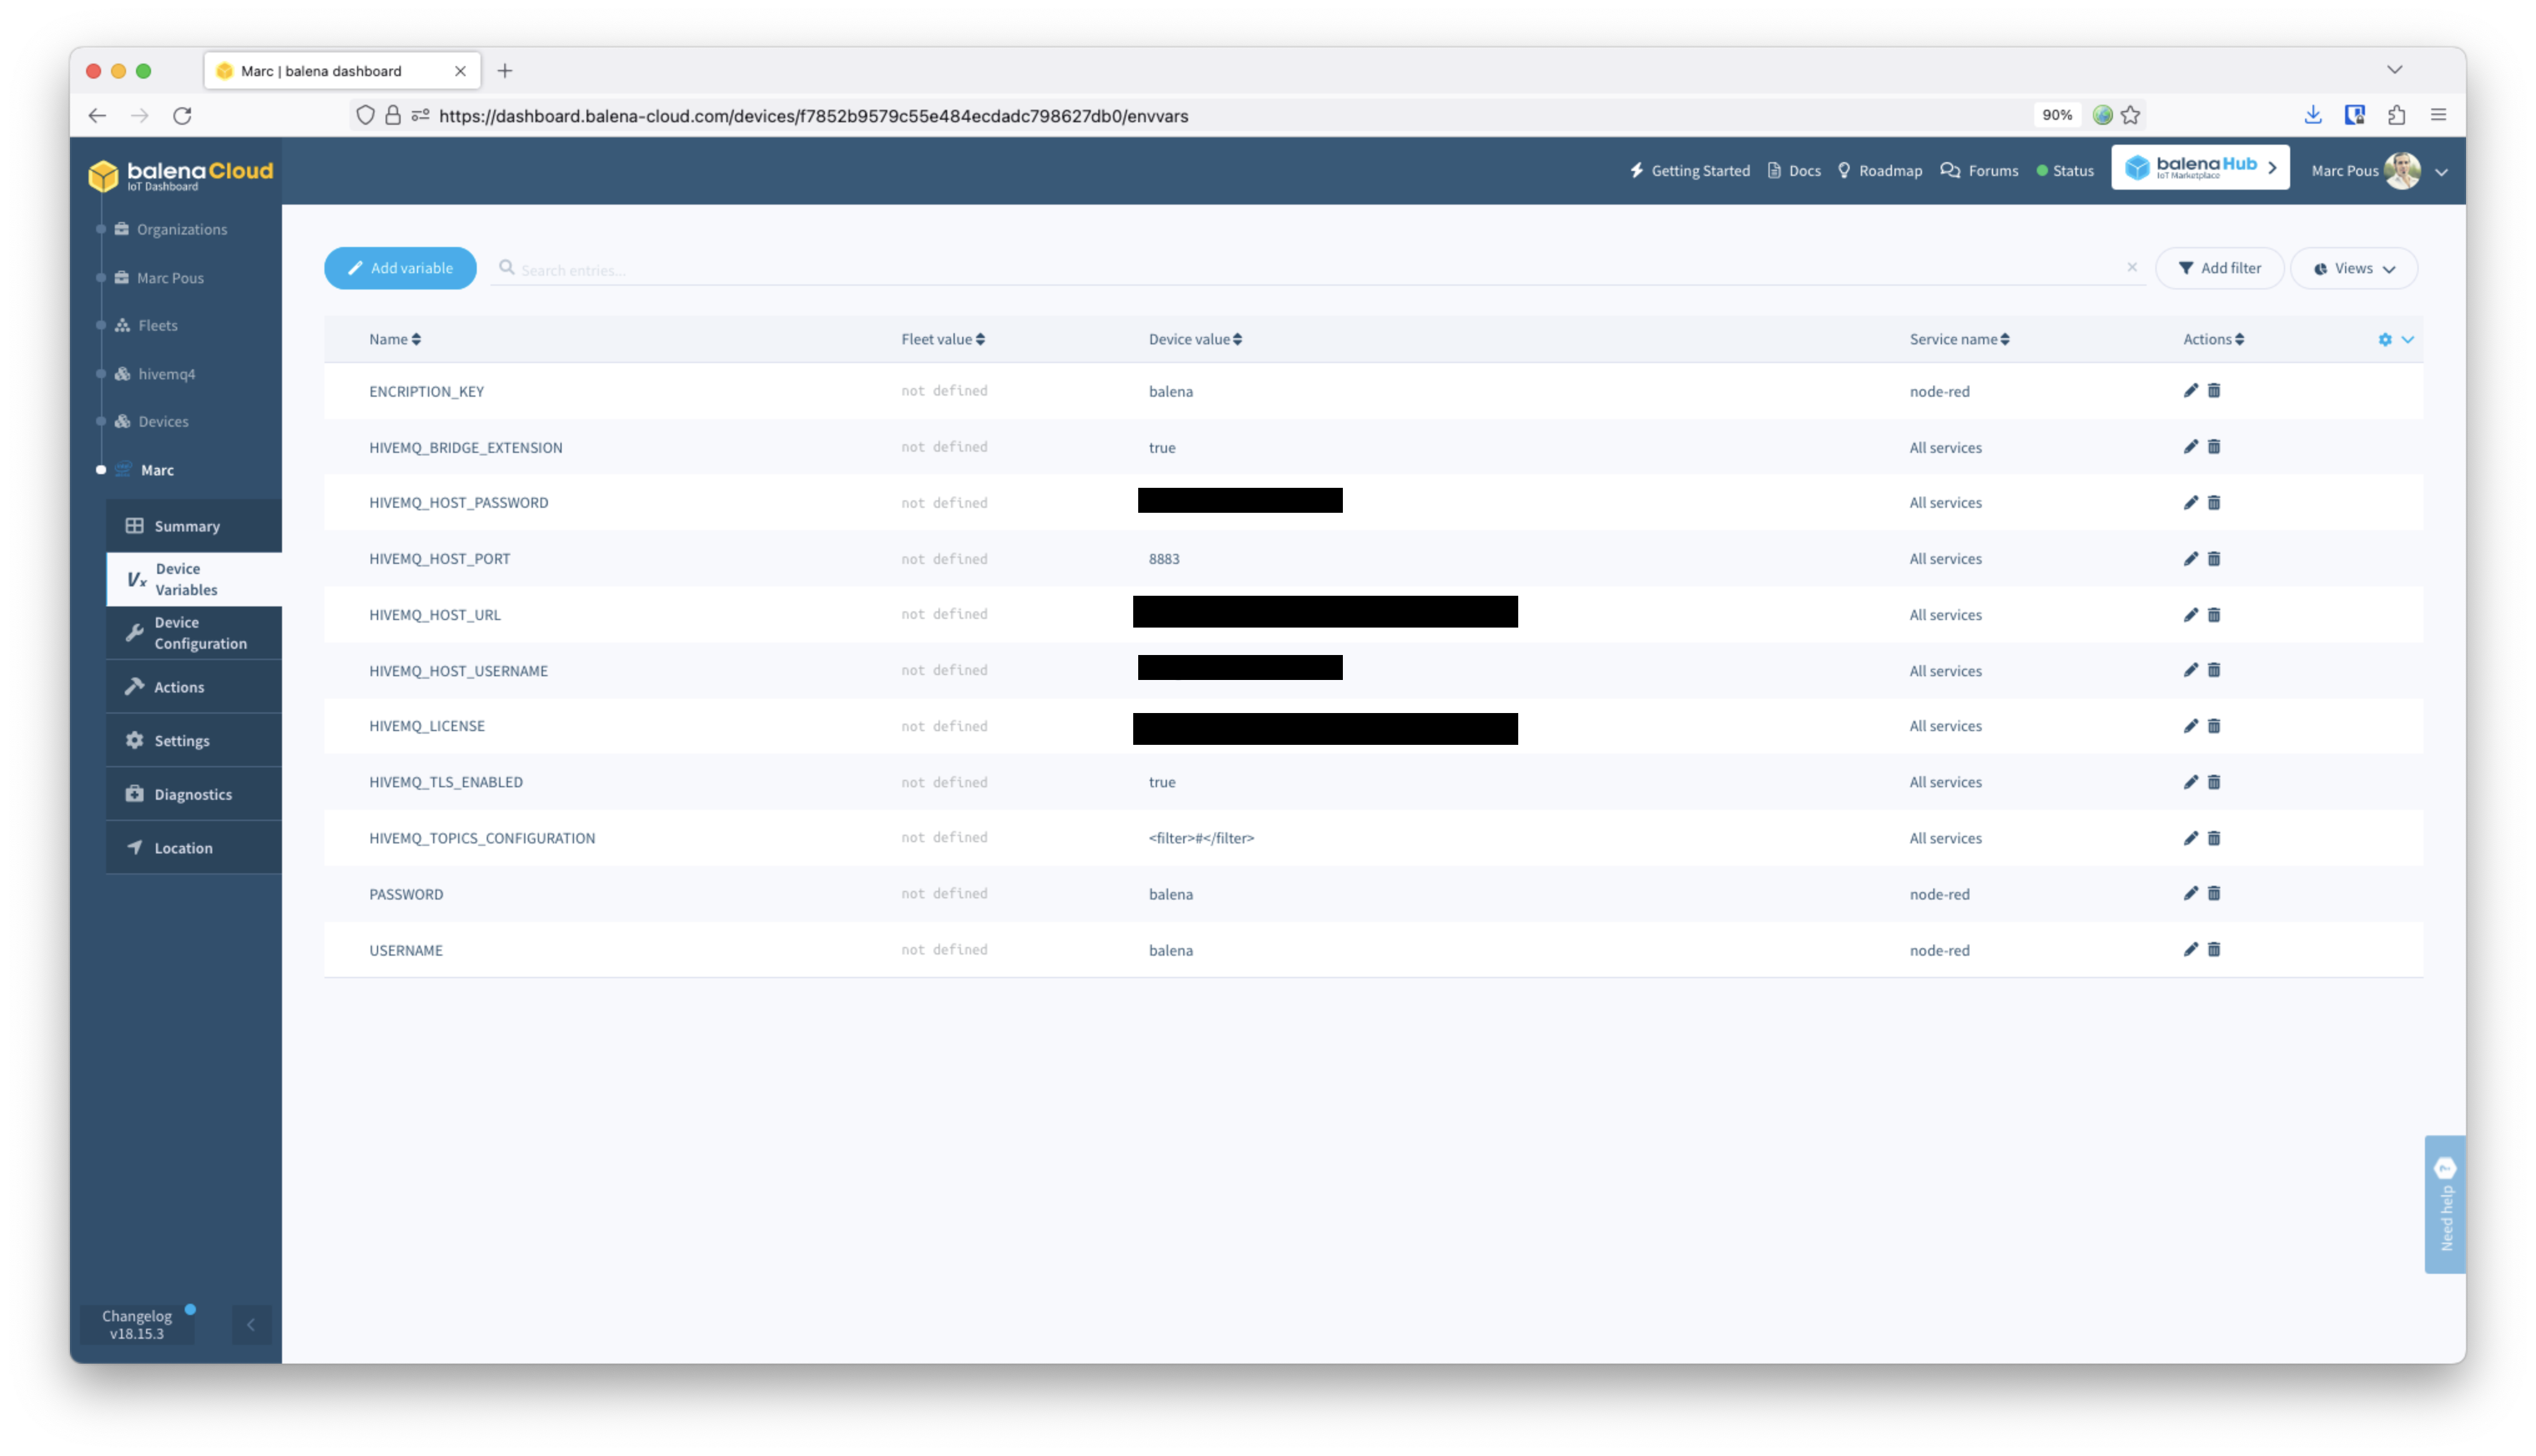
Make sure the HIVEMQ_BRIDGE_EXTENSION variable is set to true as this variable enables the Bridge Extension to get configured properly once the local broker is started.
Beware that HiveMQ Enterprise Bridge Extension is a paid feature of the HiveMQ MQTT broker. If you’re using the free tier of the enterprise MQTT broker (without an enterprise license set up), you can still use the HiveMQ Enterprise Bridge Extension as a trial for 5 hours. Once the trial ends, the feature will be automatically disabled, however you can then restart the service to have it available again.
To configure the HiveMQ Bridge Extension with HiveMQ Cloud MQTT Broker details add the following variables:
| Variable Name | Value | Description | Default |
|---|---|---|---|
| HIVEMQ_BRIDGE_EXTENSION | boolean |
On true enables the bridge extension and delete the DISABLED file on the bridge-extension folder. |
false |
| HIVEMQ_HOST_URL | STRING |
URL of the Host connected via the Bridge Extension. | HIVEMQ_HOST_URL |
| HIVEMQ_HOST_PORT | STRING |
Port of the host is connected via the Bridge Extension. | HIVEMQ_HOST_PORT |
| HIVEMQ_HOST_USERNAME | STRING |
Username of the MQTT simple authentication to connect the Bridge Extension. | HIVEMQ_HOST_USERNAME |
| HIVEMQ_HOST_PASSWORD | STRING |
Password of the MQTT simple authentication to connect the Bridge Extension. | HIVEMQ_HOST_PASSWORD |
| HIVEMQ_TLS_ENABLED | boolean |
Adds the TLS tags to use the MQTT over TLS through the Bridge Extension. | false |
| HIVEMQ_TOPICS_CONFIGURATION | STRING (XML) |
Topic tag XML definition on the bridge-extension.xml file. | <topics><topic> What it goes here </topic></topics> |
Define the Topics configuration
A special mention is needed for the variable HIVEMQ_TOPICS_CONFIGURATION. With this variable you will proceed to use a filter to select the MQTT topics within the local MQTT broker at each site that you wish to forward to the centralized HiveMQ Cloud MQTT broker. You can achieve this by entering a subset of the following XML as the tags inside the <topic> tag.
<topics>

    <topic>

        <filter>#</filter>

    </topic>

</topics>
Since we want to forward all the data from all topics that are published to the local MQTT broker we are going to use <filter>#</filter>, taking advantage of the # multi-level wildcard which allows the bridge extension to receive all messages that are sent to the MQTT broker and forward them to HiveME Cloud. Read more about the HiveMQ topics here.
Subscribe to the HiveMQ Cloud MQTT broker
As mentioned before, the edge MQTT brokers are automatically bridged with the HiveMQ Cloud MQTT broker thanks to the configuration files modified through the balena Device Variables.
The HiveMQ Cloud MQTT broker is a cloud-based MQTT messaging platform that provides a clustered solution to scale IoT applications. HiveMQ provides a fully managed MQTT broker that allows IoT devices to publish and subscribe to messages in the cloud hosted on Azure or AWS.
One of the most relevant features provided by HiveMQ Cloud is support for secure communication using TLS (Transport Layer Security), integration with various cloud services, and advanced monitoring and analytics capabilities.
HiveMQ Cloud has a free tier to connect up to 100 MQTT devices, however it doesn’t provide a control panel in the free tier to visualize the messages.
There are multiple monitoring solutions to ensure that the data is sent properly to the MQTT cloud broker. You could either utilize the NodeRED available on the edge gateway or install an MQTT client such as MQTT Explorer on your local machine.
NodeRED
By adding the Device Variables (described above) HIVEMQ_BRIDGE_EXTENSION equal to true and HIVEMQ_HOST_* different variables with credentials and HIVEMQ_TOPICS_CONFIGURATION with the proper fields, the current flow will bridge the data published to the local broker to the HiveMQ cloud MQTT broker automatically.
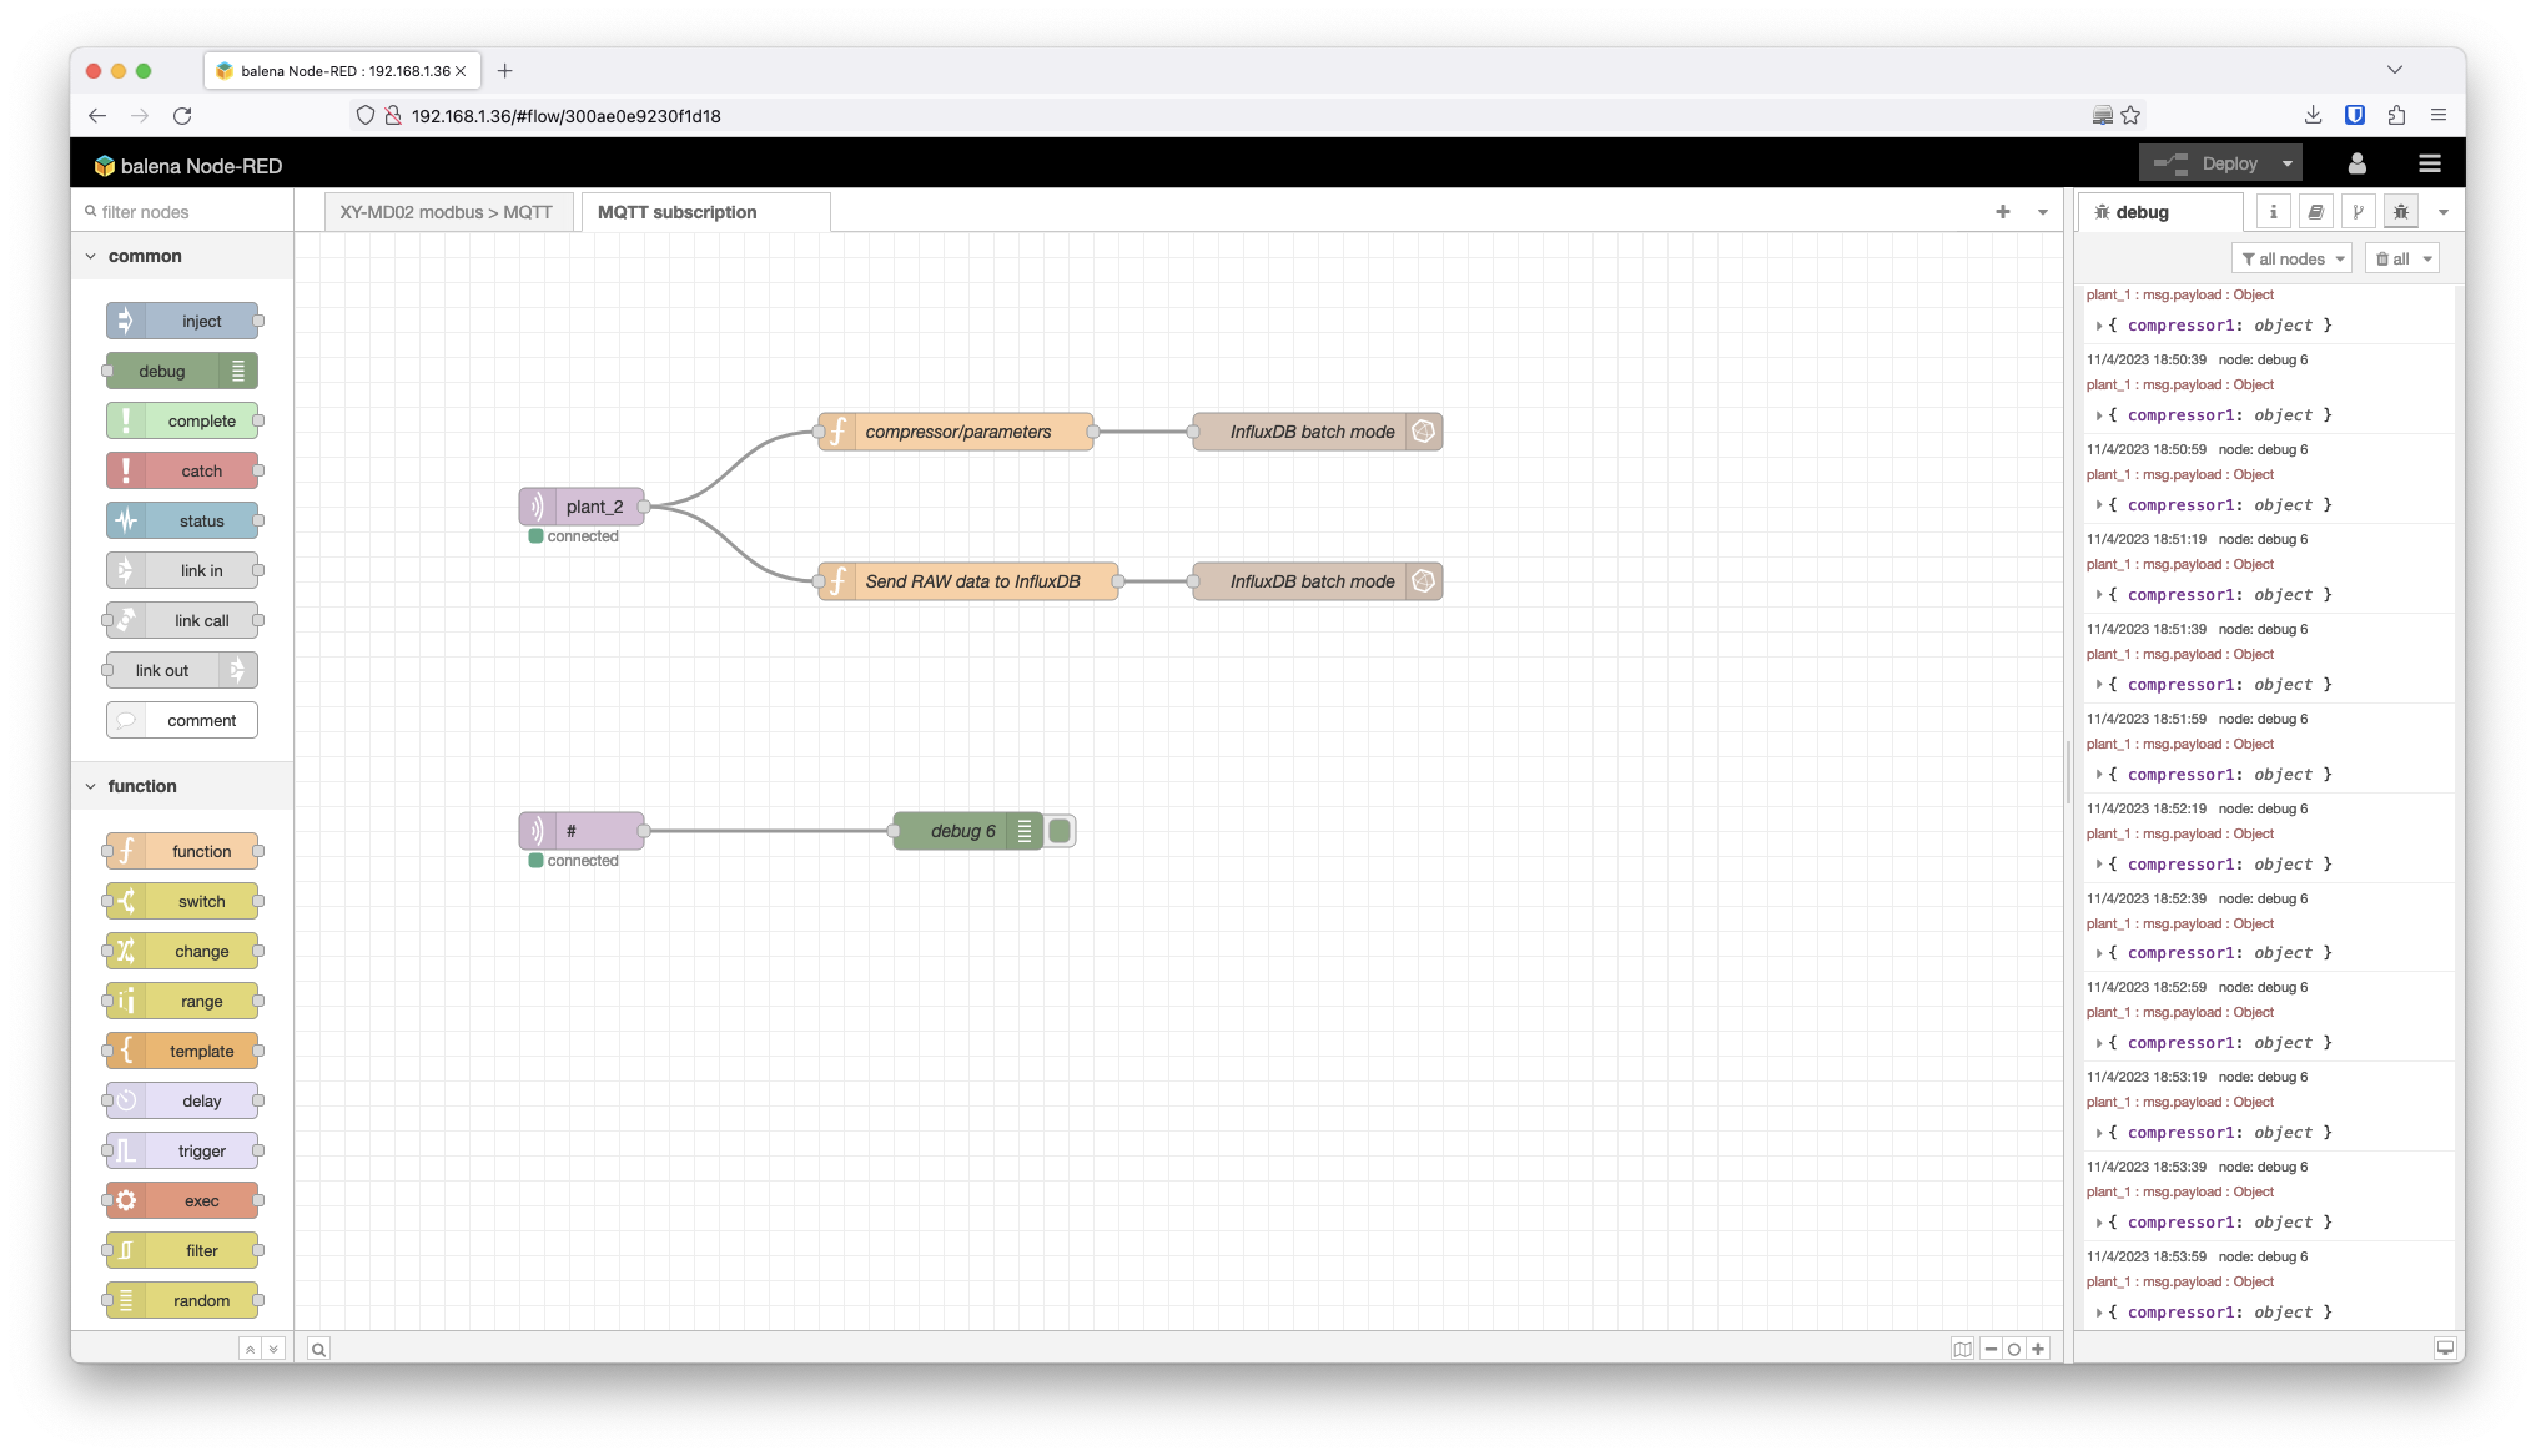
To check that data is published to the HiveMQ cloud, we created a tiny flow with an MQTT client node subscribed to # at the HiveMQ cloud broker. You can see this flow above on the previous screenshot and on the debug node debug 6 you can see the logs coming from Plant_1 (Munich) and Plant_2 (Barcelona).
Remember to add the Security credentials with the corresponding username and password provided by the HiveMQ Cloud MQTT broker.
MQTT Explorer
Alternatively, you can use MQTT clients such as MQTT explorer or MQTTfx. The MQTT Explorer is a free tool with a simple user interface for connecting and interacting with MQTT brokers. MQTT Explorer is a useful tool to subscribe to the HiveMQ Cloud MQTT broker and easily debug and visualize all the MQTT traffic that goes through the broker. Configure the connection with the HiveMQ cloud MQTT broker using the credentials provided by the HiveMQ cloud interface.
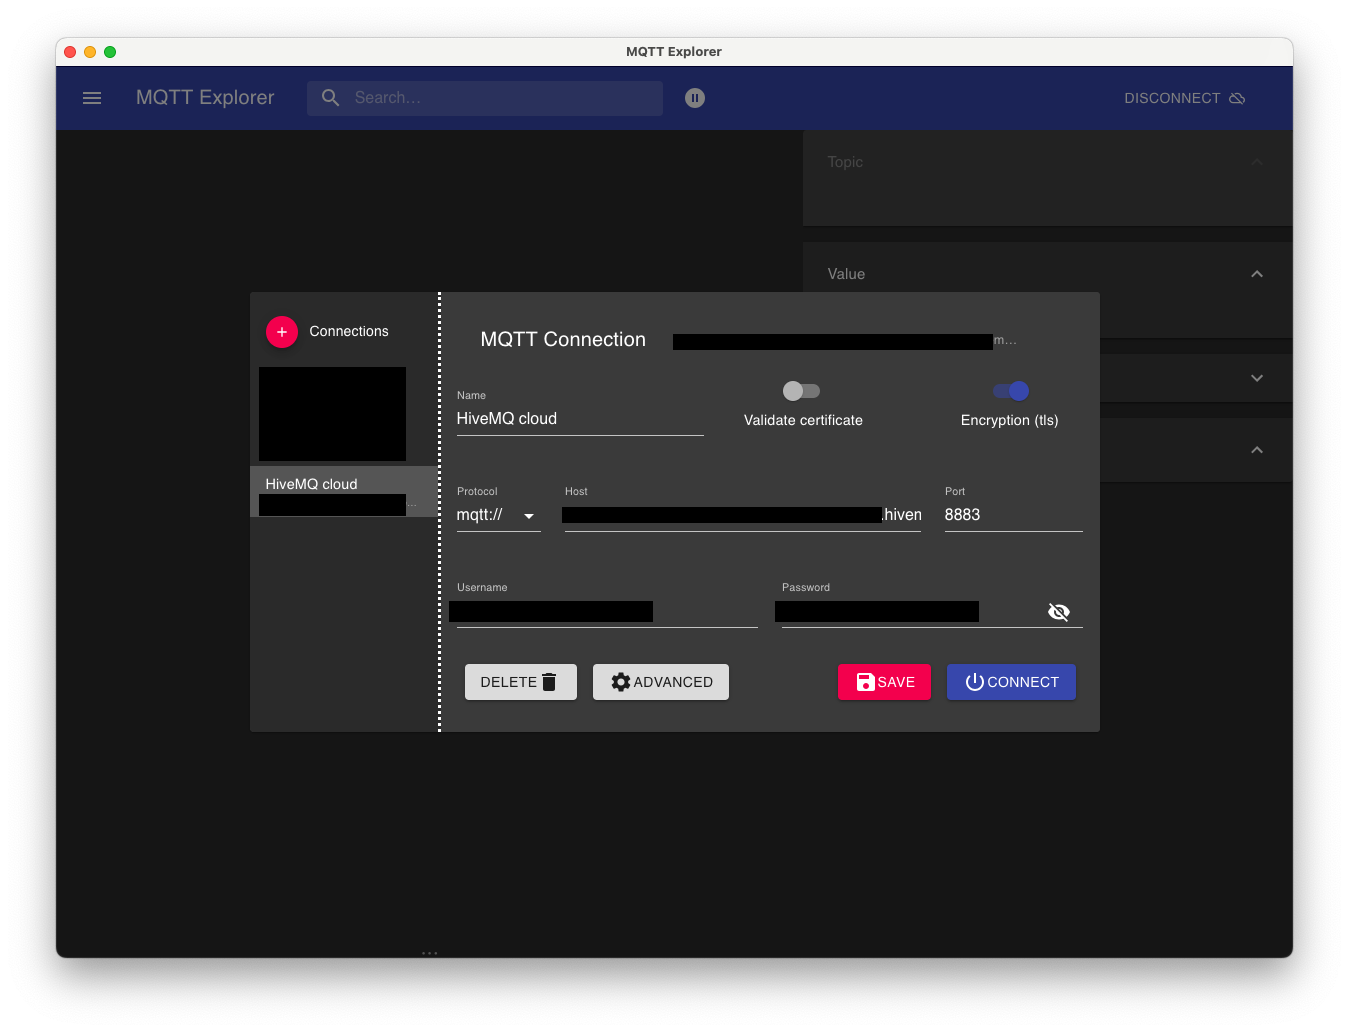
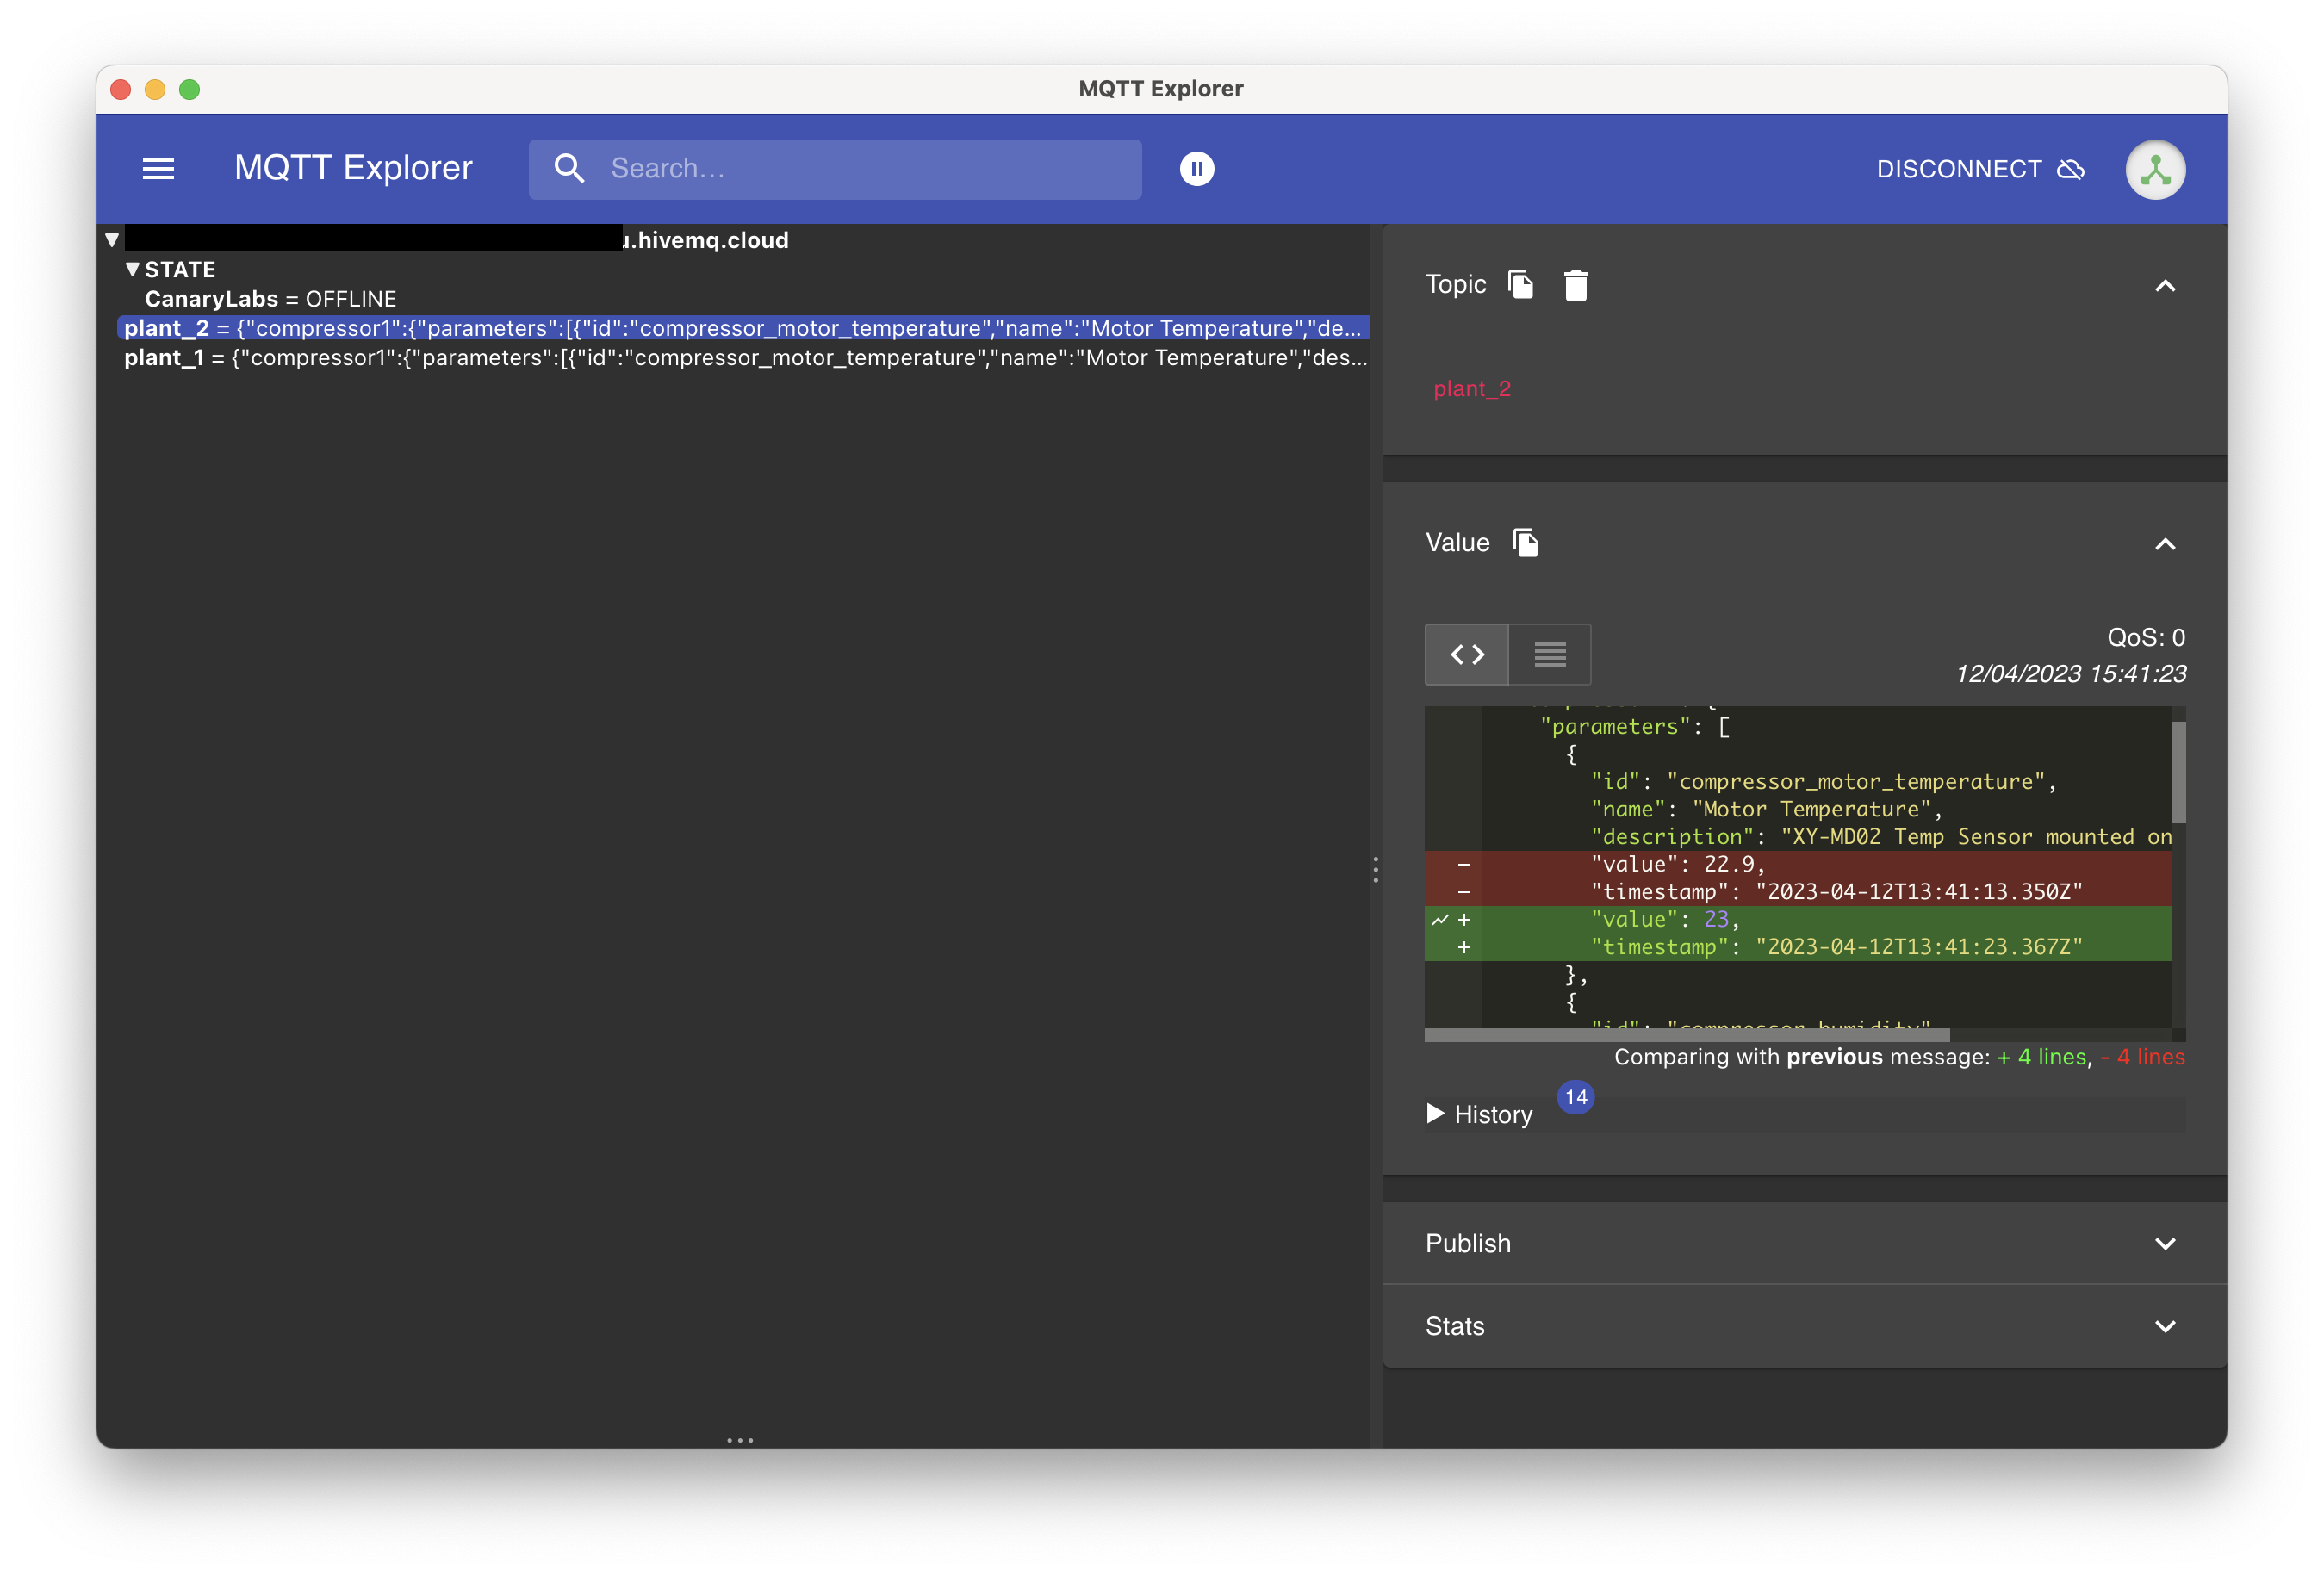
Click Save and then click Connect. You will see all the different topics publishing data to the MQTT broker with history comparison among other features.
Visualize the data on Datacake
In this blogpost we are using Datacake as a visualization platform. The main reason to use Datacake cloud IoT platform is because it’s simple to subscribe using MQTT to the HiveMQ Cloud broker. Not all IoT platforms allow you to subscribe to 3rd party MQTT brokers. Each edge gateway will run the MING stack, so the local data will be managed locally and all of the data will be unified in the HiveMQ Cloud broker. This follows the Industry 4.0 concept that we mentioned in the previous blog post.
Go to Datacake platform and create a free account. You will need to create an API device.
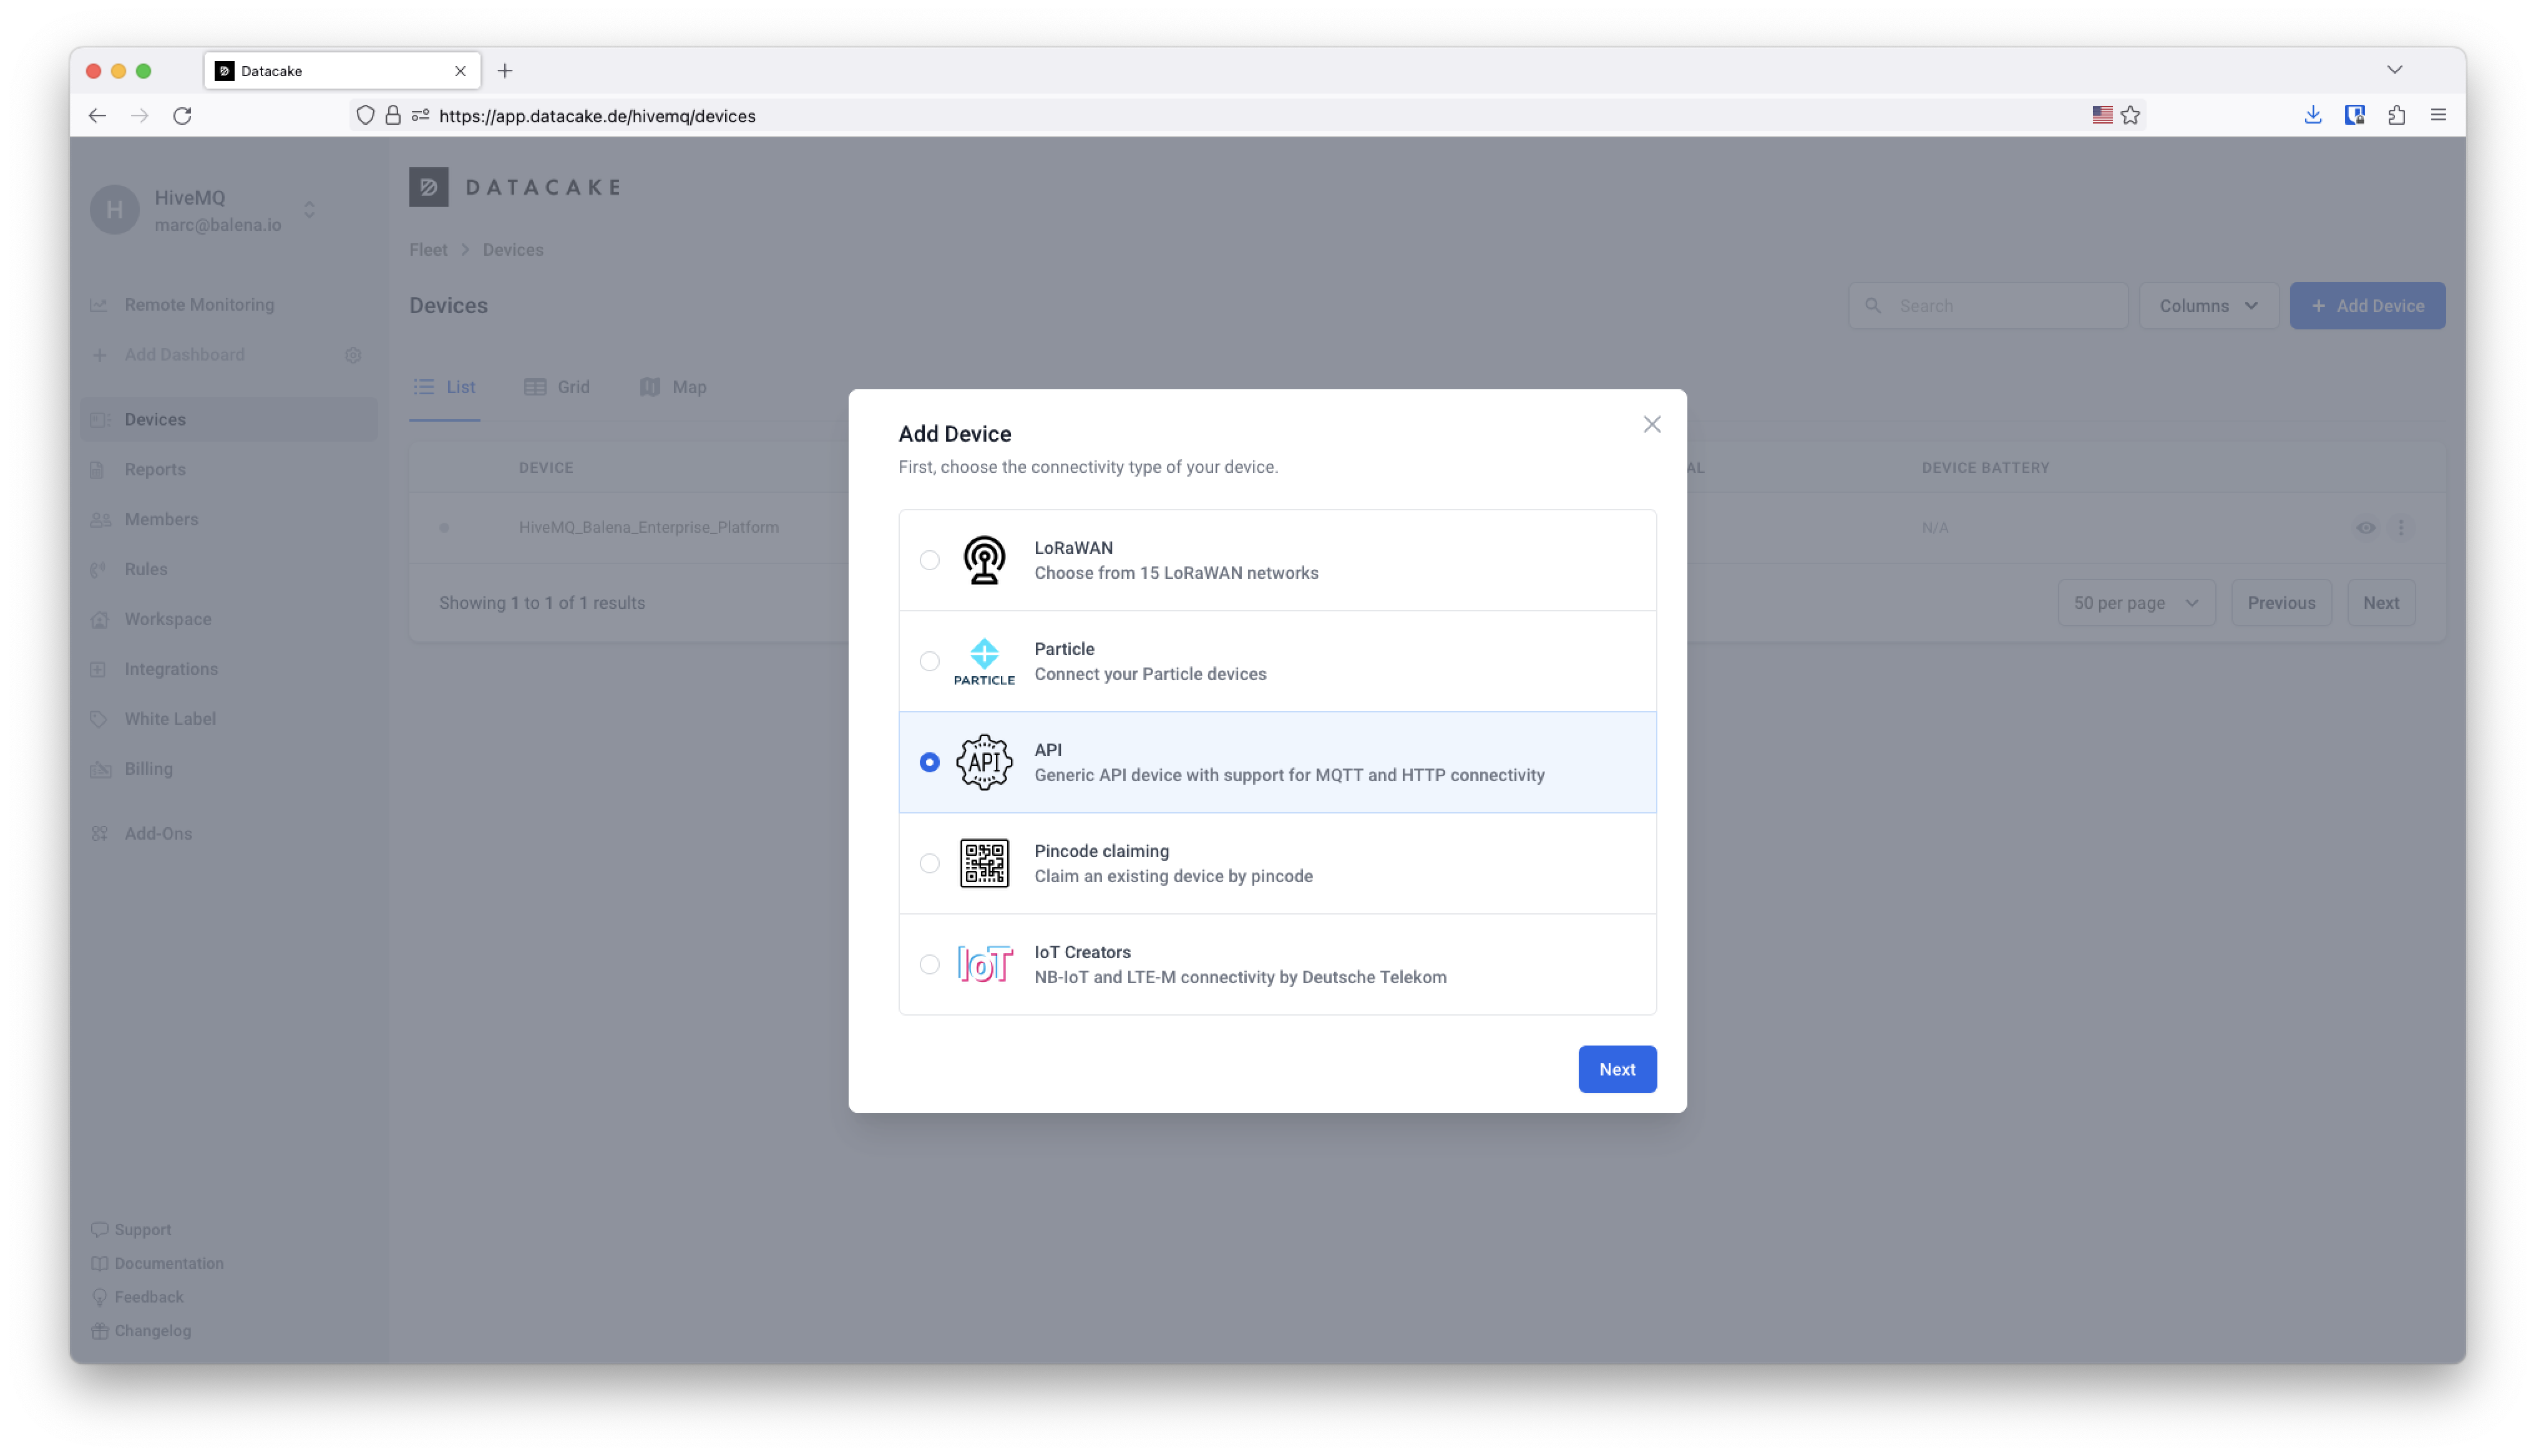
Then on Step 1 - Product step, select New Product and add the name of your device. Finally on Step 3 select the Free plan and click Add 1 device.
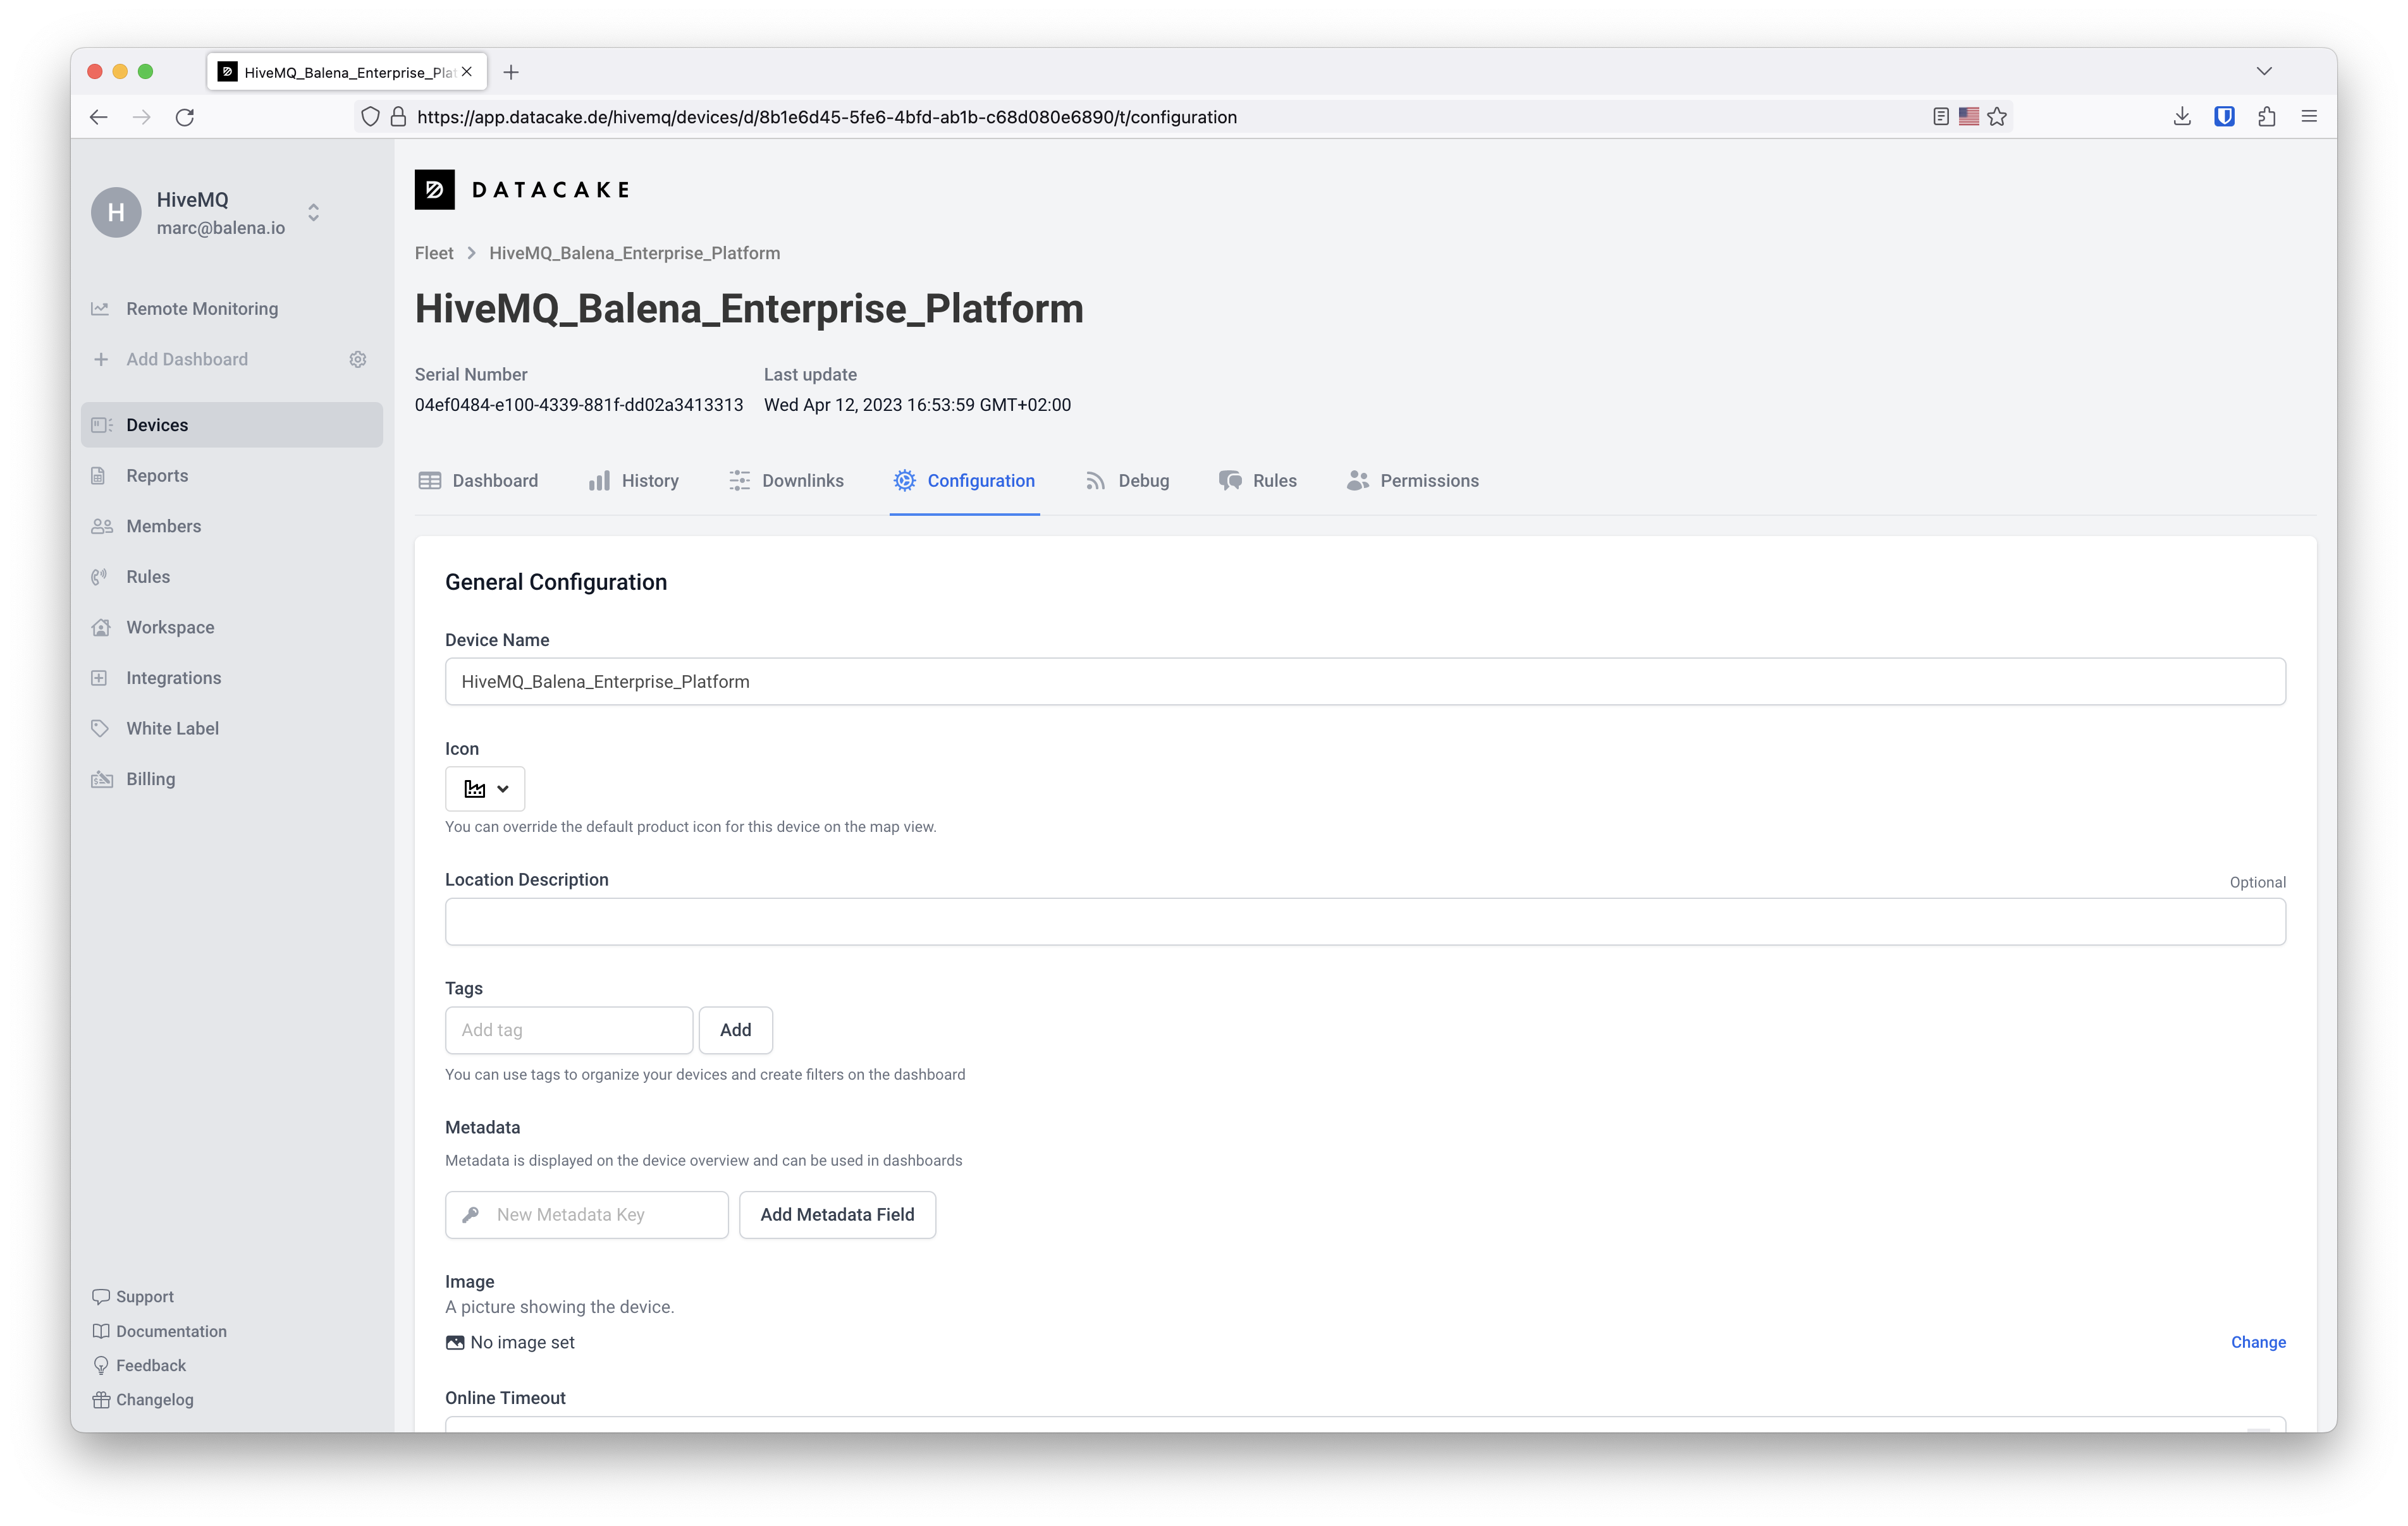
Get into Devices and scroll down to the MQTT configuration.
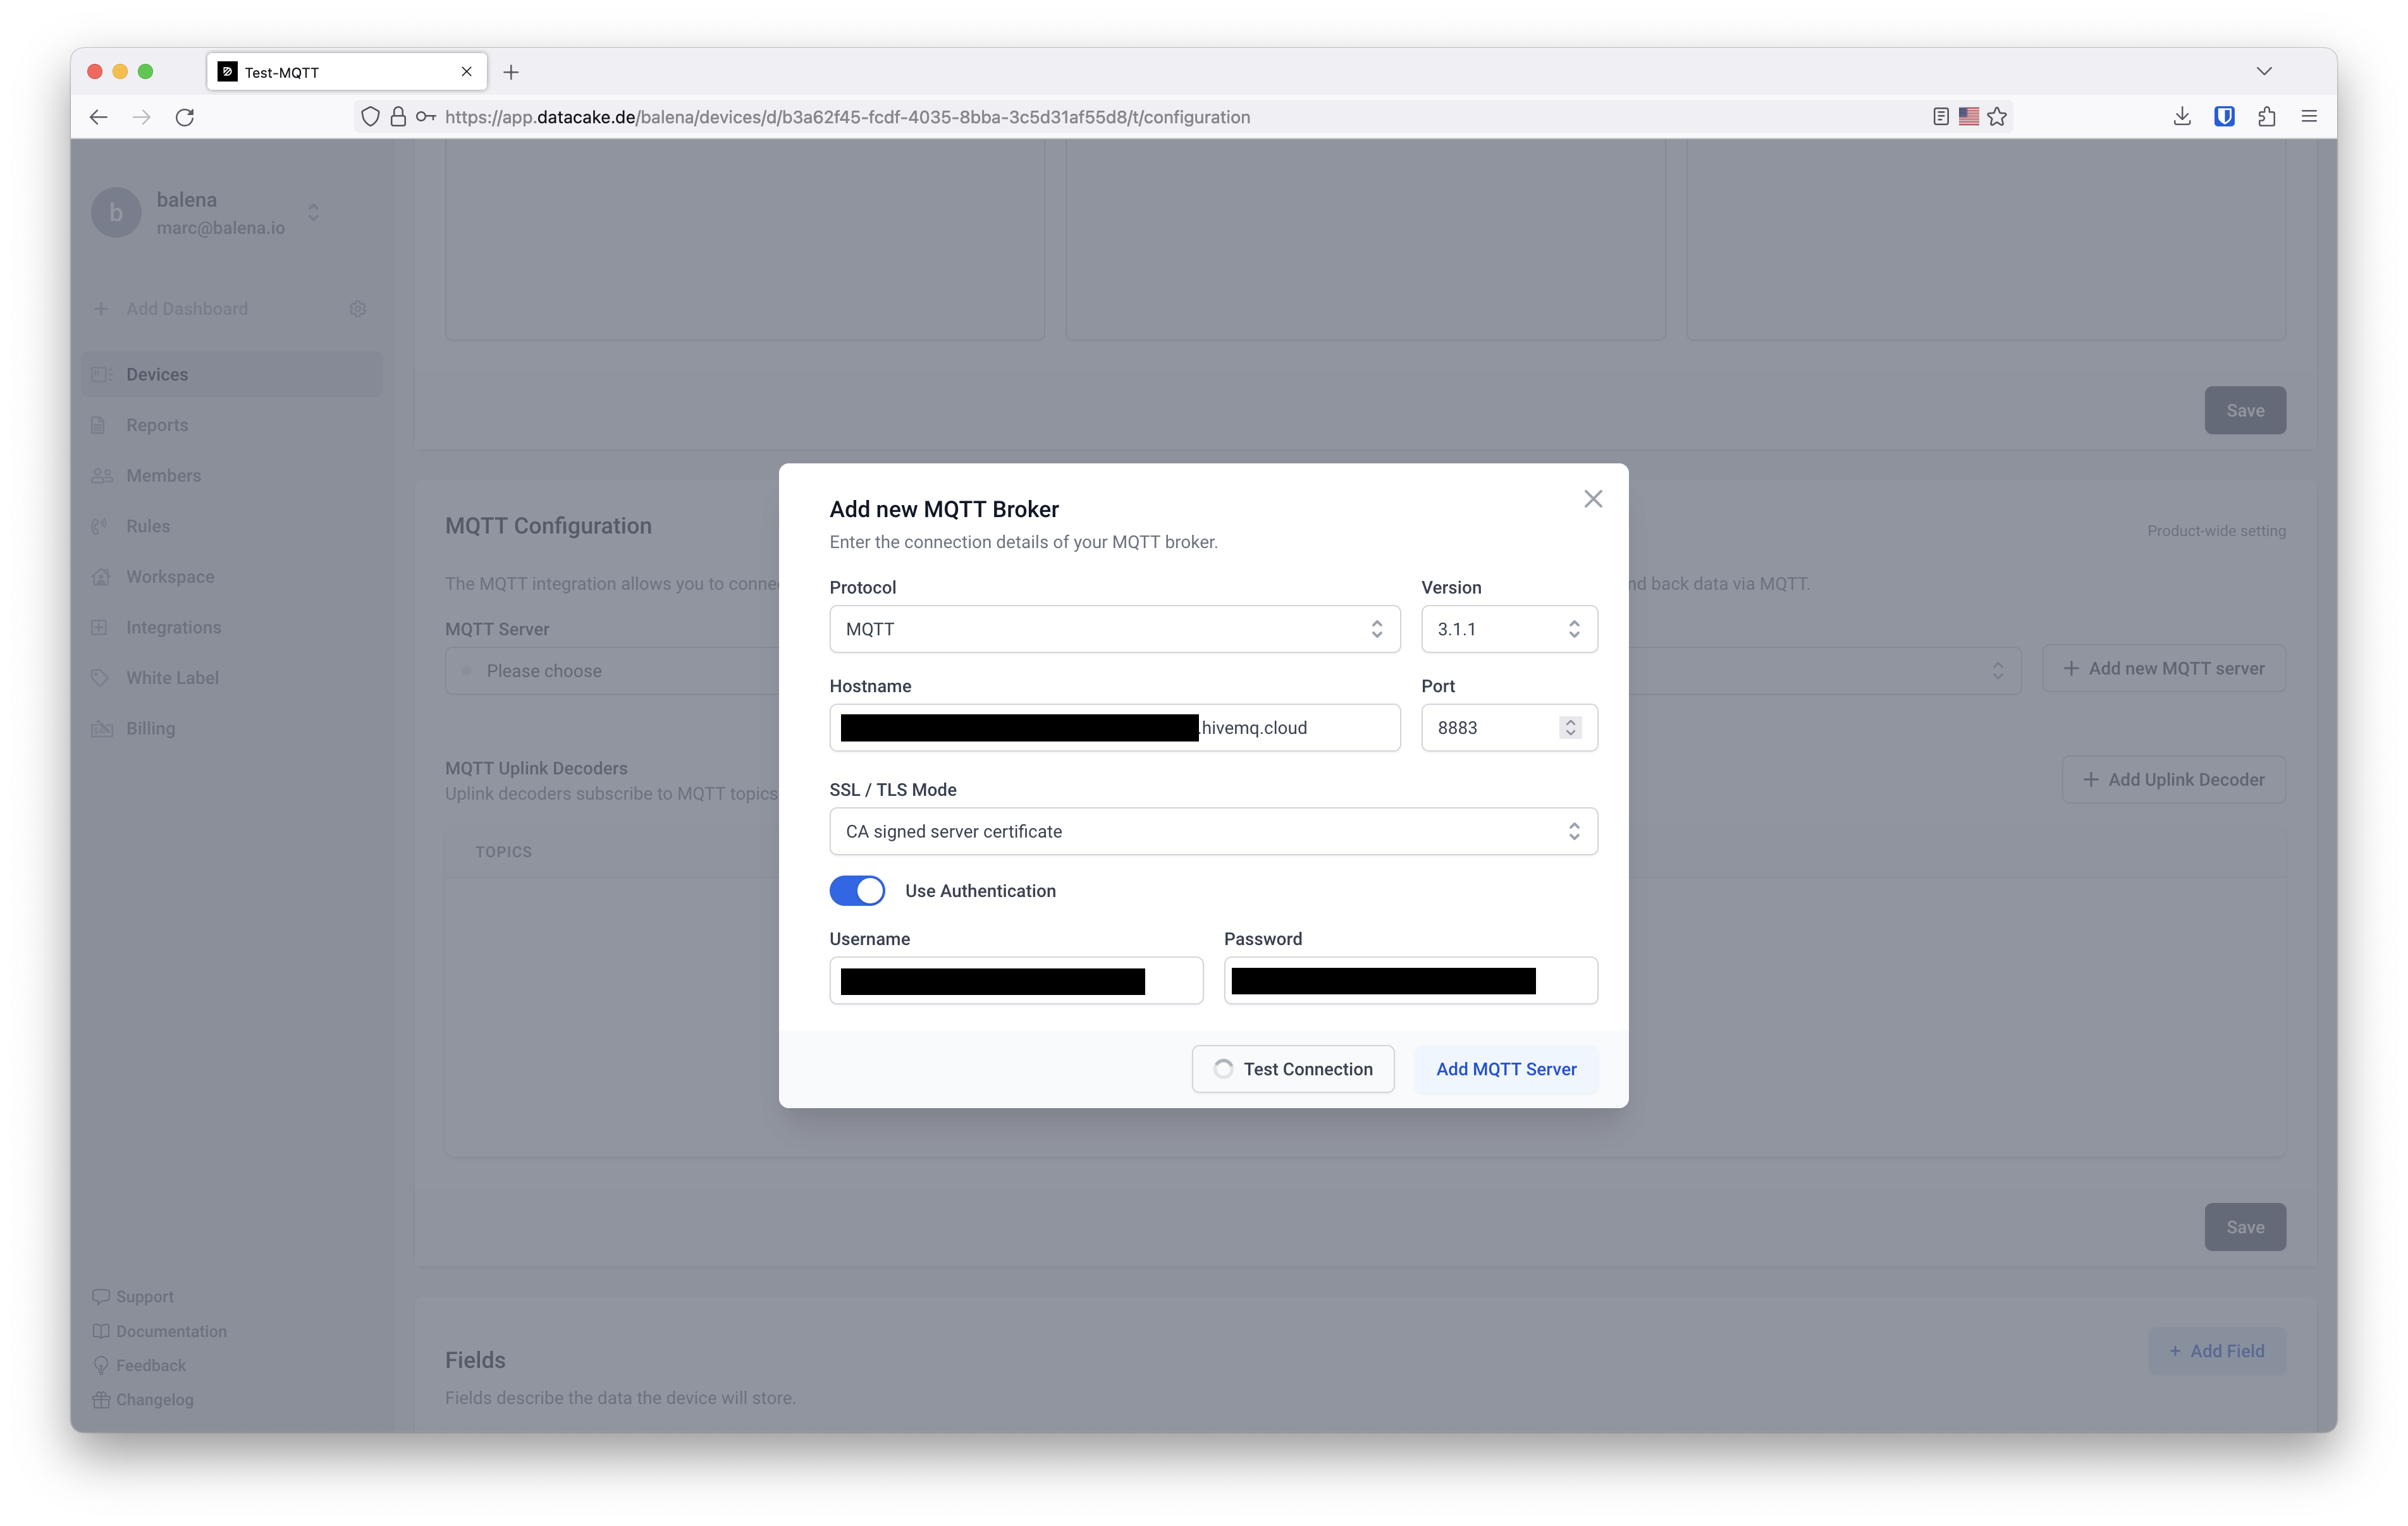
As we are using HiveMQ Cloud MQTT broker which is secure, we are going to select the MQTTS protocol instead of MQTT (as shown in the screenshot). Introduce the hostname that you added on the bridge configuration file (and the HiveMQ Cloud) and the port that appears there (in our case 8883). Select SSL/TLS Mode as CA signed server certificate and toggle Use Authentication and add the username and password that you used for the bridge extension as it appeared in the HiveMQ Cloud portal.
Click Test Connection which should produce a positive response (green color). Now you can Add MQTT server and it should appear listed with a green icon next to the name.
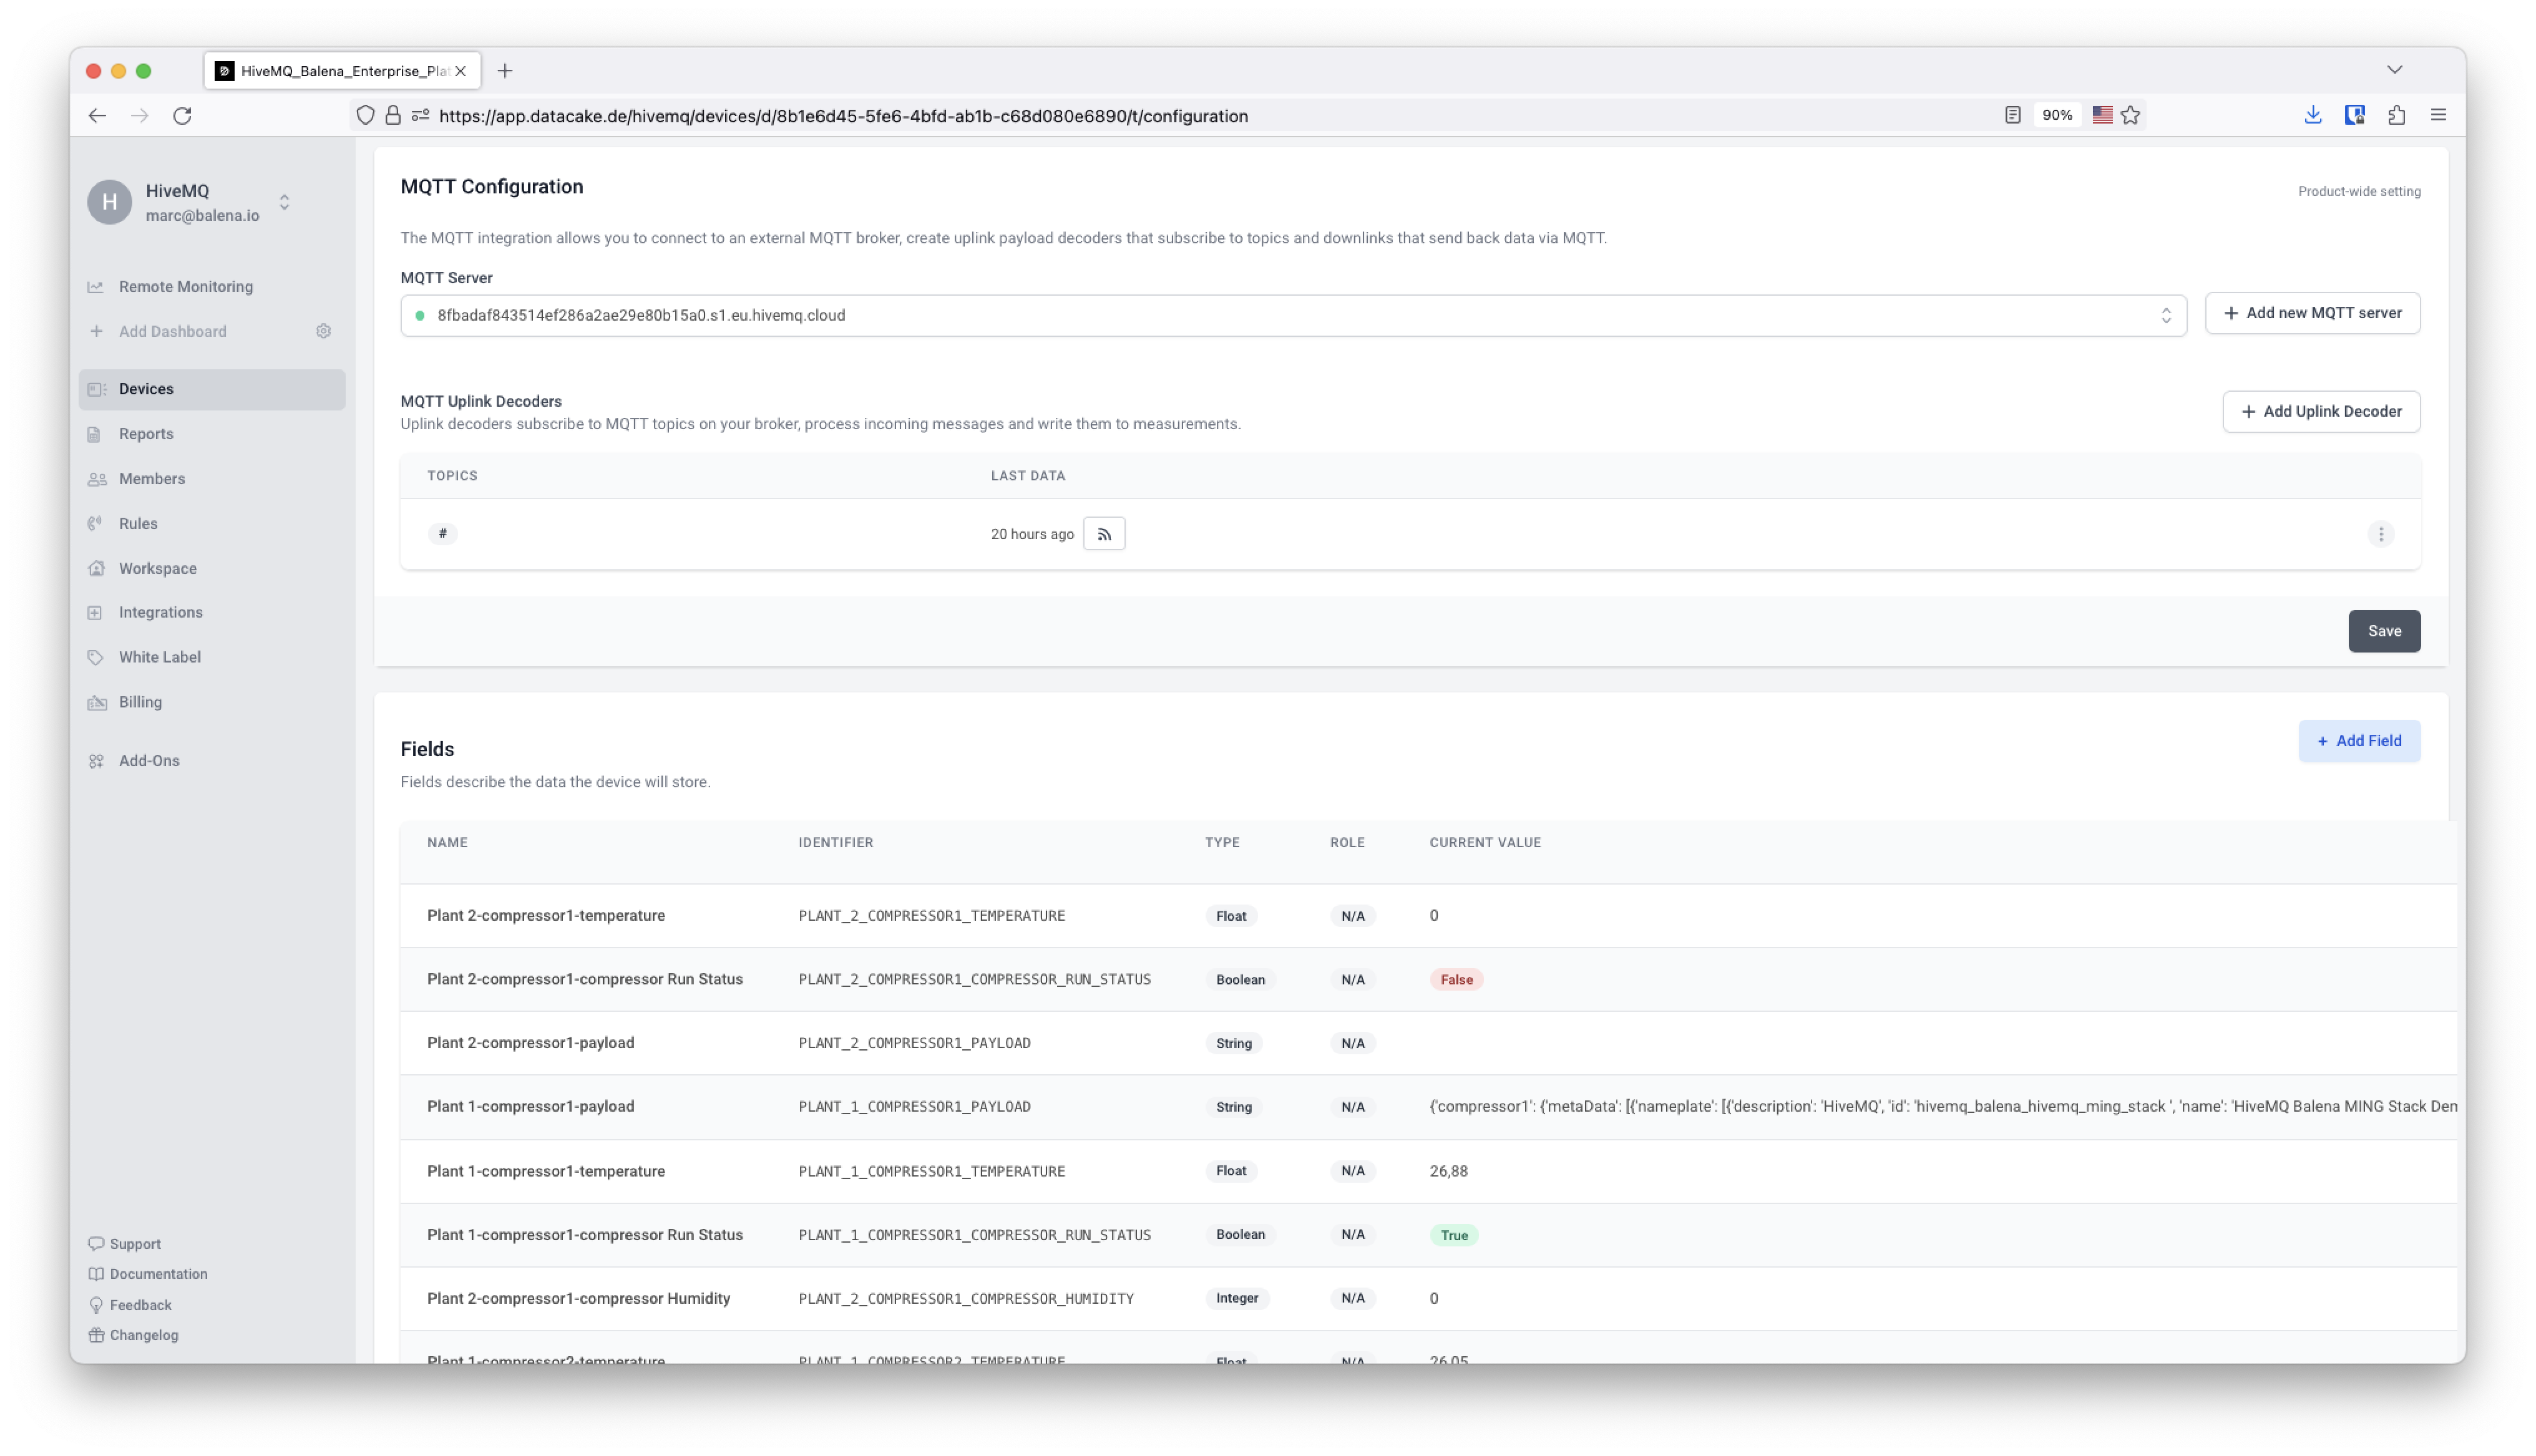
Click Add Uplink Decoder to define the topics that Datacake is subscribed to and how to parse the payload received by Datacake. In this case we are going to use the Decoder function which extracts the proper data from the proper compressor and plants, creating the dynamic variables. In this case, we only decode the data coming from 2 compressors, and if you have a different configuration you might need to adapt this decoder function.
“`
function Decoder(topic, payload) {
payload = JSON.parse(payload);
var plant = topic.split("/")[0]; // "plant_1" or "plant_2"
var compressor = Object.keys(payload)[0];

if (compressor == "compressor1")
{
    var temperature = payload.compressor1.parameters[0].value;
    var status = payload.compressor1.parameters[1].value;
    var status_field = payload.compressor1.parameters[1].id;
}
else
{
    var temperature = payload.compressor2.parameters[0].value;
    var status = payload.compressor2.parameters[1].value;
    var status_field = payload.compressor2.parameters[1].id;
}

return [
    {
        device: "04ef0484-e100-4339-881f-dd02a3413313",
        field: plant+"_"+compressor+"_payload",
        value: payload
    },
    {
        device: "04ef0484-e100-4339-881f-dd02a3413313",
        field: plant+"_"+compressor+"_temperature",
        value: temperature
    },
    {
        device: "04ef0484-e100-4339-881f-dd02a3413313",
        field: plant+"_"+compressor+"_"+status_field,
        value: status
    }

];
}
“`
Using this Decoder function, all the data from multiple devices and plants is going to be stored in one Datacake device. In this way, we will have all the data in one unique place.
Test the Decoder with a Payload coming from NodeRED or the MQTT Explorer, and then start adding all of the Fields needed to store the data. Find here an example of the dynamic variables created by the Decoder function on Datacake.
After that, go to the Dashboard and start defining the dashboard to visualize all the fields coming from the MQTT broker in the cloud.

Troubleshooting
If you have any issues with the HiveMQ Bridge Extensions feel free to contact us at the balena forums and share the error logs that you get. Double check your Host URL or authentication credentials as they are the most probable cause for issues.
What’s next
In the next blog post of the Industrial IoT Edge gateway series with HiveMQ, we are going to explain how to use a different stack with professional industrial tools such as Ignition for the Unified Namespace. Using Ignition in the edge and in the cloud will allow the use of MQTT Sparkplug B definition through the HiveMQ Bridge Extension. Furthermore we are going to show how to use the InfluxDB Extension on the edge HiveMQ to store data locally.
Feedback
The balena platform is all about reducing friction for fleet owners. As always, let us know if you run into any issues when following this guide or getting the Industrial IoT gateway reference architecture set up in your factory or industry plant floor.
Feel free to add a comment below or contact us on the balena forums.
Thank you @dmackenzie welcome to the balena community!
Let me know if you can test the gateway and send some feedback
And yes! the robot images were generated by midjourney!