

Our guest community author, Xabier Crespo of SC Robotics, walks through a GPS project that uses Docker and balenaOS, written in Python. Learn more about their prototyping process using balenaOS and try the project.
My name is Xabier Crespo and I’m a co-founder at SC Robotics, a small consulting firm which develops electronics and embedded systems. We work on a lot of IoT (and IIoT) projects and we’ve always had a need for remote monitoring and updating solutions for our customers. In the past we typically ended up building custom one-time solutions, but in our quest to find a better approach we came across balena.
Why start with balenaOS?
Most of the tutorials I’ve found focus on balenaCloud and how to deploy an image to your device using balenaCloud’s web-based interface. balenaCloud is a powerful platform, but during the early development stage of our work we need a bit more flexibility from the operating system.
In this blog post I will be explaining what balenaOS is and how we use it to build prototypes by showing you an example of one of our latest projects, a GPS tracker written in Python. Let me first explain what balenaOS is.
About balenaOS
balenaOS is a minimal Linux-based OS which mainly packages balenaEngine, an engine designed to run Docker-like containers. The OS will launch the supervisor (the container in charge of interacting with Balena tools) and manage each of the containers deployed by the user.
One of the things we like most about balenaOS is that it has been designed to make updates and SD Card operations safe thanks to the partitions’ design. Don’t miss the opportunity to read the official documentation which contains extensive information about this. Due to its open source nature, you can also check their GitHub repo and learn from it (familiarity with the Yocto project tools and build system is helpful).
About the build
I’ll be showing you all how we set up a GPS tracker including temperature measurement. We’ll walk through the hardware, how we use balenaOS, the development workflow, and a quick look at first results.
Hardware setup
For this project we have used a Raspberry Pi 3 Model B and a Radiolink GPS which sends NMEA sentences through UART. To spice it up a little bit, we have also connected an LED and an I2C temperature sensor (BME280) to demonstrate how to access and control GPIOs from within the container. This setup intends to be an introduction to the usage of Docker containers on an embedded Linux device while interacting with the hardware.
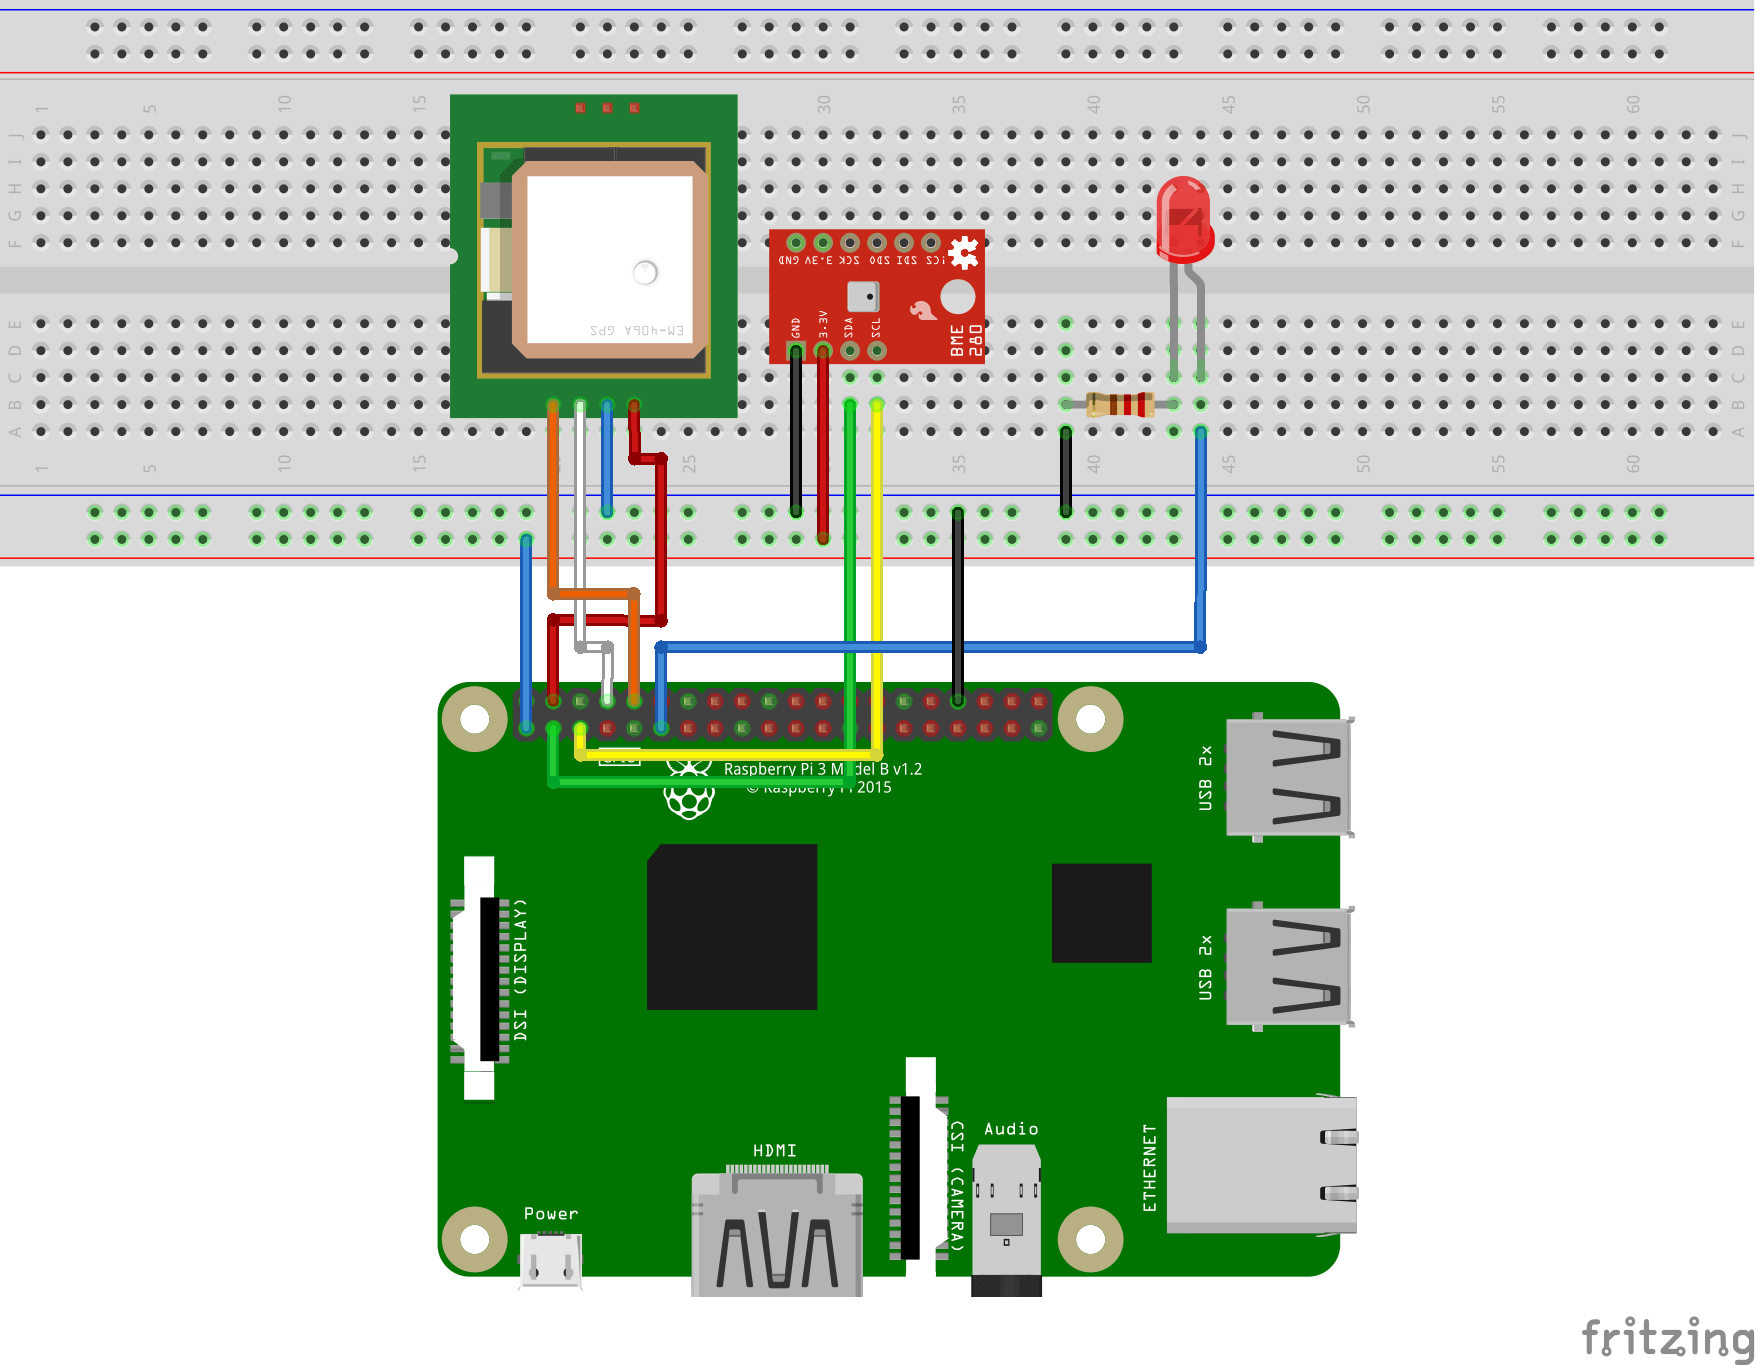
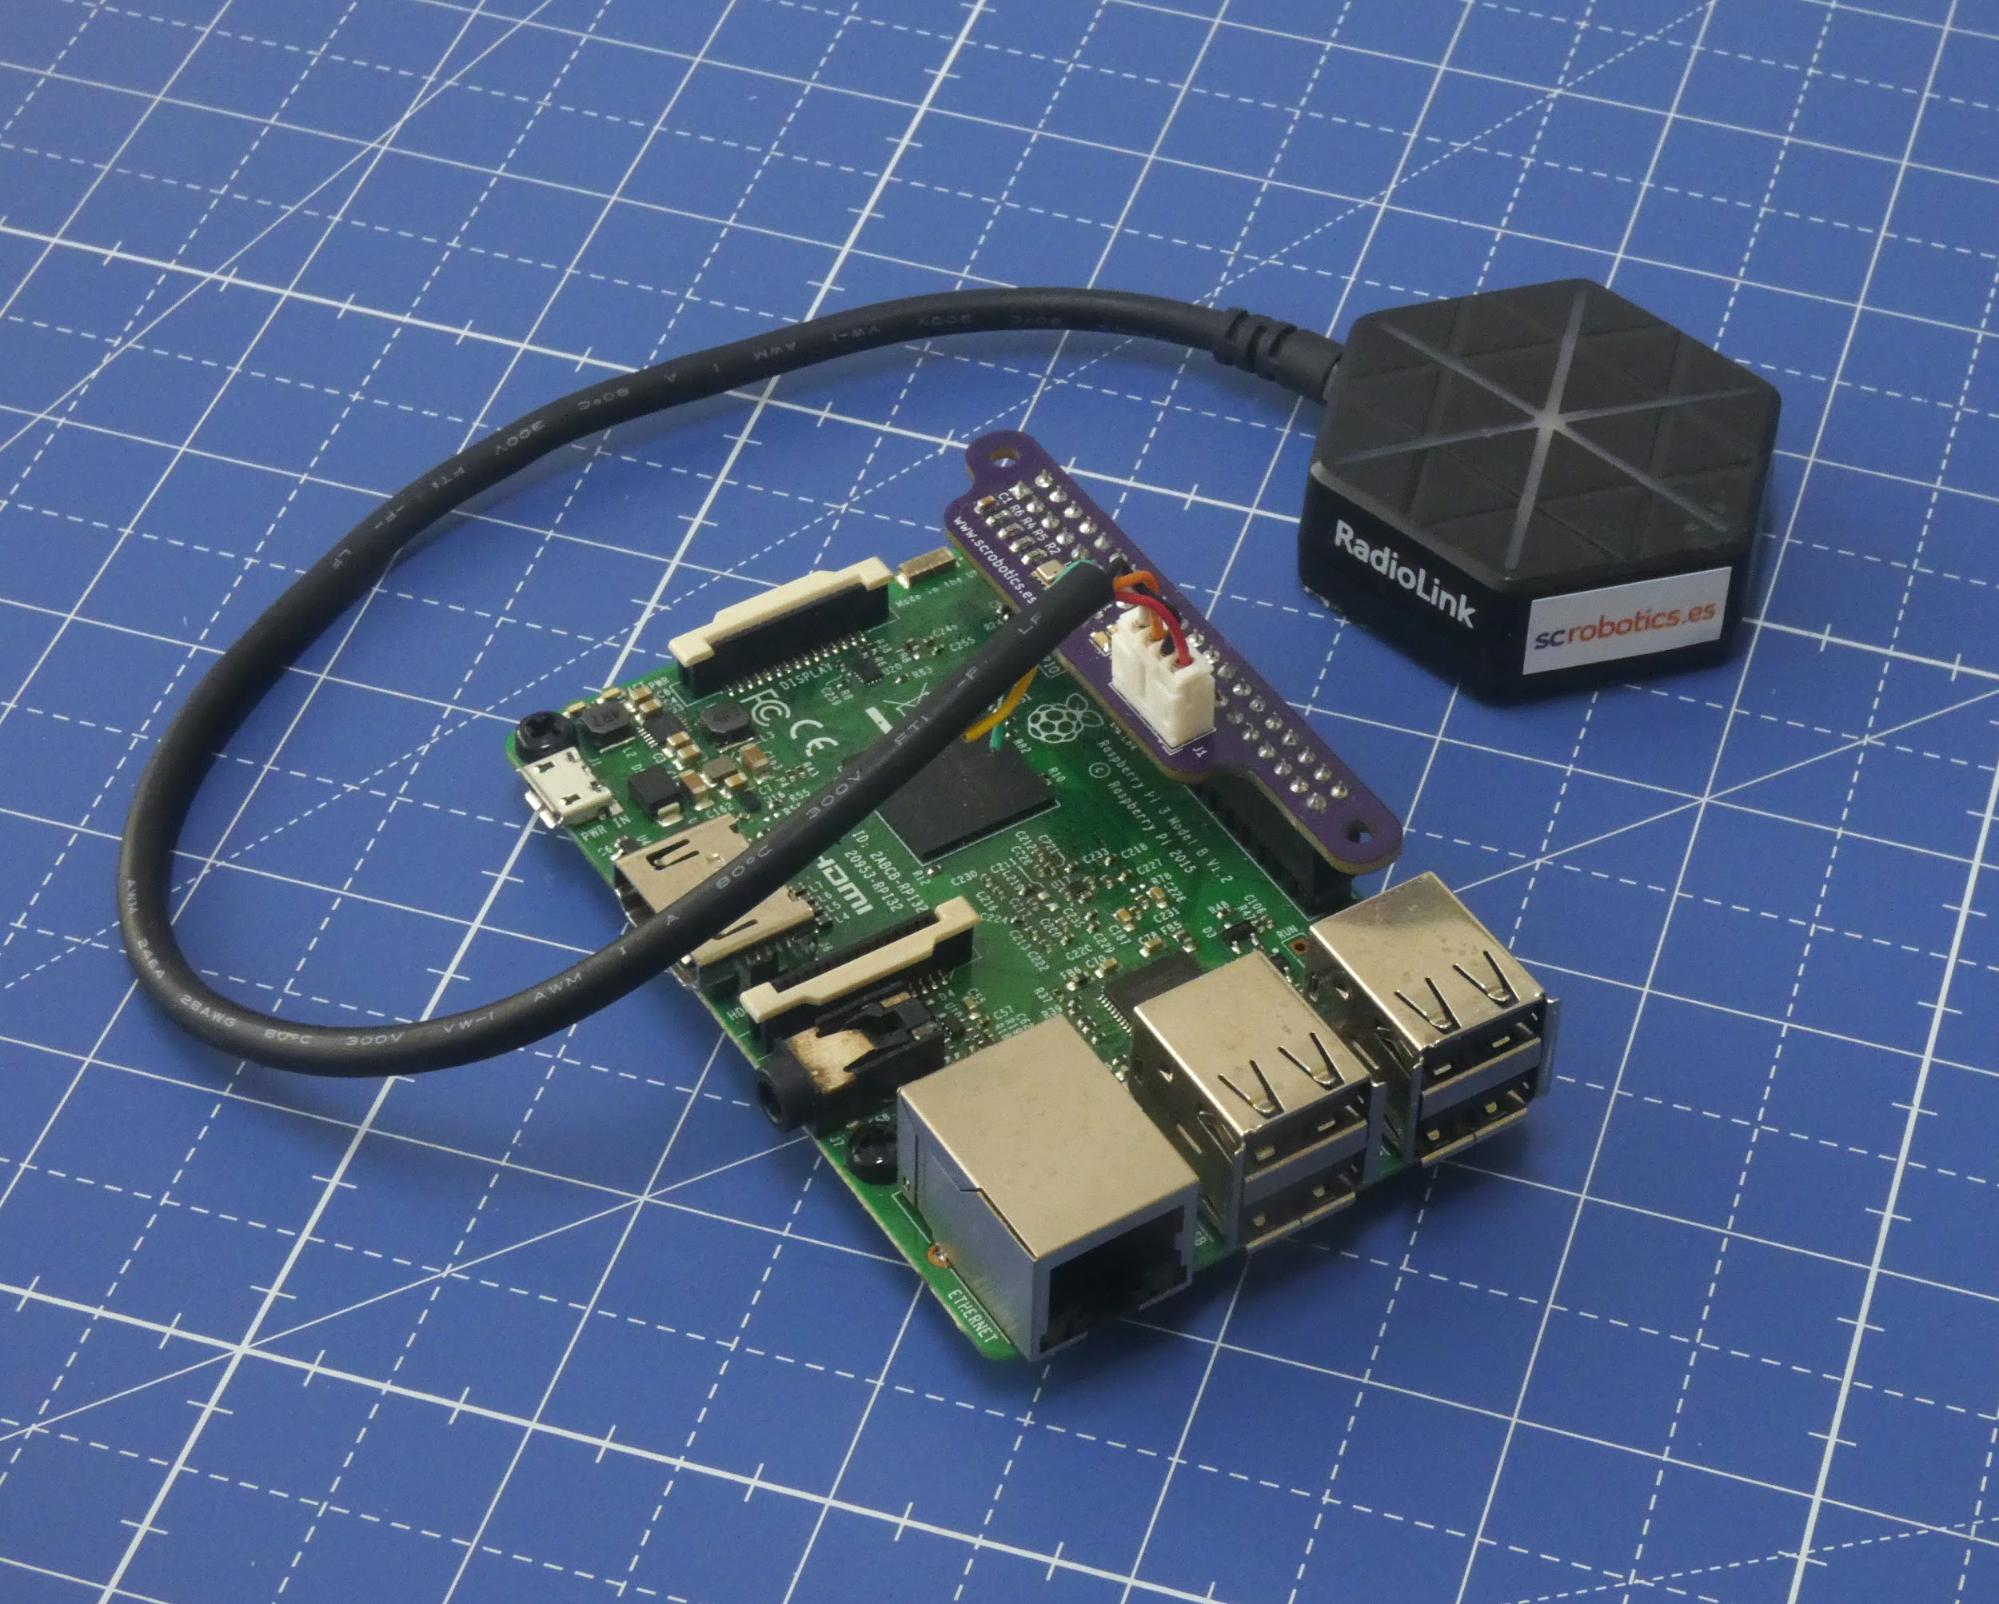
A simplified version of the schematics is shown in the image above. Since carrying around a prototyping breadboard was not easy during our tests, we have also designed and manufactured a small Raspberry Pi HAT that is available at OSHPark and it’s also open source. The result is a really compact version that can be seen in the image below:
The first step is to download the balenaOS image for your device type. There are two different flavours for each target board: Development and Production. We are going to use the Development version, which enables passwordless login and a special local development mode that allows us to push new changes and test them live (more on that later).
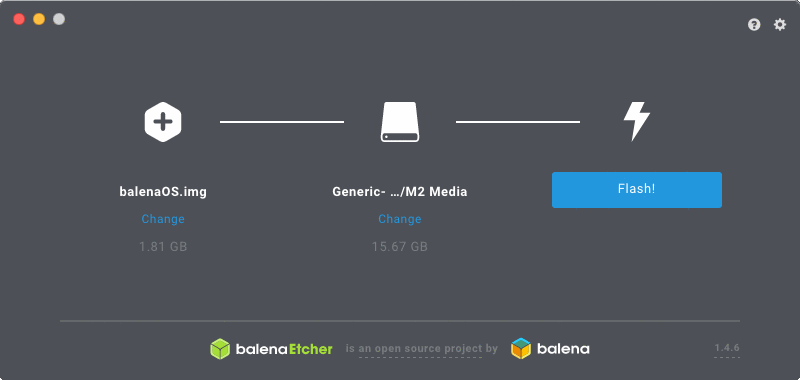
After downloading the image we will flash it to our SD card using balenaEtcher. Once that’s done, we can put the card in our Pi and we are set to go.
How it works
Docker image
Our Dockerfile looks like this:
“`dockerfile
FROM balenalib/raspberrypi3-alpine-python:3-build
WORKDIR /usr/src/app
COPY requirements.txt requirements.txt
RUN pip3 install -r requirements.txt
COPY . .
CMD [“python3”, “cli.py”, “gps”, “-s”, “/dev/ttyS0”, “-vv”]
“`
In the first line we select an Alpine Linux image from Docker Hub. The image includes Python 3 and many build tools like ‘make’ and ‘gcc’. These tools increase the size of the container but they are necessary to build the ‘RPi.GPIO’ library used to control the LED.
Thanks to Docker multistage builds we can optimize the size of our image very easily. Let’s see what would the new Dockerfile looks like:
“`dockerfile
Download, install and build dependencies
FROM balenalib/raspberrypi3-alpine-python:3-build as build
COPY requirements.txt requirements.txt
RUN pip3 install -r requirements.txt
Copy dependencies to run time container
Thanks to multi-stage builds, the size of the resulting image is ~70% smaller
FROM balenalib/raspberrypi3-alpine-python:3-run
COPY –from=build /usr/local/lib/python3.5/site-packages/ /usr/local/lib/python3.5/site-packages/
WORKDIR /usr/src/app
COPY . .
CMD [“python3”, “cli.py”, “gps”, “-s”, “/dev/ttyS0”, “-vv”]
“`
As you can see, we use one image for the build stage and a smaller one at runtime. Thanks to Balena, this optimization is straightforward because they provide thousands of base images following the pattern:
xml

balenalib/<hw>-<distro>-<lang_stack>:<lang_ver>-<distro_ver>-(build|run)
To take advantage of multistage builds we just have to modify the last word in the image name (‘build’ by ‘run’).
Thanks to this simple trick, the size shrinks from 537MB (check image ID 3537837912f4 in the snippet below) to 157MB (id ade1eb89ecfc).
“`bash
root@balena:~# balena images
REPOSITORY TAG IMAGE ID CREATED SIZE
local_image_main latest ade1eb89ecfc 43 seconds ago 157MB
balenalib/raspberrypi3-alpine-python 3-run 8bc4a2eb0f61 2 days ago 144MB
balenalib/raspberrypi3-alpine-python 3-build 3b4f32c791c1 4 weeks ago 535MB
balena/armv7hf-supervisor v10.6.27 76fd2be95b74 7 weeks ago 55.5MB
balena-healthcheck-image latest 618e43431df9 13 months ago 1.64kB
“`
Accessing hardware peripherals
Balena is designed for embedded systems, so we must talk about hardware at some point. However, once you’ve chosen the right Docker image, the rest is trivial and you can access the peripherals the same way you would do on a Raspberry Pi running Raspbian.
In this case, to access the GPIOs I’ve added RPi.GPIO to my ‘requirements.txt’, which was built and installed in the first stage of our Dockerfile. Once installed, we can use that library to access as we usually would do:
“`python
import RPi.GPIO as gpio
PIN_LED = 21 # Power pin
gpio.setmode(gpio.BCM)
gpio.setup(PIN_LED, gpio.OUT)
gpio.output(PIN_LED, False)
“`
Data persistence
The GPS and temperature values from the sensors are stored in a file using the GeoJSON format. Since we want to save this file even if the container crashes or if there is a sudden power loss, we need to understand how persistent storage works. Balena (and in general Docker) uses what are called “volumes” to achieve this, which means that one directory of the container (/data) is linked to a directory in the main file system (/var/lib/docker/volumes/_resin-data/_data).
If we save the file in this directory, we should be able to mount the SD card on a host computer and read back the data up to the point of a container crash or power loss.
Development workflow
During development we will rely on Balena’s CLI tool. This tool allows us to connect to devices, and manage applications and containers from a host PC. Be sure to follow the installation instructions in order to proceed with the rest of this tutorial.
The balenaOS image comes pre-configured as a zeroconf mDNS endpoint. What this means is that if you are connected to the same local network as the Raspberry PI, you can identify it by it’s assigned IP or by it’s id balena.local. For the rest of this tutorial, we have connected the Pi to a local ethernet switch that automatically assigns IP Addresses via DHCP, therefore we will use the id ‘balena.local’ on the network.
One of the features of the balenaOS development image is that it attaches a Getty console to tty1 and serial (to access the shell and see the logs). However, since we want to use the UART to communicate with our GPS module we have to disable this feature:
“`bash
$ balena ssh balena.local
mount -o remount,rw / # Disable read-only rootfs
systemctl mask [email protected] # Mask serial Getty service
reboot
“`
Let’s now clone the sources of the project:
bash

git clone https://gitlab.com/scrobotics/balena-gps-tracker.git

cd balena-gps-tracker
Next we have to push the project to the Raspberry Pi and we’ll be using ‘balena push’ for that.
bash

balena push balena.local
You should see something similar to this in your terminal:
toml

[Info] Starting build on device balena.local

[Info] Creating default composition with source: .

[Build][main] Step 1/8 : FROM balenalib/raspberrypi3-alpine-python:3-build

[Build][main] ---> 3b4f32c791c1

[Build][main] Step 2/8 : WORKDIR /usr/src/app

[Build][main] ---> Running in cab29b9b83b0

[Build][main] Removing intermediate container cab29b9b83b0

[Build][main] ---> 2cedf2c80c43

[Build][main] Step 3/8 : COPY requirements.txt requirements.txt

[Build][main] ---> c5d66e4d2057

[Build][main] Step 4/8 : RUN apk add --no-cache wiringpi && pip3 install -r requirements.txt

[Build][main] ---> Running in 620176ac01a3

[Build][main] fetch https://dl-cdn.alpinelinux.org/alpine/v3.10/main/armv7/APKINDEX.tar.gz

[Build][main] fetch https://dl-cdn.alpinelinux.org/alpine/v3.10/community/armv7/APKINDEX.tar.gz

[Build][main] (1/1) Installing wiringpi (2.46-r2)

[Build][main] Executing busybox-1.30.1-r2.trigger

[Build][main] OK: 458 MiB in 187 packages

[Build][main] Collecting pyserial

[Build][main] Downloading https://files.pythonhosted.org/packages/0d/e4/2a744dd9e3be04a0c0907414e2a01a7c88bb3915cbe3c8cc06e209f59c30/pyserial-3.4-py2.py3-none-any.whl (193kB)

[Build][main] Collecting wiringpi

[Build][main] Downloading https://files.pythonhosted.org/packages/95/8a/2bb23fe154a5ca4df5f8f0758614c2aa84dac2d9dd4151dea3ea3a368f35/wiringpi-2.60.0-cp35-cp35m-linux_armv7l.whl (265kB)

[Build][main] Collecting pynmea2

[Build][main] Downloading https://files.pythonhosted.org/packages/88/5f/a3d09471582e710b4871e41b0b7792be836d6396a2630dee4c6ef44830e5/pynmea2-1.15.0-py3-none-any.whl

[Build][main] Collecting geojson

[Build][main] Downloading https://files.pythonhosted.org/packages/e4/8d/9e28e9af95739e6d2d2f8d4bef0b3432da40b7c3588fbad4298c1be09e48/geojson-2.5.0-py2.py3-none-any.whl

[Build][main] Installing collected packages: pyserial, wiringpi, pynmea2, geojson

[Build][main] Successfully installed geojson-2.5.0 pynmea2-1.15.0 pyserial-3.4 wiringpi-2.60.0

[Build][main] Removing intermediate container 620176ac01a3

[Build][main] ---> 5a43c0181a0a

[Build][main] Step 5/8 : COPY . .

[Build][main] ---> 45216d9103b4

[Build][main] Step 6/8 : CMD ["python3", "cli.py", "gps", "-s", "/dev/ttyAMA0", "-vv"]

[Build][main] ---> Running in c01856c7287b

[Build][main] Removing intermediate container c01856c7287b

[Build][main] ---> 781e4119619d

[Build][main] Step 7/8 : LABEL io.resin.local.image=1

[Build][main] ---> Running in 74a7183f77d4

[Build][main] Removing intermediate container 74a7183f77d4

[Build][main] ---> 9fdece1be5d0

[Build][main] Step 8/8 : LABEL io.resin.local.service=main

[Build][main] ---> Running in ee397dcbc60e

[Build][main] Removing intermediate container ee397dcbc60e

[Build][main] ---> bb390609fa21

[Build][main] Successfully built bb390609fa21

[Build][main] Successfully tagged local_image_main:latest

[Live] Waiting for device state to settle...

[Info] Streaming device logs...

[Live] Watching for file changes...

[Logs][2020-1-17 12:21:00] Creating volume 'resin-data'

[Logs][2020-1-17 12:21:01] Creating network 'default'

[Logs][2020-1-17 12:21:01] Installing service 'main sha256:bb390609fa219ee64221f8e1b83330cb31aecb6894956483dd04c7a27c2b2caf'

[Logs][2020-1-17 12:21:10] Installed service 'main sha256:bb390609fa219ee64221f8e1b83330cb31aecb6894956483dd04c7a27c2b2caf'

[Logs][2020-1-17 12:21:10] Starting service 'main sha256:bb390609fa219ee64221f8e1b83330cb31aecb6894956483dd04c7a27c2b2caf'

[Logs][2020-1-17 12:21:14] Started service 'main sha256:bb390609fa219ee64221f8e1b83330cb31aecb6894956483dd04c7a27c2b2caf'

[Logs][2020-1-17 12:21:16][main] INFO:__main__:Connecting serial port '/dev/ttyAMA0'

[Logs][2020-1-17 12:21:16][main] INFO:__main__:GPS tracker
Once we’ve pushed the image, the supervisor will make sure the container is started, and up and running at all times, even after a crash or when the system boots up.
Another cool feature of balenaOS development image is that while this command is running it will monitor for changes in the host source files and push them to the Pi without having to start the whole process over from the beginning. For instance, imagine you want to change the LED pin. To do it you can simply change the corresponding lines in the python file, save the changes and wait for the CLI to detect them. The CLI will then immediately push the modified code over to the device. You can read more about this feature on this blog post.
You should see something like this in the terminal logs:
toml

[Logs][2020-2-21 12:48:47 PM][main] WARNING:GPS:GPS not ready yet

[Live] Detected changes for container main, updating...

[Logs][2020-2-21 12:48:48 PM][main] DEBUG:GPS:b'$GNGGA,,,,,,0,00,99.99,,,,,,\*56\\r\\n'

[Logs][2020-2-21 12:48:48 PM][main] WARNING:GPS:GPS not ready yet

[Logs][2020-2-21 12:48:49 PM][main] DEBUG:GPS:b'$GNGGA,,,,,,0,00,99.99,,,,,,\*56\\r\\n'

[Logs][2020-2-21 12:48:49 PM][main] WARNING:GPS:GPS not ready yet

[Logs][2020-2-21 12:48:50 PM][main] DEBUG:GPS:b'$GNGGA,,,,,,0,00,99.99,,,,,,\*56\\r\\n'

[Logs][2020-2-21 12:48:50 PM][main] WARNING:GPS:GPS not ready yet

[Live][main] Restarting service...

[Logs][2020-2-21 12:48:51 PM][main] DEBUG:GPS:b'$GNGGA,,,,,,0,00,99.99,,,,,,\*56\\r\\n'

[Logs][2020-2-21 12:48:51 PM][main] WARNING:GPS:GPS not ready yet

[Logs][2020-2-21 12:48:56 PM] Service exited 'main sha256:6d505e1f819505acc844211f03b3e1cd43a64fbb4540a032a81cfd73b129164f'

[Logs][2020-2-21 12:49:03 PM] Restarting service 'main sha256:6d505e1f819505acc844211f03b3e1cd43a64fbb4540a032a81cfd73b129164f'

[Logs][2020-2-21 12:48:51 PM][main] DEBUG:GPS:b'$GNGGA,,,,,,0,00,99.99,,,,,,\*56\\r\\n'

[Logs][2020-2-21 12:48:51 PM][main] WARNING:GPS:GPS not ready yet

[Logs][2020-2-21 12:49:03 PM][main] INFO:__main__:Connecting serial port '/dev/ttyS0'

[Logs][2020-2-21 12:49:03 PM][main] INFO:__main__:GPS tracker
Results
This image generates a JSON file located at /var/lib/docker/volumes/1_resin-data/_data/, or if you power off the Raspberry Pi and mount the SD card into a host computer you will have to navigate to the resin-data partition and check resin-data/docker/volumes/1_resin-data/_data/. Below, you can see an image of the example output. However, the actual data is dynamic, and if you head over here you can click on any point and will find more information attached, in this case a timestamp and the temperature we read from the BME280 sensor.

Conclusion
As you can see, while in the very early stages of development, using balenaOS and interacting with devices locally is a fast, easy way to iterate and make changes. The Development version of balenaOS has many useful features that help us during the bring-up, testing, and prototyping of projects.
Of course, once we are sure everything works, we can then easily switch to using balenaCloud to deploy the project to an entire fleet of devices, and manage them all remotely. balenaCloud provides an easy to use web-based dashboard for these operations, but there is also an open-source, on-premise version called OpenBalena for our projects that have special data privacy, vendor or data portability, governmental regulations or other types of challenges that prevent them from using hosted solutions. In either scenario, transitioning from local development directly using balenaOS to either of the balena Fleet Management solutions is easy to accomplish.
Let us know what you think
We hope you find this post useful, and be sure to let us know in the comments, on our Forums, or via Twitter if you build this project! We’d love to see some pics of your setup!
Special Note
This project and guide were written and contributed by balena Community Member Xabier Crespo, co-founder of SC Robotics, who came up with the idea, built the containers required, and wrote up the material for this project. We’re very grateful for his contribution!