
In my last post, I walked through a high-level look at how one could use balena and ROS a platform to create one or many edge device robots. Since then, I’ve published several balena Blocks that help bring this vision to life, and in this post, I’d like to walk through how anyone can use these blocks to prototype, deploy, and scale an IoT robot fleet.
All around the world, people use ROS to develop robotics applications. The ROS ecosystem is a large and diverse group of organizations and individuals, including academia, enterprises such as ABB and Boston Dynamics, government and institutions like NASA and ESA, and thousands of robotics enthusiasts and makers all around the world.
Demonstrating how Docker and ROS can work well together
Last year, Canonical published an article on 6 reasons why Docker and ROS are not a good fit.
To summarize, here are the main points of the article:
* No transactional updates for ROS on Docker
* No delta updates for applications
* Privileged containers are a security risk
* Configuring networking is challenging
* Fleet management is a pain.
* No notifications for updating vulnerable software packages
Let’s go through some of these concerns and see how we could help.
Transactional updates
Updates that happen in a single step and can be rolled back in case of failure are called atomic, or transactional. While docker doesn’t support this functionality, the way releases are structured in balenaCloud, enables the same functionality, you can simply set the target release to an earlier, working version.
Delta updates and preloading
Edge devices can be connected to the internet through various methods, from wired ethernet to LoRa and 3G Cellular. Robotics applications tend to be large in size compared to other edge-computing use cases. Balena can help you keep your robots up to date no matter how they are connected using delta updates and preloading
Connecting to external hardware resources
Using GPIO, I2C, USB, and other similar interfaces usually requires administrative rights on any Linux box. A common solution to this when using docker is to add privileged: True to your docker-compose.yaml file for that specific container. However, this opens the door to a bunch of potential security issues. That’s why everybody will tell you that privileged containers are a bad idea.
Adding a single device by its path: /dev/i2c-1 instead of giving access to the whole bus or tree: /dev/i2c doesn’t require a container to be privileged. In the case of I2C this is, but what about a USB-to-UART converter like CH340 which changes its name at every reconnection?
In essence, privileged: True enables all the Linux capabilities for a specific container. A more fine-grained way of accessing external hardware is to only enable CAP_RAWIO capability. Here‘s more info on how to do that.
Additionally, if you are using a balena base image for your container you can make use of UDEV to connect to dynamically named devices like the aforementioned USB-to-serial bridge.
Networking
ROS indeed has a few strict requirements when it comes to multi-device networking, mainly a few environment variables that you have to set. You find out more here
On balena devices, services can be resolved by their hostname, no need to find out their IP or anything else. Check out the readme for ros-core to see how easy it is to get multiple ros-based containers to talk to each other.
Balena can furthermore help you by allowing you to SSH into your robots remotely, either from the dashboard or our balena-cli tool.
Additionally, if you enable the Public URL option on the dashboard, you can expose a web-ui to the web.
Oh, and as for fleet management, that’s literally what we do. 🙂
That being said, we beg to differ and we won’t only show you why docker and ROS are a good fit, but also how we can help you grow your robotics solution from the prototyping stage to mass deployment and scaling using the same tools and principles.
Prototyping
Let’s take a concrete example out of my personal experience. For a former project, I was considering a couple of different single-board computers (SBCs). My goal was to find the cheapest, smallest, most powerful option that could support the Intel RealSense camera.
I bought three different options, BananaPi Zero, NanoPi Duo2 and another one I can’t remember. I had to compile the RealSense SDK and its ROS wrapper on the boards themselves, with build settings corresponding to the kernel version each vendor offered.
Anyway, the whole operation took several weeks, not to mention the compile time for the SDK only, was around 12h+ for each board.
This is exactly the kind of situation we mean when we say our mission is to “reduce friction for fleet owners”.
Let’s explore the ways in which balena can help you drastically shorten your prototyping time.
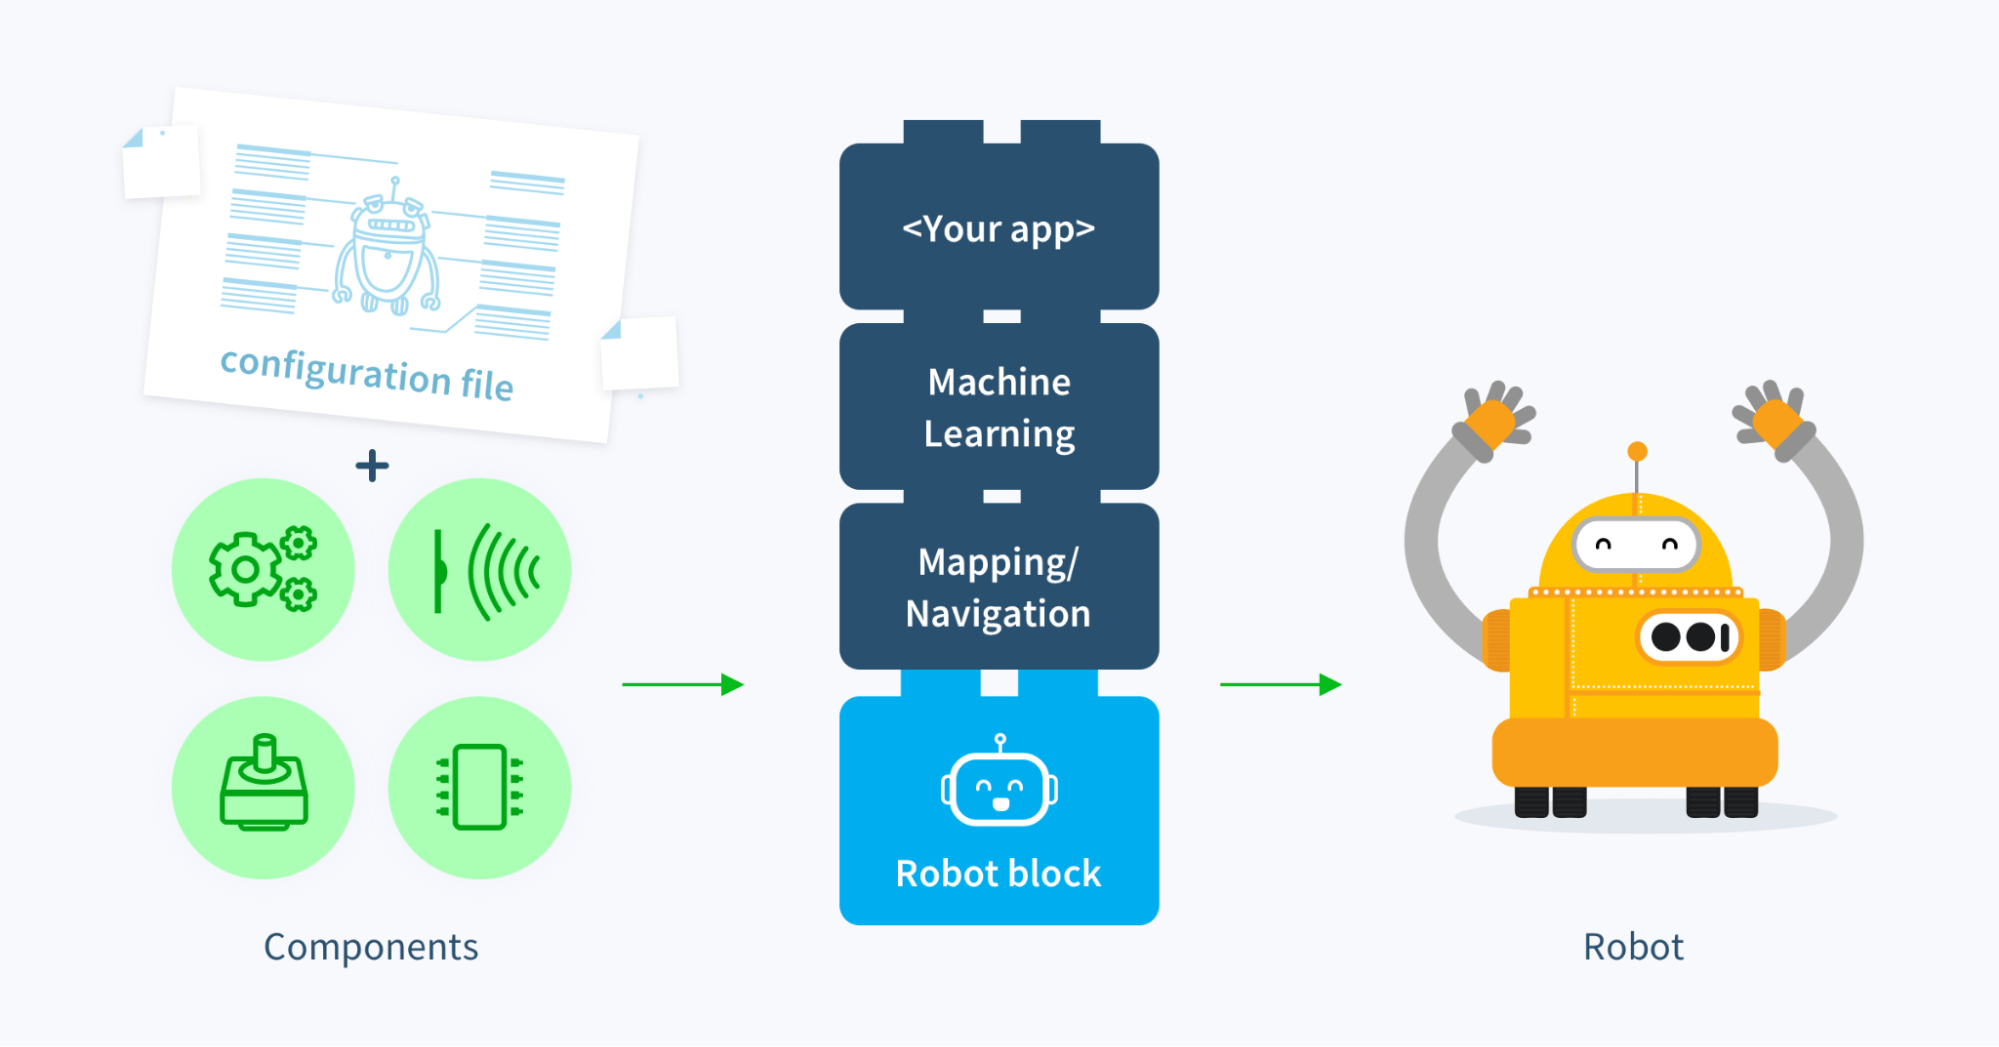
Blocks
Per their official definition balena-blocks are “intelligent, drop-in chunks of functionality built to handle the basics, allowing you to focus on solving the hard problems”.
Let’s take the former example of the realsense camera. You can wrap the installation of realsense SDK and its ROS package into a dockerfile, upload it to balenaHub, and target the architectures you want. Then, it’s ready to run on every board we support.
You are not only saving time for yourself. But also for everyone who might be using this part. You’ll only need to reference the block in your docker-compose.yaml file and you are ready to go.
We have prepared a few ROS blocks, both to test the way ros-core would plug in with other blocks, and provide you with a neat robotics starter kit.
Let’s explore some of the ros-centric blocks we have prepared for you:
ros-core
ros-core is the beating heart of the whole balena-ros ecosystem. It’s a full installation of ROS(1) Noetic wrapped inside a block. On runtime, it runs the roscore process. This process keeps track of the nodes that are running, how to reach them, and what their message types are.
Instead of having a full copy of ROS for each service, we define a volume mount share and let the other ROS blocks access the same binaries, this reduces the amount of space needed considerably and allows for layered ros-packages.
Additionally, ros-core makes it possible that ROS nodes can all talk to each other even if they are part of different services/containers. For security reasons, there’s a separate internal network for the services. However, you can open whatever port you want to the external world.
To include ros-core in your balena solution, you simply need to add it to your docker-compose.yaml file like this:
You can find more information about how roscore works on its github repository. Also, there’s a guide on how to write your own ros-core compatible images here
“`yaml
version: “2.1”
volumes:
ros-bin:
services:
– roscore:
image: cristidragomir97/ros-core
environment:
– ROS_HOSTNAME=roscore
– ROS_MASTER_URI=http://roscore:11311
links:
– service0
volumes:
– ros-bin:/opt/ros/noetic
- service0:
build: ./service0
environment:
– ROS_HOSTNAME=service0
– ROS_MASTER_URI=http://roscore:11311
volumes:
– ros-bin:/opt/ros/noetic
“`
ros-io
ros-io is a hardware abstraction layer for ROS. Conceptually, I like to visualize it as docker for hardware where part drivers are the containers, ros-io is the orchestrator, and “config.json” is docker-compose.yaml.
I’d like to note that this is built for “simple” components, modules and chips like: PWM drivers,
Stuff that usually gets connected to low level interfaces like I2C, UART, SPI, GPIO, and it’s mainly aimed at ARM SBCs. More complex parts like LIDARs, cameras and complex actuators that have their own vendor-supplied ROS-package are out of scope for this project.
Separating access to lower level hardware from the rest of your solution brings a lot of flexibility in your workflow. It allows you to focus on the implementation of the more important parts of your solution and know that even if some part is discontinued, you can still rely on the fact that your solution will keep on working the same way.
In the context of the global chip crisis this gives makers the ability to keep on learning with the alternatives available, even if the hardware that they would need it not available now, and for hardware manufacturers, it gives the ability to keep on selling the same product, with the same capabilities, even if the hardware has changed between units.
Here’s how this all works:
You define your hardware in a configuration file and upload to a git repository. You can find more information on how that file should look like here https://github.com/cristidragomir97/ros-io#2-config-file
ros-io downloads your config file, parses its contents and installs the proper packages and 3rd party dependencies
Package code gets imported into the ros-io code, and worker threads are deployed:
Workers wrap the part object, create ROS messages and map the read/update functions to rospy Subscriber and Publisher objects
Later, we plan to support the Service model as well.
Parts, packages and the library
Package – the code and the configuration file
* package.py contains the source code for the package you are going to reference
* package.json contains some important information for ros-io, mainly what the dependencies of the package are, the callback functions we can use to get or set data from or to the part, and last but not least, the ros message type it expects
Library – the library doesn’t really exist anywhere, it’s just the collection of packages that gets downloaded for your solution
Part – a part is an instance of a package. ros-io supports two types of parts:
* Simple parts expose one ROS topic / part
* Multi-channel parts like ADCs or PWM drivers, these expose a separate ROS topic for each one of the channels.
For more details on how to configure ros-io and write your own packages check out the github repository
To see some examples of packages check out this repo and for an example of a config file, and a robot fleet based on ros-io check out this example.
Why, though?
fter reading this, you might have a few questions. Writing a ros-io package sounds a lot like writing a ROS node for that specific part, why go the extra mile to make it a ros-io package? I created this as a solution to the frustrations gathered in almost 10 years of prototyping and building electronics projects. I truly hope this could be adapted for the professional market too, this project is by a maker, for makers.
Network effects in the community.
Splitting the drivers of hardware components into modules instead of a monolithic codebase ensures easy maintainability and portability which also encourages more community contributions. At the same time, there’s a limited amount of popular options for DIY robot parts. Let’s take the example of IMUs, the same 5 chips (LSM9DSx, LSM6Dx, ADXL345, MPU6050/MPU9250, and BNO055) are used in probably 80% of the breakout boards available on the market. With the contributions of a few developers, you’ll be able to use them just by referencing them in your config file. One of them is not available? Simply swap its library name in the config file. We hope that with enough community contributions, the most popular breakout boards can be supported out of the box, creating an incredible “playground” for any absolute beginner to hack on.
Everything is in one file
ROS’s parameter server is a great way to gather all the parameters of different components in your stack in the same place, however, most beginners, pass it by instead. Even More So, the quality of community-written ROS (for hardware) varies greatly. I’ve seen a lot of implementations that have important parameters hardcoded. With ros-io you can safely assume that everything is modifiable, and everything is in the same file.
Granular control in case of failure
The degree to which error handling is done is another topic that varies from node to node. Some higher-level software might crash or halt in case some topic is not present (from a device node). ros-io separates the topic handling from the hardware connection itself, allowing you to simply restart a misbehaving hardware component, (which can take a few milliseconds) in time for the next update tick. Not to mention that in the case of a shared bus, I2C for example, a misbehaving chip can hold the whole clock line, and cause everything to crash.
Centralized Logs
ros-io gives you the ability to see the logs of all your modules in a single terminal window.
Automatic Dependency Handling
ros-io automatically installs all the required libraries for a specific component and updates them to the latest version if needed.
Long story short, my vision is that anyone that ever simulated a TurtleBot, or followed a tutorial by The Construct, can move their solution to real hardware in a matter of minutes, no matter what components are available at that moment in time, by just tweaking one file: config.json
Add this to your docker-compose.yaml file to use this block:
yaml

ros-io:

  image: cristidragomir97/ros-io

  environment:

    - ROS_HOSTNAME=ros-io

    - ROS_MASTER_URI=http://ros-core:11311

    - CONFIG_REPO=https://github.com/<repo_containing_your_config>

  volumes:

    - ros-bin:/opt/ros/noetic

  devices:

    - "/dev/i2c-1:/dev/i2c-1"

  cap_add:

      - SYS_RAWIO
More info at ros-io
ros-camera

This block adds plug-and-play ROS support for the official Raspberry Pi cameras. On runtime, if everything is connected properly, you’ll be able to see the camera feed from this sensor on the /image/compressed topic.
This block wraps the most popular ROS package for the Raspberry Pi camera. Check out their GitHub repository for more information.
Add this to your docker-compose.yaml file to use this block:
yaml

ros-camera:

    depends_on:

      - ros-core

    image: cristidragomir97/ros-camera

    environment:

       - UDEV=1

       - ROS_HOSTNAME=ros-camera

       - ROS_MASTER_URI=http://ros-core:11311

    volumes:

      - ros-bin:/opt/ros/noetic

    devices:

      - "/dev/vchiq:/dev/vchiq"

    cap_add:

      - SYS_RAWIO
More info at ros-camera
ros-lidar
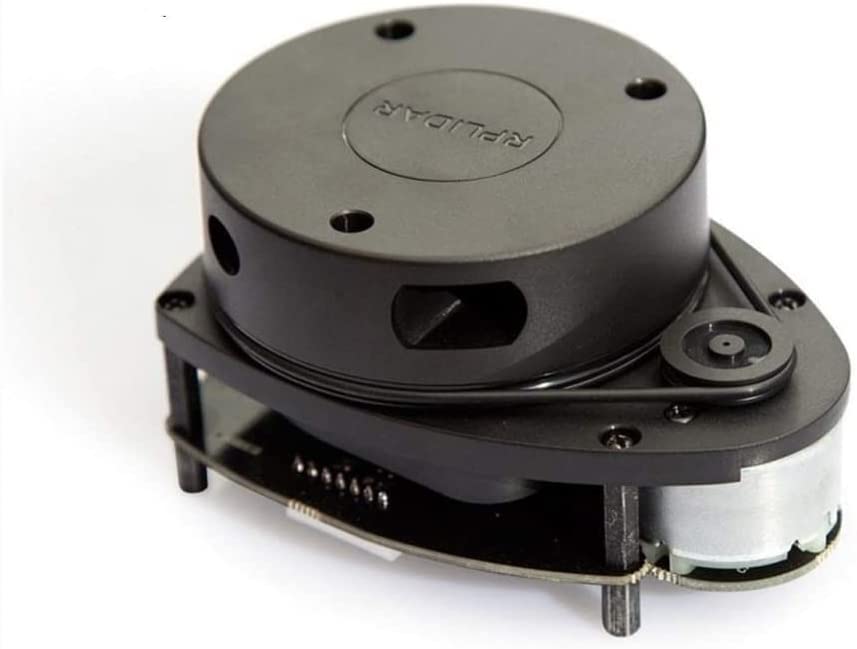
Slamtec’s RPLidar series is one of the most affordable 2D LIDAR hardware solutions on the market.
This block adds plug-and-play ROS support for these devices, by wrapping their official ROS package. On runtime, if everything is connected properly, you’ll be able to see the laser scan data from this sensor on the /scan topic.
yaml

ros-rplidar:

    depends_on:

      - ros-core

    image: cristidragomir97/ros-rplidar

    environment:

       - UDEV=1

       - ROS_HOSTNAME=ros-rplidar

       - ROS_MASTER_URI=http://ros-core:11311

    volumes:

      - ros-bin:/opt/ros/noetic

    devices:

      - "/dev/ttyUSB0:/dev/ttyUSB0"

    cap_add:

      - SYS_RAWIO
More info at ros-rplidar
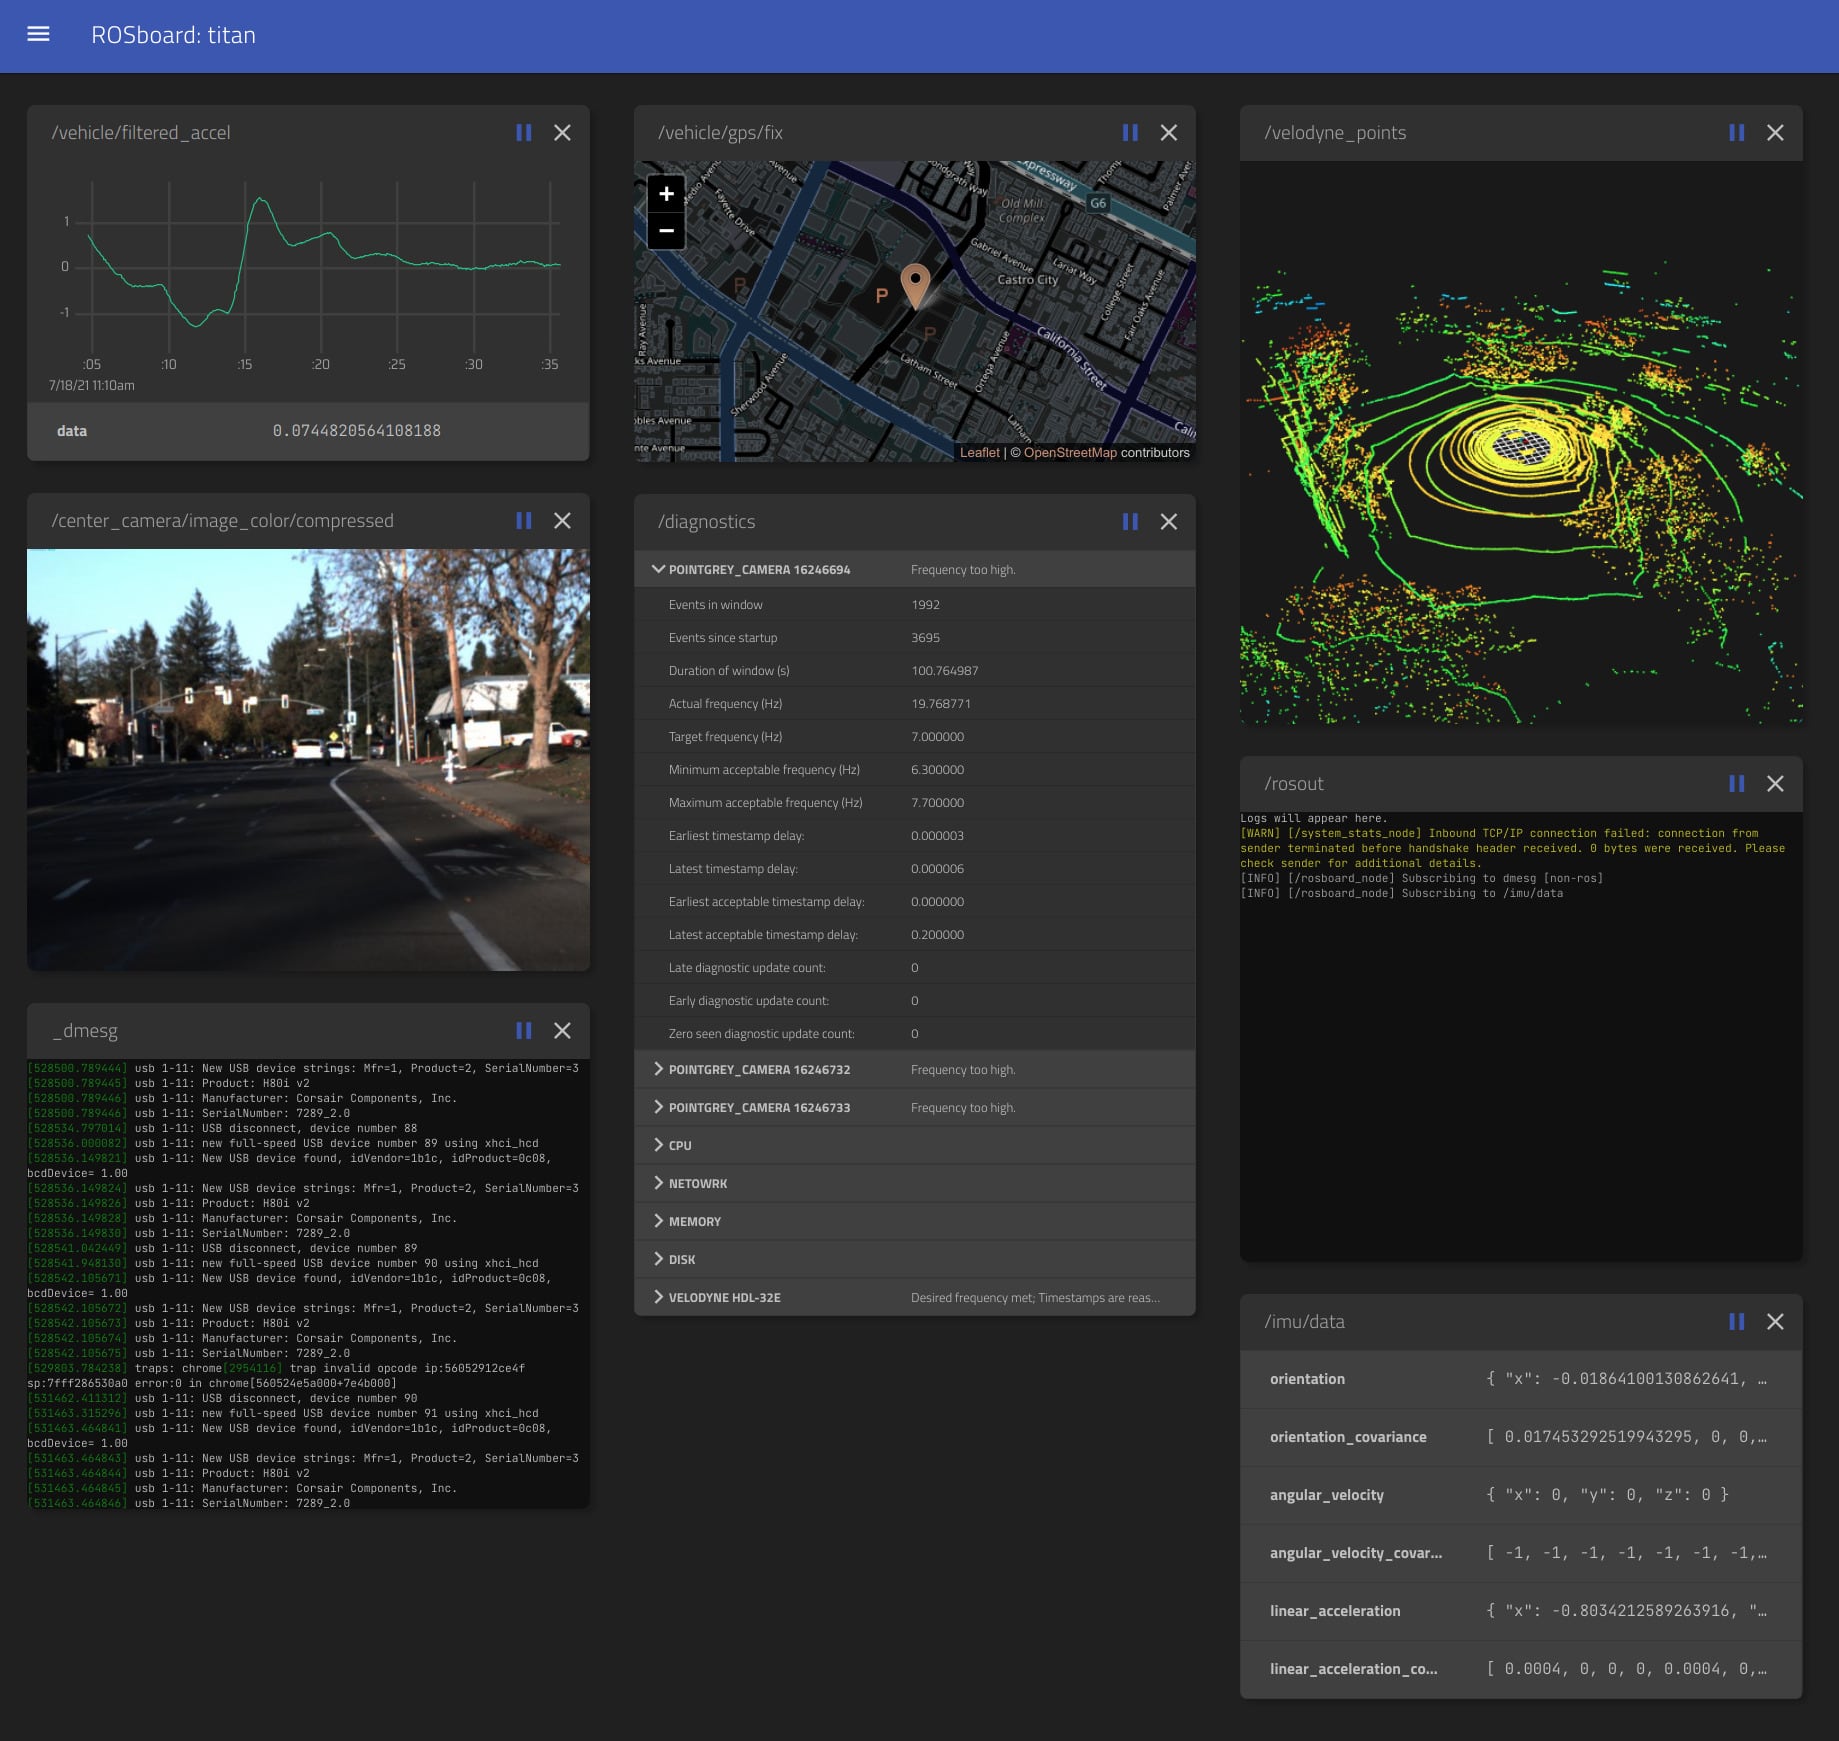
ros-board
The standard ROS installation contains RViz, a powerful configurable tool that creates visual representations of your ros topics. Maps, image streams, and even complex 3D robot models.
This is great for development, but in our scope, we are targeting headless embedded computers. There’s a way to stream your topics to another machine that has a desktop environment, but the network configuration is pretty complex, and it tends to be laggy even in a local area network, not to mention miles away over a VPN.
This is where dheera’s rosboard comes in handy. This is a great piece of software that provides a browser-based visual representation of the topics published on your robot. It’s kind of like Grafana, but for robotics.
Add this to your docker-compose.yaml file to use this block:
yaml

ros-board:

    depends_on:

      - ros-core

    image: cristidragomir97/ros-board

    environment:

       - ROS_HOSTNAME=ros-board

       - ROS_MASTER_URI=http://ros-core:11311

    ports:

      - "8888:8888"

    volumes:

      - ros-bin:/opt/ros/noetic
More info at ros-board.
ros-joystick
This is a very simple block that allows you to use any linux compatible gamepad to remotely control your robot. It turns information from /dev/input/js0 to ROS messages on the /cmd_vel topic.
yaml

ros-joystick:

    depends_on:

      - ros-core

    image: cristidragomir97/ros-joystick

    environment:

       - UDEV=1

       - ROS_HOSTNAME=ros-joystick

       - ROS_MASTER_URI=http://ros-core:11311

    volumes:

      - ros-bin:/opt/ros/noetic

    devices:

      - "/dev/input/js0:/dev/input/js0"

    cap_add:

      - SYS_RAWIO
More info at ros-joystick.
arduino-block
While not a ros-block per se, this is a useful tool that helps you to compile, flash and update firmware using arduino-cli and avrdude. For now, this is only compatible with 8-bit Arduinos that use USB/UART.
yaml

arduino-block:

    image: cristidragomir97/arduino-block

    devices:

        - "/dev/ttyAMA0:/dev/ttyAMA0"

    environment:

        - AVRDUDE_CPU=atmega328p

        - MONITOR_BAUD=115200

        - SERIAL_PORT=/dev/ttyAMA0

        - REPO="https://github.com/cristidragomir97/motorhead"

        - REPO_NAME="motorhead"

        - SKETCH_FOLDER=/firmware

        - ARDUINO_FQBN=arduino:avr:nano
Upon runtime, the block pulls the repository found at REPO, compiles the sketch for the board you have set with ARDUINO_FQBN, and flashes it to SERIAL_PORT using avrdude.
Deployment
You can find most of the popular ROS packages on their official repository and install them with your distro’s package manager. The true power of ROS however comes with its build system called catkin. You can configure very complex builds, that include code from many sources and written in different programming languages.
There is one major downside to this, however: builds tend to get large, really quickly. Complex packages like 3D SLAM, or advanced physics engines required for kinematics can take a long time to build on powerful x64 workstations, so building them on a Raspberry Pi-like device is close to impossible.
That’s where the balena cloud builder comes in handy.
Take advantage of the cloud builder
The cloud build can take care of this load for you, just configure your packages, create a docker file, and let the cloud builder take care of the heavy lifting for you. In the end, you’ll get an image containing just the artifacts that are required. If you want to keep image size to a minimum, consider using multistage docker builds.
Target multiple architectures
Apart from some very specific cases, for example, the ROS package for the Raspberry Pi camera, which uses both the physical CSI interface and some binary blobs from Broadcom, most ROS packages can be built for all the popular platforms out there, mainly armhf, arm64, and amd64.
Using balena you can also just create a fleet for each device type you are targeting and push your release to it. This is extremely useful as your solution grows.
Another aspect of this is the ability to move between different SBCs with the same CPU architecture. You can prototype on a Raspberry Pi or Jetson Nano and then move to something more production-ready, like Variscite’s series of SOMs (System-on-a-Module).
Preloading & Delta Updates
Since robotics tools, software and libraries are considerably more space hungry than other edge device use-cases, having the bulk of an image already loaded before the device is provisioned is crucial for robotics applications. Once it leaves the factory, it can be deployed in the wild, where no assumptions about the internet speed can be made. Any further update must be as slim in size as possible, and this is where delta updates come in handy. Learn more about preloading your application here
Scaling
All the techniques, blocks, and aspects of the balena ecosystem we presented in this article are an integral part of making sure that deploying ROS-powered software to 100 robots is as easy as deploying software to one unit. The only thing you need to take care of is flashing the SD cards, but hey, we have Etcher Pro for that.
What’s next?
Next up, I’m going to introduce you to yet another DIY robotics platform that I’ve been developing for the last couple of mind. It was built from scratch with blocks in mind and uses a brick style mounting system to make it infinitely extendable. Using that platform we are going to pretend we are the fictional company Paws Inc. which is building the world’s most advanced cat companion robot. Armed with a laser pointer and powerful machine learning, it can keep your pet busy for hours.
We are going to use most of the blocks presented in this article to create a working prototype and then show you how to get this ready for mass deployment. Additionally, we are going to show you some tips and tricks on how to make your robot development workflow as fast as possible.
While I build out said fictional robot prototype, please check out the recently published ROS blocks and experiment on your own:
* ros-core
* ros-io
* ros-camera
* ros-rplidar
* ros-board
* ros-joystick
* arduino-block
Also, please leave any questions and comments below!