
Last updated: 26th October, 2020
Try balenaDash, a simple project to quickly get you up and running with a web frame to display family photos, dashboards, videos, and more.

Introduction
![]()
balenaDash is a Raspberry Pi powered digital photo/web frame with a difference! It can display a fully GPU accelerated web page or app of your choosing and allow you to update that content from anywhere.
Here’re some ideas to get you started:
- Data-centric dashboards using Grafana or Datadog
- Display for services such as Flightradar24 or Flightaware
- Digital fishtank or jellyfish
- Streaming webcam display (e.g. NASA HDEV)
- 24 hour live animated cat display
- Home automation dashboard
Note: Previously, balenaDash could be used with photography and social media uses cases such as: Instagram photo stream (based on hashtag or user) and live digital photo frame feeding from Google Photos. We’ve removed the photo service from balenaDash and encourage you to try the standalone smart photo gallery project instead.
balenaDash is a project you can build really quickly, and if you’re a bit of a hacker/maker like us, hopefully with hardware you already have lying around. If not, read on, as there’s a good deal on a hardware bundle from a friendly supplier for you to check out too.
You can set up a Raspberry Pi, connect it to a dashboard allowing you to remotely manage it, and then install and build applications to run on it.
Recent updates
- 26 October, 2020: balenaDash has been refined to focus more on its core goal of visualizing data from other services. It now uses the browser block, and the photo service has been removed (please use the smart photo gallery project instead).
- 28 May, 2020: Refactored this blog guide to include the
deploy with balenamethod, making it much easier to get started
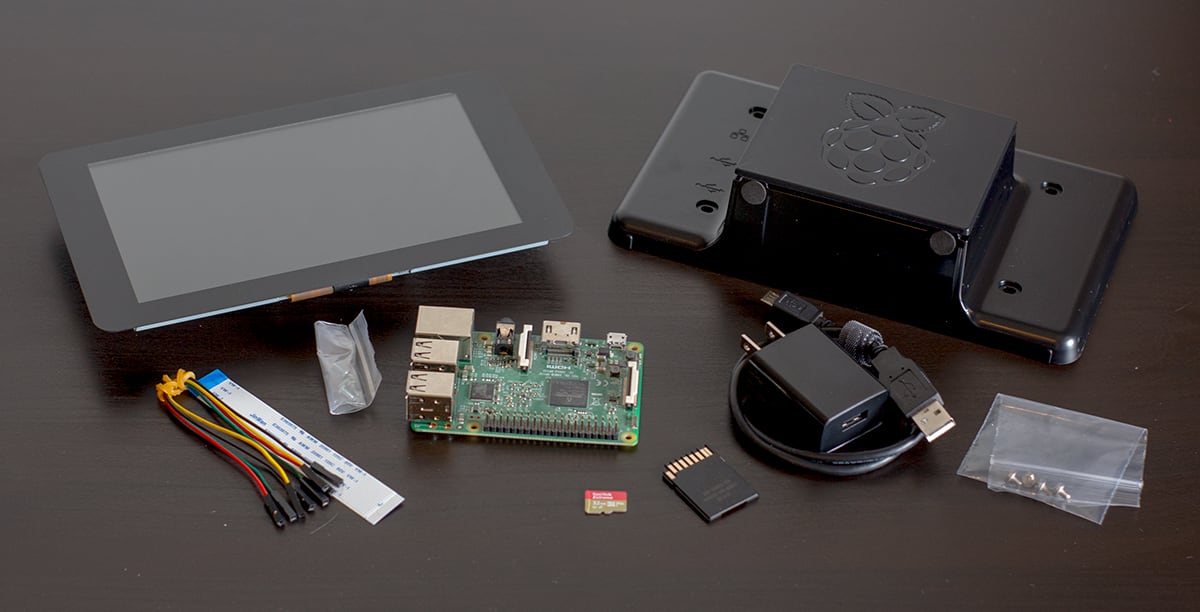
Hardware required
This project has been designed so that you don’t need any unusual hardware, and so hopefully you have everything you need to get started already.
You’re going to need:
- Raspberry Pi 3B/3B+ (Note: this project will not work with the Pi Zero or older devices with < 1GB RAM; unfortunately that means the new 3A+ wont work either)
- 16GB Micro-SD Card (we recommend Sandisk Extreme Pro SD cards)
- Display (any Raspberry Pi display will work for this project, and you can use HDMI monitors too)
- Micro-USB cable
- Power supply
- Case (optional)
- Ability to flash your SD card (try balenaEtcher!)
This project makes a great gift once you’ve built it so if you haven’t got the hardware or just need more, our friends at PiSupply have created a couple of bundles that contain everything you need. You can get the full kit that includes everything you need or a barebones kit without the display.
Software required
We can download the latest version of balenaDash and deploy it to a balenaCloud application with this button:
Just be sure to sign into balenaCloud first. Note: your first ten devices are free and fully featured so you can get going quickly with balenaDash!
Alternatively, you can set this project up with the repo and balenaCLI if you choose. Get the code from GitHub, and set up balenaCLI on your computer to push the code to balenaCloud and your devices. Please watch this build video on our YouTube channel for more help.
For the fastest path to setting the project up, we recommend just using the deploy with balena method.
Setup of the Raspberry Pi
This project has been built to be very simple in order to get you up and running quickly. It forms a basis for you to progress to developing your own projects.
Add a device and download the OS
Once your application has been created using deploy with balena, you can setup and add a device within that application by clicking the ‘add device’ button. When you add a device you specify your device type, which in this case is a Raspberry Pi 4, and if you are connecting to a wireless network you can set your WiFI SSID and passphrase here too.
You can also use Wi-Fi Connect to dynamically connect a Linux device to a local network. Learn more about it here.

This process creates a customized image configured for your application and device type, and includes your network settings if you specified them.
Note: When you’re first getting started, a development image will be most useful, as it permits a number of testing and troubleshooting features. More details on the differences between development and production images can be found here.
Configure your display
This tutorial is based on the official Raspberry Pi 7 inch display. You can choose to have the display in horizontal or vertical mode. On Fleet Configuration add a variable called BALENA_HOST_CONFIG_display_lcd_rotate with value 2 for horizontal (180º rotation) or 1 for vertical (90º clockwise rotation). More details about the options for this are available on the Raspberry Pi site.
Using a PiTFT
As from v1.0.0, balenaDash uses the fbcp block and you need to identify this in your device variables by changing FBCP_DISPLAY to one of these supported device values:
- adafruit-hx8357d-pitft
- adafruit-ili9341-pitft
- freeplaytech-waveshare32b
- waveshare35b-ili9486
- tontec-mz61581
- waveshare-st7789vw-hat
- waveshare-st7735s-hat
- kedei-v63-mpi3501
Configuring the PiTFT even further
In some cases, you might need to add additional Device Variables to fine-tune your TFT screen. Here are variables that might be required for proper scaling and resolutions:
| Device Variable | Value |
| ‘BALENA_HOST_CONFIG_hdmi_cvt’ | Formatted as *width* *height* *framerate* *aspect* *margins* *interlace* *rb* For example: 480 320 60 1 0 0 0 |
| ‘BALENA_HOST_CONFIG_hdmi_force_hotplug’ | 1 |
| ‘BALENA_HOST_CONFIG_hdmi_group’ | 2 |
| ‘BALENA_HOST_CONFIG_hdmi_mode’ | 87 |
If your display is not listed above, please check if the fbcp-ili9341 driver that fbcp block uses supports it. PRs are welcomed to add support for further displays in the fbcp block. Visit our fbcp block repo for more details and information (contributions welcome!).
Flash your SD card and boot the device
Once the OS image has been downloaded, it’s time to flash your SD card. You can use balenaEtcher for this.

Once the flashing process has completed, insert your SD card into the Raspberry Pi and connect the power supply.

When the device boots for the first time, it connects to the dashboard, after which you’ll be able to see it listed as online and move onto the next step. Since we used deploy with balena to preload the application code, it should begin uploading the project to your newly added device.

Troubleshooting: It should only take a few minutes for the new device to appear in your dashboard, If your device still hasn’t shown up on your dashboard after a few minutes, something has gone wrong. There’s an extensive troubleshooting guide in the documentation, with lots of information on why this could be, but if you still can’t get your device online, come on over to the forums where we’ll be able to help out.
Assembling the display and case
Once you’ve got your Raspberry Pi booted and appearing in the balenaCloud dashboard, it’s time to assemble it into the case with the display. It’s difficult to access the SD card once it’s assembled in the case so it’s good to make sure you’re up and running and don’t need to disassemble it again before putting everything together.
You can find a guide showing you how to assemble, connect and orient the display and case here too.

If you’re seeing the output on your display as above, this means that everything is working and ready to go.
Configuration
The WPE project takes advantage of the hardware GPU acceleration on the Raspberry Pi, and so in order for balenaDash to run, you’ll need to allocate a bit more memory to the GPU than is set by default. As you’ve now got the device up and running on balenaCloud, there is the benefit of being able to set configuration values like this remotely, but it’s similarly possible to specify them in /boot/config.txt by editing the file on the SD card directly.
We have a guide to setting configuration variables on balenaCloud in case you can’t find it in the menu.
Note: RESIN_HOST_CONFIG_gpu_mem is one of the default options within balenaCloud and so you can change the existing value rather than adding a new configuration variable.
| Name | Value |
|---|---|
| RESIN_HOST_CONFIG_gpu_mem | 128 |
Displaying your own content
Right now the display is a blank canvas ready to show your content.
You can choose any URL to be displayed on the screen. The easiest way to change the URL is by adding a variable into the device variables inside balenaCloud.
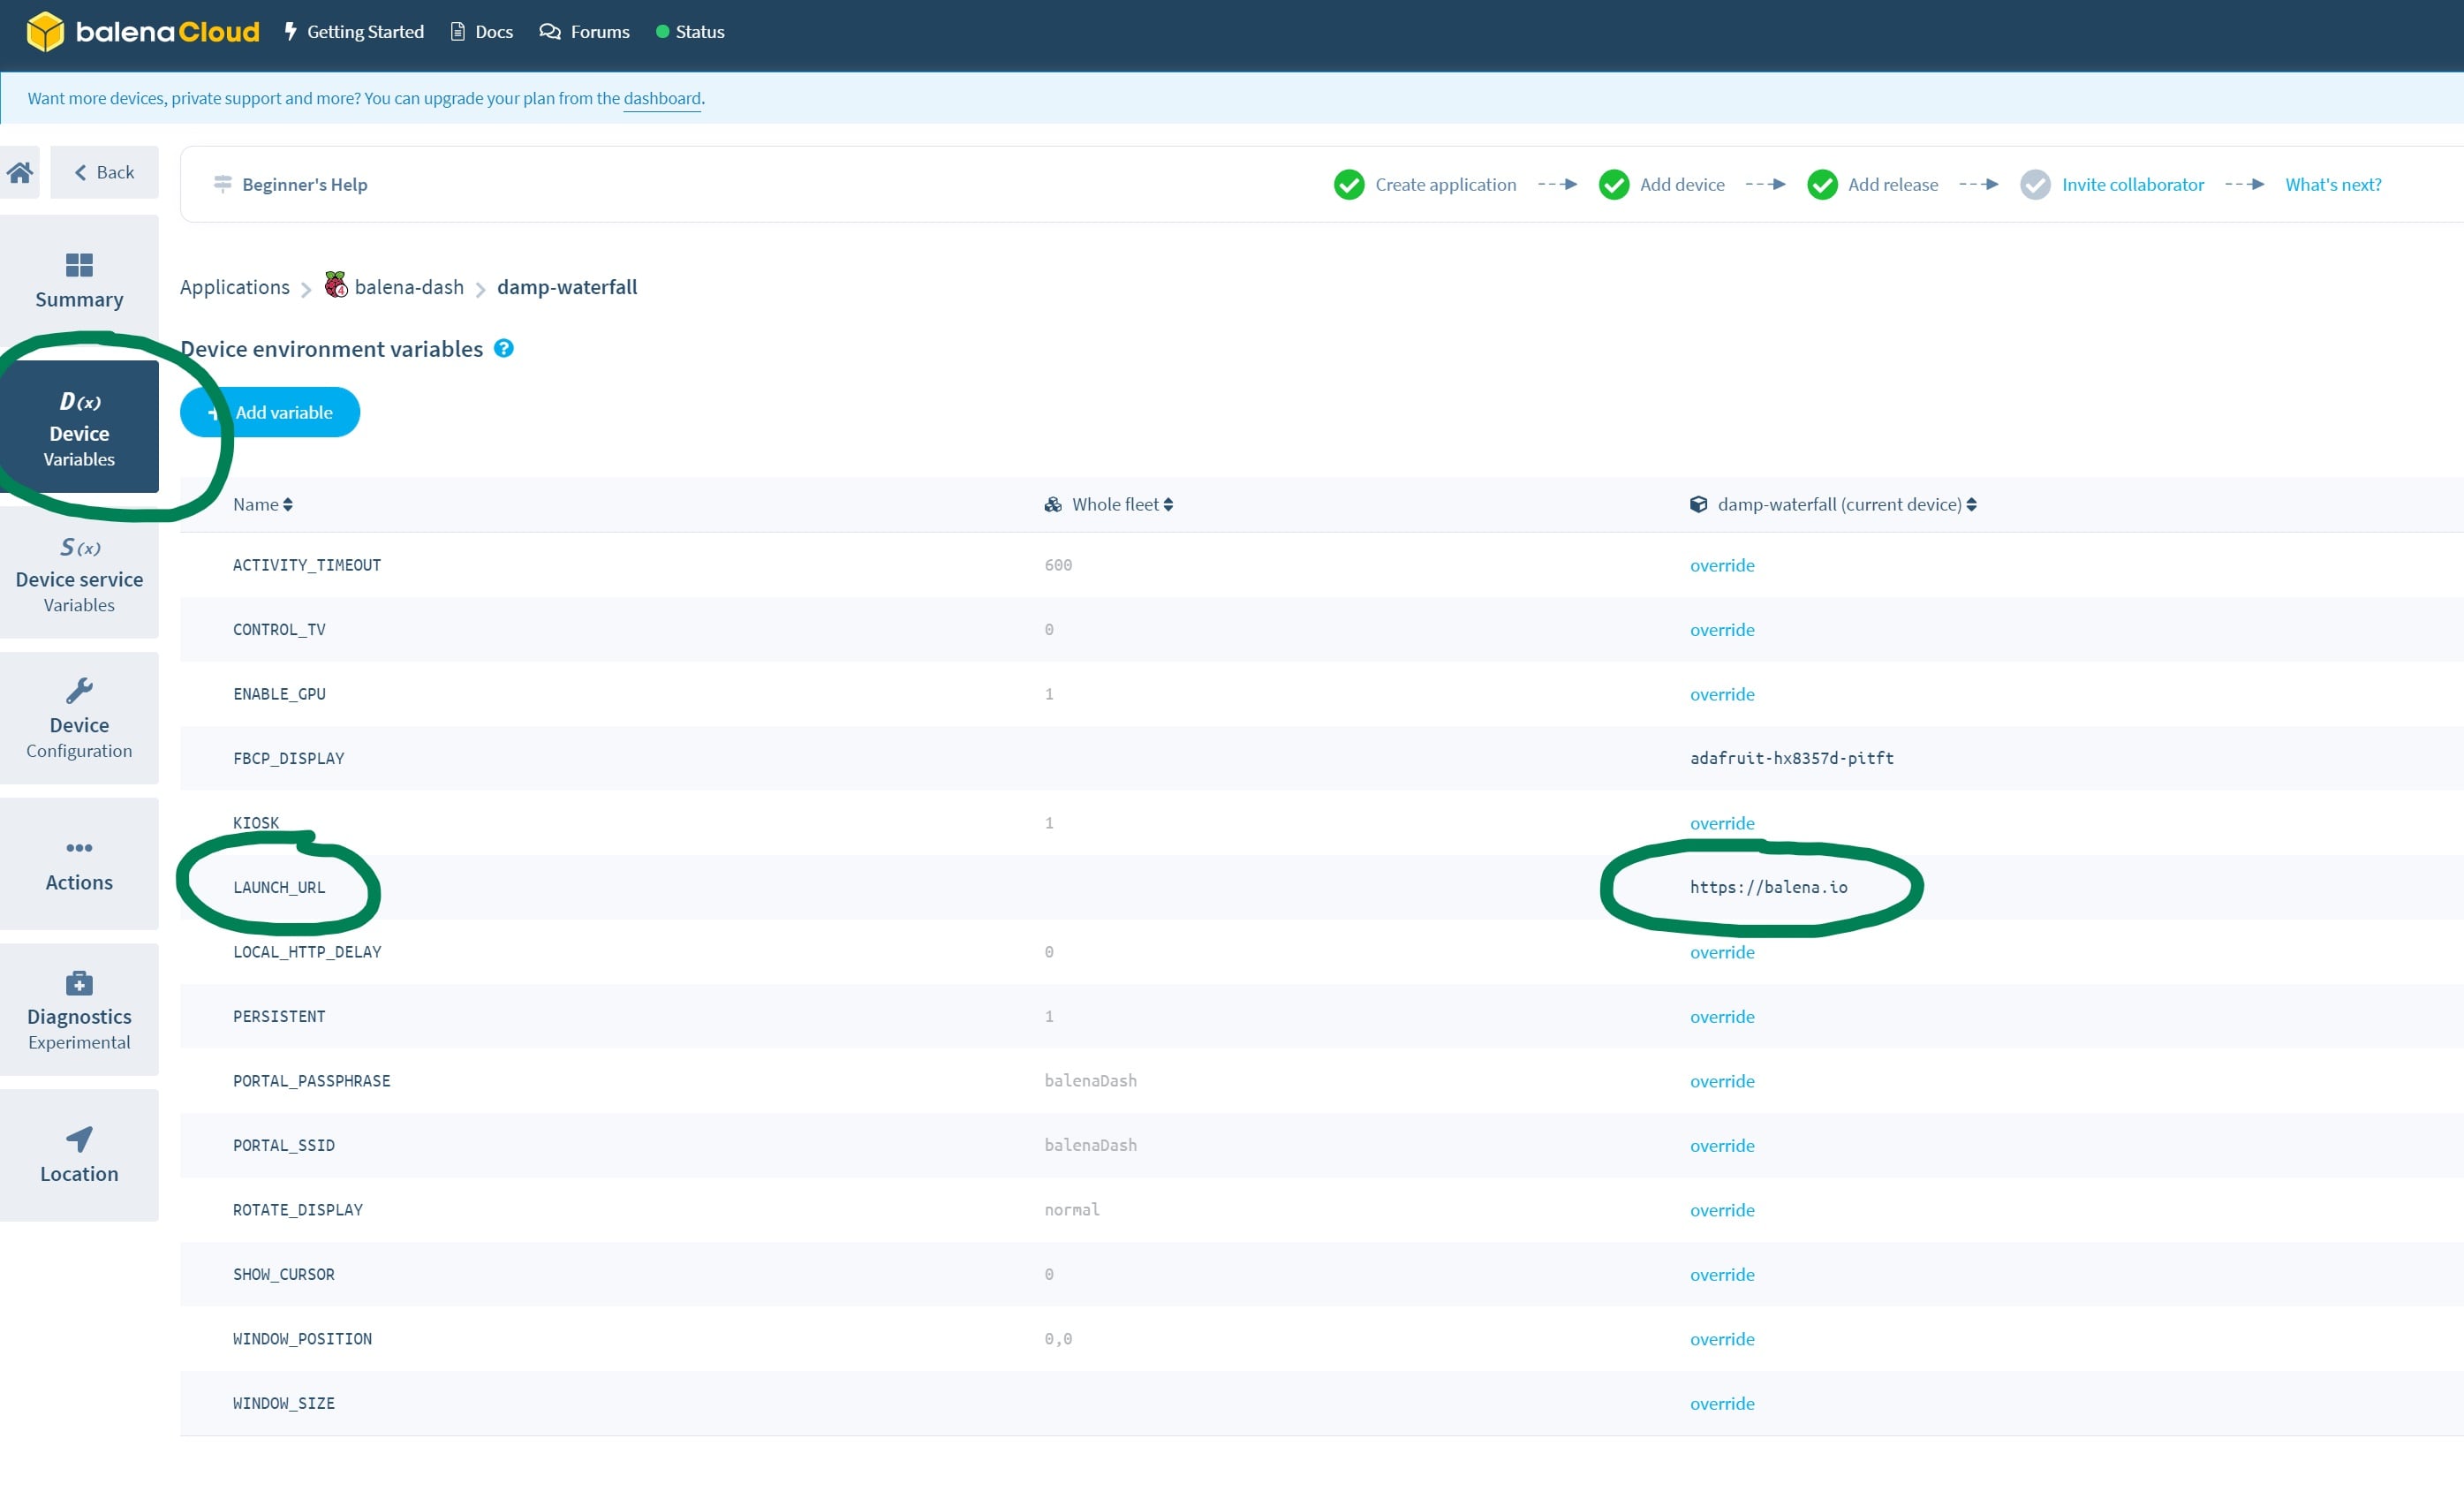
Click on “Add variable” and set the NAME as LAUNCH_URL and VALUE as the URL you’d like balenaDash to display.w
Give it a try
To give you some ideas, here are a few examples of things you can use your balenaDash display for. In addition to the big list at the start of this article, try the following…
A YouTube loop
Besides using YouTube as in the initial example, you can easily set a video to automatically open in full-screen and run on repeat.
To do this, you can use the service provided by yout-ube.com. This is as simple as finding the video you’d like to play, and adding a - character after the t in the URL. For example…
Being Rick Astley fans, we’d like to loop the video with the URL https://www.youtube.com/watch?v=dQw4w9WgXcQ, so we add https://www.yout-ube.com/watch?v=dQw4w9WgXcQ to the LAUNCH_URL parameter.
To change to a different video, alter the video ID in the URL. Some good ones to get you started: njJJSmWdIgA, OZBWfyYtYQY and QH2-TGUlwu4.

Setting up a dashboard
Take a look at our guide on setting up a dashboard application to use with balenaDash.
Controlling the content with the webUI & your own apps with the HTTP API
balenaDash has a webUI running on port 8080 allowing you to change the content with a web browser. This is covered in detail here.
Set up the display backlight to turn on and off with a timer
A feature of balenaDash is the ability to turn on and off the backlight of the Raspberry Pi according to a schedule.
Using a mouse
If you’d like to plug in a mouse to use with balenaDash, add the following environment variable to the application or device: WPE_BCMRPI_CURSOR with a value of 1.
About the project
The balenaDash project uses Chromium for all supported devices. Chromium is an open-source browser project with a goal of building a safer, faster, and more stable way for all Internet users to experience the web. This project takes advantage of the hardware GPU acceleration available on the Raspberry Pi, and so allows us to display a wide variety of web applications with fullscreen animation and full motion video smoothly.
Using this software means that you can display web-based projects without the requirement to install a full GUI and typical desktop browser, with the benefits of improved performance, reduced resource requirements, and ease of automation.
We’ve removed the complication of setting up a Chromium-based browser for you all within a Docker container. A container can be thought of as an isolated environment within the operating system running on the Raspberry Pi, that can be preconfigured to install various software packages, data, code and configuration files.
If you’d like to learn more, an introduction to containers can be found here.
What’s next?
At this point you’re setup with your shiny new balenaDash display and are most likely overflowing with ideas what to use it for.
You’ve setup your Raspberry Pi using balenaCloud which makes adding a second screen trivial. Flash another SD card with the same image and your second device will appear in the same application and automatically be provisioned with the same software without any further setup work!
Find, try, and submit your own projects on balenaHub
You’ll find this edge project and many others at balenaHub, our marketplace for IoT and edge projects. With a quick search, find your next edge project, from digital signage, surveillance, edge AI, audio analysis, and more. Or create your own project and share it with the world.
We hope this post has inspired you to set up your own balenaDash display. If you have any questions or feedback, or have built your own version of this project, we’d love to see you share your work over in our forums! Happy hacking!
Join the discussion at forums.balena.io