
Editor’s Note, 25 March 2021: Edge developers can now access balenaBlocks pre-built containerized services ready to drop into new applications. Check them out on balenaHub.
Developing containerized applications can be time-consuming, particularly when they have multiple services and you want to ensure they run properly on different platforms and IoT devices. With balenaCloud Local Mode and livepush, development happens right on your devices, allowing you to quickly iterate and see updated results immediately.
When you use Local Mode, your applications and devices are still managed by balenaCloud, but instead of waiting for your images to be uploaded to the balena build servers and then downloaded to your devices, your images are built directly on your devices. This saves a lot of time, particularly for large multi-service applications.
At the same time, devices in Local Mode can take advantage of livepush, which pushes incremental container changes to your device, not only rebuilding affected layers, but synching any changed files and re-running any affected RUN steps. It skips those that don’t need to be touched, making the rebuild process much faster. This doesn’t impact your workflow, allowing you to develop just as you always have.

This combination is so powerful and easy that I’ve made it my preferred way to develop applications. With thousands of base images available from the balena library, building apps this way is a breeze.
Getting started with Local Mode
In order to take advantage of Local Mode and livepush, you’ll need a balenaCloud account (free or paid) and:
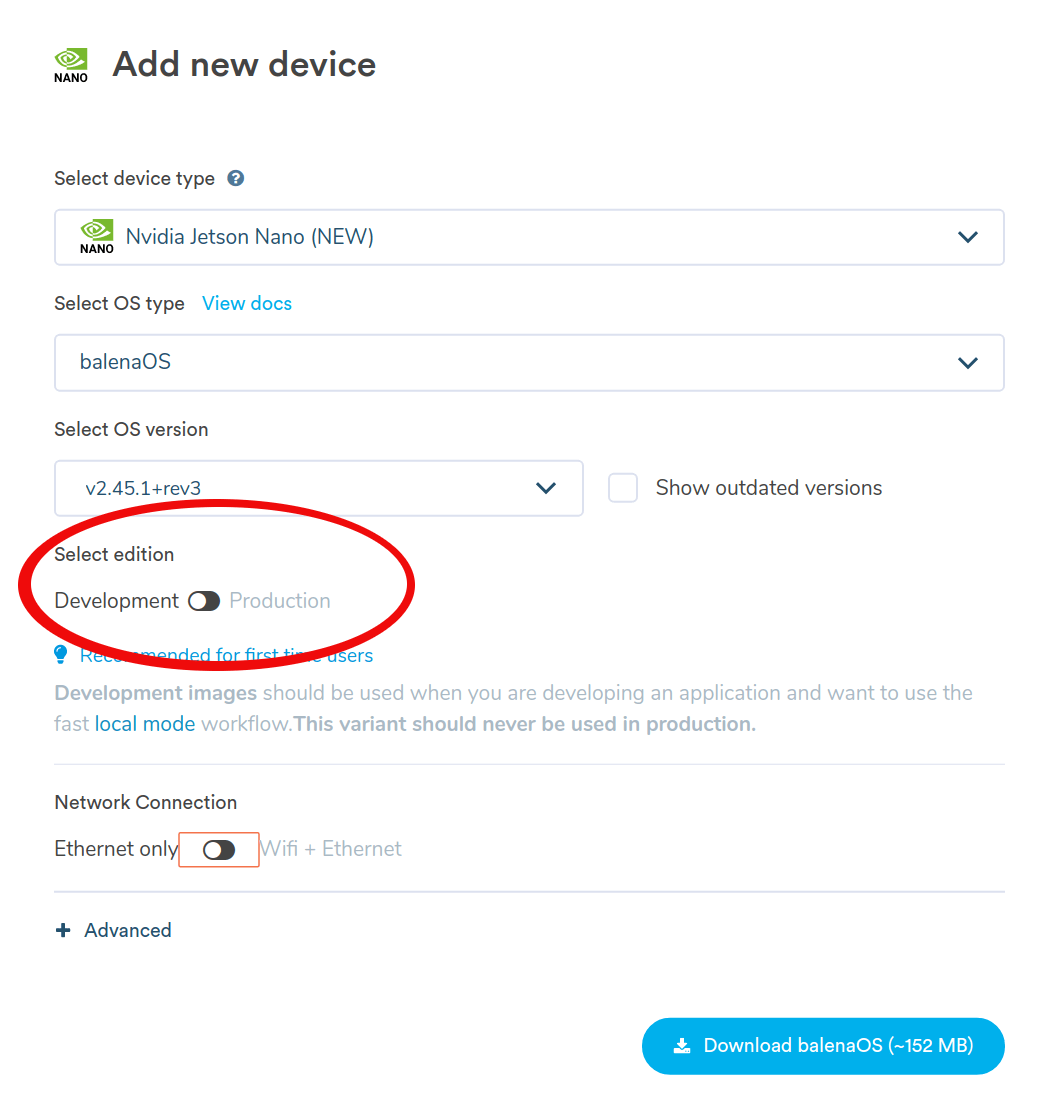
- A device running balenaOS v2.29.0 or higher (the current version is v2.47.1).
- A device running a development variant of the OS (set when you download an application image).
- balena CLI installed on your development machine. Local mode must be enabled for your device through the balenaCloud dashboard.
For livepush, it’s also nice, but not necessary, to have a development IDE like Visual Studio Code or Eclipse, which allow you to see your code and integrated terminal together.
A Local Mode example with Alpine, Cowsay and Fortune
To demonstrate how Local Mode and livepush work, I’ve put together a simple containerized application that installs Cowsay and Fortune on Alpine that presents a quote each time a user logs in. We’ll start with a simple Alpine container, add Cowsay and Fortune, and then edit the .bashrc file in separate steps so you can see the flow in action.
“`bash
/ “What’s that thing?” \
| |
| “Well, it’s a highly technical, |
| sensitive instrument we use in computer |
| repair. Being a layman, you probably |
| can’t grasp exactly what it does. We |
| call it a two-by-four.” |
| |
\ — Jeff MacNelley, “Shoe” /
\
\
    .--.
    |o_o |
    |:_/ |
  //   \ \
  (|     | )
/'\_   _/`\
\___)=(___/
“`
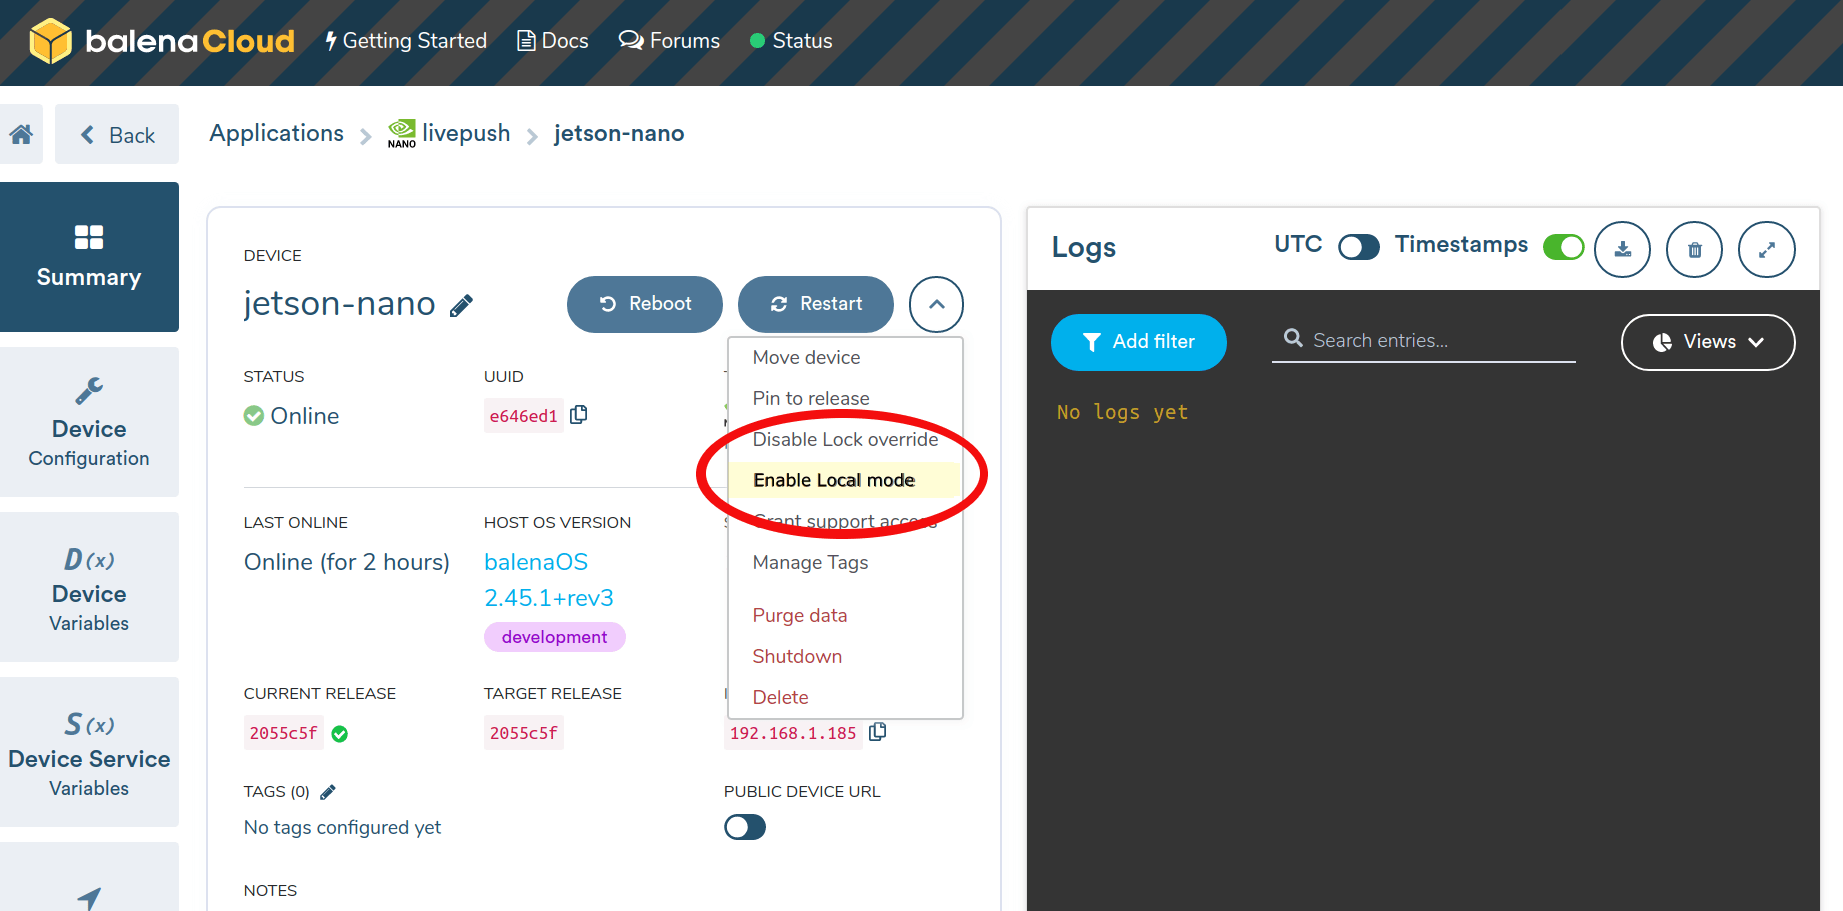
Start by creating a new application in balenaCloud, and add a device. In my example above, I’ve called my application livepush and added a Jetson Nano device to the application. In the device menu, select Enable local mode. You’ll notice that both services and service logs are no longer visible or available. Later, you’ll see how to view those from your workstation terminal via balena-cli.
Take note of the IP address and short UUID for your device. You’ll need one or the other to log into your device in Local Mode. You can also get your device information by running balena devices and balena device _from the command line after you’ve logged in to balenaCloud with _balena login.
Local Mode and livepush in action
With the application and device ready, test your Local Mode connection. Open a terminal on your workstation. First, create a new folder, change into it and log in to balenaCloud:
``bash || | / __ | ‘ \ / ` |
$ mkdir ~/localpush
$ balena login
| |__ __ _ | | ___ _ __ __ _
| '_ \ / _
| |) | () || || /| | | || () |
|_./ _,||| _ /|| || _,_|
Logging in to balena-cloud.com
? How would you like to login? (Use arrow keys)
❯ Web authorization (recommended)
Credentials
Authentication token
I don’t have a balena account!
“`
Now, use the device IP address to log in to the container Host. In my example, the IP address is 192.168.1.185. You can also log in with < uuid >.local. Keep in mind that logging in this way connects to the host. You’ll add the –service flag later to log in to the Alpine container.
bash

balena ssh 192.168.1.185    # Replace with your device IP address
Create a simple Dockerfile.template to build your application
Though it’s possible to deploy this service without a docker-compose.yml file, we’ll create one along with a Dockerfile.template in order to highlight some of the livepush features. Create these in the folder you created earlier. Keep the Dockerfile.template file open so you can add content later.
The docker-compose.yml file:
yml

version: ‘2.1’

services:

  alpine:

    build: ./

    container-name: alpine
Next, the Dockerfile.template file:
“`dockerfile
FROM balenalib/%%BALENA_MACHINE_NAME%%-alpine
CMD [“bash”]
“`
This is obviously very simple, but it’s just the start. The Dockerfile.template will pull the latest Alpine image and the correct architecture based on the balenaCloud variable %%BALENA_MACHINE_NAME%%. In my case, it’ll pull the aarch64 version for my Jetson Nano.
Push the application to your device:
bash

balena push <ip-address>
Progress will appear in your terminal, but instead of exiting at the end as with a regular push, the terminal will remain active after the Local Mode push. Adding the –detach flag to the push command will return you to the command line, but don’t add that. We want to keep this connection active for livepush.
Once the deployment finishes, you’ll see a message like this telling you the application is running:
toml

[Live]    Waiting for device state to settle...
You can ssh into the new container, this time adding the service name to the command. Leave the original terminal in this state, and open a second terminal to log in. Run the command which cowsay to confirm the package is not installed:
bash

balena ssh <ip-address> alpine

bash-5.0 # which cowsay
With everything working, you’re now ready to see livepush in action. Go back to your Dockerfile.template file and add the following RUN command to install git, perl, cowsay and fortune.
“`dockerfile
Install git and the various packages
RUN install_packages git perl fortune
RUN cd /tmp && \
git clone https://github.com/jasonm23/cowsay.git && \
cd cowsay ; ./install.sh /usr/local && \
rm -rf /var/cache/apk/ /var/tmp/ /tmp/* && \
apk del git
“`
The moment you save the file, you’ll notice activity in your first terminal logs. Balena is rebuilding your alpine service, checking to see what needs to be changed and immediately building the changes on your device. The alpine service will restart, so you’ll be automatically logged out of the second terminal ssh session.
Log back in, and run the same which command. Cowsay is now installed. Don’t be alarmed that this updated process happens quickly! It only takes your balena device a few seconds to make these changes and restart the service.
bash

balena ssh <ip-address> alpine

bash-5.0 # which cowsay

/usr/local/bin/cowsay
Check that Cowsay and Fortune are working well together:
“`bash
bash-5.0# fortune | cowsay
/ We may not return the affection of \
| those who like us, but we always |
\ respect their good judgment. /
    \   ^__^
      \  (oo)\__ ___
        (__)\       )\/\
            ||----w |
            ||     ||
“`
Finally, let’s make it so this service displays a random message on log in. This is done by adding a command to the /root/.bashrc file. Again, edit your Dockerfile.template file, adding the following lines (which check to see if the applications are installed before running the cowsay command):
“`bash
Show a cowsay fortune at login
RUN echo -e ” \
if [ -x /usr/local/bin/cowsay -a -x /usr/bin/fortune ]; then \n \
fortune | cowsay \n \
fi \n” > /root/.bashrc
“`
In your first terminal, you’ll see the logs changing and a sample Cowsay fortune. When you ssh in from your second terminal, you should be greeted with the cow and message. Remember to add the container name (balena ssh <ip-address> alpine).
Since we’re Linux lovers, let’s make a small change to the cowsay command to use the Tux mascot instead of a cow. In your Dockerfile.template, change fortune | cowsay to fortune | cowsay -f tux and save. Log in from your second terminal to see the change.
“`bash
/ Experience is what you get when you \
\ were expecting something else. /
\
\
.–.
|o_o |
|:/ |
// \ \
(| | )
/’_ /`\
___)=(___/
bash-5.0#
“`
Since the balena dashboard terminals and logs aren’t available in Local Mode, you can always view logs of a running development container from a remote shell. Add the –service flag to a standard logs command to access the specific container:
bash

balena logs <ip-address> --service alpine
If you don’t see output initially, that’s normal. Logs will appear as you make changes to your Cowsay application.
What’s next
Sign up for a free balenaCloud account today and try experimenting with container application development on your IoT devices using Local Mode and livepush.