
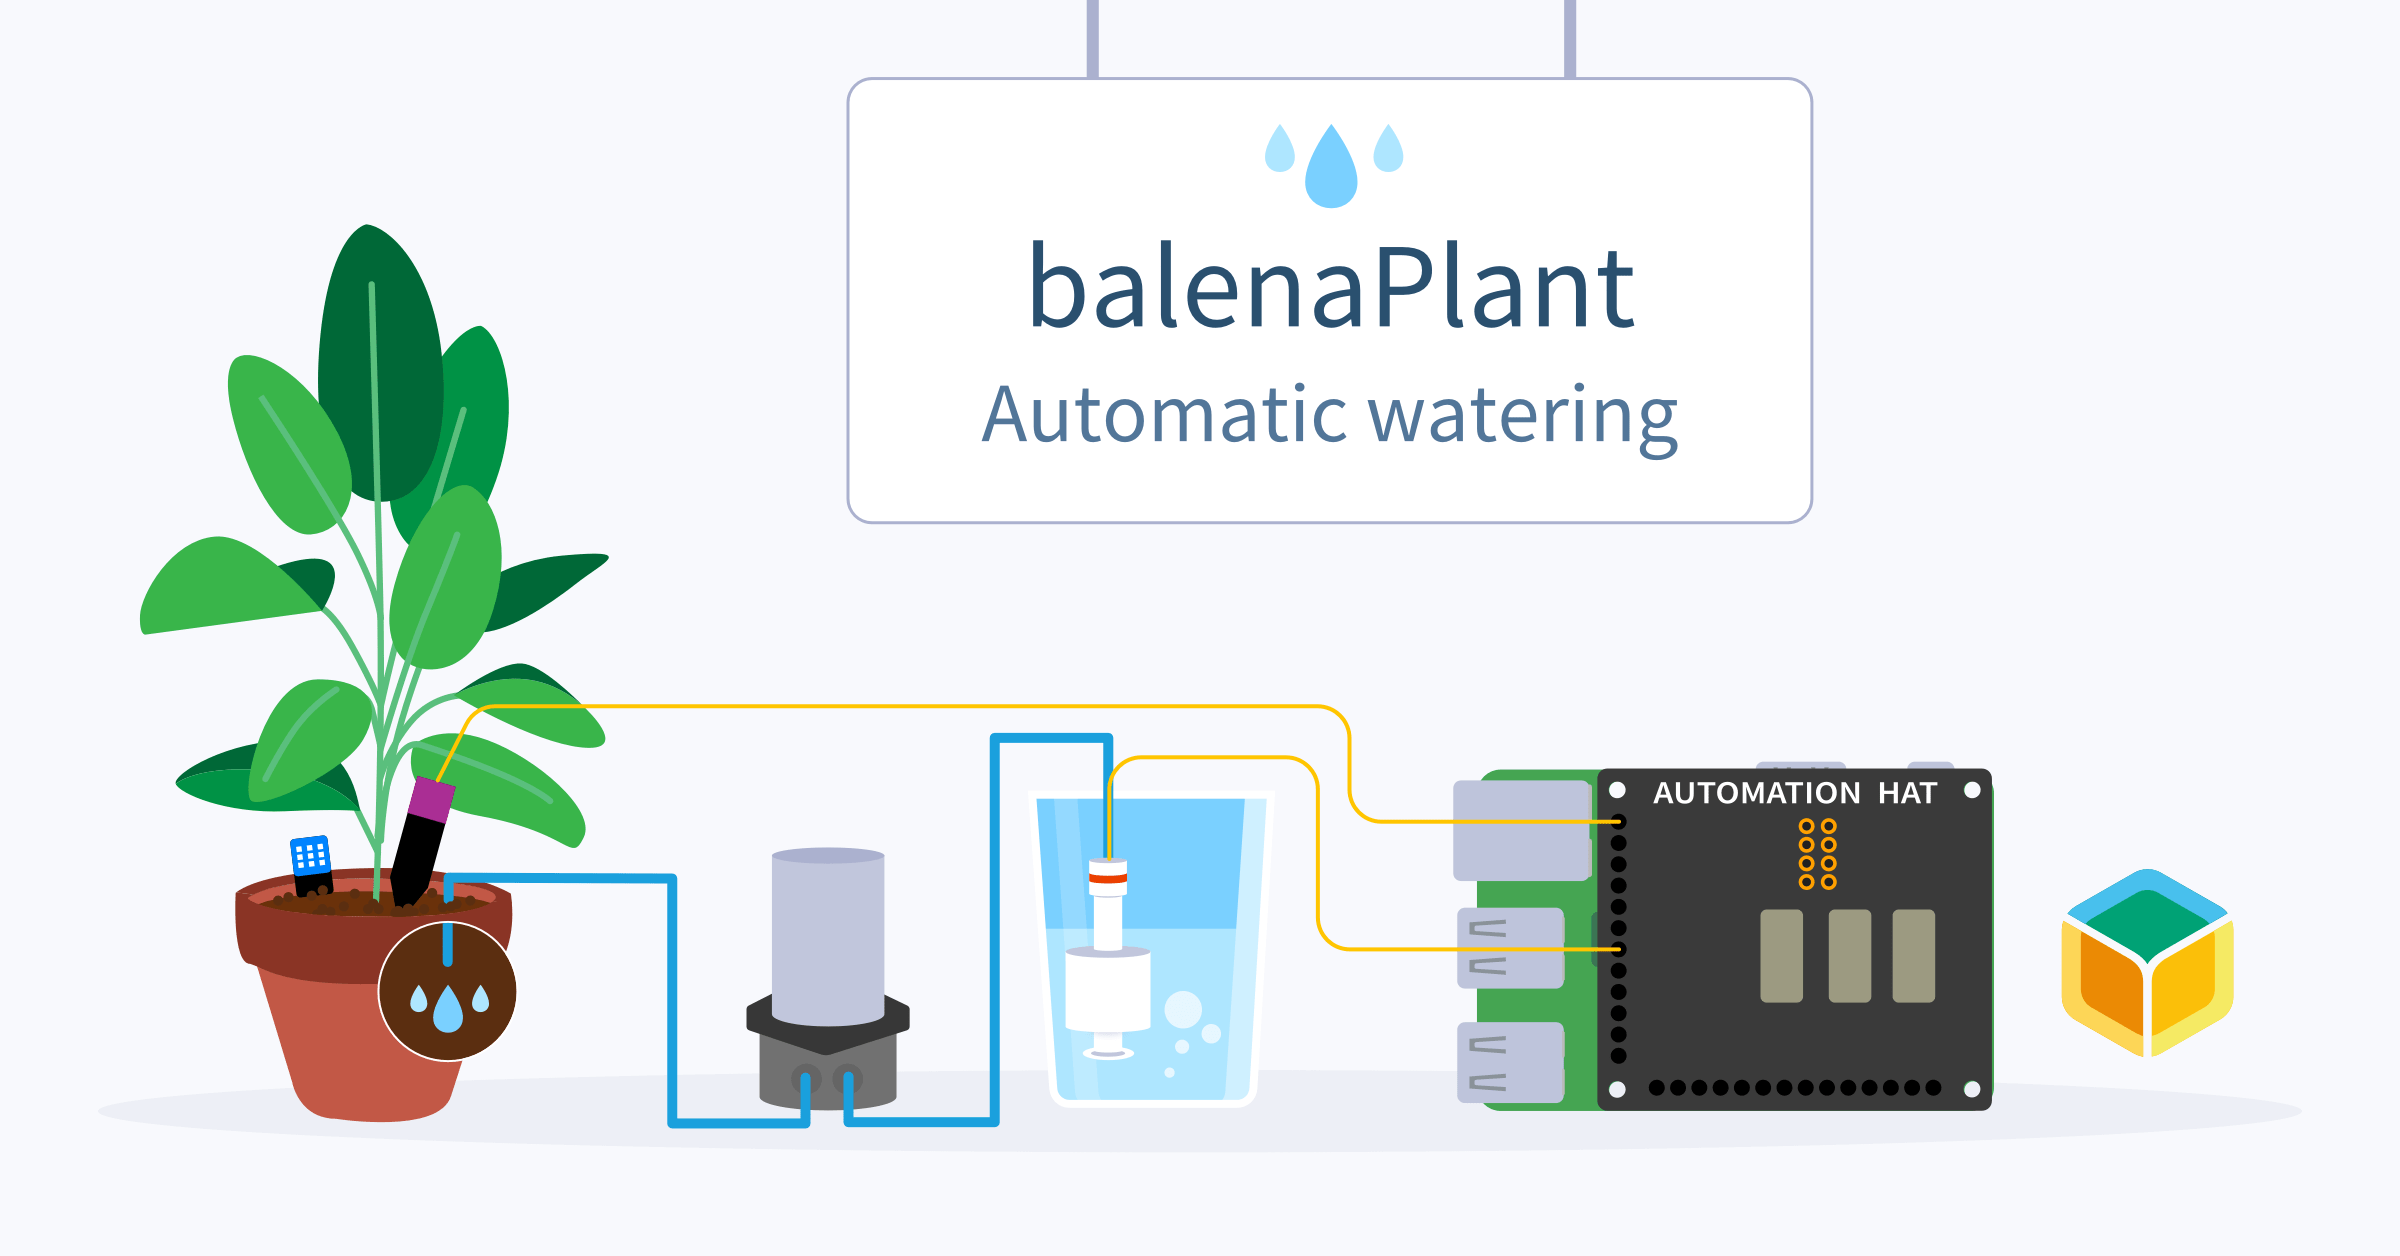
Even when you remember to water your plants, did you water too much? Not enough? This project combines a Raspberry Pi, balenaBlocks, environmental sensors, and water pump automation to help keep your plants watered with a data-driven touch.
Access a dashboard showing your plant data from anywhere in the world using balenaCloud. Add new plant monitors quickly and easily using the same application code on different devices. Use your imagination (and some extra parts) and turn balenaPlant into a balenaGarden.
We’ve shared a previous version of this project on the IoT Happy Hour. This time around, and with the help of amazing teammates, we’ve converted much of the code into balenaBlocks.
Before you start
Overview
This project will frequently take in measurements of our temperature and humidity sensor, capacitive soil moisture sensor, and keep an eye on water reservoir level. The idea: make sure the plant maintains a target moisture level.
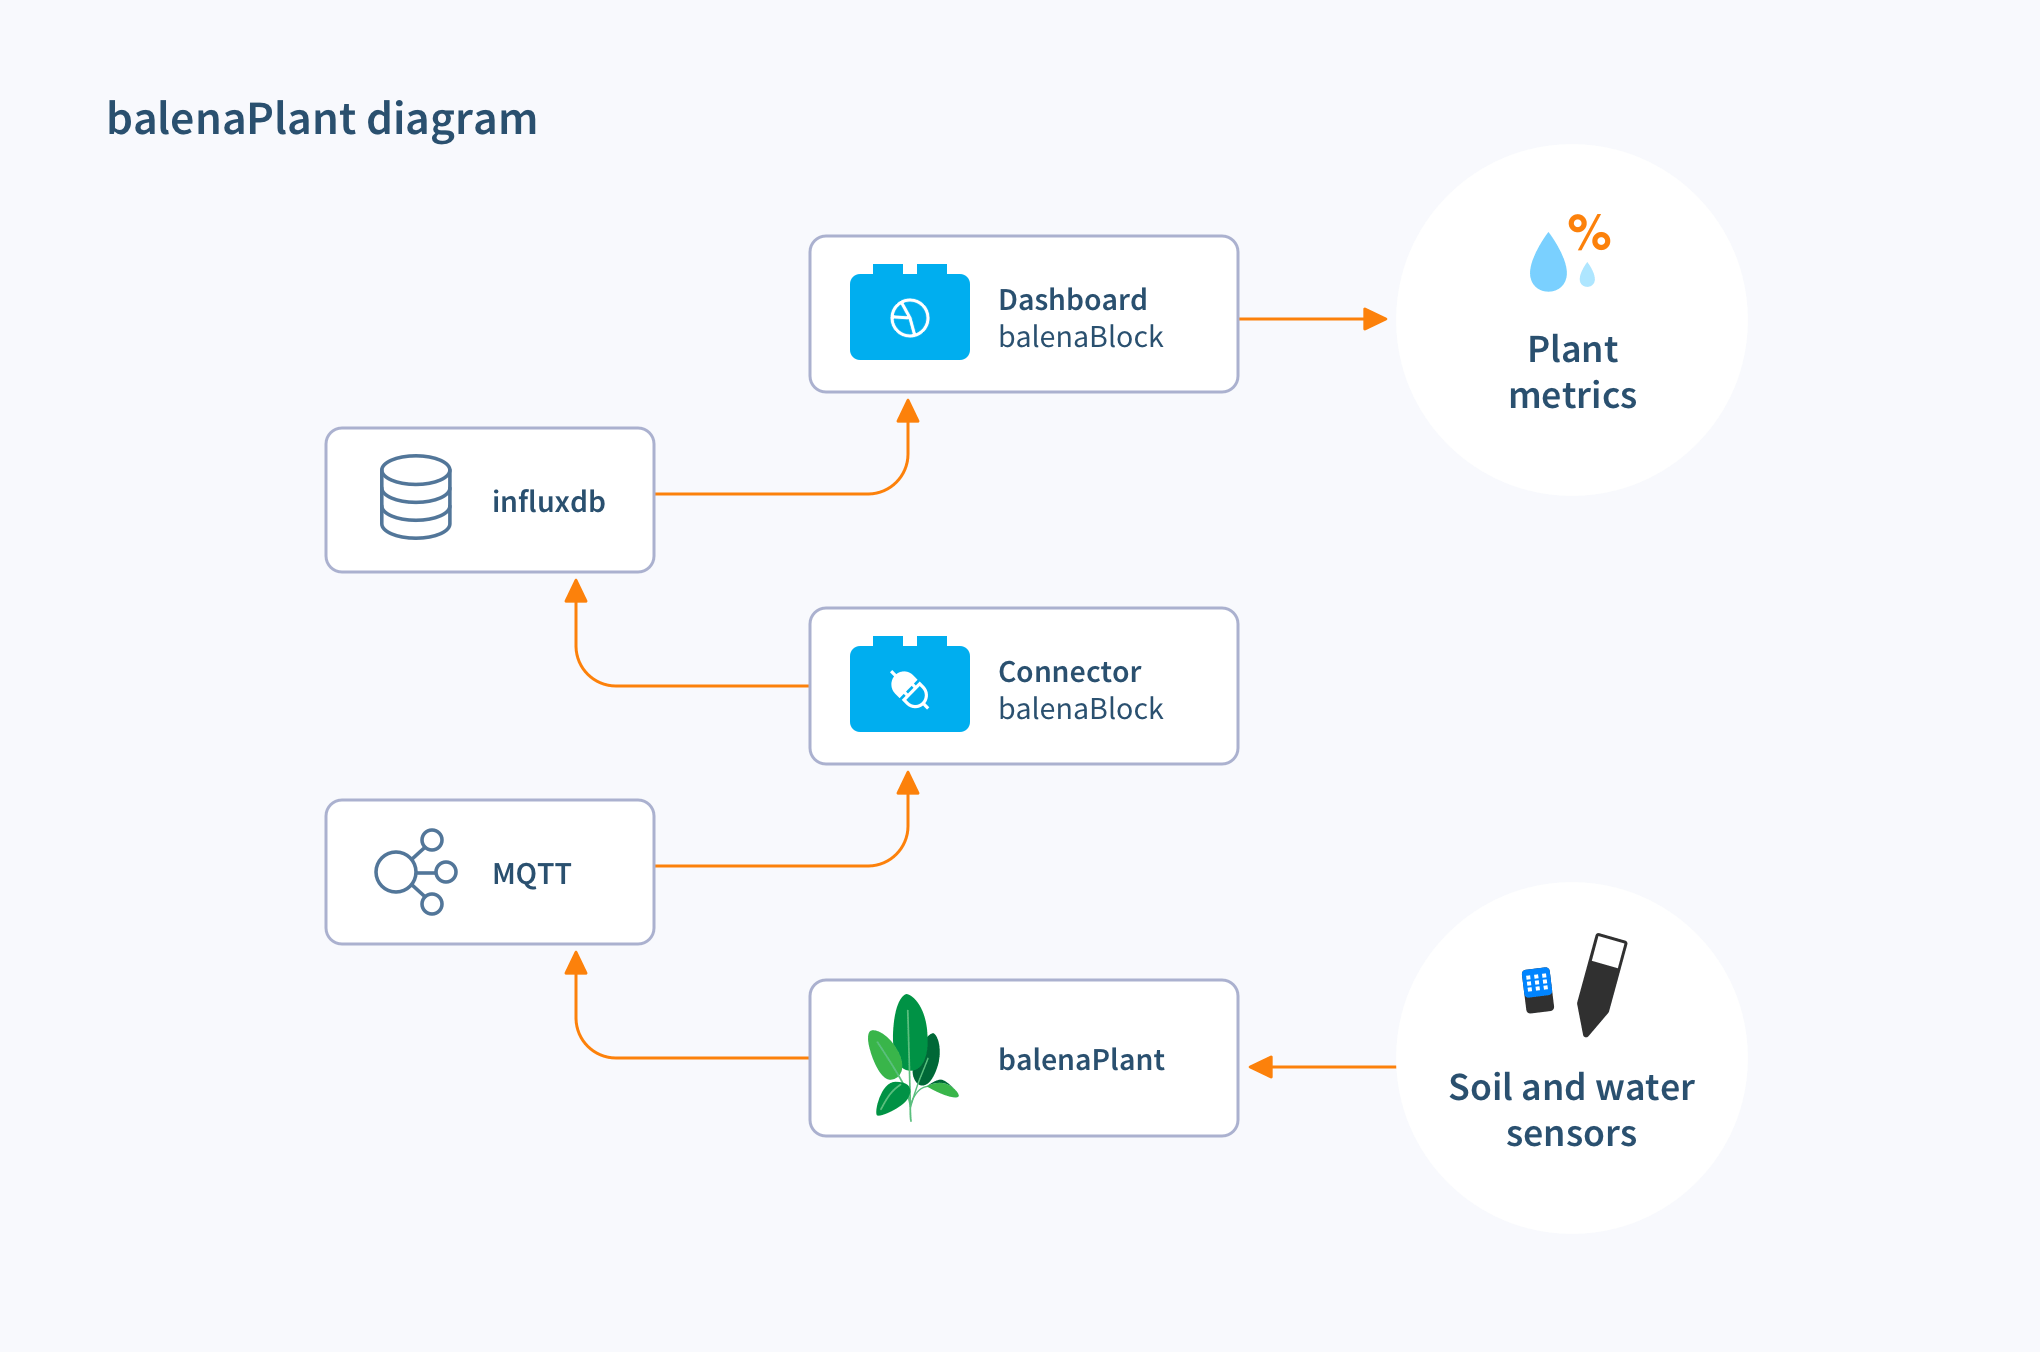
The python scripts will take the temperature, humidity, soil moisture, and pump switch readout and the balenaBlocks; connector and dashboard handle storing and charting the data. Separately another python script will check water reservoir level and manage how often the pump feeds water into the plant soil.
Hardware requirements
Here’s the list of materials. These aren’t necessarily recommendations, but links that represent what will likely work well with this project.
- Raspberry Pi ZeroWH/3B/4 (that’s what we’ve tested so far)
A 32GB+ SD card (e.g. SanDisk Pro) - Pimoroni Automation HAT/HAT MINI/pHAT (discontinued)
- DHT22 temperature and humidity sensor
- Capacitive soil moisture sensor
- Float switch
- 5V peristaltic pump (with water tube– some vendors don’t include the tubing– remember the tubing!!!)
Software requirements
Here’s the software that you’ll need to get going:
- a free balenaCloud account (first ten devices are fully featured and free)
- balenaEtcher to burn OS images to SD cards
- (optional) balenaCLI if you want to hack on this project, push code locally, etc.. If you want to go this route, you’ll want to clone the GitHub repo as well.
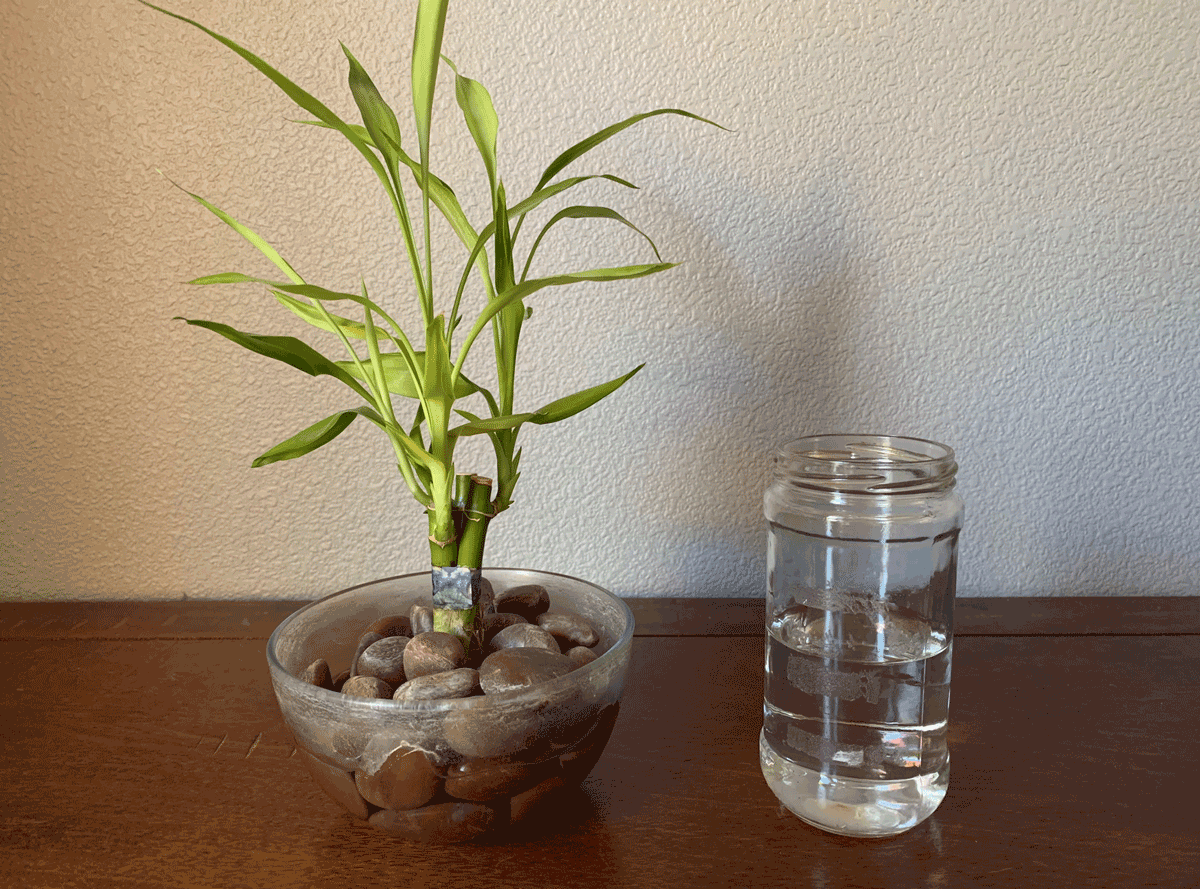
Don’t forget a plant. We recommend something resilient that you can over or underwater as you test– something like bamboo works great. And the most important part: water.
Tutorial
Assembling the hardware
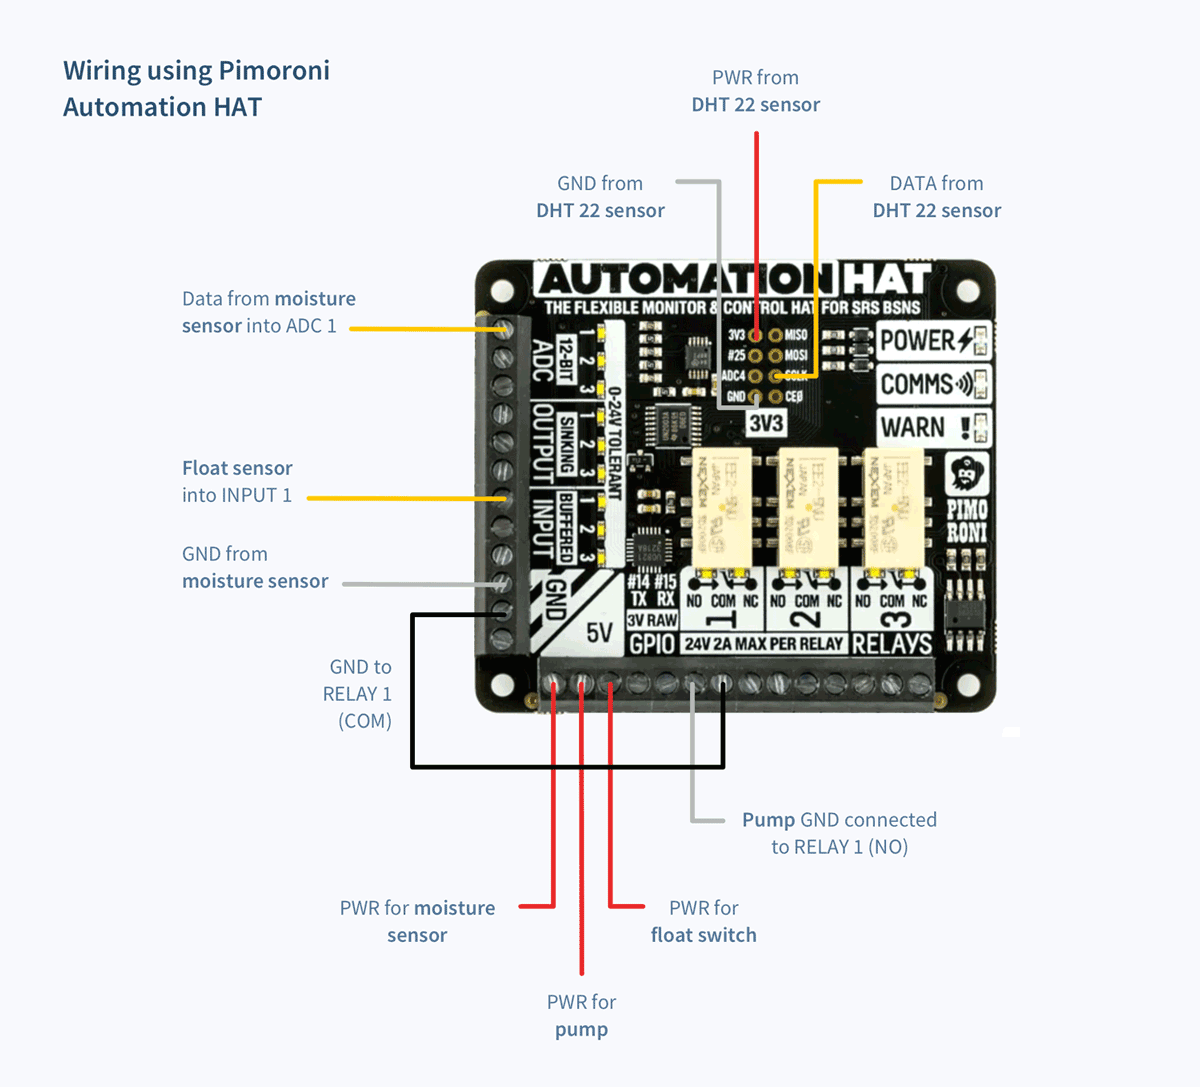
The original build can be done with custom wiring using breadboards, or using an automation HAT to help. NOTE: For this build, we’ll use the Pimoroni Automation HAT. In a future update, we’ll test out the Automation HAT MINI as well. The wiring and relay schema should be similar across the board (pun intended).
Solder on DHT22 sensor
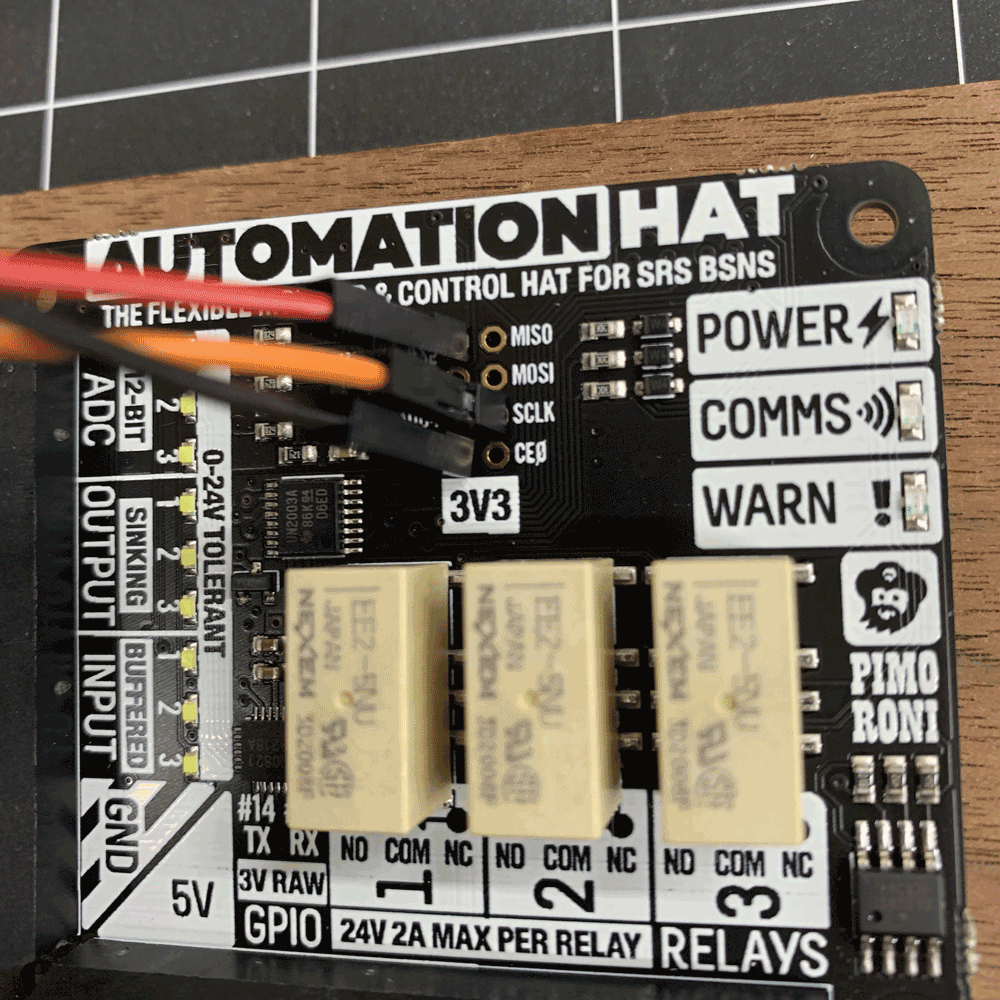
Connect the power and ground to the 3.3V pins. Connect the data pin to the SCLK pin, which is GPIO pin 11 (you’ll see this referenced in the plant watering code). This is the only soldering you’ll have to do for this project.
Add capacitive moisture sensor
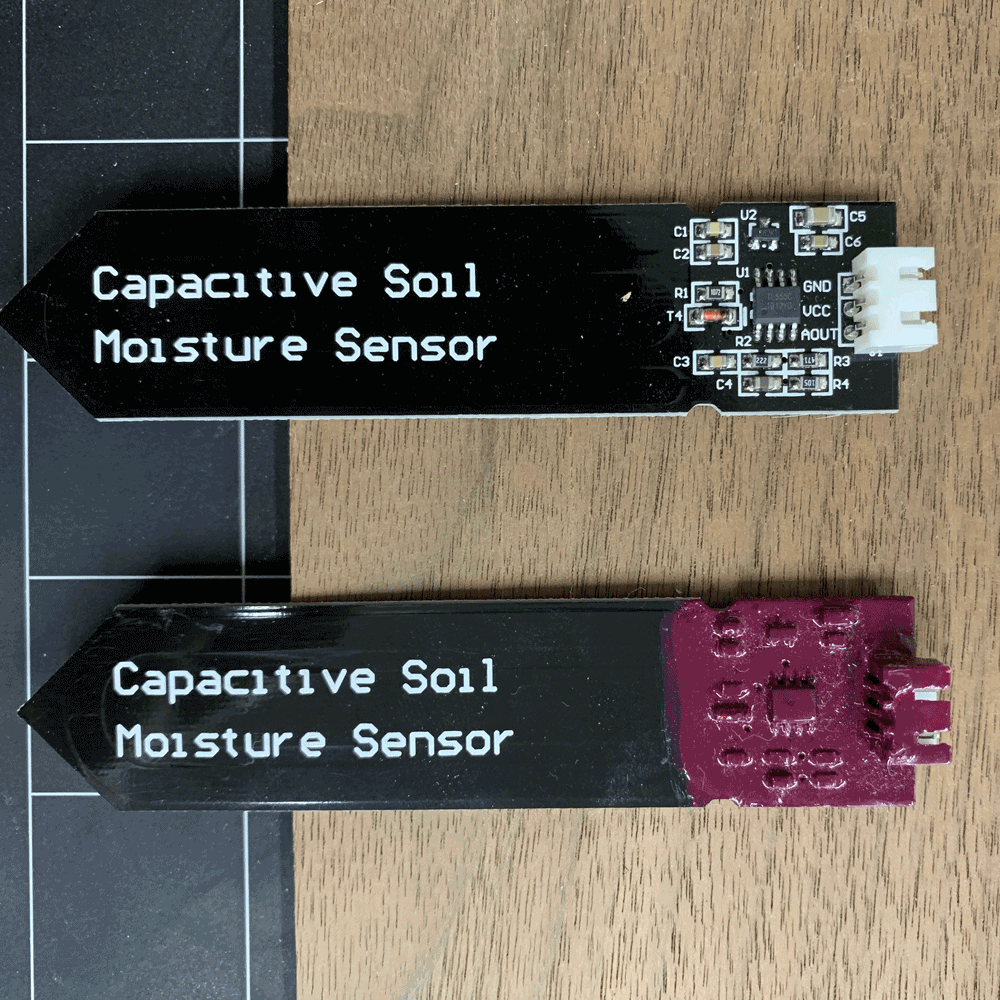
It’s helpful to paint or coat the exposed electronic components of this sensor with outdoor paint or nail polish. That way, water can’t short your sensor or setup.
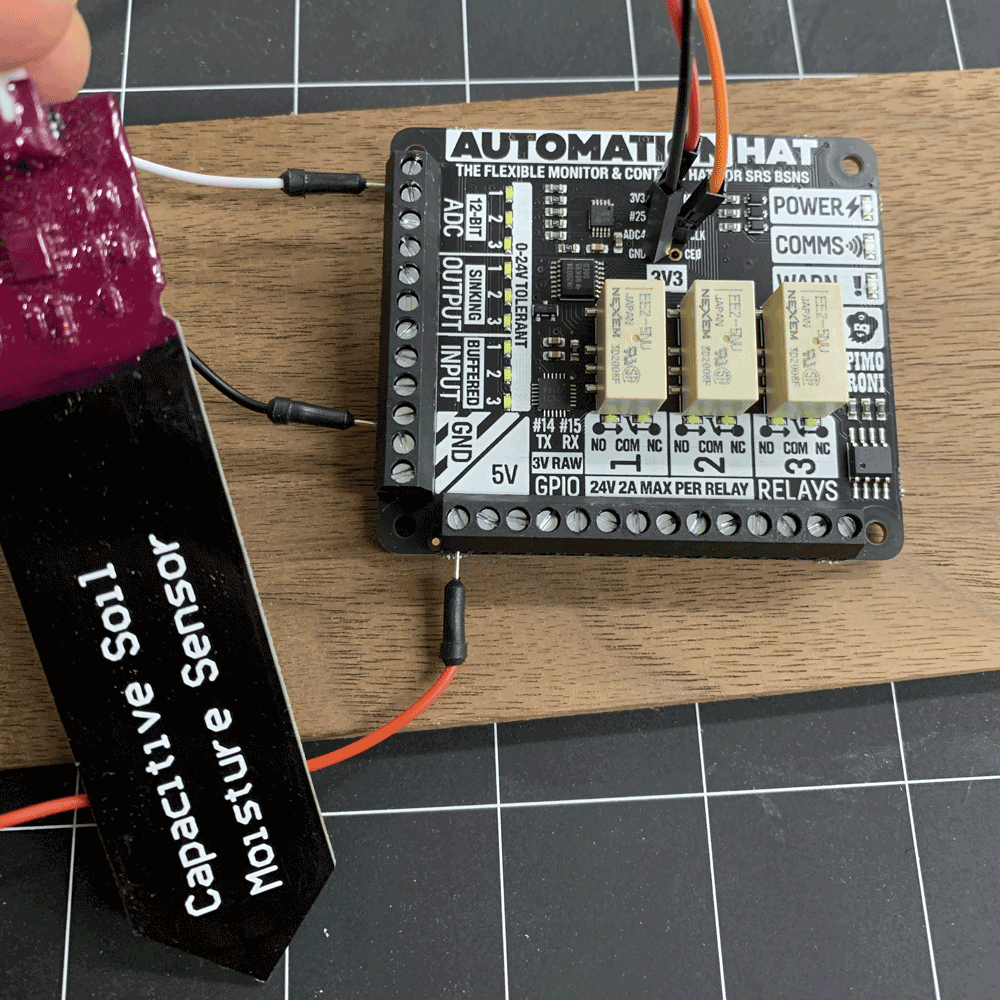
Power the soil moisture sensor using the 5V terminals on the HAT, and insert the data wire into the ADC 1 terminal (since the sensor is giving us an analog signal to convert).
Add the 12V peristaltic water pump
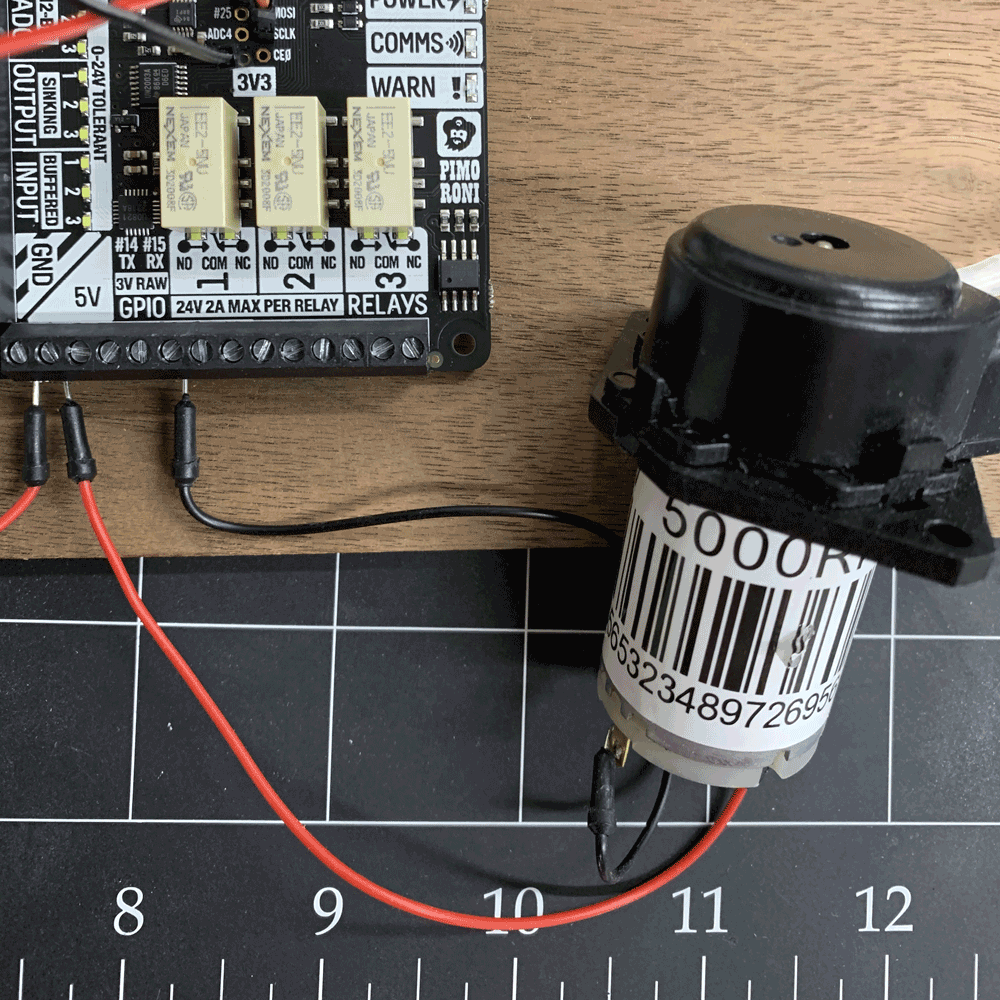
Power the peristaltic pump using the 5V terminal on the Automation pHAT. Connect the pump’s ground wire to the NO (Normally Open) terminal to access the HAT’s relay functionality.
Add the float switch
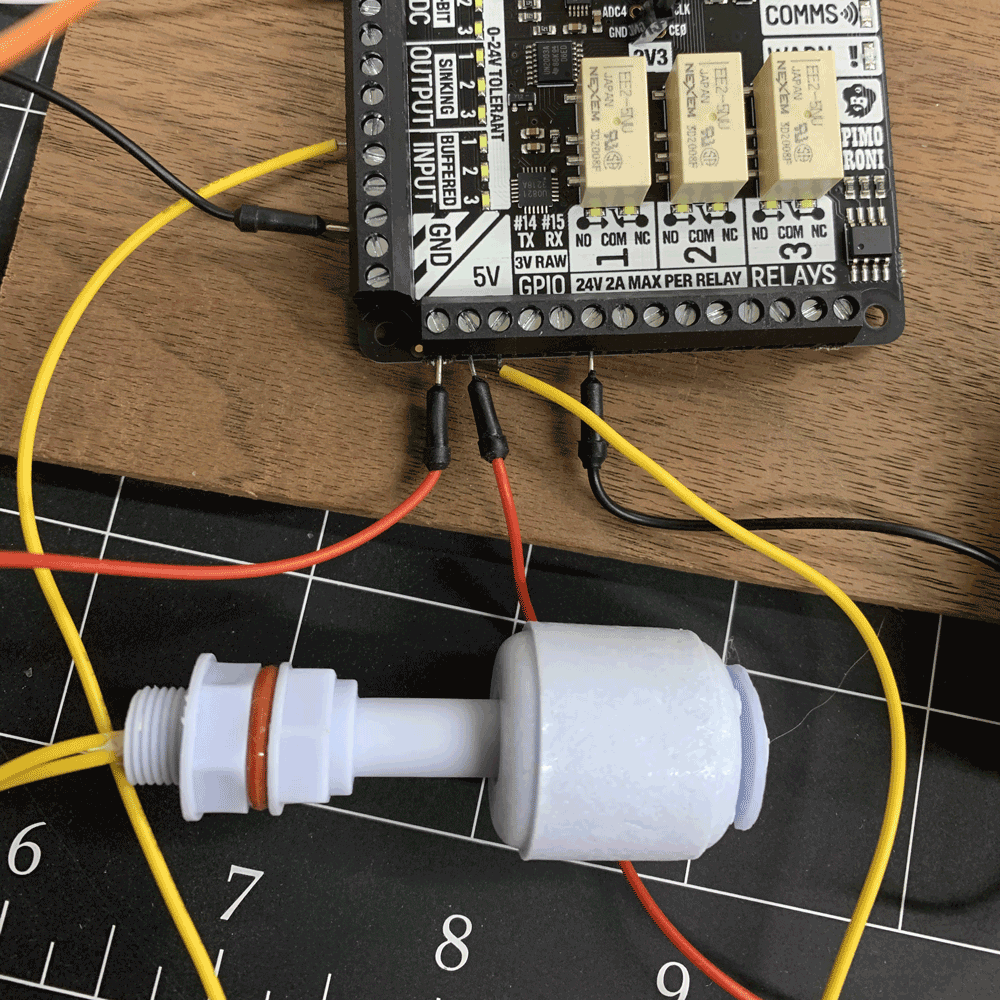
Power the float switch using the 5V terminal and connect the other wire into the INPUT 1 terminal.
Close the loop
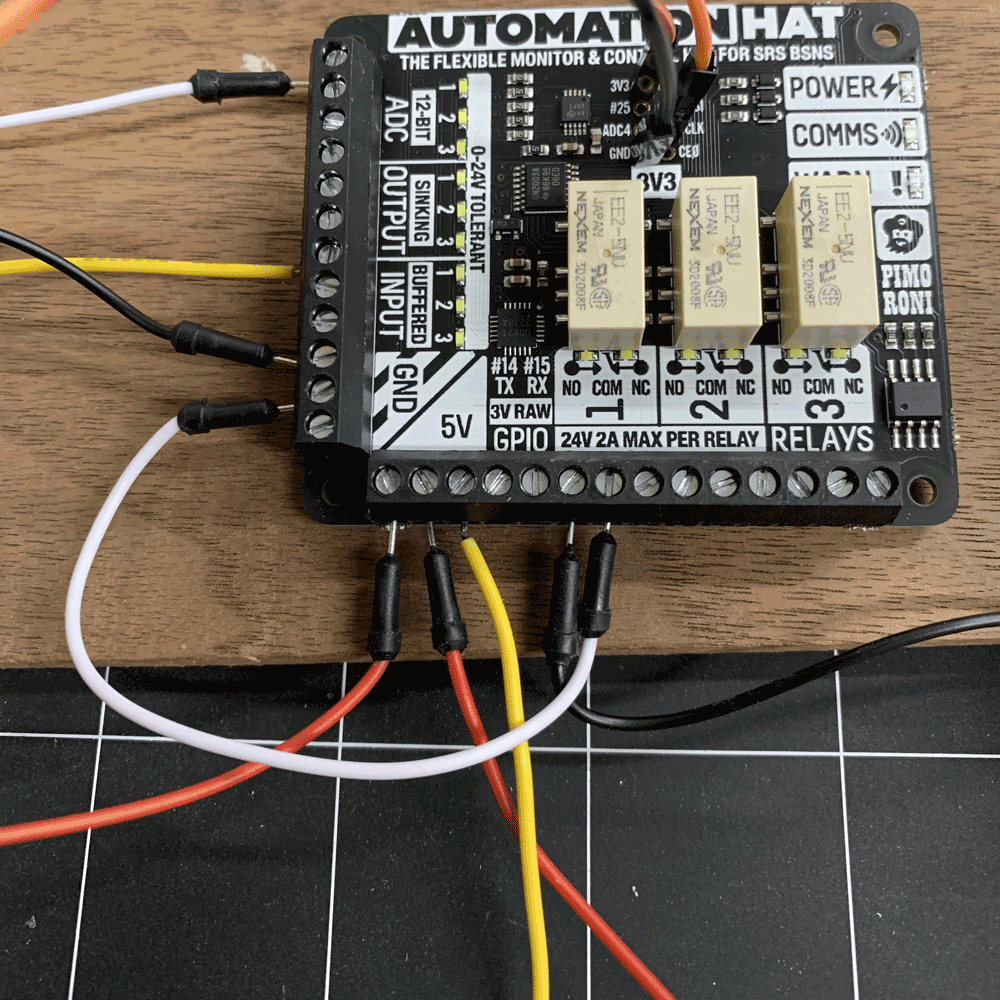
Close the circuit for the water pump by using a wire to connect the RELAY 1 COM terminal to GND (white wire above).
Set everything up
After preparing the Automation HAT (soldering pins, connecting terminals, etc.), connect it to the Raspberry Pi via GPIO pins.
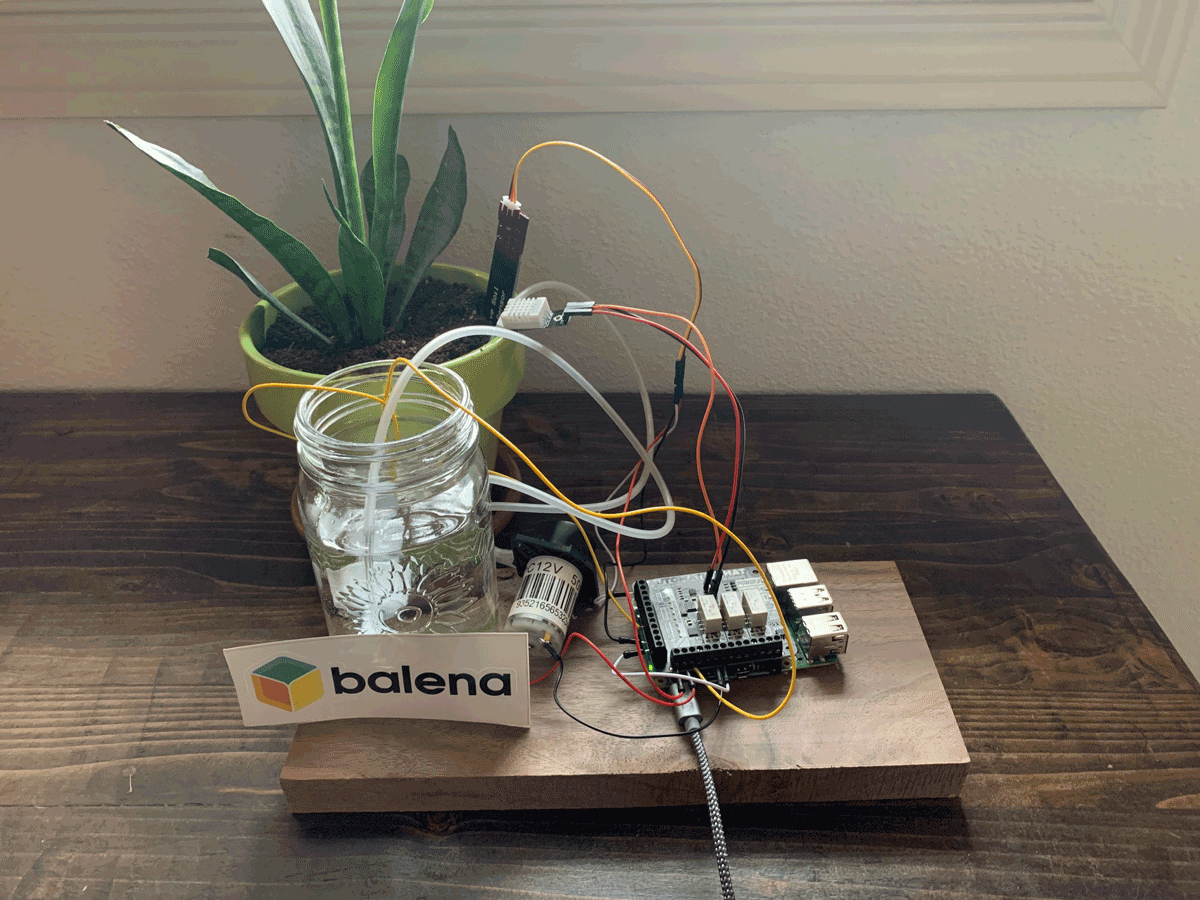
Add the moisture sensor to the plant’s soil (or lack thereof in the case of this bamboo). Add the pumping end of the water pump into your water source and the other end into the plant’s soil. IMPORTANT: Sometimes it’s not clear on some pumps as to which pipe does what– once you test, mark or tape a line to help tell which is water in, and which is water out. The last thing you want to do is douse your electronics with water.
(Optional) Build or 3D print additional accessories
The original project creators built 3D-printed parts to hold various parts or to enclose the electronics for the project. Check out this forum thread to learn more.
Add and deploy the application
Deploy with balena
Once you’re logged into your balenaCloud account (remember: first ten devices are free and fully-featured), click the button below to auto-magically deploy the project to your account.

Name your application, select your device type, and click “Create and deploy.” You’ll be taken to your application dashboard and our builders will start creating your build release in the background (you’ll see the notification in the breadcrumb navigation).
Add a device
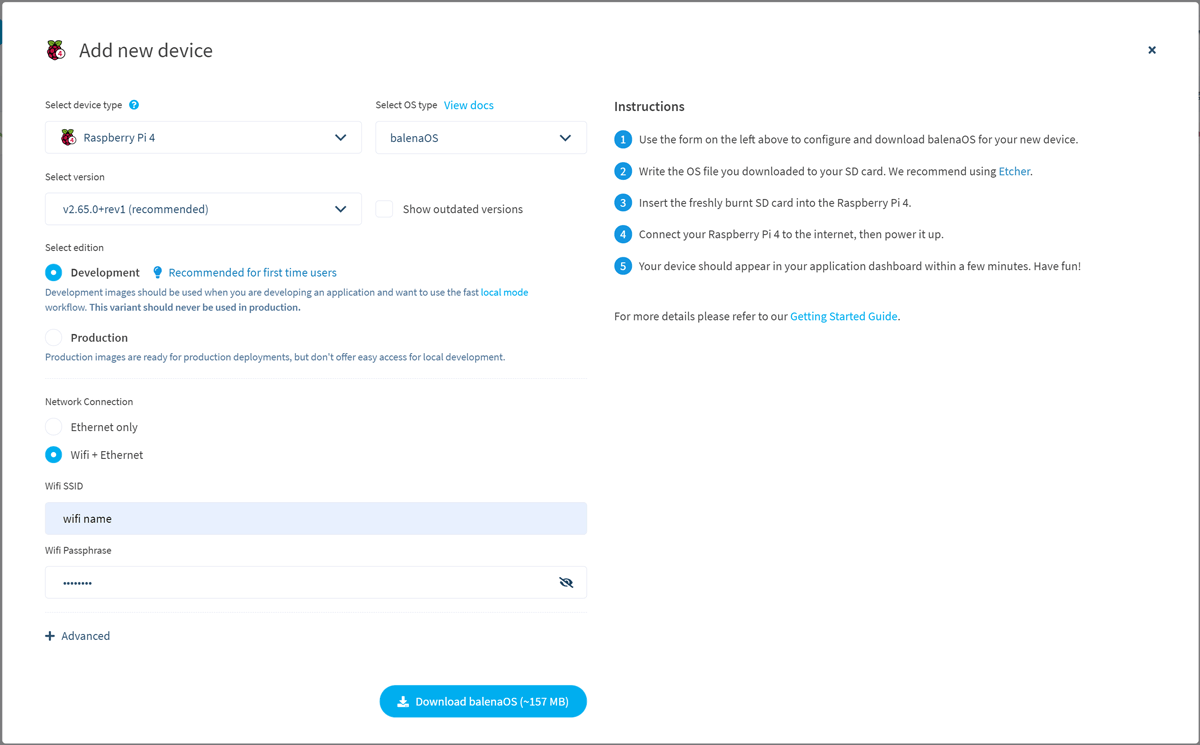
Once that step is complete, add a new device by clicking Add device and selecting your device type. If you plan on using Wi-Fi, add your credentials here. Otherwise, proceed with an Ethernet cable connected to your internet setup. Complete the modal and your OS will download.
Flash the OS image onto your SD card
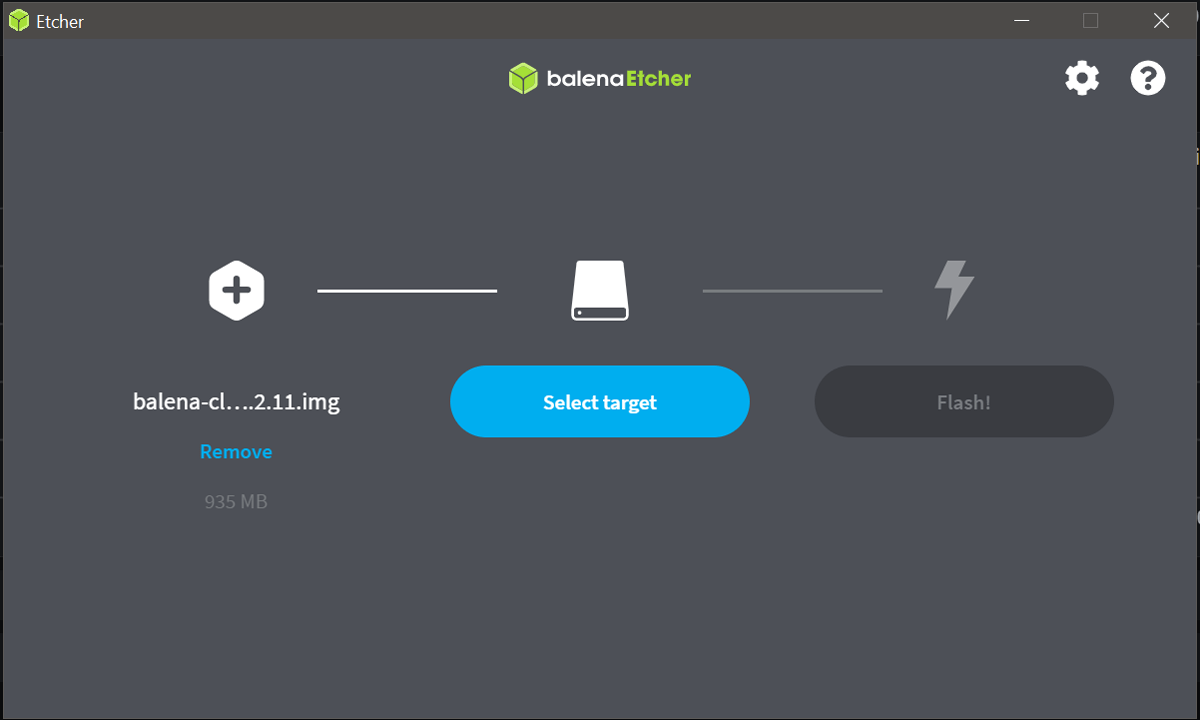
Insert the SD card into your computer, boot up Etcher and flash the downloaded balenaOS to your card. Insert the card into your device and wait for it to power on and show up on your dashboard within your app. Once the device downloads the code, the application should be ready for use.
Using balenaPlant
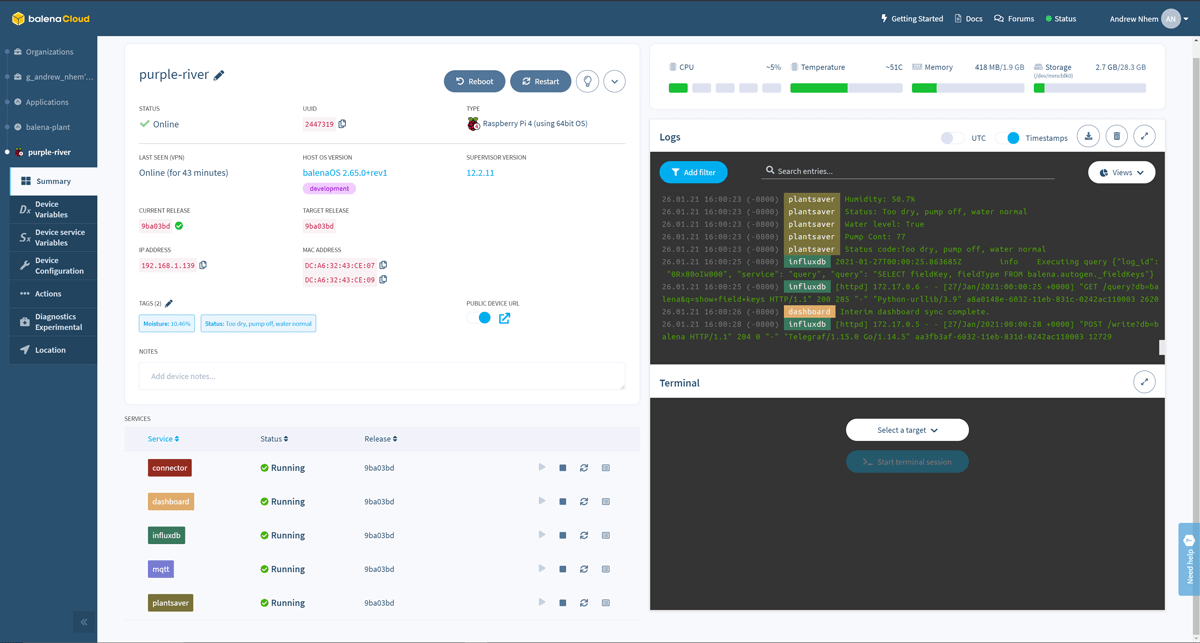
Now it’s time to put everything to the test. First, let’s access your device within the application. You’ll see its details including tags that show moisture levels and whether or not the water level is high or low.
You’ll also see a local or public URL option for the device. Use either of these to access the dashboard for the sensors.
Accessing and setting up the dashboard
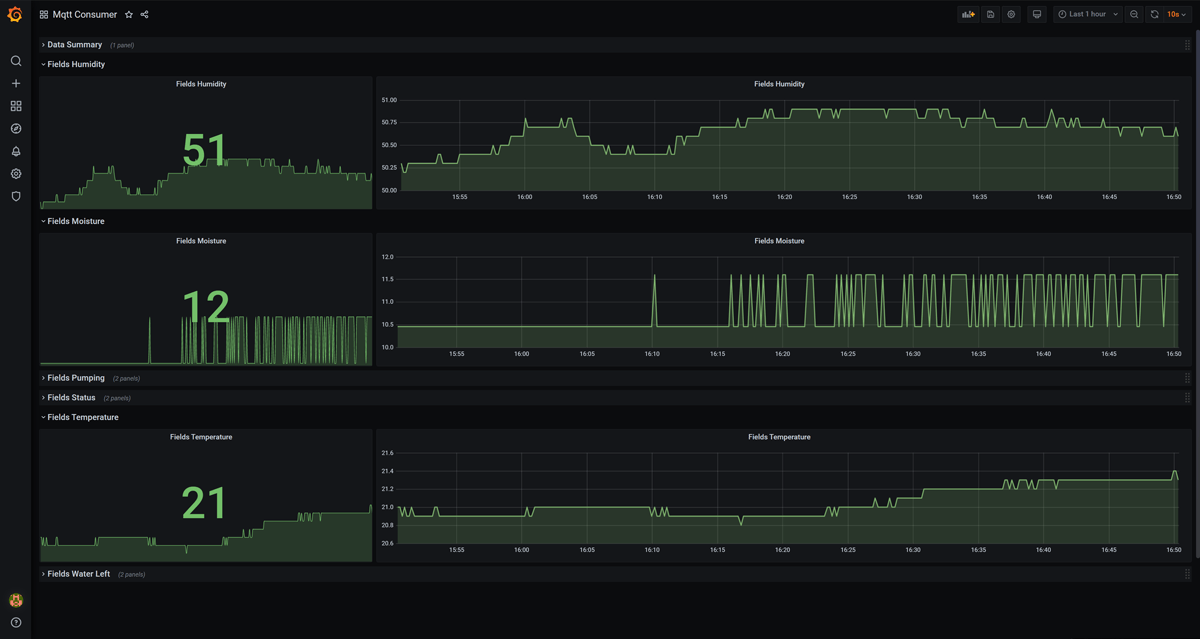
Accessing your device URL takes you to your dashboard. From here you can see a time series graph of temperature and humidity, water level, and recorded pump activity. For advanced Grafana users, feel free to customize your dashboard or experiment with adding alerts for each chart (we won’t cover that in this guide though).
Setting up the pump timing
By default, balenaPlant checks the water level of the plant every 90 counts (determined by pump_delay variable times 6). Depending on the setup and hardware, 90 pump counts might mean 15 minutes. For other setups, it might mean 45 minutes. There will be a bit of calibration required to dial this in.
The default setting is for these reasons:
- Running the pump infrequently prevents the motor from burning out
- Watering with long intervals between each session allows soil or growing material to absorb water for a more accurate reading
You can change the pump delay time by changing the Device variable (located on the left-side menu in balenaCloud). Set pump_delay to a higher number for a longer wait time (more pump cycle counts) and a lower one for a shorter wait between watering. If properly set, you’ll never overwater because even if the elapsed delay goes by, the pump won’t start if the moisture level meets your requirements.
| Device variable | Definition | Default value |
|---|---|---|
| target_soil_moisture | Sets target moisture percentage | 60 |
| target_soil_threshold | Sets threshold of moisture past target | 15 |
| pump_delay | Adds time between how often pump code runs | 15 |
Visit a site like this one to determine what moisture percentage is ideal for your plant. Every plant is different and will likely need different settings. Its environment and surroundings will also affect its well-being as well!
NOTE: When you change a device variable, it will reset the device.
What’s next?
Once you test a few things here and there, try other kinds of plants, adjust the soil moisture targets, and take one chore off your to-do list.
An entry point into IoT hydroponics and aquaponics
As a technologist, maker, and hydroponic gardener, I found this project to be immensely interesting and satisfying to build. It gave me a foundation IoT project to start thinking beyond watering just one plant.
Now my brain is turning with ideas such as:
- How do I adapt this project for IoT-driven hydroponics?
- How can I set up multiple instances of that project to be on balenaCloud so I can manage an entire garden much easier?
- Can I hook this up to a main water reservoir rather than a separate tank?
- What more can I do to monitor the quality of the water I’m using (e.g. pH sensors, turbidity, etc.)
- How can I add IP camera capabilities to monitor my plants?
- Can I use AI to detect and determine plant sickness or failure?
I feel like I’m in a much better position to answer these questions now that I’ve covered some fundamentals with this first project. Stay tuned for more updates to this project (e.g. running a fleet as a garden) and perhaps some answers to the questions above.
Try it out
Why automate the watering of one plant when you could grow and nurture many more? What if you upgrade the pump? What if you add LED grow lights?? The possibilities are endless.
Check out this livestream build (older build that uses the balena CLI method) or visit our Forums for more information. If you try this project out, we’d love to hear your questions and feedback on Twitter, Facebook, and Instagram as well.
Find, try, and submit your own projects on balenaHub
You’ll find this edge project and many others at balenaHub, our marketplace for IoT and edge projects. With a quick search, find your next edge project, from digital signage, surveillance, edge AI, audio analysis, and more. Or create your own project and share it with the world.