
As we often point out at meetups and talks, the origins of resin.io go back to digital signage applications. We’ve since been focused on improving remote device deployment and management for all types of applications, but have only recently revisited the digital signage use case. Carlo, who is very experienced in the area of digital signage, developed resin-electronjs, an Electron-based template application to quickly deploy a resin.io-enabled device that can display web pages, play video, or be used as a base for more complex, interactive displays.
Electron is a framework to create native applications based on web technologies. We also use it for Etcher, our cross-platform SD card writer. Electron has quite a few dependencies, so our aim with resin-electronjs was to create a solid base project from which you can develop further. The template pulls in the proper dependencies, installs Electron, and defines a set of environment variables that you can use to adjust the behaviour of your signage installation without any code changes.
We have a basic guide to help you get started, but it is high time to expand on it, and show you what kind of awesome use cases resin-electronjs opens up!
Your First Signage
If you would like to display your signage as a set of web pages, you likely don’t need to modify any of the resin-electronjs code, and can simply get started by following the guide from the Github repository:
- sign up for resin.io (if you haven’t yet);
- follow the getting started guide for your hardware and create a new application for your particular hardware type;
- clone
resin-electronjs; - add
resinremote as discussed in the getting started guide; git push resin masterto send your code to our application building service;- have your chosen hardware device ready, together with a display;
- download the host OS image from your application and provision your device;
- connect the device and see
resin-electronjsbeing deployed!
The last thing in the simple setup is to set the URL that the device should display. This is done by setting an environment variable with the name URL_LAUNCHER_URL and the value of the URL you’d like to display (eg. https://resin.io :)). After this you should be ready!
You can set up multiple devices, and each device can have it’s own URL_LAUNCHER_URL parameter, or you can use the same setting across all devices by setting a Fleet Environment Variable.
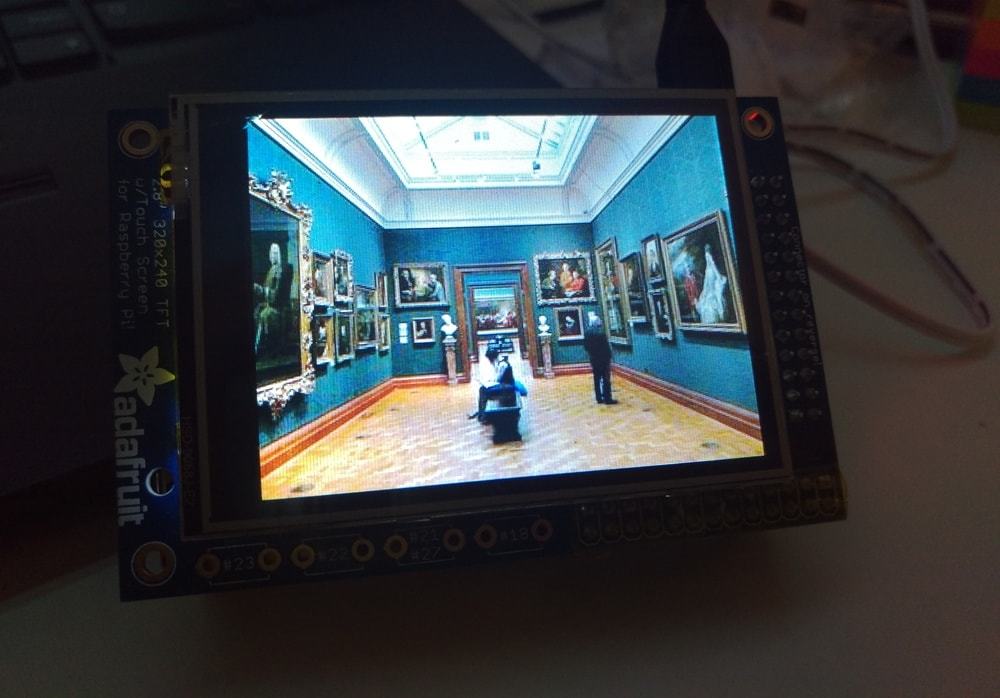
My favorite example would be a museum, where each exhibit has its description on a screen: just deploy resin-electronjs across the connected devices, and point each device to the URL where you’d host the exhibit description on the local network.
This behaviour can be further customized with other environment variables, such as enabling touch support, zooming, setting exact sizes for the display, setting a launcher frame, enabling Node.js support, and more. See the full list of adjustable environment variables in the project readme!
Electron Apps
For more complex use cases, you can make use of Electron’s cross-platform capabilities and create your application as an Electron app! You can follow the same development workflow as if you were creating a desktop application, plus make use of the hardware interfaces of the device, for example the GPIO pins if you are deploying on a Raspberry Pi.
You can add your HTML files and other source code to the app/data directory within the resin-electronjs repository, and your Node.js dependencies to the app/package.json file. This way your dependencies will be installed when you git push to resin.io, and your application automatically displayed starting from app/data/index.html.
Display Hardware
You can use any resin.io supported device type for your project. For some devices, you might need to adjust the hardware settings for best performance (see the readme). For example, the Raspberry Pi family of devices need to be told to allocate more GPU memory.
By default, resin-electronjs will display content on the primary display (e.g. the HDMI connector). Some devices have alternative display types. Raspberry Pi devices have a lot of SPI-connected TFT displays, which use a secondary framebuffer device (e.g. PiTFT). Support for these will be eventually merged into the mainline code, but currently you need to deploy the framebuffer branch.
Projects & Inspiration
Eyes on YouTube
One of our first use cases for the project was playing YouTube videos: around Christmas we were continuously playing a yule log video, and another day we had a 1960s sci-fi B-movies marathon screening in the background.

Playing YouTube videos is almost as easy to set up as a basic website display. You just have to set the URL_LAUNCHER_URL to a YouTube video or playlist embed URL, with a couple of extra parameters added. For example, if you are trying to play a single video in a loop:
rel=0to disable showing related videosautoplay=1to autoplayloop=1to loop after finishplaylist=<VIDEOID>for the loop to work correctly; replace<VIDEOID>with your video’s own ID
Thus our yule log video was using the following URL:
https://www.youtube.com/embed/97g1krDkzNI?rel=0&autoplay=1&loop=1&playlist=97g1krDkzNI
To play an entire playlist, you need to set similar variables except for playlist, which is replaced by list=<PLAYLISTID>. The playlist ID can be found on YouTube in the playlist’s share & embed section. The best thing is to create your own playlist, with videos in the order you’d like to see them, with advertisements disabled, and ensure that all videos are playable (i.e. not removed, if you are linking to other people’s videos) in the playlist.
See more information on the available YouTube embedded player variables in their developer documentation!
Note that on Raspberry Pi this video playback is not hardware accelerated (but hopefully will be in the future!).
Local Video Playback on Raspberry pi
If you are playing back local video, you can get very nice, hardware accelerated performance by using omxplayer. In this case you can add that to your project through the node-omxplayer library, which enables controlling the player from Javascript.
ClockOS
ClockOS is a great work-in-progress community project using resin-electronjs. It is a smart desktop clock application which deploys onto the Raspberry Pi. It’s a good example of how to add hardware support to your Electron application, in this case by adding button support through the Raspberry Pi GPIO pins.
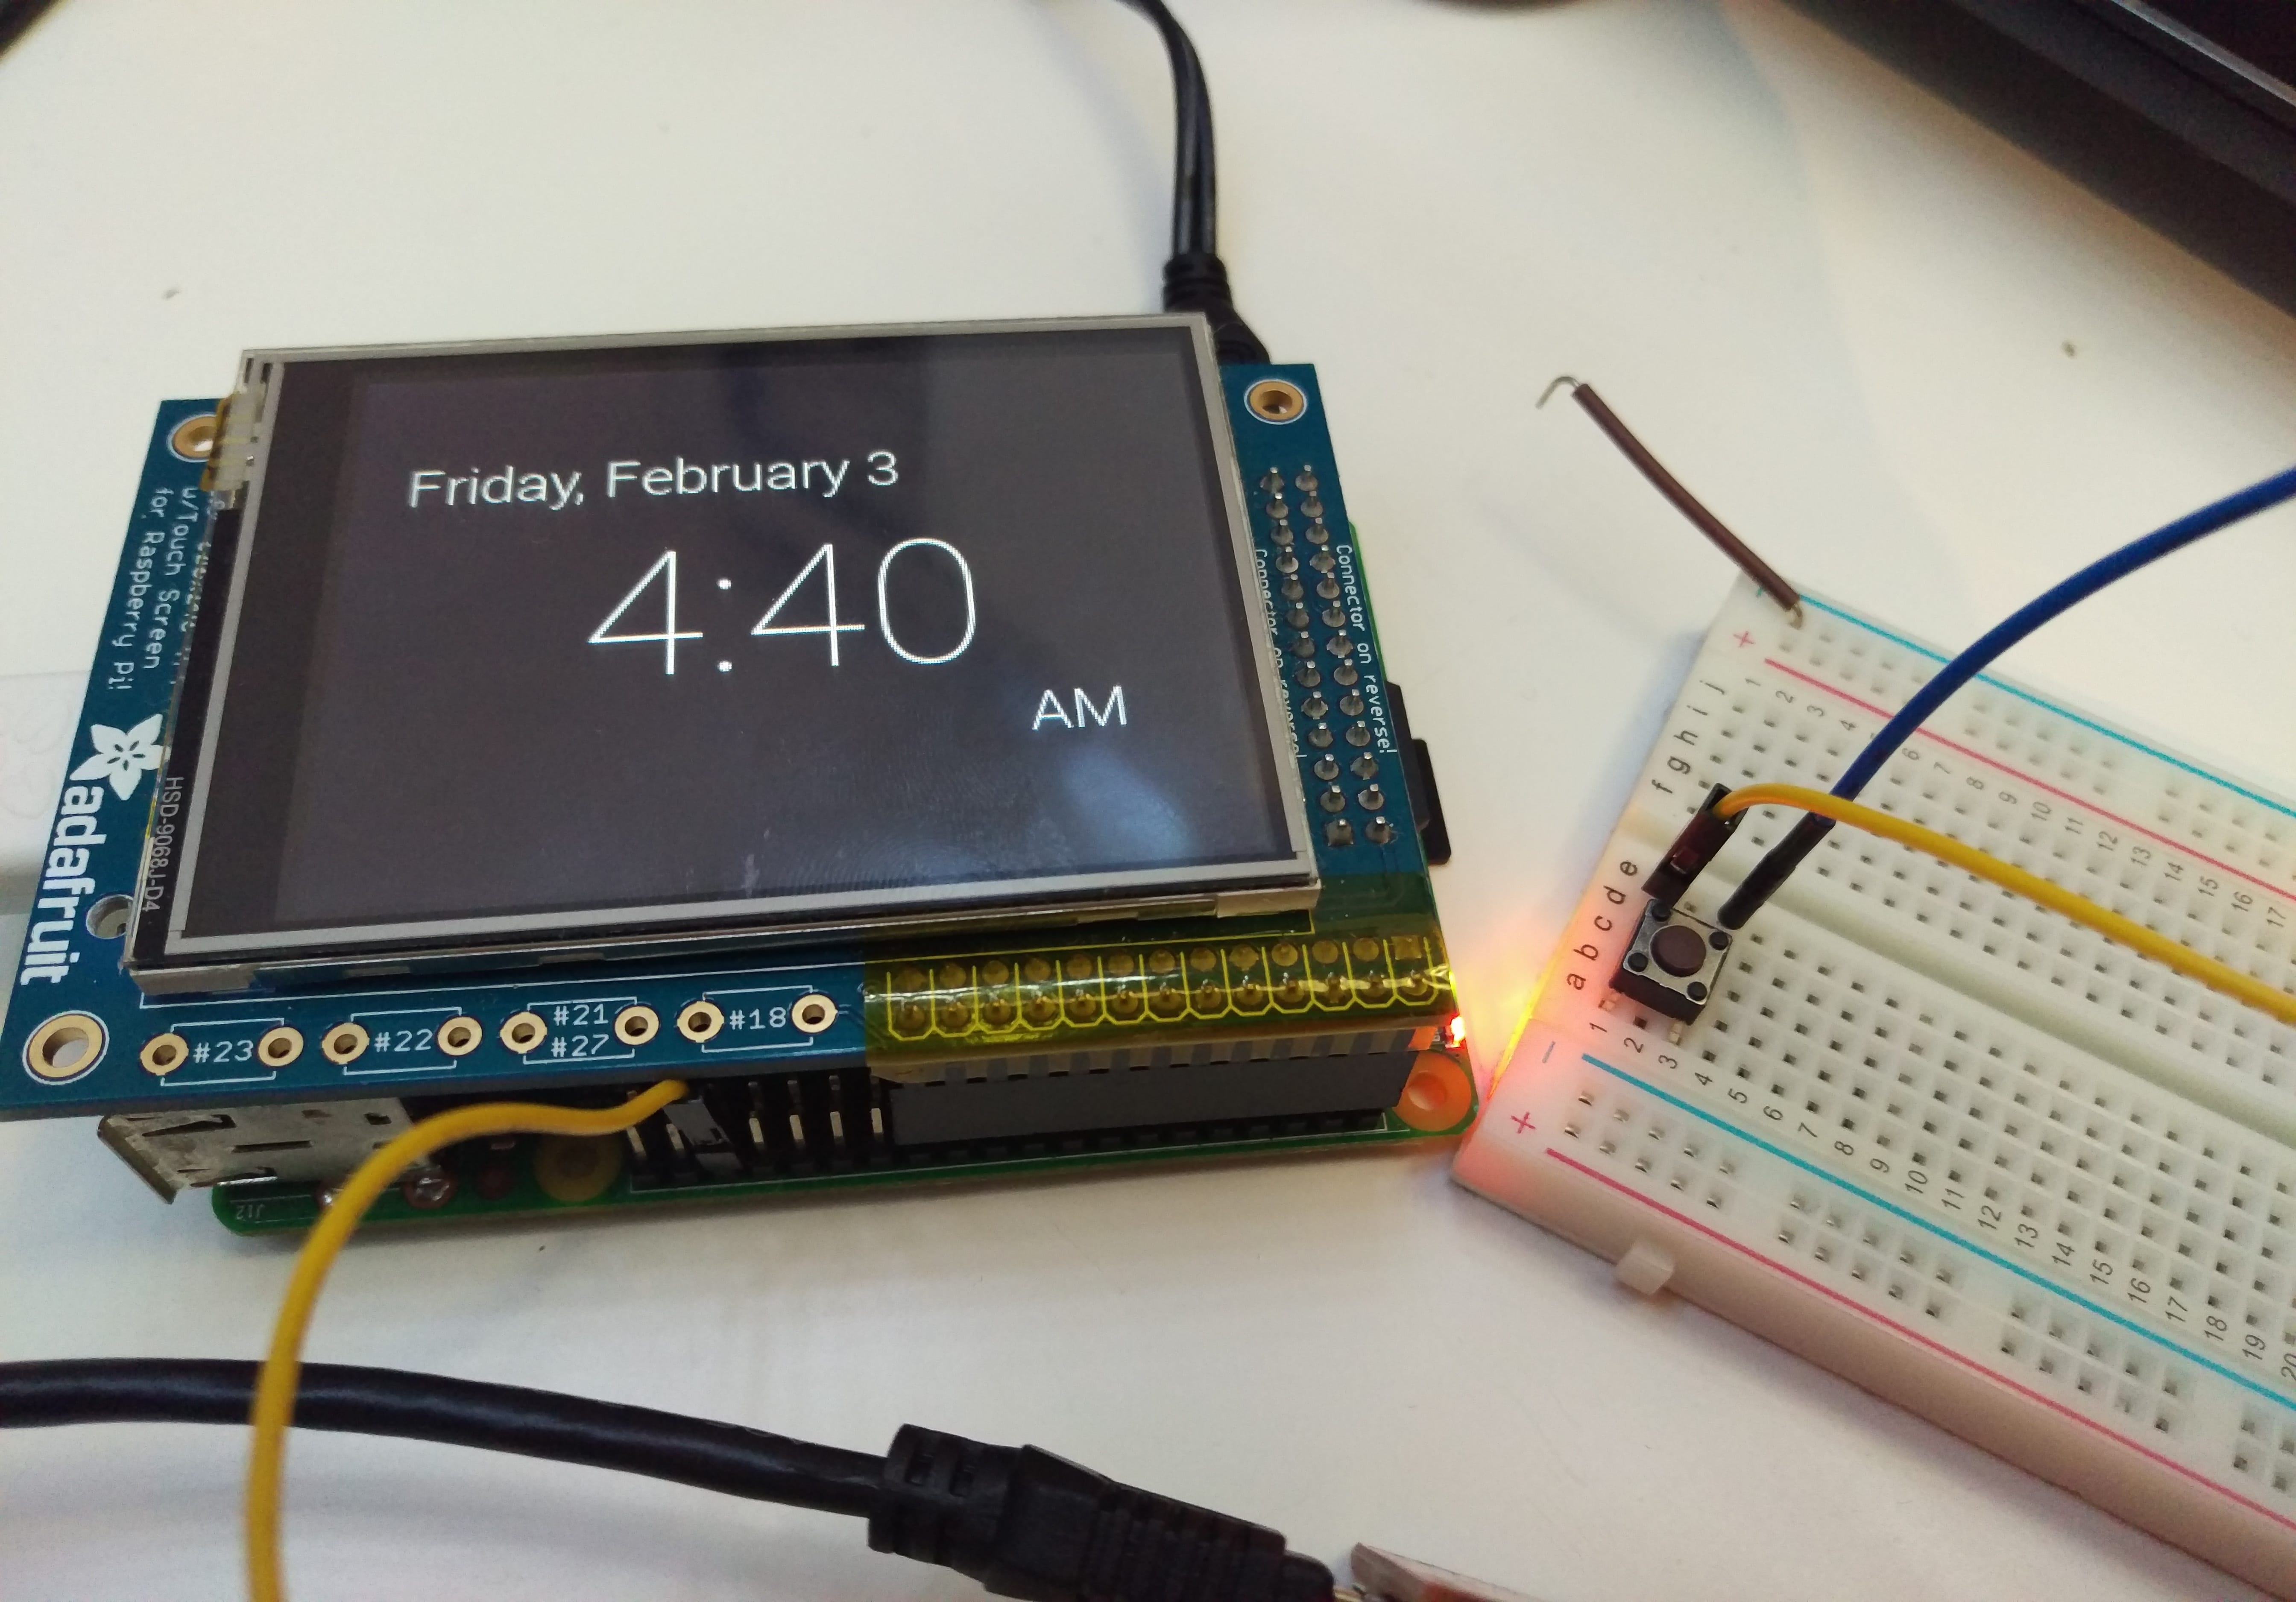
If you like this project, please consider contributing!
React.js
resin-electronjs can be also used as a base for more complex applications. For an example of how to combine it with other frameworks and tools, there’s a work-in-progress resin-electronjs-react boilerplate application. That should be a great starting point to help get your interactive interface up and running quickly!
Advanced Topics
Manual Tuning of the Raspberry Pi HDMI Display Settings
When using Raspberry Pi, sometimes you might want to tune the HDMI display parameters to fit your chosen display. Normally, those changes are done through adjustments to the config.txt file on the Raspberry Pi’s boot partition. On resin.io, you can apply changes to that file remotely, by defining device or fleet Configuration Variables with the name of RESIN_HOST_CONFIG_name set to a given value (where name and value are the config.txt variable names and values).
For example, increasing the GPU memory to 160MB on the device requires setting gpu_mem=160 in config.txt. You can achieve the same result using resin.io by setting RESIN_HOST_CONFIG_gpu_mem to 160.
You can read more config.txt documentation regarding the values available to set, especially the HDMI Mode options. For example, in some cases we need to set framebuffer_depth=32 and framebuffer_ignore_alpha=1 to get better color depth (bits per pixel) on certain displays.
Programmatic Update of Environment Variables
If you have a larger number of devices running as resin-electronjs displays, and you would like to manage them in a more scalable way, you can use the Data API, or the Software Development Kits (Javascript or Python SDKs) to interact with the application and devices.
For example, you could use the API or SDKs to:
- restart the application across all devices. If you change the website you would like to display, this will update all the devices to the new display.
- programmatically set or update display URLs (using the environment variables) according to your own device schedules and requirements.
- shut down devices on their own schedule, if you have some external power management functionality to bring them back to life later (e.g. WittyPi).
Your imagination (and the complexity of your application) is the limit for automating the management of your application!
Looking to the Future
We now have a dedicated maintainer for resin-electronjs and plan to add continuous improvements. Patches and pull requests are very welcome, and please file issues on Github if you experience any problems!
We are also turning this project into a Docker base image, meaning you will be able to get started quickly and build your application on top of it. Even simpler than before!
We are porting Electron to Wayland, which will enable hardware accelerated display for even more platforms. This should improve video performance and result in a much friendlier signage experience. We’re still in the experimental phase but will keep you updated.
If you make any resin-electronjs-powered projects, please share them with us! We’d love to see what awesome things you’ve created 🙂
Not yet on resin.io? Sign up here!