
If you’ve ever been frustrated with intrusive and distracting internet advertising, malware and other malicious spyware and tracking software online, and wondered if there was a solution to stop it, this is the project for you. We’re going to set up a Raspberry Pi running Pi-hole to block unwanted content network-wide in about 15 minutes!
Before you start
Introduction
For all you adblock/ublock users out there that want to extend your ad-free bliss to the rest of the inhabitants of your home, you may (or may not) have heard of Pi-hole, a free and open source software project designed to block unwanted internet advertising for the whole local network, operating at the DNS level. We’re going to run this software on a Raspberry Pi to create a small and low-power device to add to a network and provide ad-blocking without requiring client-side extensions or plugins.

This tutorial utilises a project by Kyle Harding (@klutchell) that installs Pi-hole on a balenaOS device, allowing you to remotely manage and update your standalone ad blocking device, keeping it always up to date with the latest armaments for the interminable ads vs. blockers arms race.
We’ve written this guide so that you’ll be able to follow along even if you’re not experienced with networking terminology, and we’ve provided explanations and links to resources to learn more. You absolutely don’t need to understand networking to see the benefits of Pi-hole, but if you’re curious we’ve linked all the information to learn about how that works as well.
How does it work?
Pi-hole is a DNS Sinkhole, which means that it is used on your network as a DNS server, and will respond with a false address when any browser or other client software attempts to load content from a known advertiser. Pi-hole maintains a set of “blocklists” and in addition we’ve supplemented them with additional blocklists from WaLLy3K and firebog.net.
DNS is the system used to resolve server hostnames such as balena.io into the IP address for the server sitting behind them when you try to load a web page, for example 52.210.75.180. In the case of an advertising server such as internetadvertising.com, Pi-hole will respond with a false address such as 0.0.0.0 rather than the real address, meaning that the advertising will not load.
If you’re curious, you can read more about how the system works in the Pi-hole documentation.
Hardware required
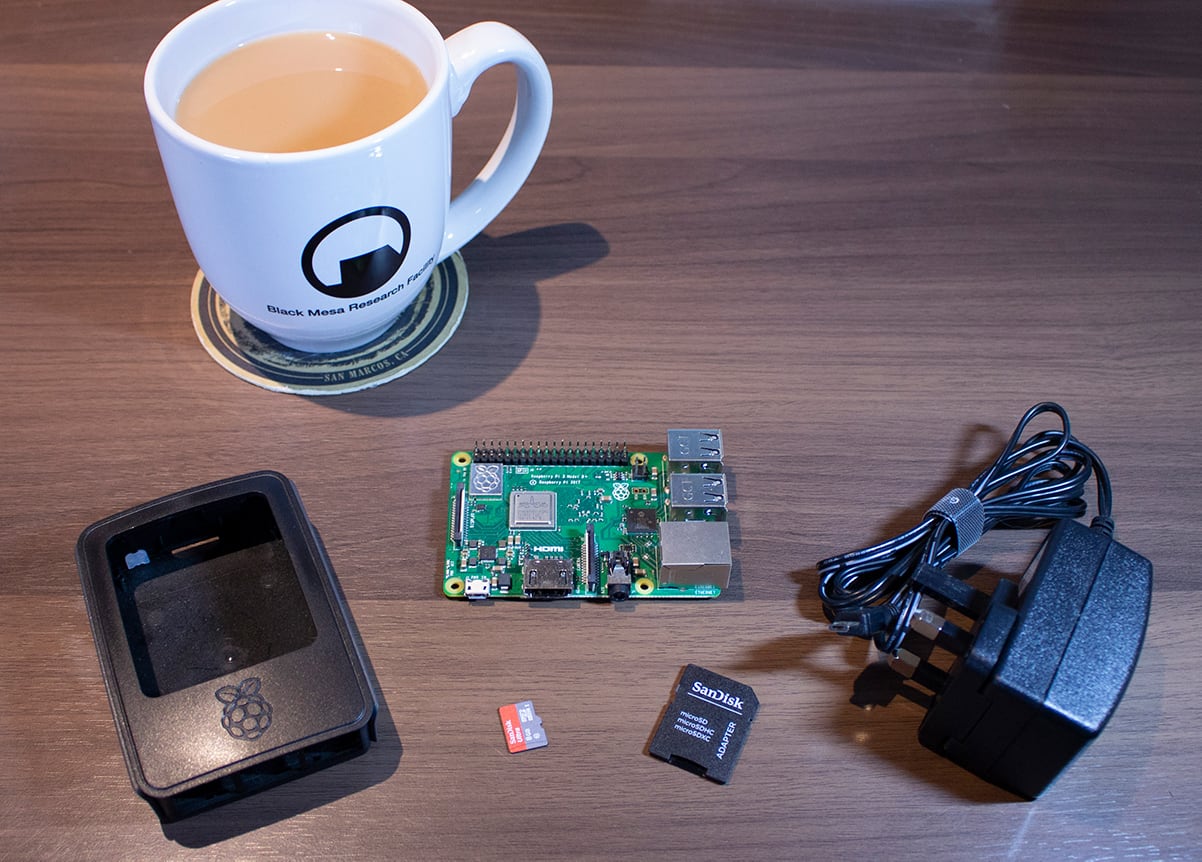
As this is primarily a software project, you don’t need a lot of hardware; only the basics are needed this time:
- Raspberry Pi 2, 3B, 3B+, 4B (not 1/Zero)
- 8GB (or larger) Micro-SD Card (we recommend Sandisk Extreme Pro SD cards)
- Power supply & micro-USB cable
- Your favourite beverage to enjoy whilst building (don’t tell my past employer I pilfered one of their company mugs!)
Optional:
- Case for your Raspberry Pi
- Ethernet cable
Software required
We’re deploying fully developed software packages here, so all we need to do is set them up. A balenaCloud user by the name of Kyle Harding (@klutchell) has already published a project on GitHub that makes deploying and setting this up extremely simple. We’re going to provision a new device using balenaCloud and deploy Kyle’s project, therefore, you’ll need:
- Tool to flash your SD card, such as balenaEtcher
- A balenaCloud account
- A clone or download of Kyle’s project from GitHub
- Access to your network router or DHCP server to change settings (not required if you only intend to use Pi-hole with your own personal devices)
As a side note, in this guide, we’re looking at deploying Pi-hole to a Raspberry Pi, but you don’t have to! Pi-hole can be installed directly to a few different Linux operating systems or deployed as a container using Docker (which is what we’re doing here with balenaCloud). You’re also able to use balenaCloud to deploy to a whole range of supported devices.
This project includes dnscrypt-proxy, which at a high-level is a method of authenticating and preventing spoofing of DNS lookups, helping to ensure you’re always using the sites and apps you think you’re using.
If you’d like to read more about dnscrypt and why you might want it, take a look at the dnscrypt FAQ.
Tutorial
1. Set up the Raspberry Pi
We’re going to flash an SD card with balenaOS via a download from the dashboard and add the device to balenaCloud in order to push Kyle’s project, and set things up in such a way it can easily be updated later.
We recommend using the ethernet interface of the Raspberry Pi, setting a static IP address and hard wiring the device into your router, although if this isn’t feasible, wireless will work too, just make sure to configure it in the OS download step below.
The first thing to do is to get set up with a balenaCloud account; this means signing up if you haven’t already, adding an application and adding a device.
Sign up to balenaCloud
The first thing you’ll need to do is sign up for an account. If you’ve already got a GitHub or Google account you can use that to login and bypass the signup process.
Create an application
Add an application using Raspberry Pi 3 as the default device type, and choosing Starter as the application type, then hit Create New Application.
This will take you to the dashboard for your newly created application, where you can move on to the next step and add your device.
Add a device and download the OS
Once your application has been created, you can setup and add a device within that application by clicking the ‘add device’ button. When you add a device you specify your device type, which in this case is a Raspberry Pi 3, and if you are connecting to a wireless network you can set your WiFI SSID and passphrase here too.

This process creates a customized image configured for your application and device type, and includes your network settings if you specified them.
Note: When you’re first getting started, a development image will be most useful, as it permits a number of testing and troubleshooting features. More details on the differences between development and production images can be found here. If you’re confident you can go ahead and deploy the production image straight away — that’s what I’m running.
Flash your SD card and boot the device
Once the OS image has been downloaded, it’s time to flash your SD card. You can use balenaEtcher for this.
Once the flashing process has completed, insert your SD card into the Raspberry Pi and connect the power supply.
When the device boots for the first time, it connects to the dashboard, after which you’ll be able to see it listed as online and move onto the next step.

Troubleshooting: It should only take a few minutes for the new device to appear in your dashboard, If your device still hasn’t shown up on your dashboard after a few minutes, something has gone wrong. There’s an extensive troubleshooting guide in the documentation, with lots of information on why this could be, but if you still can’t get your device online, come on over to the forums where we’ll be able to help out.
2. Set configuration options
Note: this section has been revised April 22nd, 2019 – all variables are now environment variables.
There are a few configuration options we need to set within balenaCloud in order for Pi-hole to run. We specify all of these as application environment variables.
| Name | Value | Purpose |
|---|---|---|
TZ |
E.g. Europe/London, find a list of all timezone values here. |
To inform both pihole and dnscrypt-proxy services of the timezone in your location, in order to set times and dates within the applications correctly. |
DNS1 |
127.0.0.1#5053 |
To tell Pi-hole where to forward DNS requests that aren’t blocked. We’re using the dnscrypt-proxy project here (running on port 5053) but you can specify your own. |
DNS2 |
127.0.0.1#5053 |
Secondary DNS server – see above. |
DNSMASQ_LISTENING |
eth0 |
We set this to eth0 to indicate we want DNSMASQ to listen on the ethernet interface of the Raspberry Pi. If you’re connecting to your network with WiFi replace this with wlan0 |
INTERFACE |
eth0 |
As above |
WEBPASSWORD |
mysecretpassword |
Password for accessing the web-based interface of Pi-hole – you won’t be able to access the admin panel without defining a password here. Note: it’s important that this is set before you boot your Pi-hole for the first time. If not, a random password will be generated. |

The variables are explained in further detail here.
In case you weren’t able to find it in the menu, we have a guide to setting configuration variables on balenaCloud.
3. Deploy the software
Now that your Raspberry Pi has been provisioned, has booted, and connected to balenaCloud, you’re ready to push the application code to the device.
Installing the balena CLI tools
If you already have (or can setup) npm on your machine, this is most likely the easiest way to get the CLI tools up and running quickly. However, there are also standalone binaries for Windows, macOS and Linux available.
The documentation for the CLI tools is the best place to start, and covers the installation and setup of both the npm package and the standalone binaries.
When you have the CLI installed and working, the first step is to login to balenaCloud by issuing the balena login command:
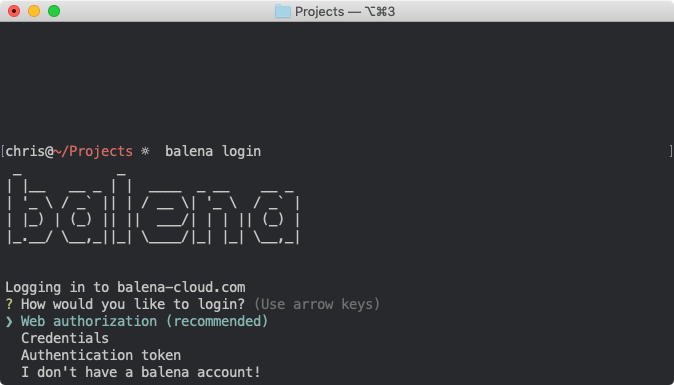
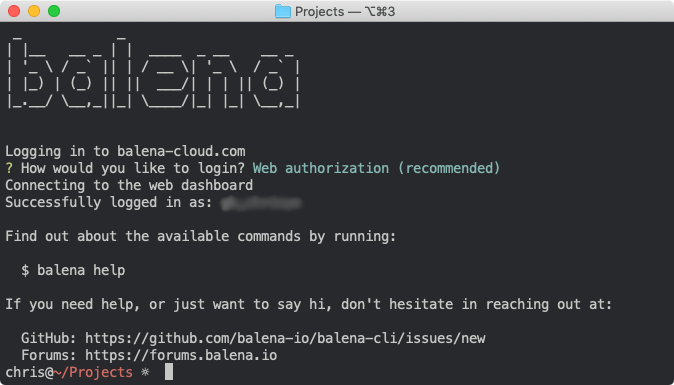
Once you’ve reached this point, and have a working CLI which has been logged in to your account, you’re ready to start pushing code to your Raspberry Pi.
Downloading the project from Github
The next step is to download the code for this project from GitHub. Go to: https://github.com/klutchell/balena-pihole and download the project.
The green button will download a .zip file of the project which you’ll need to unzip, but if you’re already familiar with Git you can use git clone in the normal way.
Pushing the project code to your Raspberry Pi
As you have the CLI setup and the latest code downloaded, you can now execute a single command to push that code to balenaCloud which in turn builds the Docker image and handles the process of setting it up and running it on your device.
From within the unzipped project directory, execute balena push <appName>, where appName is the application name you set back at the beginning of the guide. For example: balena push balenaPi-hole.
If everything worked out correctly, after a few minutes your device information screen in the dashboard should look something like this, showing the 2 services running, one for each of the software components.

When you push the code for the first time it can take a few minutes to download (dependant on your internet connection speed) but after that only the changes in the container are downloaded so things happen much quicker.
4. Set up your router/clients
The next thing we have to handle is changing your network configuration so that all DNS requests go via your new Pi-hole device rather than through your router or ISP.
tl;dr: We need to set the DNS server settings on your router or client device to point to the local IP address of Pi-hole.
The main thing we need is the IP address of your new Pi-hole device. If you set this to a fixed/static IP earlier in the guide you’ll know what this is already. If not, you can find out by visiting the application or device list page in the balenaCloud dashboard.
For initial testing purposes, you might want to change just one device on the network, such as your computer or laptop, to try it out. After you’re happy with how things are running, you can deploy network-wide by changing the settings on your router or DHCP server to point all devices/clients on your network to Pi-hole automatically. Dynamic Host Configuration Protocol (DHCP) is a method used on a lot of networks to automatically set up computers, smartphones and other devices with the correct network settings as soon as they connect. By default, your router will issue DNS settings pointing either to the router itself or to your ISP; we’re going to change that so that your DNS settings will point to Pi-hole in order for it to filter the requests before they reach your computer.
On your router, look for anything relating to DHCP and the associated options. You’re looking for a screen similar to that below. If you’re not sure what you’re doing, make a note or take a screenshot before changing anything so you can revert the settings if you make a mistake.
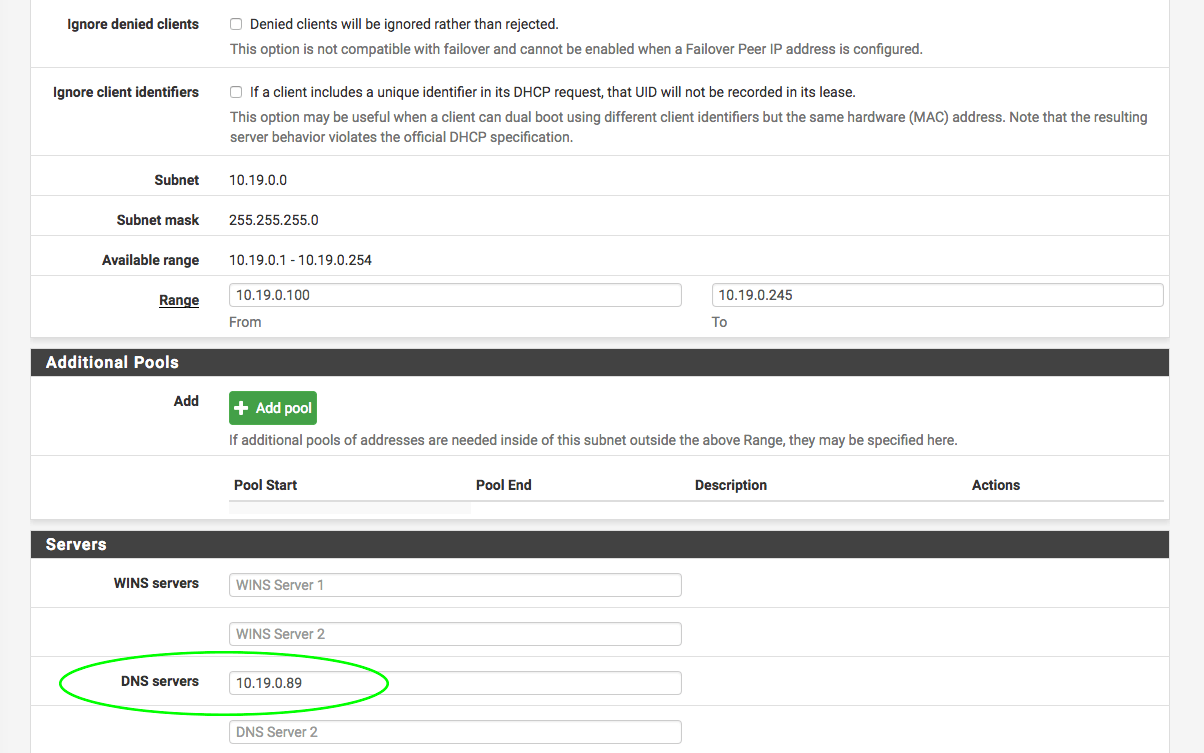
Some routers may have a different page just for DNS settings rather than including them within the DHCP settings page.
There are hundreds of different makes and models of router, all of which allow you to configure DNS with a slightly different user interface, but the underlying premise is the same. With some ISP-provided routers it may not even be possible, in which case you’ll have to change the settings on all your devices individually or change to using Pi-hole for your DHCP server — see troubleshooting at the end of this guide.
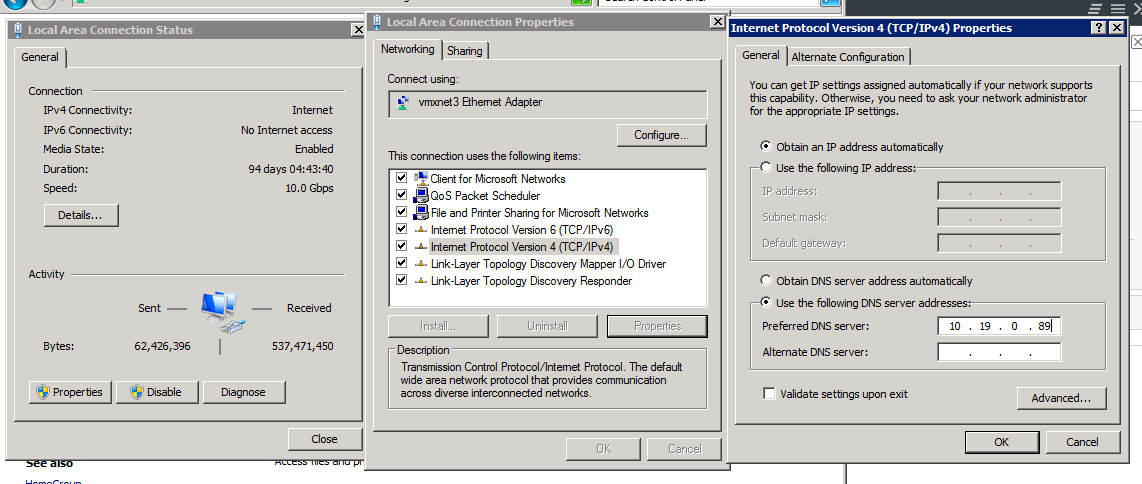
Windows
In Windows, you can access the DNS settings for a connection by first locating the connection status, then going to properties, and then highlighting Internet Protocol Version 4 (TCP/IPv4) and clicking properties again, as in the screenshot below. Different versions of Window may look slightly different but the principle is always the same.
macOS
Within macOS, find System Preferences, and then open the Network pane. The left hand column will show all of your network interfaces; select the one that you’re using and is connected, and then click on the Advanced button, which will bring up a panel similar to that below where you can choose the DNS tab and enter the IP address of Pi-hole on your network manually.

iOS
When using iOS, go to Settings > Wi-Fi and tap on the i to the right of the network you’re connected to. This opens a new page where you can tap on Configure DNS to reach the screen below:

Android
When using an Android device, the method used to change the DNS settings varies depending on the version. OpenDNS have a guide to doing this, just remember to use your own Pi-hole IP address rather than the OpenDNS ones.
Pi-hole also have an extensive forum thread telling you how to set this up for various devices and operating systems.
5. Test it!
With your DNS setup configured, you should now be up and running. You can run a test to make sure with the following link. Make sure any ad block extensions or plugins are disabled when you do this to avoid a false result.
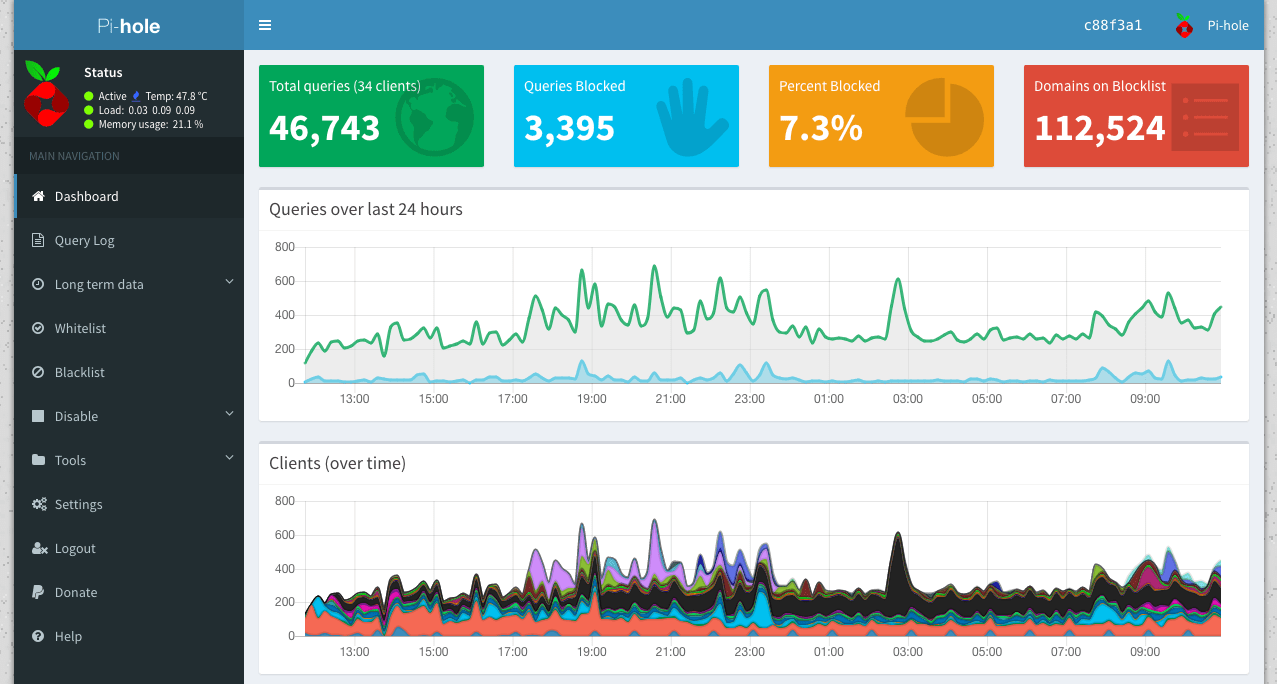
By default, Pi-hole blocks over 112,000 known advertising domains, so there’s no other setup work to do.
What’s next?
Checking the stats
Now that your Pi-hole is up and running, you’re able to check the statistics on the built-in web interface. The comprehensive interface shows what percentage of all DNS requests from your network are advertising, as well as which hosts on your network are making the most requests, what the most common advertising hosts requested are, and so on.

You can access the web interface if you’re on the same network by visiting the local IP address of your new device in a browser. If you don’t know the IP of your device, the easiest way to find it is on the balenaCloud dashboard.
A great benefit of deploying the device with balenaCloud is that you instantly gain the opportunity to access the web-interface of your device remotely without any further router configuration. To do this, enable the public URL feature:
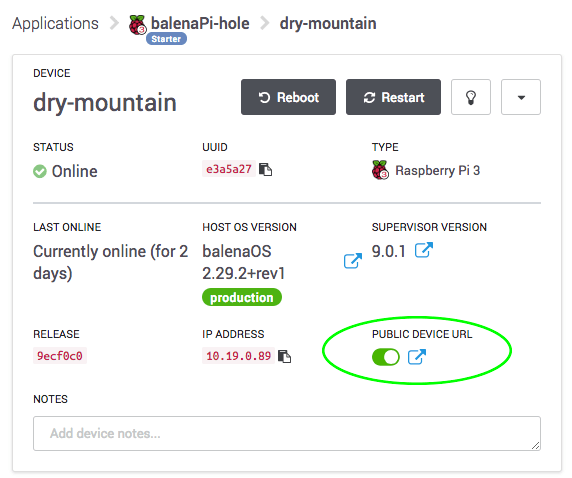
Once you’ve enabled the public device URL, click the link to open the web interface. Note: you’ll need to append /admin to the end of the device URL to access the stats and admin interface.
To access the detailed information you’ll need to set up the WEBPASSWORD service variable as described earlier in the guide and log in if you haven’t done so already.
If you’d like to access the device locally, depending on if you have connected one or two interfaces you’ll have one or two IP addresses shown here but the interface should work on either one.

In my example above I would visit https://10.19.0.89/admin to access the web interface – yours will be different depending on your own network configuration.
Whitelisting domains
Now that you’re up and running with Pi-hole, there’s very little left to do. Enjoy your new and improved browsing experience!
There may be some instances where Pi-hole blocks content that you need access to; some examples of this are reporting and analytics services such as Google Analytics. If you run or manage a website you may need access to this type of content. Pi-hole has a built-in facility for whitelisting (or blacklisting) specific sites that you can access via the web-based admin page.
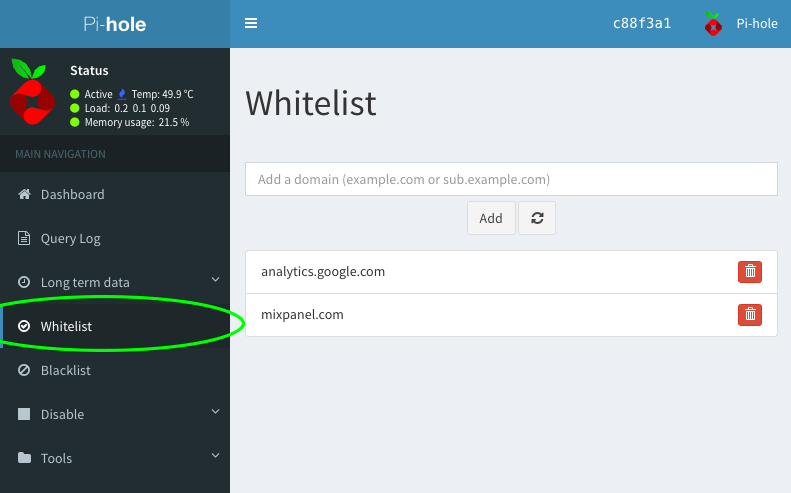
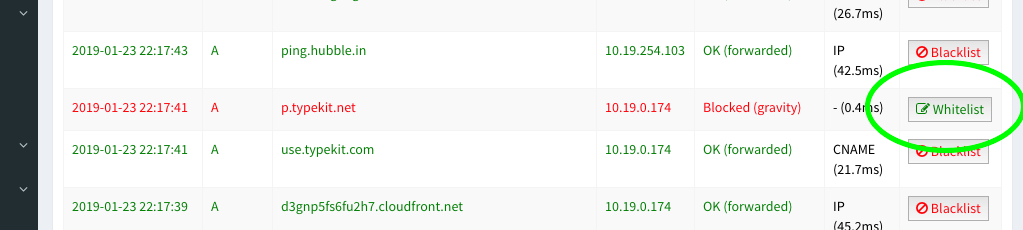
You can add domains manually or pick blocked entries from the log and quickly add them.
There are some interesting projects, such as PADD, which implement a statistics display that can be used on a miniature TFT screen connected to the Raspberry Pi. This would work well with a case such as this from Thingiverse. We might look at expanding the project to include this next time – let us know if that’s something you’d like to see.
Update March 6th 2019: we’ve now posted a guide to setting up PADD on a PiTFT display!

Updates
Pi-hole maintains the domain block lists and will check and download the latest versions automatically.
When an update is released, updating your device (or your entire fleet!) is as simple as pushing the latest version of the project code. balenaCloud handles the update process and switches to the new version you’ve pushed only when the image has built successfully, preventing any downtime.
Deploying more Pi-holes
A huge benefit of the setup you’ve just created using balenaCloud means that if you want to set up a second (or more!) device that does the same job for your family or friends it’s really simple.
To get a second device running with the same application, it’s just a case of flashing another SD card with the same image you used for your first device and booting up the Raspberry Pi. The second device will appear within the same application and automatically run the same software.

The main thing for you to consider when you set up multiple devices is that you may need different network settings per device. The facility to do this exists within the balenaCloud dashboard, allowing you to override device variables on a per-device basis. For example if you wanted to use a different password for each device, that can be set here without affecting any other devices you’ve already set up.
Using balenaCloud you can easily add more devices for other family members’ houses in different physical locations and networks, whilst still maintaining the ability to remotely manage and maintain them.
Need help?
Troubleshooting
Although this is a simple project with only a few components, DNS is a critical service, so there are a few things that could go wrong and prevent you from being able to connect to the internet.
I can’t find where to set the DNS settings on my router
Some routers, usually those provided for free by your ISP, won’t let you change your DNS settings. Depending on your view you may find this suspicious or just annoying, but if this is the case you can turn off the DHCP functionality on your router and use the service built into Pi-hole instead. Pi-hole have a guide to setting this up.
Everything works fine for a while and then stops
Ensure your Pi-hole has a static IP as described in the guide. This can either be achieved by setting a static IP within balenaOS or assigning your device with a static DHCP lease on your router or DHCP server. We have information on setting a static IP in our documentation.
Once I change my DNS settings to Pi-hole my Internet access stops working
As long as you’re setting the correct IP address and have confirmed the Pi-hole web interface is accessible in a browser on the same IP address, things should work. In this instance check that your upstream DNS servers within the Pi-hole settings are correct. If you’re using dnscrypt-proxy within this project they should display as below, and mirror what you defined in the service variables earlier.

I can’t login to the Pi-hole web admin interface
The password for the web admin interface is defined in the service variable WEBPASSWORD as explained earlier in this guide. However, if for some reason that’s no longer working, you can reset the password to something else of your choosing by logging in to the pihole service from within the balenaCloud dashboard and executing the command: pihole -a -p.
I can’t access the Pi-hole web admin interface
If you can’t access the Pi-hole web interface either via the local IP address of the device or via the public URL facility, this usually means that the Pi-hole app has been unable to fully start for some reason. The most common reasons for this we have found are that Pi-hole itself is unable to resolve DNS so check your upstream server – be that your own ISP server or dnscrypt, and secondly issues with line endings if you’re using Windows to deploy the project. If you’re using Windows the use of git clone and balena push can cause issues due to line ending changes; we recommend using a combination of either the zip download of the project and balena push or if you’d like to use git clone then also use the git deployment method git push instead of balena push.
Thanks for reading! If you decided to implement Pi-hole on your own network, we’d love to hear how it went, similarly if you got stuck or have any questions, let us know in our forums at https://forums.balena.io, on Twitter @balena_io, on Instagram @balena_io or on Facebook. See you next time!