
A popular use case for simple machine learning on current single board computers is license plate recognition. (Also known as “automatic license plate recognition” or ALPR) ALPR is used by many industries but is particularly useful for toll collection, property management and in the parking industry.
Plate Recognizer is a company that has a variety of paid and free products that incorporate their custom machine learning model for accurate ALPR. They’ve concentrated on solving some of the harder problems in plate recognition, namely low resolution, low lighting, stacked text, nonstandard plates, bumper stickers, and steep camera angles.
Plate Recognizer products can run on a variety of devices such as NVIDIA Jetsons, Raspberry Pis and x86 devices, both on premise and in the cloud. The on premise versions use Docker containers, which is why they are a great fit with the balena platform.
Balena platform
When you start deploying Plate Recognizer (or any app) to more than one device, the management burden can become quite overwhelming. If you want to update the software, reboot the device or change a few parameters, it often involves inconvenient trips to the device’s location with a laptop in tow. The balena platform allows you to do all of these tasks (and more!) remotely through the balenaCloud dashboard.
In this guide, we’ll deploy Plate Recognizer’s Stream product to a few Raspberry Pi 4 devices to demonstrate how balena vastly streamlines the provisioning and management of these installations.
Hardware requirements
- A Raspberry Pi 4 or CM4 device on a supported carrier card (A Raspberry Pi 3B+ should also work as well)
- A micro SD card and power adapter
- A live camera feed from an IP camera, typically an RTSP address.
Software requirements
- An account at Plate Recognizer and a paid or free trial of Stream (sign up link)
- A free balenaCloud account – the first ten devices are free and full-featured.
- Software to flash the microSD card – we recommend the free, open source balenaEtcher
Provisioning and deploying
Normally to use Stream, you would install Docker on your Raspberry Pi and then go through a multi-step process to run commands and set configuration, all the time needing to connect a mouse, keyboard and monitor to the device.
Instead we are simply going to flash the Raspberry Pi with balenaOS, which already includes a docker-compatible runtime called balenaEngine. Before we flash the SD card we can enter our WiFi credentials (if needed) and instruct the OS to download and run Plate Recognizer Stream. This will happen without ever logging into the Pi or connecting a keyboard and monitor (aka headless) and we can easily repeat this process for each additional device by simply flashing as many SD cards as we need for our fleet!
To get started, all you need to do is click the button below:

You will first be asked to log into your balenaCloud account if you haven’t already done so. Once logged in, you’ll see the “Create and deploy to fleet” dialog box.
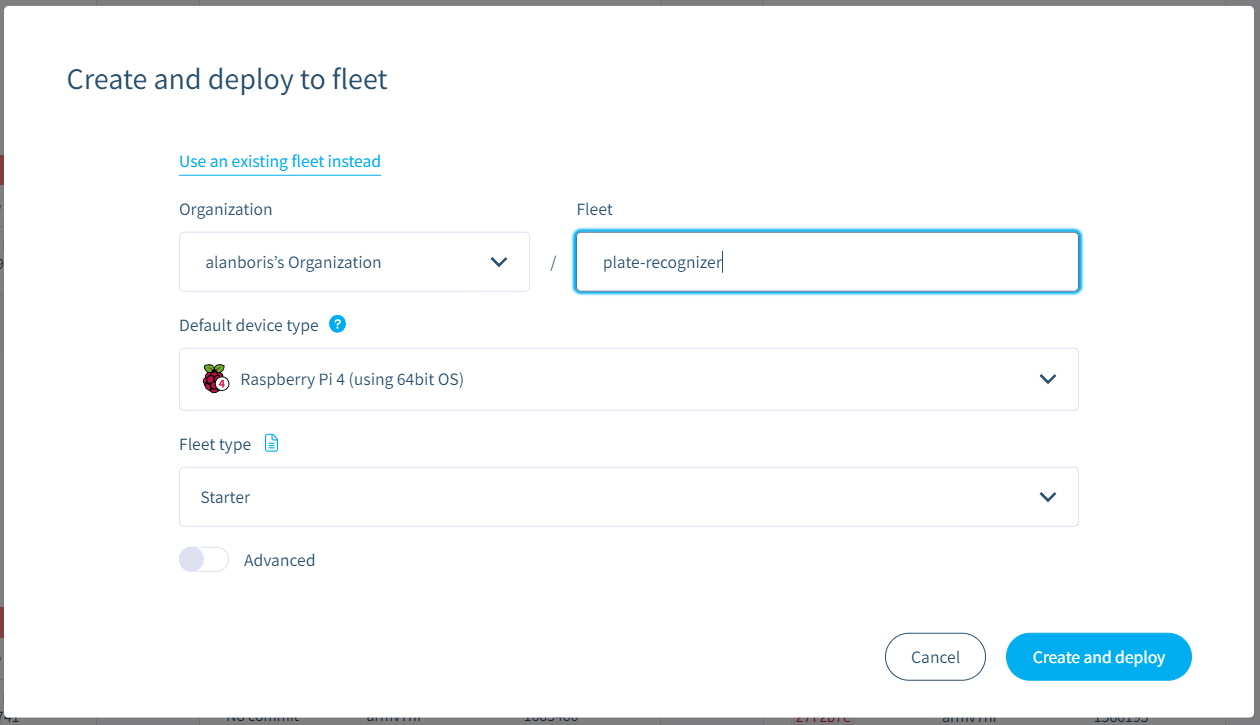
You can simply accept the default settings on the page and click the “Create and deploy” button on the lower right. This creates a fleet that is associated with the Stream software. We’ll now add our Raspberry Pi 4 to this fleet. You should see a “devices” section now:

Click on the + Add device box which will open the “Add new device” dialog.
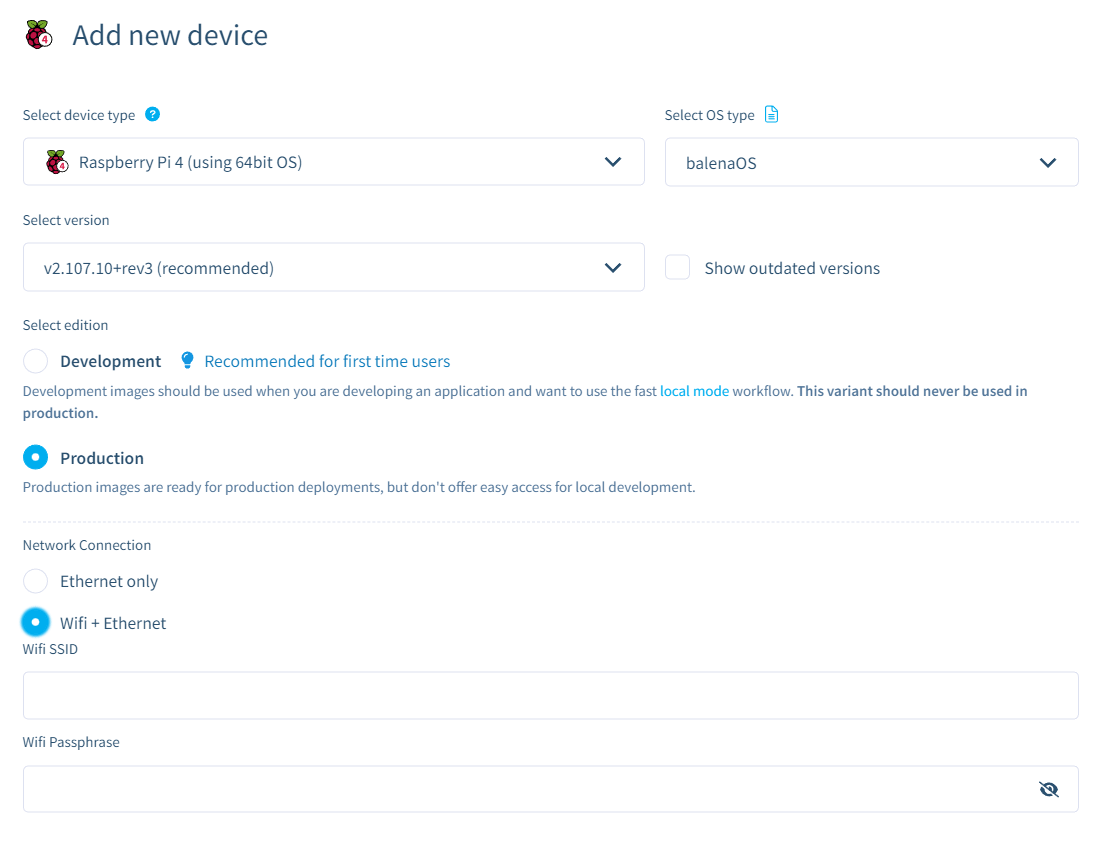
First select the device that you are going to use, Raspberry Pi 4, Raspberry Pi 3 (Using 64 bit OS) or Compute Module 4.
If you want to use WiFi on your Raspberry Pi, click the “WiFi + Ethernet” radio button and enter your WiFi credentials. (This will only be used on your device, and not saved in the cloud.)
If you already have the balenaEtcher flashing tool installed, you can click the “Flash” button and it will send the OS image to Etcher and wait for you to insert an SD card in your computer to start the flashing process. If you instead want to use another tool or computer to flash the image, click the down arrow on the “Flash” button and select “Download balenaOS”.
You now have an image file with everything you need to run Plate Recognizer Stream – simply insert your flashed SD card into your Raspberry Pi 4 and power it up. You can repeat the “Add device” process for each Pi 4 you want to add to this fleet – they will all get the same Stream software and any updates you push out to them!
Running Plate Recognizer Stream
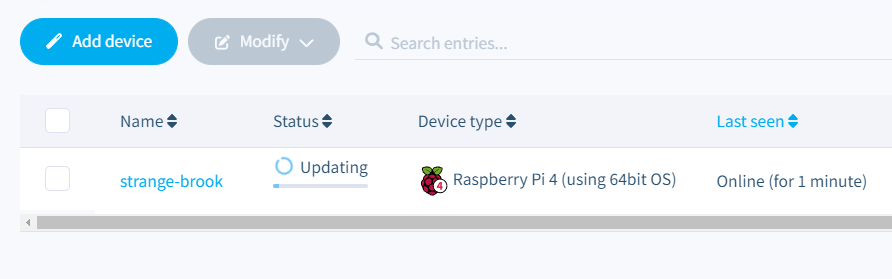
Once you power on your Pi, it will boot up balenaOS and then start downloading the Stream software. You’ll see the device appear in your balenaCloud dashboard:
If you click on the device, you’ll see the summary page. Once the containers have finished downloading, they should start running.
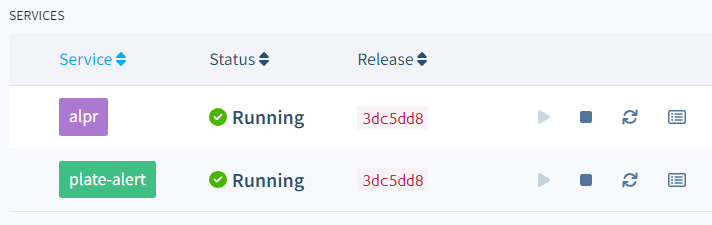
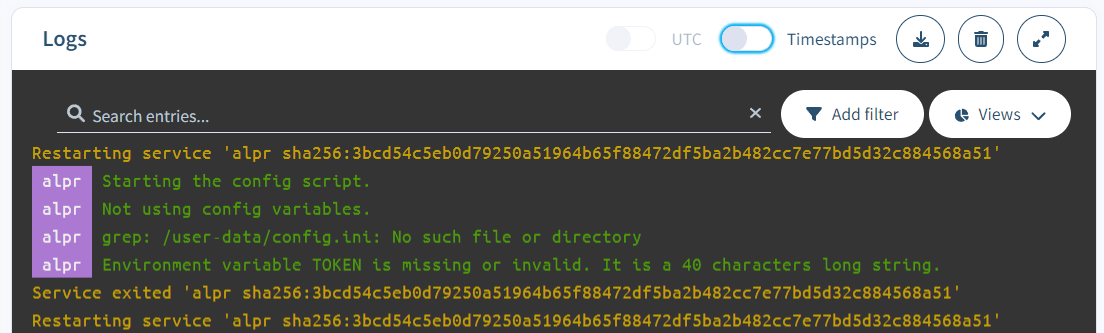
However, if you look at the logs in the upper right, you’ll see that Plate Recognizer, which is called the “alpr” service, requires valid credentials in order to run.
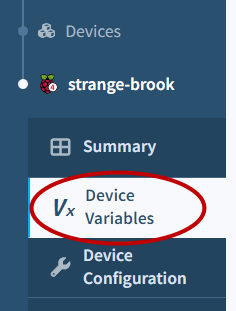
You can set these credentials remotely using the Device Variables feature of the balenaCloud dashboard. Click on the Device Variables button on the left side menu.
Click the “Add variable” button and the “Add variable” dialog box will appear.
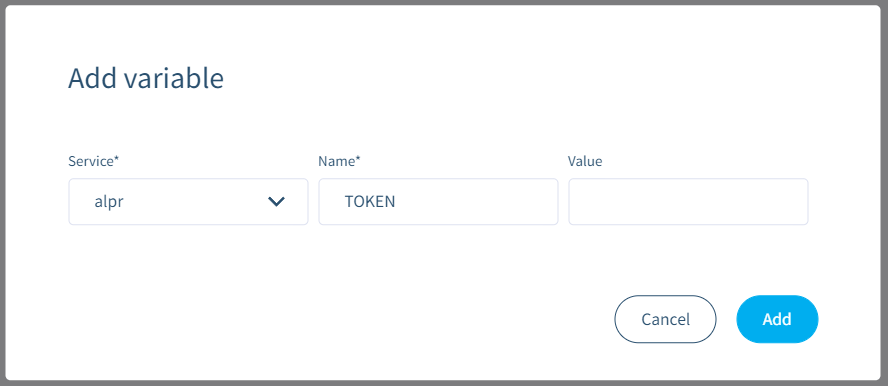
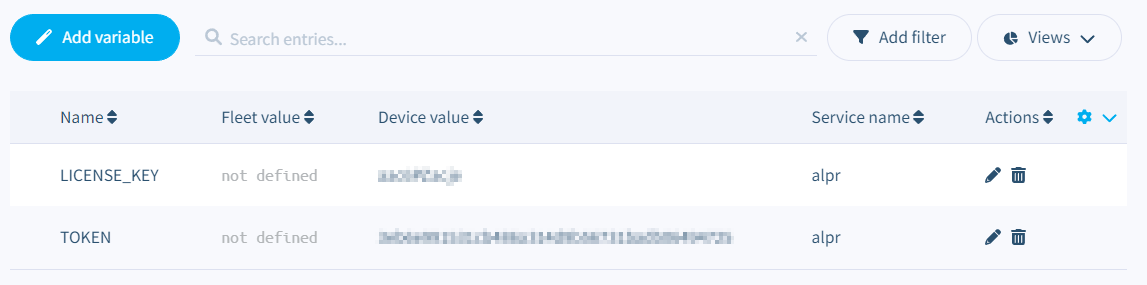
Select the “alpr” service from the “service” drop down and enter TOKEN for the variable “Name”. In the “Value” box, paste the “API TOKEN” from your Plate Recognizer dashboard at https://app.platerecognizer.com/products/stream/ – then click the “Add” button. Add another variable named LICENSE_KEY and copy the License Key from your dashboard in a similar fashion.

(Location of Token and License Key in the Plate Recognizer dashboard. Copy these values into variables on the balenaCloud dashboard.)
Your balenaCloud device variables page should look like this: (with your own token and key values, not these fake ones!)
Each time you add a variable, the alpr container will restart and use the new values. After the license key and token have been entered, you can switch back to the “Summary” page for the device and you should see the Plate Recognizer software starting up in the logs.

Now that we have the Stream software running, we need to configure it! Right now it’s using the default configuration which is a test camera stream from Plate Recognizer.
Configuring Plate Recognizer Stream
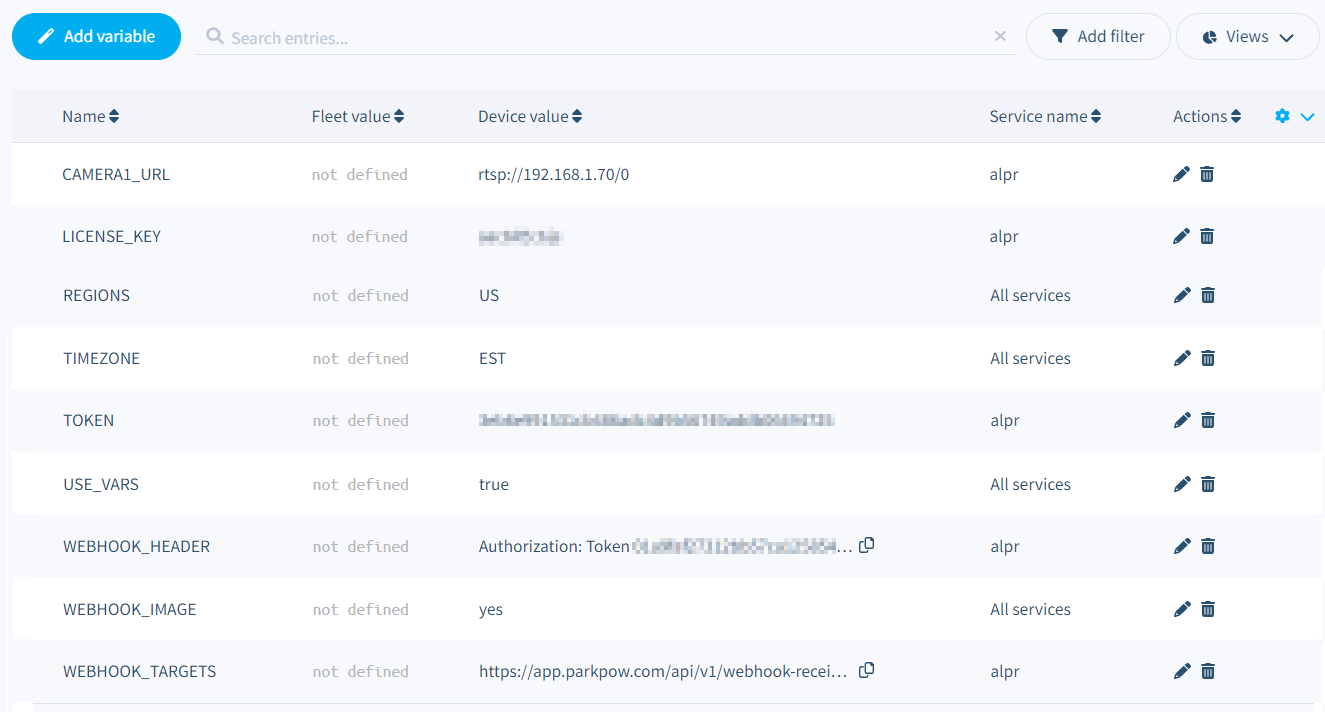
Normally to configure Stream, you need to manually edit its configuration file. You can still do that (see below) however we added the capability to use device variables for the most often used configurations. In the same way you added the LICENSE_KEY and TOKEN values above, you can enter the following device variables to configure Stream parameters:
CAMERA1_URL – the url or RTSP address of your IP camera.
REGIONS – Include one or multiple regions from this list
TIMEZONE – set to one of the timezones in this list
MMC – if you have a subscription for vehicle MMC, set this value to true
WEBHOOK_IMAGE set to yes to send image data to a target URL or no
WEBHOOK_TARGETS – enter one or more locations (separated by commas) to send your license plate data.
WEBHOOK_HEADER – enter a custom header for your webhook data
All of the above settings other than CAMERA1_URL are optional. See this page for more details on the parameters.
If you want to use any of the device variables above to set parameters, you’ll need to set one more value:
USE_VARS should be set to true.
Think of this variable as a switch – when it’s set to true, Stream will use the values in your device variables. When USE_VARS is set to false (or deleted) then Stream will use its configuration file which you can edit as needed. You should not, however, edit the configuration file when USE_VARS is set to true – in that case any changes you make will be overwritten.
Manual Stream configuration
If you want to manually configure Stream as outlined in its configuration page you can do that remotely through balenaCloud as well.
On your device’s summary page, go to the “terminal” window in the lower right, select the alpr service from the “Select a target” drop down list and click the “Start terminal session” button. At that point you’ll be logged into the alpr container. To start editing the config file in the Nano text editor, enter the following commands:
cd /user-data

nano config.ini

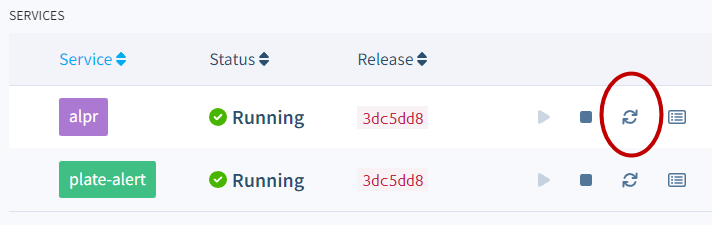
When you are done, hit CTRL + x, then y, then enter to save your changes. Any time you make changes to the configuration file, you need to restart the alpr container for them to take effect. You can easily do that by clicking the “restart” button next to the container in the “services” list:
ParkPow integration
Plate Recognizer has a sister product called Park Pow, which helps track vehicles, get custom alerts, and enforce your parking rules. It has a seamless integration with Stream which is easily set up using the device variables above. Using the Park Pow example configuration, we can set the integration up using device variables alone:
Remember to set USE_VARS to true and use your token from your Park Pow dashboard in the WEBHOOK_HEADER rather than the example one above! Of course you can also set up this integration by editing the config.ini file (after setting USE_VARS to false)
Fleet variables
For device variables that will likely have the same value on every device, such as REGIONS, TIMEZONE, etc. you can set them at the fleet level in balenaCloud. (If you also set them at the device level, the device level value will take precedence.)
To set a fleet-wide variable, you need to click on the “Variables” button under the fleet name, rather than at the device level.
You can then create a new variable and its associated value similarly to creating a new variable for a single device as previously described. This saves time if you are deploying a large fleet of devices!
Plate-alert container
You may have noticed the additional container (or service) named “plate-alert” running on the device. The plate-alert service contains a Python script that can connect to your Stream output to evaluate each recognized license plate. You can specify a custom list of license plates using a device variable, and if one of those plates is detected by Stream, plate-alert will send you a text message and/or change the state of a GPIO pin. (GPIO pins can be used to turn on a LED, energize a relay to close a gate, ring a bell, or many other electrical operations) You can use this service as-is, ignore it, or use it as a template to build your own custom solution.
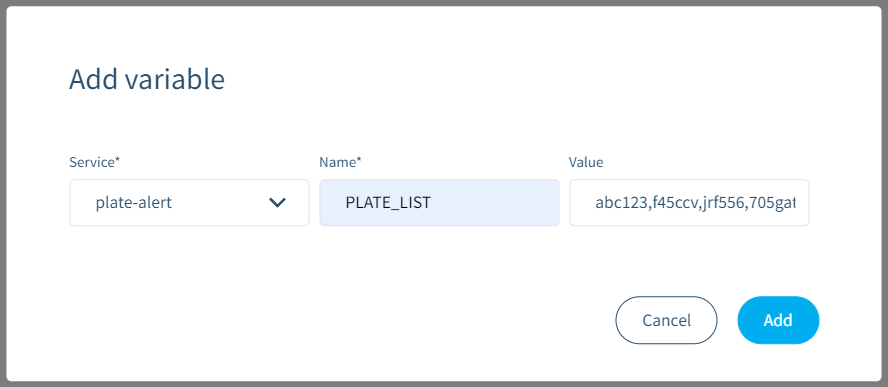
To specify the list of license plates you want to be notified about, use the PLATE_LIST device (or fleet) variable. Be sure to choose the “plate-alert” service. The list of plates should be lower case only, separated by commas:
To activate this service, we’ll need to add the local plate-alert service as a webhook target. You can set the alpr service device variable WEBHOOK_TARGETS to http://plate-alert:5000 . If you already have a value in WEBHOOK_TARGETS, add this address separated by a comma like this:
https://app.parkpow.com/api/v1/webhook-receiver/, http://plate-alert:5000
Or if using the config.ini file:
webhook_targets = https://app.parkpow.com/api/v1/webhook-receiver/, http://plate-alert:5000
When the plate-alert service restarts, it should start receiving data from Stream and letting you know if the plate is a match to one on your list, and if so, what action was taken:

To learn more about the configuration for sending text messages and the GPIO usage, check out this section of this project’s GitHub repository.
Taking it further
There are additional features of balenaCloud that we haven’t covered which can also be useful when managing one or more devices running Plate Recognizer software:
- Host OS updates – Take advantage of updates and improvements in periodic releases of balenaOS
- Device diagnostics – Remotely check and troubleshoot issues with your device
- balenaCLI – For advanced users that want to modify their containers and push updates to their fleet
balenaHub
You can also find Plate Recognizer Stream on balenaHub, our platform for finding and sharing applications.
Feedback
The balena platform is all about reducing friction for fleet owners. As always, let us know if you run into any issues when following this guide or getting Stream set up on your device or devices. Feel free to add a comment below or contact us on our forums.