

I’ve always been a bit hesitant to add cellular networking to my IoT projects because I figured the cost of bandwidth and the hardware requirements were more trouble than they were worth. But after some experimentation, I got over my fears and found cellular wasn’t nearly as expensive or as complicated as I thought.
In this blog post, I’ll explain how I went about adding cellular network service to a Raspberry Pi 4 with a Sixfab HAT, Quectel EC25 Mini PCle 4G/LTE Module modem, and balenaCloud. I’ll also talk about how the easy device-provisioning capabilities of the balena platform and the built-in balenaCloud deltas dramatically reduce bandwidth consumption when updating device code over the air.
Adding cellular to an IoT project presented certain challenges, including:
- Without readily available free WiFi or Ethernet, what would bandwidth cost?
- What additional parts or HATs would I need to extend the capabilities of my raw device?
- Where should I get a SIM card and what should I look for in an IoT network provider?
Regardless of your reasons for trying cellular, whether it’s curiosity, an absence of WiFi where you’re deploying devices, or a business use case for connecting hundreds or thousands of IoT devices like Infarm, 30MHz, or others, you can apply the lessons I learned to any SIM-ready device or device + SIM HAT.
Determine where you’re going to get your cell service and SIM
Many vendors provide SIM cards and companion accounts to activate them. These include traditional U.S. and international cell-phone companies like AT&T, Verizon, T-Mobile and Vodafone. You can also find third-party providers that can give you access to multiple cellular networks in a single account, such as Soracom and Twilio.
Of course, you’ll want to check prices and service availability, but you should have in mind the type of data you’re planning to use. For example, 2G GPRS service gives you < 0.1 MB/second, which might be enough for reporting sensor data, but not necessarily enough speed for pushing code and updates to remote devices. By comparison, standard 4G can give you 15 MB/second and 5G can give you > 150 MB/second.
Since you’re probably going to be charged by the megabyte, consider how important speed is to your use case. You may need to do some shopping around, or talk to your current cell phone vendor for options.
In this example, I used Twilio and what they call their Super SIM. Twilio’s web-based dashboard made it easy to configure my SIM, assign public cellular networks, filter throughput, enable roaming and otherwise manage my account.

What’s the deal with APN?
Each cellular network has its own APN, essentially a code that allows a SIM card (and your cell phone or IoT device) to communicate with that network. The APN is unique to each vendor and, sometimes, to each different type of SIM card you buy from that vendor.
For example, T-Mobile’s 4G APN is fast.t-mobile.com. Twilio’s standard SIM APN is wireless.twilio.com, and for my Twilio Super SIM, it’s simply super.
If you don’t know your SIM-provider’s APN, don’t guess. You’ll need this information later when setting up your IoT device’s networking, and making a configuration change later requires some extra manual set-up you want to avoid.
If you have doubts, you can first insert the SIM card you intend for your IoT device into a cell phone to test it using the network APN for your SIM provider. When your cell phone properly connects, you’ve confirmed that your APN and cell-service configurations are correct.
Setting up your device’s cellular hardware
With your SIM card activated, you’re ready to insert it into your IoT device. Since a typical Raspberry Pi doesn’t have a SIM-card slot, you’ll need a HAT and a cellular modem. Some devices, including the balenaFin, our custom Raspberry Pi carrier board, have an onboard SIM slot, so you only need to add a modem.
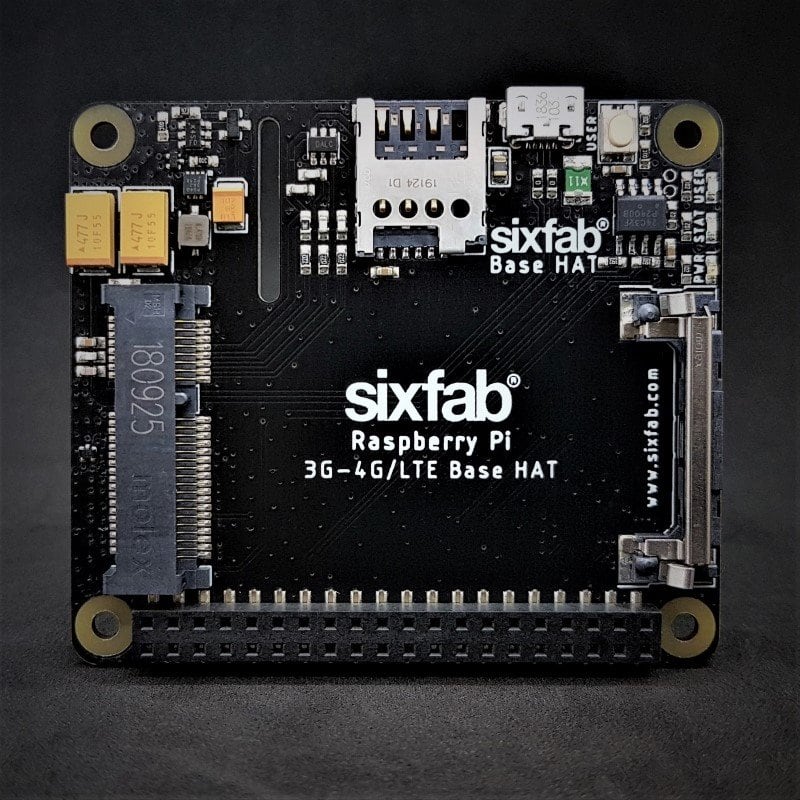
It’s important to distinguish between the modem and the SIM. The SIM is essentially a key for accessing a cellular network. The modem does the actual communicating. For my Raspberry Pi 4 example, I inserted both a SIM card and a Quectel mPCI modem card (below) into my SixFab HAT. The combination makes cellular happen.

Before leaving the hardware set-up, be sure the antenna that came with your IoT modem is connected to the correct connector on the device. The Quectel EC25-A, configured to work in the U.S. where I live, has three possible connectors that fit the antenna; the above EC25 example has just one. For this series of Quectel models, only the connector marked Main is correct. Your device likely has its own labeling, so read the instructions to make sure you get it right.
If you’re thinking of skipping the antenna, don’t. Without it, you’re unlikely to be able to connect to the cellular network — even if all your software-based configurations done later are correct. Take a moment to find the proper connector and attach your modem antenna.
With the Sixfab HAT, I also needed to connect a short USB cable from the microUSB connector on the HAT to one of the standard USB ports on the Raspberry Pi 4. Though the two devices are connected by GPIO, this USB-to-USB connection is necessary for the Raspberry Pi to see and access the cellular modem.
Use balenaCloud to provision your device
Provisioning IoT devices to use WiFi or wired Ethernet with balenaCloud is straightforward and means you don’t have to manually connect a keyboard or monitor to your device, or scan your network for the proper IP address to use. With balenaOS, wired networking works automatically and all IP addresses show up in the balenaCloud Dashboard when the device boots. With wireless, you can add your WiFi credentials when initially provisioning a new balenaCloud device, allowing it to connect automatically as soon as the device boots.
balenaOS manages network connections with NetworkManager, a common and flexible package. It makes it possible to quickly get a device online with a DHCP address, one or more static addresses, and even multiple WiFi access point credentials. On balenaOS, NetworkManager looks for configuration files on the device in /mnt/resin-boot/system-connections. These can be edited on the device if things need to change.
A cellular connection is a little more involved, and the configuration cannot be done on the device itself. For this, you’ll need to perform a couple steps on your workstation.
Creating a cellular network configuration file for NetworkManager
As with any balena-provisioned device, it all starts with creating an application. If you haven’t already, create a balenaCloud account (the first 10 devices are free, fully featured, and don’t require any credit card information to start), and create an application. Be sure to designate the specific type of device you’re using, such as Raspberry Pi 4.
This is an “empty” balenaCloud application, meaning no code has been deployed to it yet. Click the “Add device” button and complete the form, again choosing the same device type as your application. You can easily add WiFi credentials here, but skip that so your device just uses Ethernet (and, later, cellular). Download the image and flash it to an SD card with balenaEtcher.
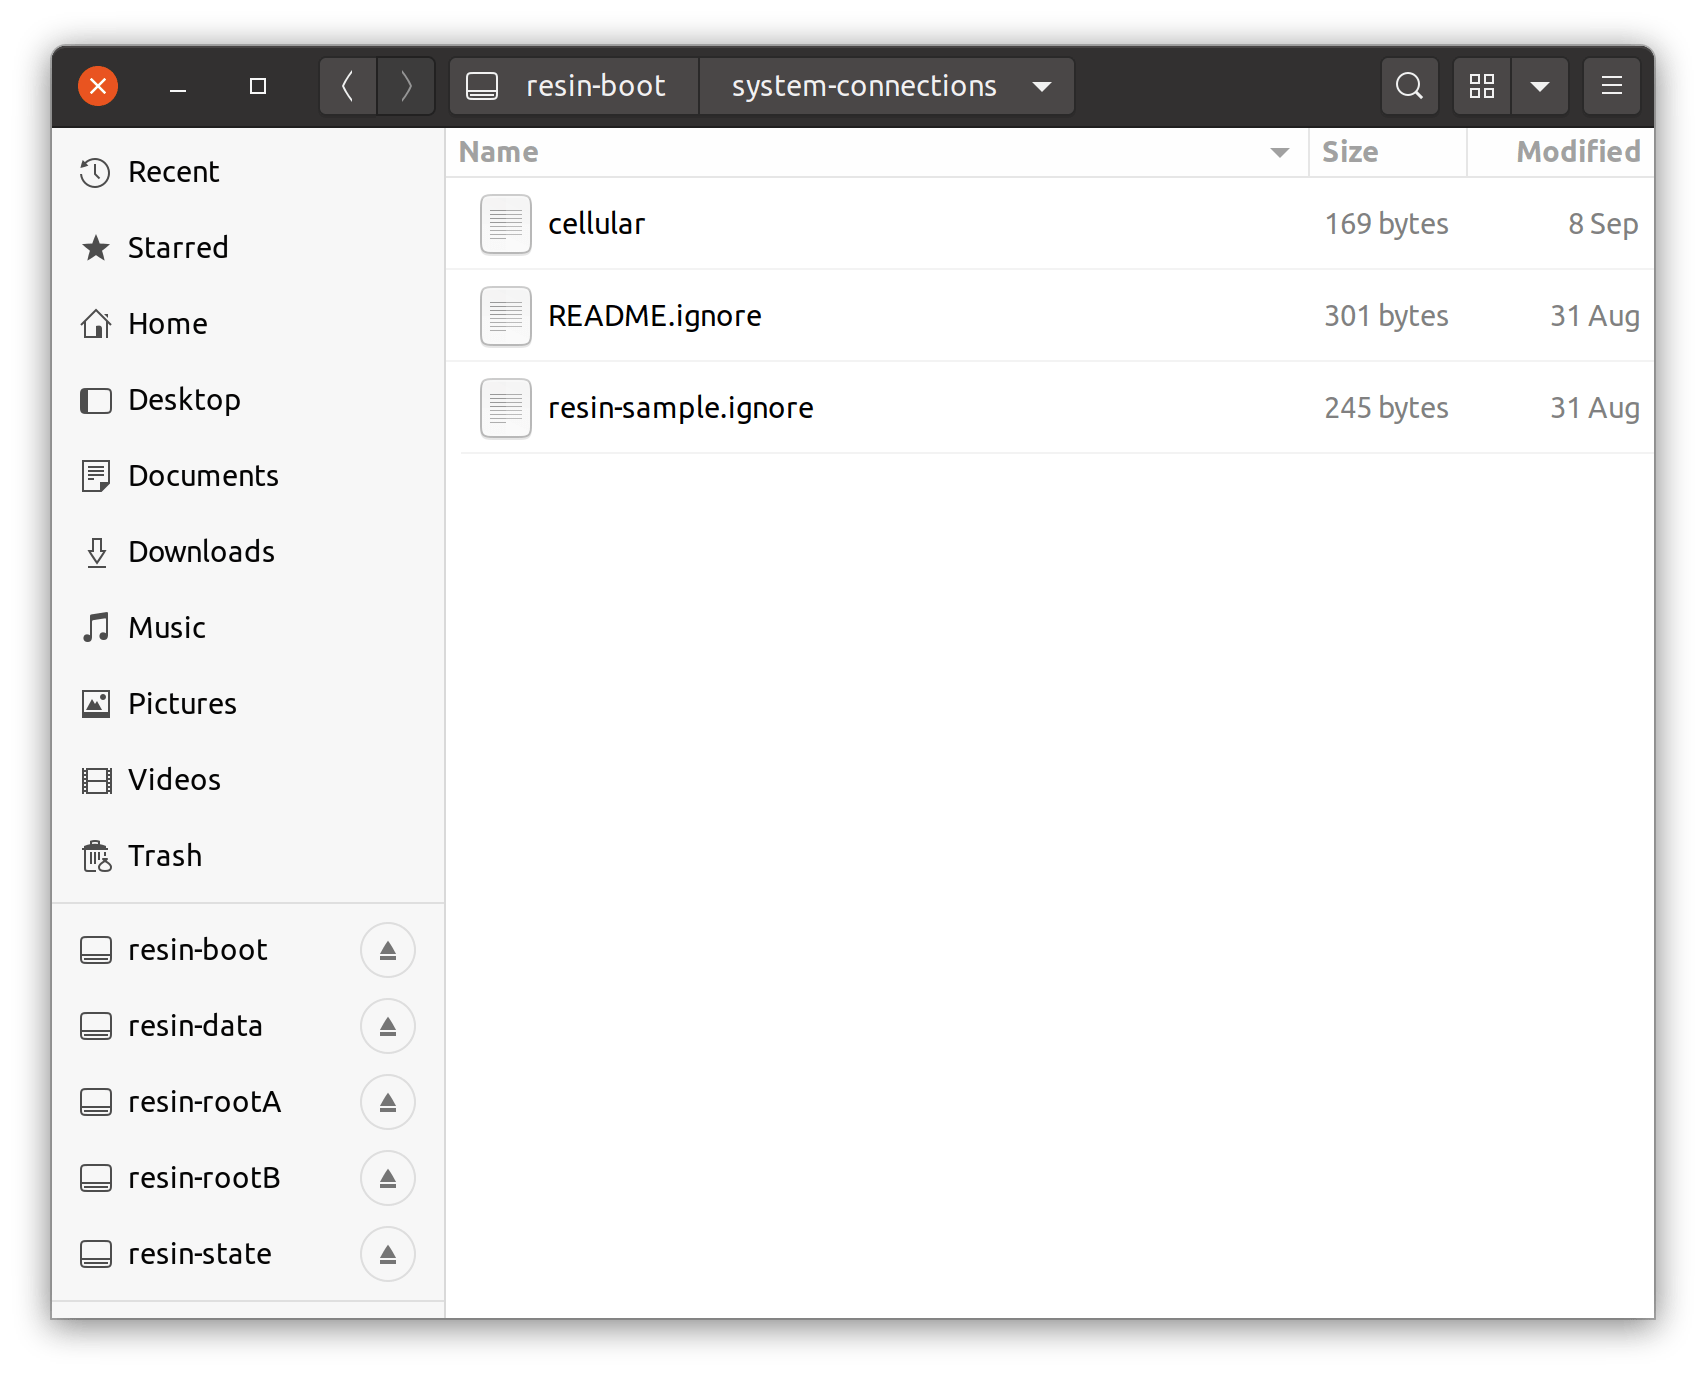
Before inserting the SD card into your Raspberry Pi, eject it from your workstation and immediately reinsert it. This will mount the SD card partitions on your workstation, including the one named resin-boot, where you’ll add the following network configuration file in the system-connections directory.
If automounting doesn’t work, you can mount the resin-boot partition to a local folder on your workstation. This is the first partition on the flashed SD card (/dev/sda1), but may be different on yours. On Linux or Mac workstations, run lsblk to ensure you’re mounting the right partition:
$ sudo mount /dev/sda1 /home/user/tmp
Save the following configuration file in the system-connections folder. If you manually mounted the SD card partition to /home/user/tmp, save your cellular configuration file to /home/user/tmp/system-connection/cellular.
The file called cellular will look something like the following. Note that I’ve set apn to super according to Twilio’s instructions. This requires no username or password, but some providers’ APNs do. If so, that information would be added to the [gsm] entry:
“`toml
[connection]
id=cellular
type=gsm
autoconnect=true
[gsm]
apn=super
[serial]
baud=115200
[ipv4]
method=auto
[ipv6]
addr-gen-mode=stable-privacy
method=auto
“`
The id is an arbitrary unique value, which you can make the same name as the configuration file. Both ipv4 and ipv6 are set to auto-configure and grab DHCP addresses when the cellular interface comes online. If you plan to use a serial console, this configuration file sets the data rate to 115200.
Boot your device and connect to cellular
With the configuration file saved to the proper directory on the SD card, eject it and insert it into your Raspberry Pi 4 and power it on. After a few minutes, the device will boot, the cellular modem will be detected and enabled, a VPN will be established with balenaCloud, and your device will show up in your balenaCloud Dashboard. If you don’t see it there after about 5 minutes, reboot your device.

If you didn’t connect an Ethernet cable to your Raspberry Pi, you’ll see only the IP address for your cellular device in the device’s dashboard view. The cellular IP won’t be an address on your local network, but an address dynamically handed out by your cellular provider’s network. Here it’s 100.72.203.122. If you added a cable and WiFi, you’ll see those IP addresses, too.
Test your connections
If your cellular-only IoT device shows up in your balenaCloud dashboard, your set-up is clearly working, but you can further test it with a couple simple ping commands. Start by getting the network device names by running the following command via a HostOS terminal:
# ip a
In my example, I found eth0 and wwp1s0u1u1i4 had IP addresses that matched what I saw in the dashboard. Now, it was a simple matter of using ping with the -I flag:
“`bash
ping -I eth0 google.com
64 bytes from 172.217.11.14: seq=0 ttl=118 time=26.885 ms
64 bytes from 172.217.11.14: seq=1 ttl=118 time=26.651 ms
64 bytes from 172.217.11.14: seq=2 ttl=118 time=30.283 ms
ping -I wwp1s0u1u1i4 google.com
64 bytes from 172.217.11.14: seq=0 ttl=94 time=232.852 ms
64 bytes from 172.217.11.14: seq=1 ttl=94 time=100.141 ms
64 bytes from 172.217.11.14: seq=2 ttl=94 time=100.870 ms
“`
Notice the time differences between the two. Clearly, my Ethernet connection is faster, resulting in short times. You can also do interface-specific traceroute tests to confirm the different paths network traffic is taking:
bash

traceroute -i wwp1s0u1u1i4 google.com
Or
bash

traceroute -i eth0 google.com
You can also get a quick view of all your device connections by running nmcli c (short for nmcli connection show) or the more verbose nmcli in your Host OS terminal. This will show your active connections in green. In the example below, you can also see my WiFi connection called resin-wifi-01 is present, but disabled.

Troubleshooting
Remember that each SIM provider has a specific APN to be used with their cards. Be sure you’re using the right one for your card. If it’s wrong, your device won’t be able to get on the proper cellular network and transfer data.
Also check that your SIM card is activated. That is, if you’re using a service like Twilio be certain that the ID on the card matches the device you activated in the dashboard.
The antennas for cellular modems are small, fragile things and the printing on the board is tiny. It’s easy to misconnect them. Be sure your cellular antenna is connected to the correct nub on your HAT.
Next steps
That’s all there is to it! You now have a Raspberry Pi (or other device) communicating over a cellular network. Remember, when it’s active and in-use, you’re using data. With balenaCloud, I provisioned a balenaSense application to my device using Ethernet initially to save on cellular costs. Then I unplugged the network cable and let the temperature data and the Grafana dashboard use cellular only.
balenaSense is a containerized application and when I went to make updates, I took advantage of balenaCloud deltas, which push only the layers of the containers that change. Instead of pushing the full 400 MB of the changed containers, balena pushed just the deltas, or layer differences, which were less than 40 MB. Updates happened perfectly, but I saved a ton of bandwidth and cellular cost.
We did this project live on balena’s IoT Happy Hour, which you can watch in full here, or start at the demo section in the video above. Learn more about running your IoT projects on balenaCloud by visiting the balena Forums or balena.io.