
Mood trackers keep a record of a person’s mood at regular intervals. Their purpose is to help look for patterns in mood variations over time caused by different situations and circumstances. However, manually feeding data into a mood tracker can be a cumbersome task, and some people may have privacy concerns about using third-party mood tracking services.
In this blog post, I’ll show how I addressed both of these issues by building my own self-hosted, voice-controlled, mood tracker using off-the-shelf components (Rhasspy and balena!) without sending any sensitive data to the cloud. We’ll walk through some background information on this project first. If you’re looking to get started right away, jump to the build instructions.
This project is part of the balenaLabs residency program
The balenaLabs residency program is a team and community-wide project where balenistas take on a physical computing project to learn more about balena and various hobbyist or industrial use cases. There are a number of successful projects and build logs that can be seen on our blog or the Forums.
Community members are welcome to join in on the fun. Share your project on the Forums to let us know what you’re working on. We’re here to answer questions and help!
Concept
A mood tracker has two basic features: it allows users to log their mood at any given time, and produces visualizations they can use to identify patterns in the data. In order to build a mood tracker capable of delivering a smooth experience while preserving as much as possible the user’s privacy, I needed to come up with an intuitive interface for feeding data into the system, create a privacy preserving storage mechanism, and build some kind of dashboard for visualization.
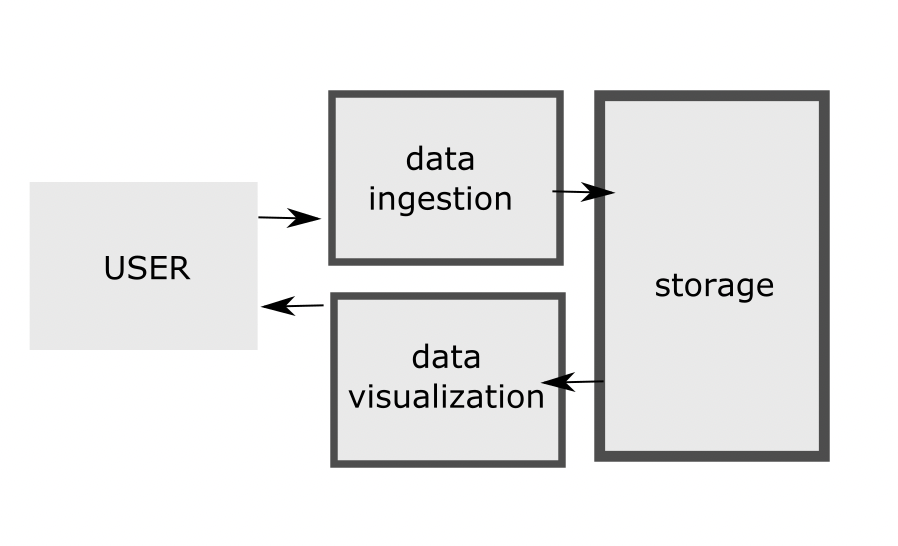
I came to the conclusion that it would be a good idea to use a single-board-computer to self-host my mood tracker, and a local database to ensure full control over the data. For visualization, I decided to build a responsive single-page-application (SPA).
The only missing piece was the interface for data ingestion.
Research
User interfaces are a key requirement in many IoT projects. While they are frequently implemented using buttons, LEDs, and displays, there are scenarios where it would simply be more convenient to have a voice user-interface. I believe this was one of those scenarios.
While the idea is not new, it was only recently that robust speech recognition became a reality. Thanks to recent breakthroughs in AI, products such as Google’s Home Assistant and Amazon Echo were able to set a new standard for man-machine interaction. These devices, however, are designed in such a way that any data collected is sent to the cloud for processing, which is a dealbreaker for people who, like me, are concerned about their privacy. If I wanted to use voice to feed data into my mood tracker, I had to figure out how to do this without relying on a cloud service so as to remain compliant with the privacy requirements.
Prior to actually implementing anything, I spent some time looking for software components in general that could help me achieve my goal of turning speech into commands. More specifically, I was looking for lightweight alternatives that could be containerized, deployed to off-the-shelf hardware such as the Raspberry Pi, and run completely offline, performing all computations on the device. These requirements allowed me to narrow my search down to two platforms: Picovoice and Rhasspy.
Although both solutions met the requirements, due to some limitations of Picovoice’s free version – which include a cap on the number of devices running the SDK as well as the number of monthly voice interactions – I decided to stick with Rhasspy.
What’s Rhasspy?
Rhasspy is an open source, fully offline set of voice assistant services with support for many human languages that is optimized for working with external systems via MQTT, HTTP, and WebSockets. It can be configured with pre-specified voice commands described in a template file containing intent definitions like the one below:
[LightState]

states = (on | off)

turn (<states>){state} [the] light
Once properly configured and trained, Rhasspy is then able to perform open transcription or convert speech into events of the format:
{

    "text": "turn on the light",

    "intent": {

        "name": "LightState"

    },

    "slots": {

        "state": "on"

    }

}
All of its services have well defined inputs and outputs, communicate over MQTT, and can be configured independently. Users can interact with Rhasspy through a web server that exposes both HTTP and WebSocket APIs. To top it off, it also serves a web UI that makes configuration a breeze.
Getting started
In the next sections I will describe how to set up the project so that others can also use the mood tracker.
Hardware required
The full list of hardware components used in the project includes:
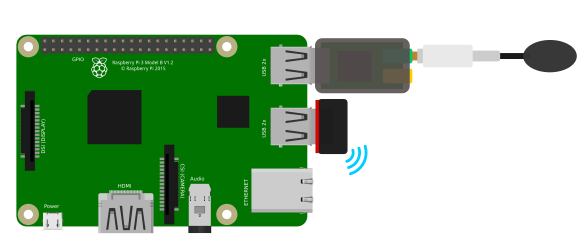
* RaspberryPi 3 B+
* A high-performance micro SD card, like a SanDisk Extreme 32GB
* USB sound card (if your device doesn’t have a suitable audio port)
* A microphone with a connector compatible with the USB sound card
* Optional A Wi-Fi dongle
For my particular voice-controlled mood tracker build, I used a Raspberry Pi 3 Model B+. This was mainly due to its computing resources, which were compatible with my requirements. Sadly, the Raspberry Pi 3B+ does not have an audio input, so I also needed to use an adapter to record audio from the environment.

If you’re interested in testing a different device type with this project, please get in touch or leave a comment below!
Software required
In terms of software, you might want to download and familiarize yourself with the following:
* balenaCloud to deploy the project to your fleet (NOTE: your first ten devices are free and fully-featured and there’s no payment method required to start)
* balenaEtcher to flash the SD card
* balenaCLI and the project code In case you plan to clone the project and build it yourself
I made use of other open-source components that might be especially interesting if you are an advanced user or wants to contribute to the project:
Deploying the software
You have two options to deploy the software. You only need to choose one of these two options to begin.
Use Deploy with balena
Sign up for a free balenaCloud account and then use the button below to create and deploy the application. You can name your new fleet whatever you’d like, just make sure to select the Raspberry Pi3 (64-bit OS) as the default device type.

Then all you need to do is add new devices to your fleet and watch as they go online. Just click the “Add device” button on your fleet’s page and input some information e.g., the credentials to the WiFi network your device is expected to connect to upon boot. This process will create a customized image you should download and flash to your SD card. This is where balenaEtcher comes in handy. Once the flashing process has completed, insert your SD card into the Raspberry Pi and connect the power supply.
Cloning the project (for advanced users)
Advanced users can clone the project from GitHub and use balena CLI to push the application to their device. This is the best option if you want to tinker with the different services and have full control. After you clone the GitHub repository, assuming you have the balenaCLI installed, all you have to do is run balena push <fleet-name> from the project’s root directory, with
I personally like to build any projects first on a local device first, so that I can iterate more quickly. Luckily, balena CLI also supports this out-of-the-box. Provided that you have a device with local mode enabled connected to your home network, you can simply run balena push <device_id.local>, and all services will be built directly on your device.
For more information, check our Getting Started guide.
Booting the device for the first time
When the device boots for the first time, it should automatically connect to balenaCloud and become visible on the dashboard.
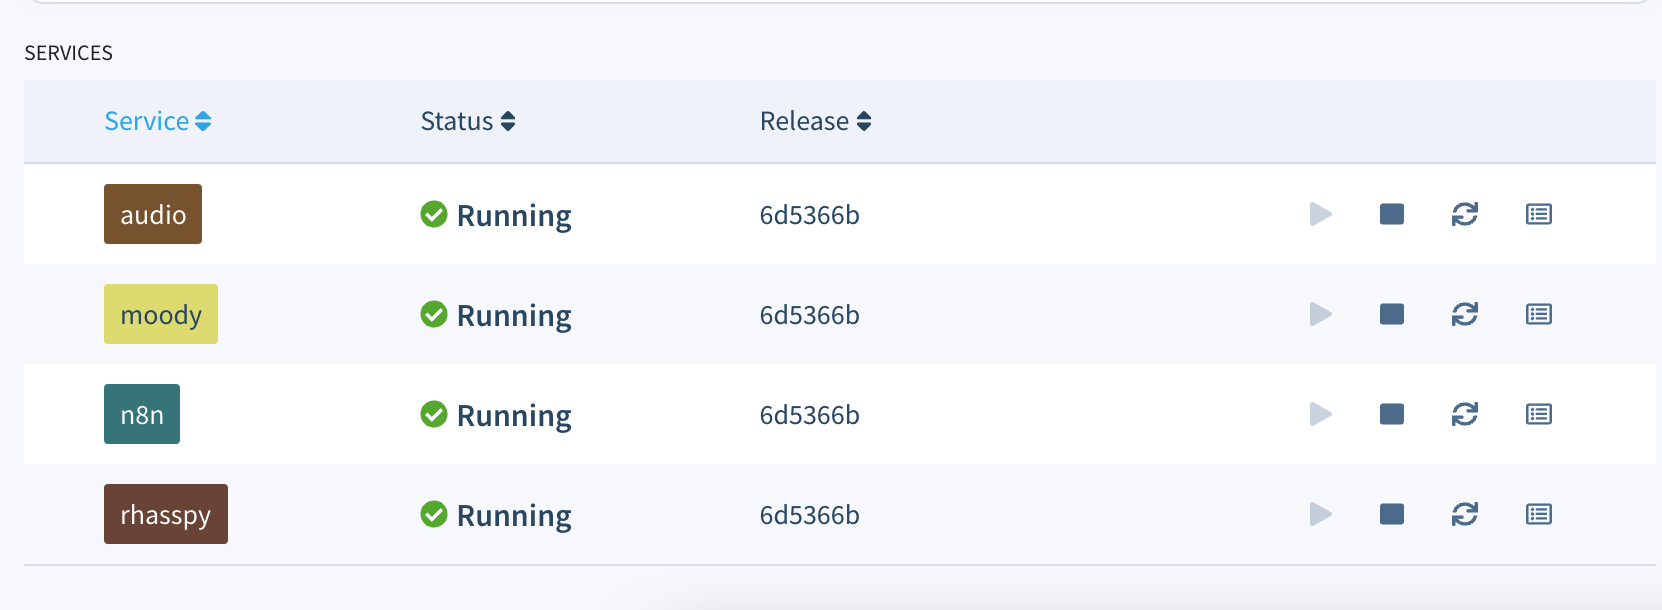
If everything worked out correctly, after a few minutes your device information screen in the dashboard should look something like this, showing all the project’s services running. (If not, check out our troubleshooting guide or head over to the forums where we can help you out.)
Watch the demo
We go into detail about the project below. You can also watch this demo video to get a better idea of how this works.
Accessing Rhasspy
Rhasspy is the service responsible for processing audio and recognizing user intents. Its dashboard can be accessed at <device-id>.local:12101 of your device, where device-id can be obtained either from the balenaCloud dashboard or using the balena scan command on the balenaCLI. I have already pre-loaded the Rhasspy image with some default configurations so that it is easier for anyone to use the project. With this configuration it should be able to recognize a LogMood intent, as shown in the table below, as well as several different moods and intensifiers. Still, when using the system for the first time, you need to open Rhasspy’s dashboard, download the necessary models, and train it, as indicated in the figure below.
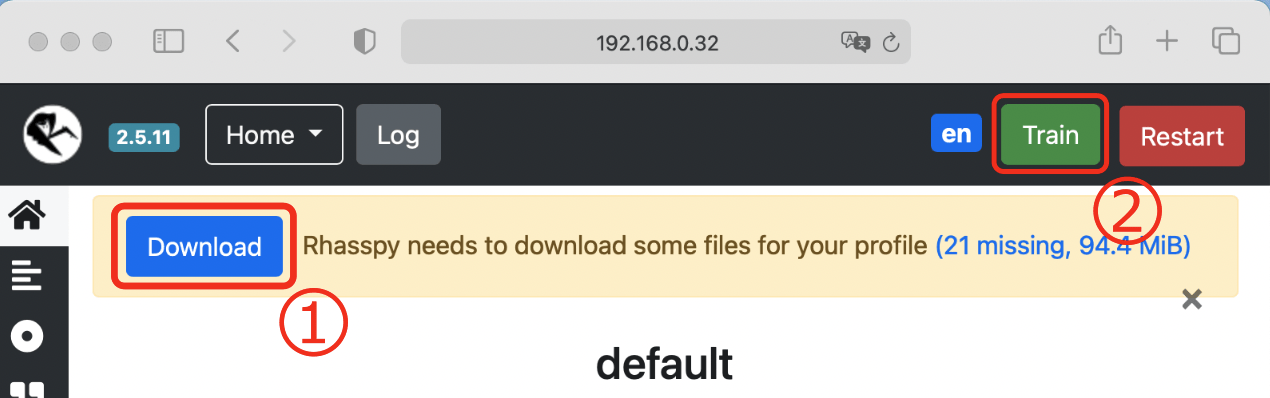
Note: After configuring Rhasspy, it is important that you download all the files required by your profile, and re-train its internal model, as described in the official documentation and indicated above. Even though the process is quite straightforward thanks to Rhasspy’s intuitive UI, I plan to automate it in the near future so that everything works out-of-the-box.
Intents/rules example
Here’s an example of how to create an intent and its commands:
[LogMood]

today I'm feeling ($moods){mood}

I'm [so] ($moods){mood} today

I'm ($moods){mood}
Mood and Intensifier options
| Examples of moods: | Intensifiers to try: |
|---|---|
| happy | amazingly |
| sad | very |
| surprised | bitterly |
| stressed | fantastically |
| tired | veritable |
| excited | fully |
| mad | colossally |
| loved | excessively |
| weird | precious |
| uncomfortable | phenomenally |
| touched | dreadfully |
| thankful | awfully |
| sympathetic | too |
| …and more | …and more |
Once again, please see the official documentation for more tutorials and information of how to use Rhasspy.
After you have trained Rhasspy, provided you have a microphone connected to the USB sound card, you should be able to create new mood logs by saying something like:
Computer, I'm extremely happy today!
Where “computer” is just a wake word, used to trigger Rhasspy’s speech processing pipeline. If the intent is successfully recognized, this will result in a new mood log being saved and showing up on moody’s dashboard.
Accessing moody
The core component of the project is moody, an app responsible for processing the intents forwarded by Rhasspy through n8n and saving mood logs to the database. Moody is a simple NodeJS project based on the NestJS framework that is wrapped into a Docker container.
In addition to a REST API, it also serves a React application that is accessible at <device-id>.local:80. Through this UI, you will be able to visualize all your mood logs, as shown in the image below. After logging your mood with a voice command, you can reload the page and the newly created record should be immediately visible in a timeline.
In this visualization, each circle corresponds to a mood log. By hovering the circles on the timeline, one can see more details including when the log was created, as well as its sentiment score, i.e., a quantitative representation of the logged mood. Although intuitive, our UI is still quite simple. The goal, however, is to continue improving it over time, so that it becomes increasingly easy for users to obtain insights from their data.

Note: One of the great benefits of using a free balenaCloud account is that you’re able to use a Public Device URL to access your device’s port 80 from anywhere. In our case, this means that once you enable this feature moody becomes instantly accessible over the web.
Contributing to the project
Now that we have a good overview of how to use our mood tracker, let’s take a look under-the-hood to see how it works. This section might be particularly helpful for those interested in contributing to the project. Feel free to skip it if it is not your case.
All four services required to run our mood tracker are defined within a docker-compose.yml file in the project’s root directory:
- audio: Provides an easy way to work with audio applications in a containerized environment. It is a Docker image that runs a PulseAudio server optimized for balenaOS, through which one can route audio to other services.
- rhasspy: A service based on the Docker image provided by Rhasspy, which is compatible with arm64 architectures and bundles all of the officially supported components. Note that this image was utilized as is, without any optimization for balenaOS.
- n8n: n8n is an extendable workflow automation tool that allows one to connect anything to pretty much everything. It is easy to use, user-friendly and highly customizable, featuring an intuitive user interface that allows the quick design of unique workflows. It is used in this project to receive intents from Rhasspy and send requests to the mood tracker’s API based on their type.
- moody: A simple containerized backend app serving a REST API for creating and fetching mood logs, as well as serving a web UI for visualization. This is the component actually implementing the mood tracker functionality.
- Additional supported devices: We welcome any and all device testing
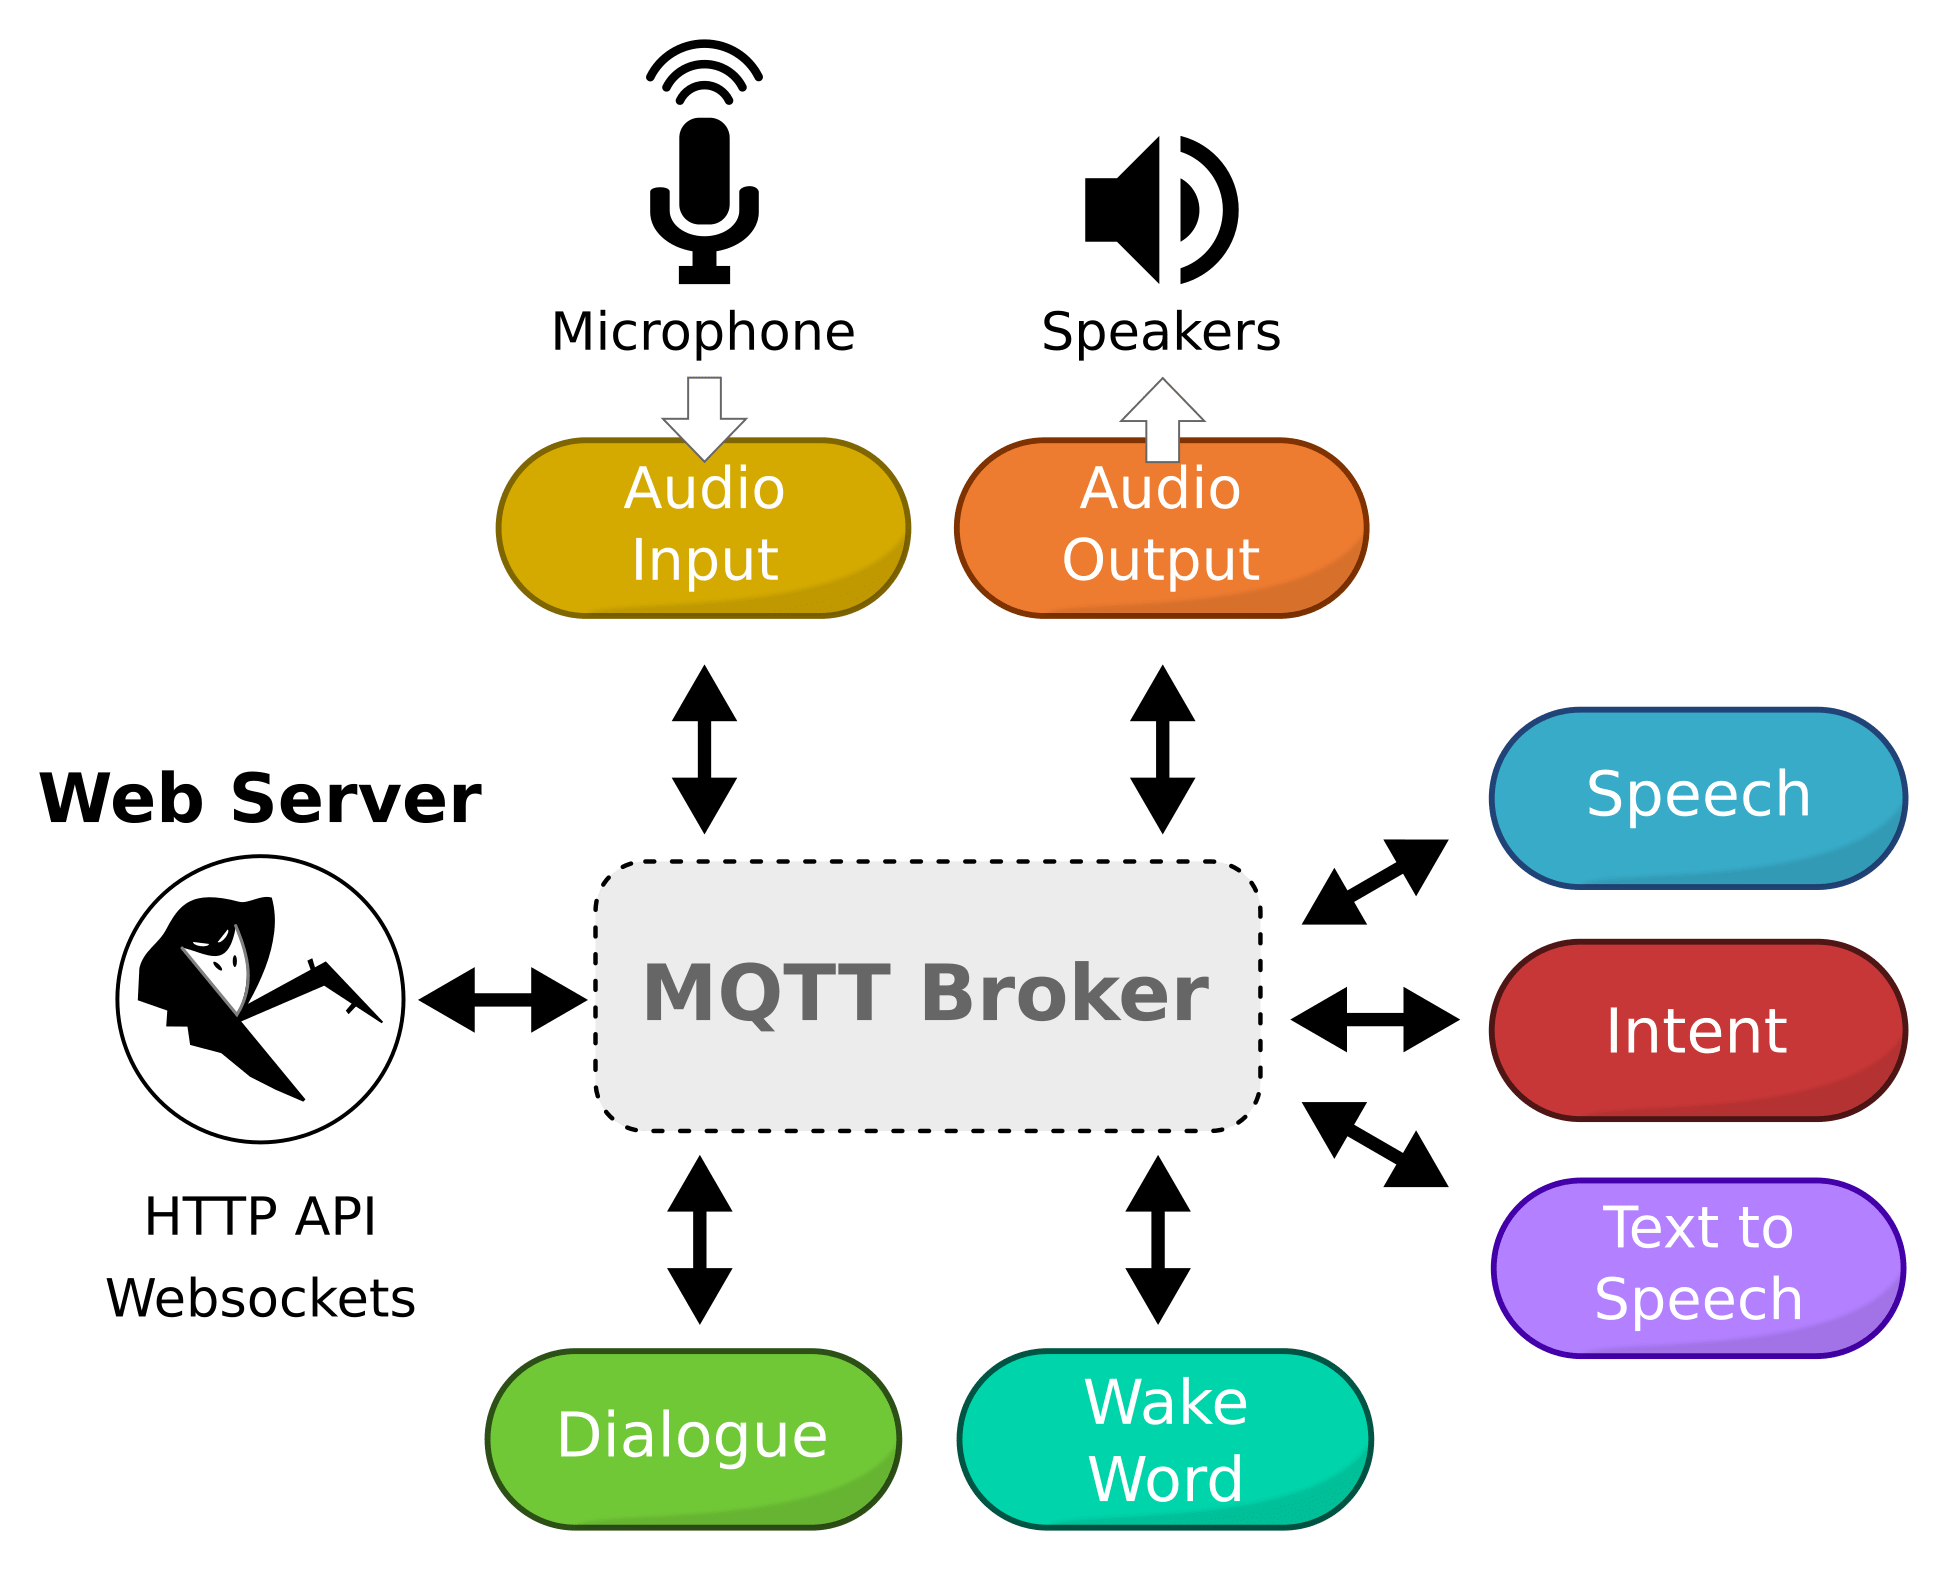
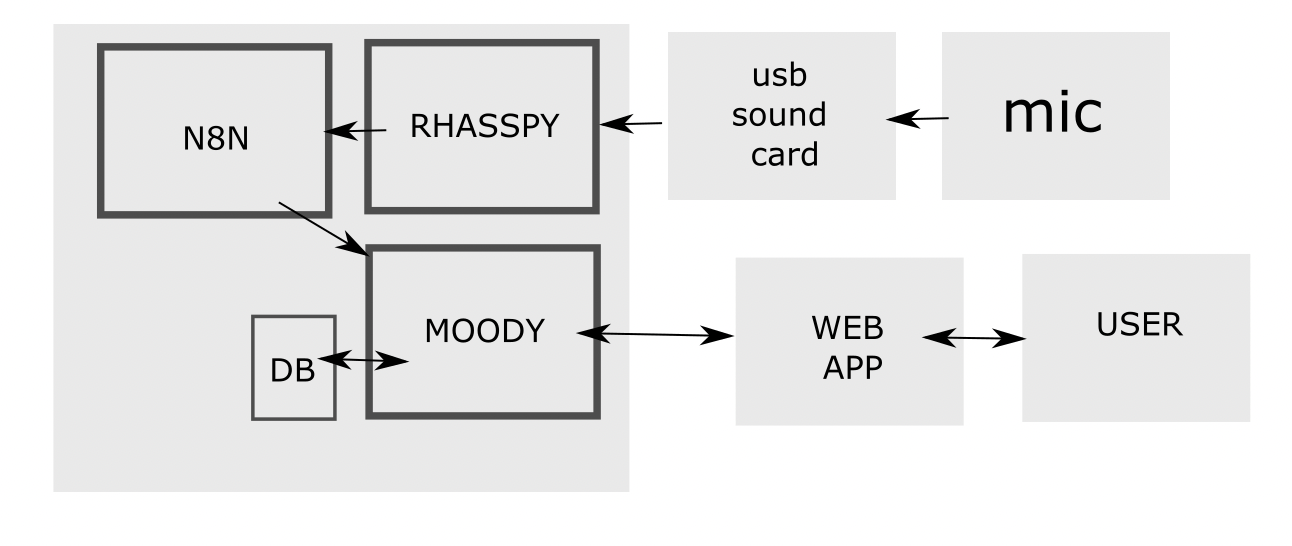
The image below gives a good idea of how our architecture looks like:
Before we dive deeper into the details of moody, it’s also worth presenting the integration options offered by Rhasspy. Whenever a new intent is recognized, it is published in JSON format via WebSockets, resulting in a stream that can be consumed by external applications. Rhasspy can also be configured in such a way that any recognized intents trigger the execution of a local command or are sent to a remote HTTP endpoint for processing. Finally, since all of its internal services communicate over MQTT, if an external application is able to connect to the same broker used by Rhasspy, it will have access to the intents, which is quite interesting in scenarios involving other devices that communicate using this protocol. For this project I chose to leverage the HTTP integration, and forward all recognized intents to a n8n workflow, where they were used to send properly formatted requests to moody’s API, but the other integration options could also have been employed.
In the n8n workflow we have a webhook endpoint for receiving intents recognized by Rhasspy. All requests received through this block are processed by a simple function, which identifies the intent, and takes action accordingly. For example, if the intent is LogMood, the function applies some formatting and forwards the request to the next block. This decouples moody from Rhasspy while giving us some flexibility for handling different intents.
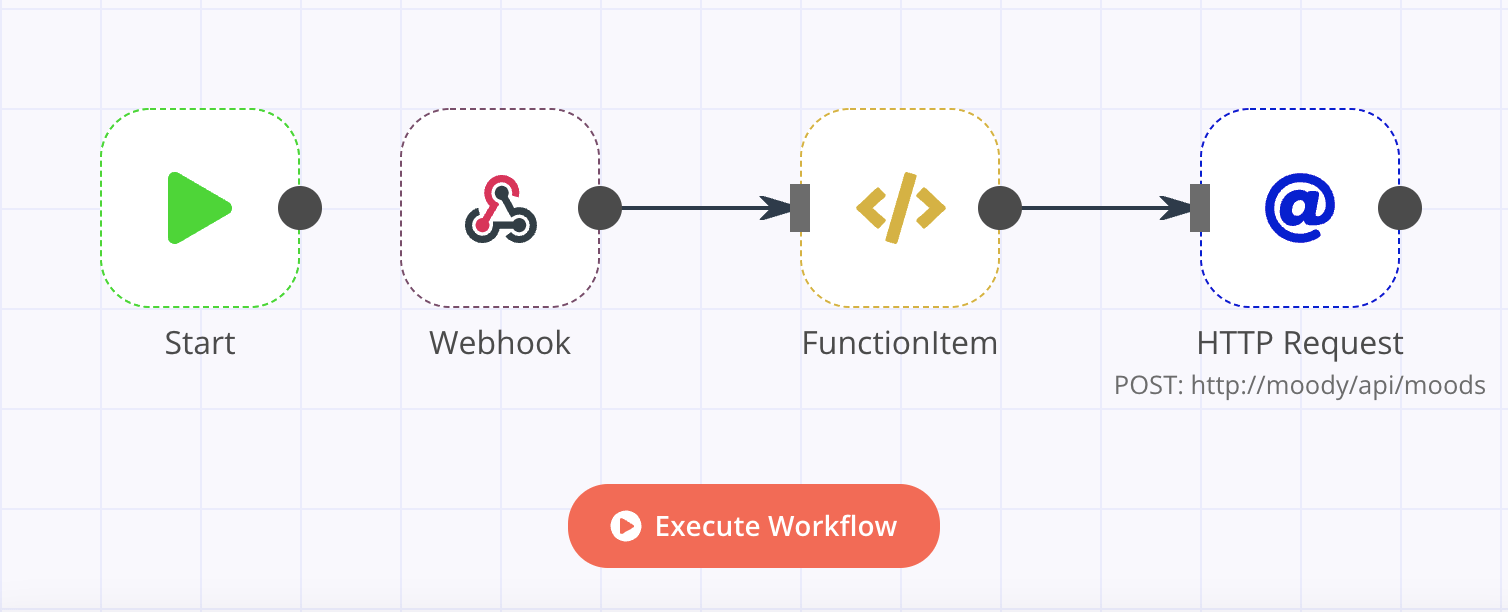
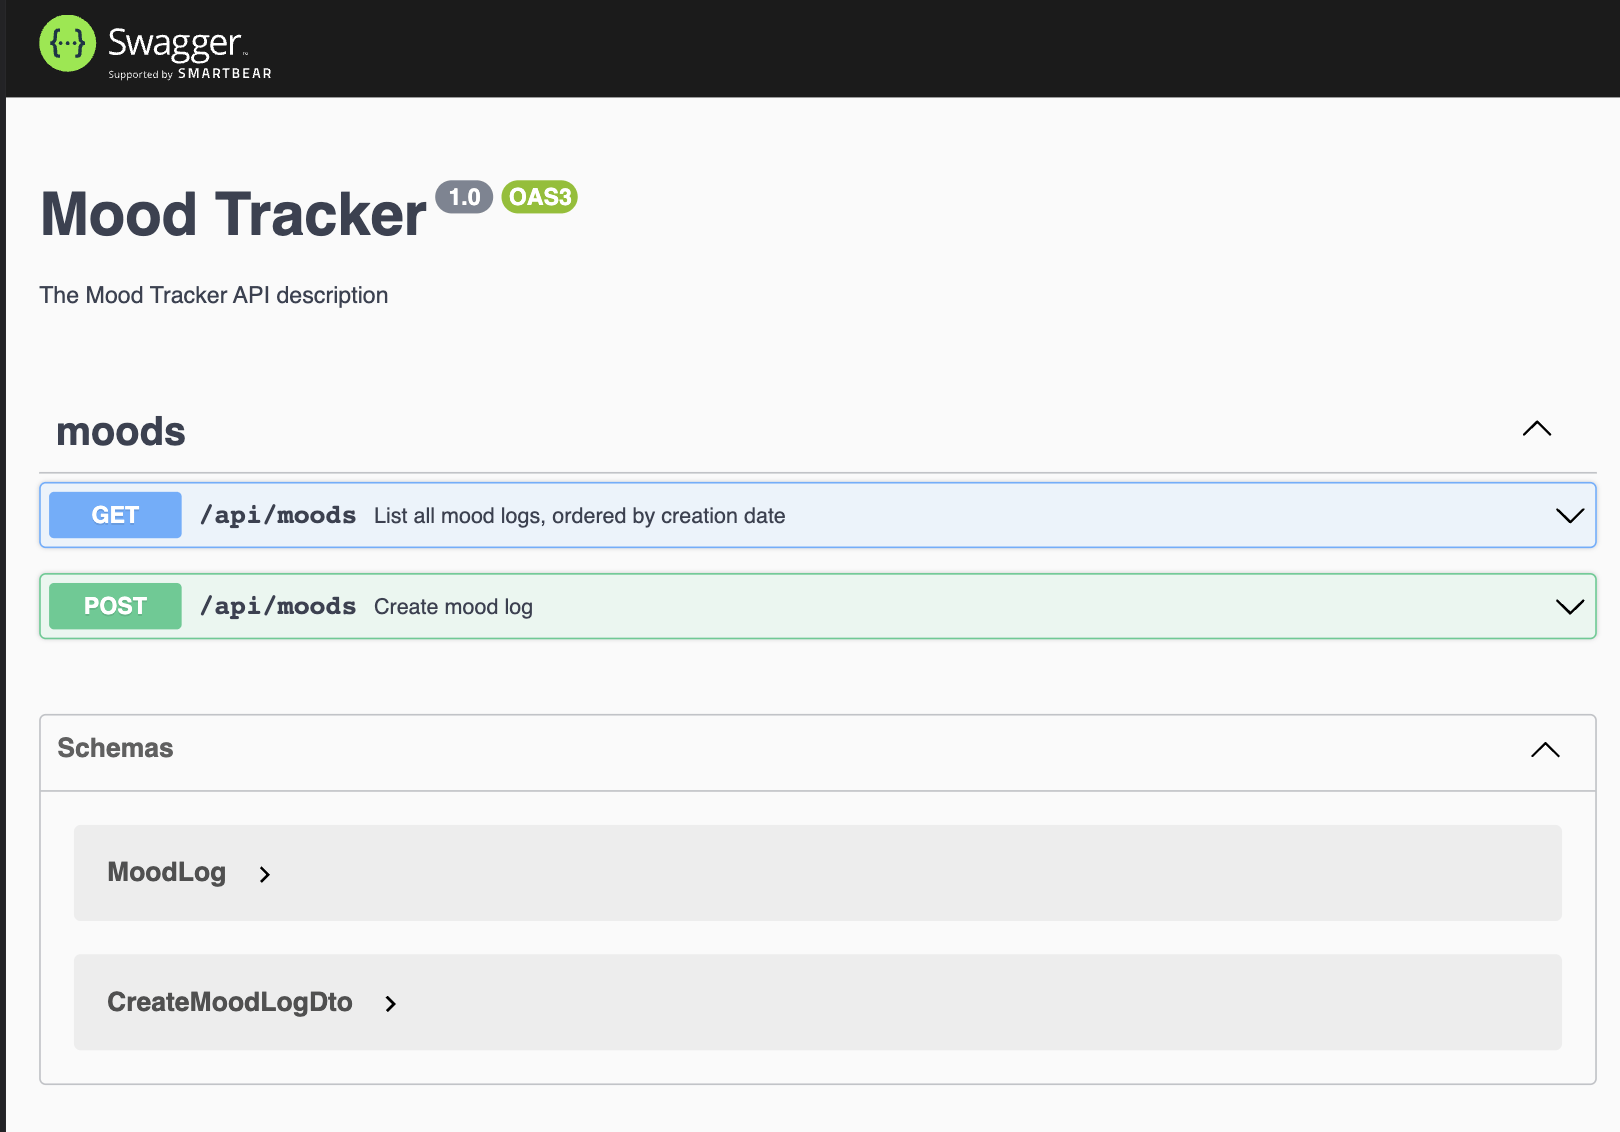
Finally, we have a NestJS application that serves a single-page-application (SPA) and implements an API with two endpoints, one for creating new mood logs (POST <device_address>/api/moods), and the other for retrieving a list of all mood logs within a given time range (GET <device_address>/api/moods). Whenever a new mood log is created, it is stored in the database together with a sentiment score generated with sentiment.js. For documenting the API, I used Swagger. The automatically generated docs can be accessed at https://<device_address>/docs. They can be used for inspecting the inputs and outputs of both endpoints, and for manually testing them.
Challenges
The first challenge faced while developing this project was the lack of an audio input on the Raspberry Pi. The solution I found was to use an inexpensive USB sound card, but in case you don’t have access to such hardware, another option is to stream audio remotely e.g., from a computer, all the way to the Pi. Even when an audio input is available, accessing it from within a container can be quite tricky. To make the process smoother, I ended up using balena’s audio block, which I highly recommend for any application involving audio.
When writing my project’s docker-compose.yml, I first tried to configure and run all of Rhasspy’s services myself, which turned out to be a cumbersome process. Therefore, for the first iteration of this project, I decided to use the official Docker image, which bundles implementations for all of the supported services. In the future, I plan to have these services defined and configured directly in my project’s docker-compose.yml, and use a balena base image to reduce the footprint, since Rhasspy’s image is quite bulky.
Still related to Rhasspy: as of now the project does not offer built-in support for something like wildcard or free text slots, meaning one can either do open transcription, or intent recognition based on a template file. I couldn’t find a way to deal with something like:
[LogMood]

I feel  [*] {mood}
…where ‘mood’ can be anything. As of now, the only solution is to declare a list containing all possible values a slot is expected to assume. If the user makes use of a word that is not in the list, it will not be recognized.
When trying to install node bindings for Sqlite I also faced an issue due to the lack of pre-compiled binaries for ARM64. I eventually managed to solve it by installing node-pre-gyp on the Docker image and building the bindings for this specific architecture.
Finally, for some reason (maybe due to the use of ViteJS?) building the UI together with the Docker image was consuming all of my device’s memory. When performing the build on my laptop with the --emulated flag everything worked fine. I ended up giving up and simply copying the pre-built bundle into the image, but this is definitely something that needs further investigation.
Results & Next steps
Using the setup described above I was able to make my Pi recognize specific commands for logging the user’s mood, perform sentiment analysis, save the result to a database, and produce a simple visualization of one’s mood over time. Now that I have a simple but functional self-hosted, voice-controlled mood tracking app that can be used to record and track mood changes via a slick web UI, the next step is to make incremental improvements and integrate more sophisticated features that can help users gather insights from their data. Some ideas include:
- Allow the user to log moods at different times (e.g. “yesterday I was feeling tired”)
- Allow the user to log moods on the web UI (either through a form or voice commands)
- Improve intent recognition rules for more intuitive/natural logging
- Complement the lists of slots with other moods and intensifiers
- Allow for the creation of logs that span multiple days/hours
- Improve sentiment analysis strategy e.g., to take into account intensifiers
- Integrate with external systems e.g., Google Calendar, and try to establish correlations
- Automatically process data and identify patterns
- Improve timeline component by adding ticks, aggregating logs based on zoom level, etc
- Show events other than moods on the timeline
Another idea that is particularly interesting is to integrate the project with Péter Makra’s curtains automation project, and try to establish correlations between circadian rhythm and mood changes.
When it comes to the project structure and implementation, I’ll probably dedicate some time to move all Rhasspy services to the docker-compose.yml, so that I have more flexibility in terms of configuration options and use base images provided by balena to reduce their footprint.
Reach out in the Comments section if you like this project or have any suggestions for improvement! If you try this out, let us know in the comments, or on the project’s GitHub repository.
Hi @meyotch,
We’re glad to hear you find the project interesting!
Although it was developed and tested on the RPi3 (64-bit OS), I’m confident that the project should work on a RPi Zero 2 with a 64-bit OS (albeit a bit slower than on the RPi3), especially considering that none of the other services require nearly as much resources as Rhasspy (which is compatible with the Pi Zero, as per their documentation). Regarding the MEMS microphone, I spoke to some colleagues and we believe that it’s unlikely that it will work with the audio block, which is the component we rely on to get audio data into the container running Rhasspy. I have even tried to find a driver compatible with Pulseaudio (which is used in the audio block), and came across this project on GitHub, but indeed it is known not to work well with PA.
We’re looking forward to seeing your progress in this project!
Let us know if there is anything we can help with
Cheers!