

This guide will show you how to set up a neural network model that runs an object detection algorithm in real time. We’ll be leveraging balenaOS and alwaysAI’s platform to greatly simplify the process.
Some prep work
In a previous article, we showed you how to easily get started with machine learning and computer vision, using balenaOS and alwaysAI. We went over the basic concepts and layers of software that are involved, and provided an example on how to deploy a containerized application that ships with all the drivers and base software packages needed to take advantage of GPU acceleration on the Jetson Nano board.
Before you start
Installing the edgeIQ Python library
Let’s revisit the sAI software layers diagram:
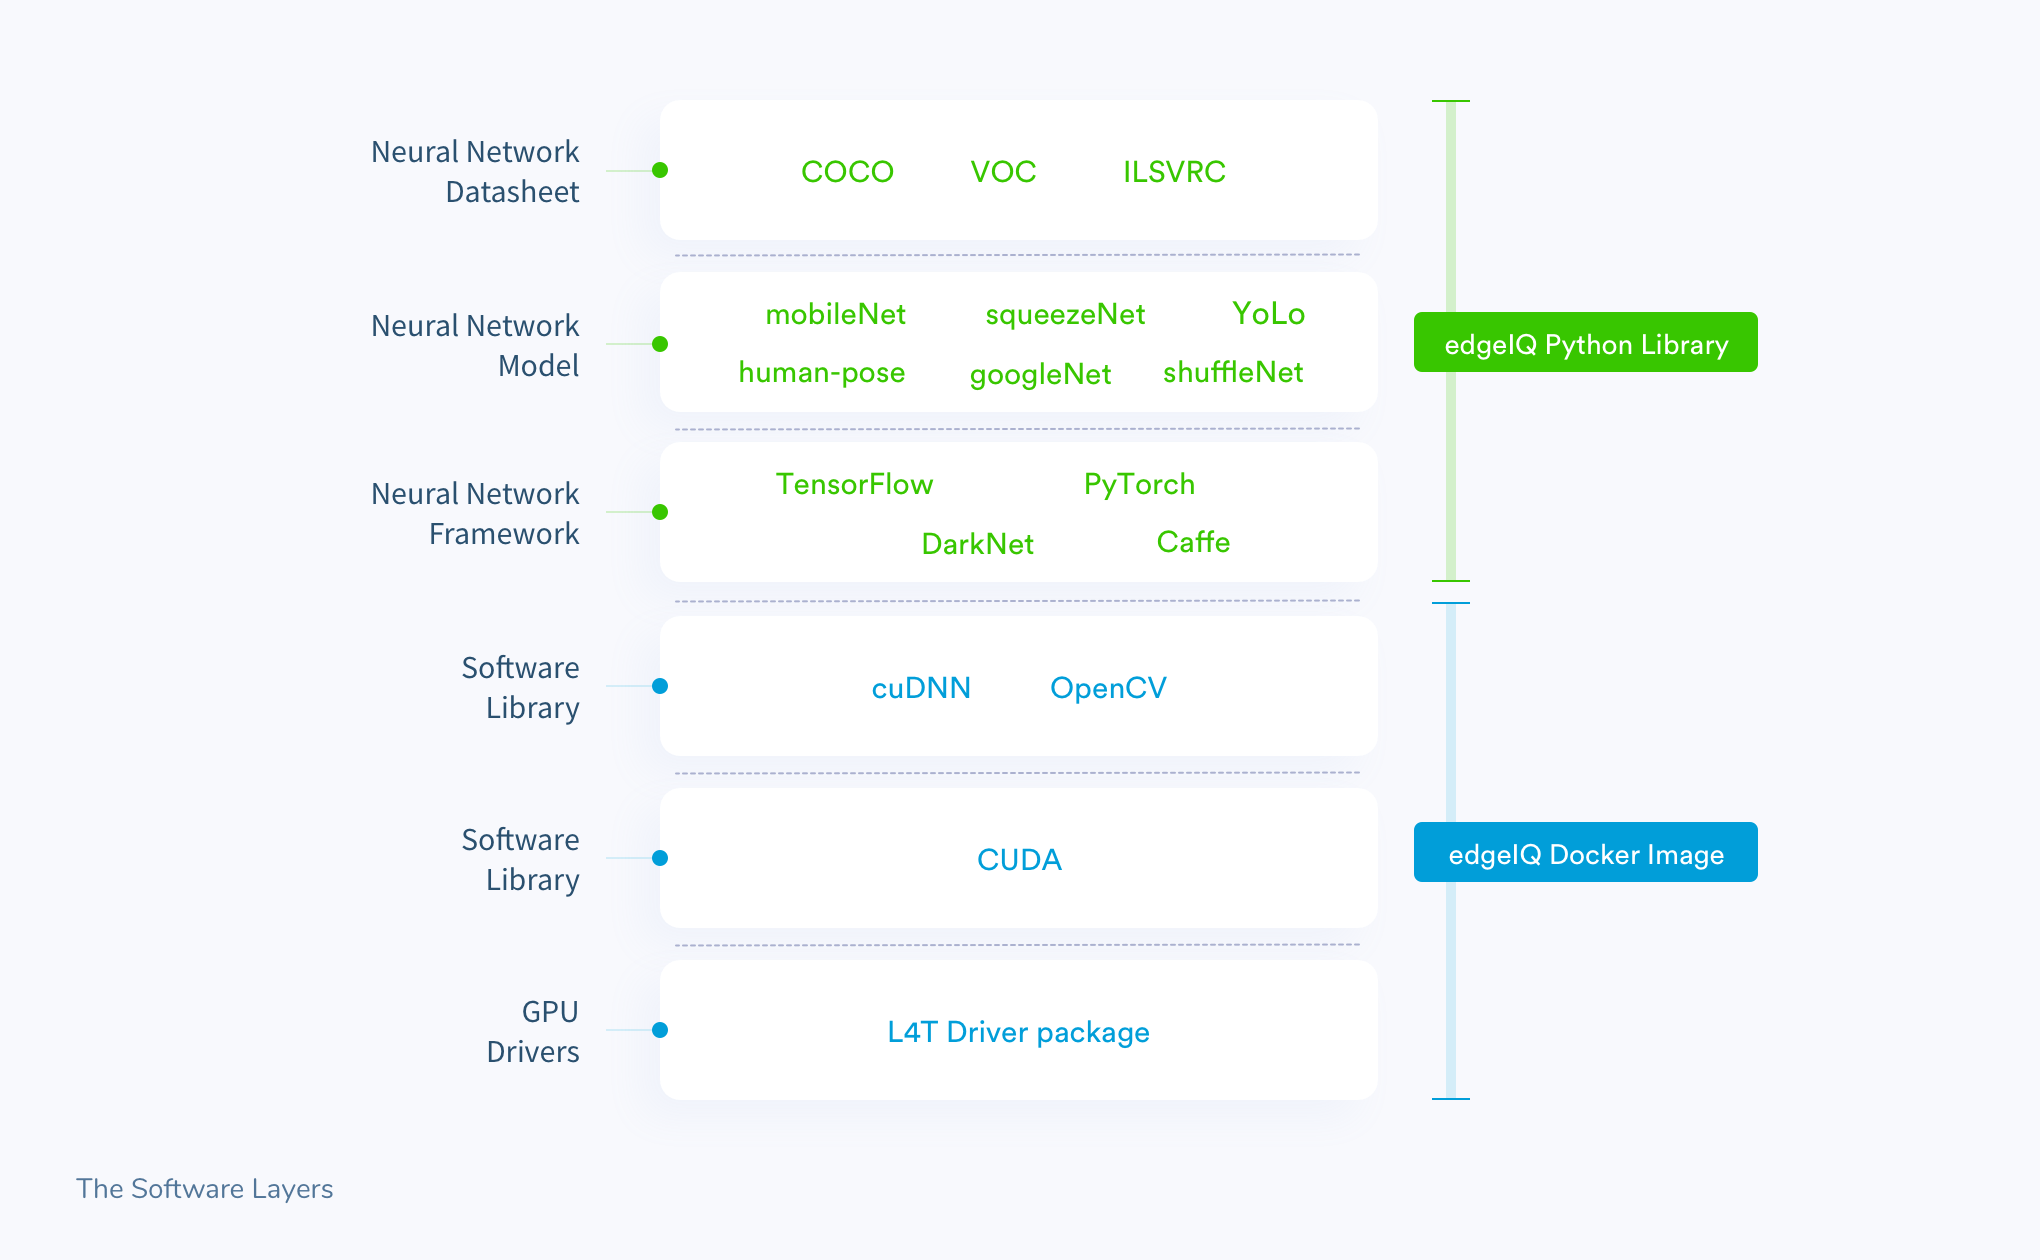
In our previous post, we used alwaysAI’s edgeIQ docker image to implement the bottom three layers with very little effort.
We will be focusing now on the top three layers that deal with the neural network frameworks and models.
Depending on the framework, the installation process can go from a simple one-liner (case in point, TensorFlow), to compiling and linking binaries (DarkNet for instance). On top of that, you usually need to source different configuration files related both to the model and dataset you chose. This can quickly escalate into a lot of setup work if you want to try out different frameworks and models, especially because each framework has its own quirks that need to be learnt.
Luckily, there is an easier way!
alwaysAI simplifies the getting started process
The alwaysAI platform has a python library companion to the edgeIQ docker image. The edgeIQ python library serves as an intermediate layer that provides a uniform API to access common neural network functionality. The library abstracts the difficulties of dealing with multiple frameworks and models, so that the developer doesn’t have to.
For example, if you want to perform object detection there is an object detection module with python classes that implements the functionality in a standard way. This allows you to switch frameworks and models effortlessly without having to change your codebase.
What’s even more handy is that the edgeIQ docker image already comes bundled with the edgeIQ library and all supported neural networks installed. We only need to provide a few model specific files to get started! Usually these files have a list of parameters to configure the neural network to work in a given way. We’ll show you how to obtain them in the tutorial.
alwaysAI has an extensive library of models that work out of the box and allow you to do object detection, object classification, pose estimation and semantic segmentation. You can also create and upload your own model if the default ones don’t fit the bill.
Tutorial
In this tutorial we are going to deploy a project that performs object detection to count people in a videostream. This project combines a fork of our very own balenaSense project with the people counter demo application from alwaysAI. It also creates a grafana dashboard that shows a live video stream with detection overlays and graphics showing the historic people count.
Hardware required
For this tutorial we’ll need the same kit we used in part one, plus a USB webcam:
- Jetson Nano Developer Kit
- A micro SD card (we recommend at least 16GB Sandisk Extreme Pro)
- An ethernet cable
- A DC barrel jack power supply with 5.5mm OD / 2.1mm ID / 9.5mm length, center pin positive that can supply up to 5V⎓4A (AliExpress, Adafruit)
- A motherboard jumper to short J48 on the Jetson Nano
- A USB webcam, we recommend Logitech webcams. (AliExpress, Amazon)
Note that while the Jetson Nano supports the use of the Pi Camera module, there is currently a bug on alwaysAI’s edgeIQ image (edgeIQ v0.11.0) that prevents us from using it.
Optional: The Jetson Nano does not have onboard WiFi, so you can also get a WiFi USB dongle for extra convenience (Amazon, Ali Express), or even use the Nano’s M.2 slot to install a WiFi card (Amazon).
Software required
- A download of this sample project from GitHub
- Software to flash an SD card (such as balenaEtcher)
- A free balenaCloud account to setup and manage the Jetson Nano
- A free alwaysAI account to download models
- Download and install the balena CLI tools – to be installed on your computer, allowing us to install the project code on the Nano
- Download and install the alwaysAI CLI – allows us to download large model files.
Power supply considerations
Note that while you can power the Nano via USB cable you will need a good quality power supply that can deliver at least 5V⎓2A at the developer kit’s Micro-USB port. But, even this won’t be anywhere near as much current as the board will need when running stressful workloads in the default 10W power mode. NOTE: If your board is unexpectedly shutting down it’s a big sign of power starvation.
To be on the safe side, you need to provide 5V⎓4A by using a DC barrel jack power supply. You’ll need to fit a jumper to J48 header on the baseboard in order to enable DC power supply usage. For a more detailed explanation on this please check out this reference guide by Nvidia.
Provision the Jetson Nano and deploy the project
If you followed part one of this series your Jetson Nano board should already be provisioned and running balenaOS. Feel free to go back and review the steps here if you need to reprovision your device.
Next, we need to grab the project from our GitHub repository either by using git or a direct ZIP download. Once we do that we deploy it using balena CLI. balenaCloud will take it from here: a new release will be created with our updated codebase and will be automatically deployed to our device. Once again, you can revisit this related post for a detailed step-by-step guide on how to deploy to balenaCloud. Here is the quick command line approach to it:
bash

git clone https://github.com/balena-io-playground/sense-people

cd sense-people

balena push <appName>
Using the project
How does it work?
Before we jump into the usage of this project we’ll briefly show how easy it is to implement an object detection algorithm using alwaysAI. The following code snippet was extracted from the people-counter/app.py file, which contains most of the important logic for this project. Code that is not relevant was redacted for simplicity:
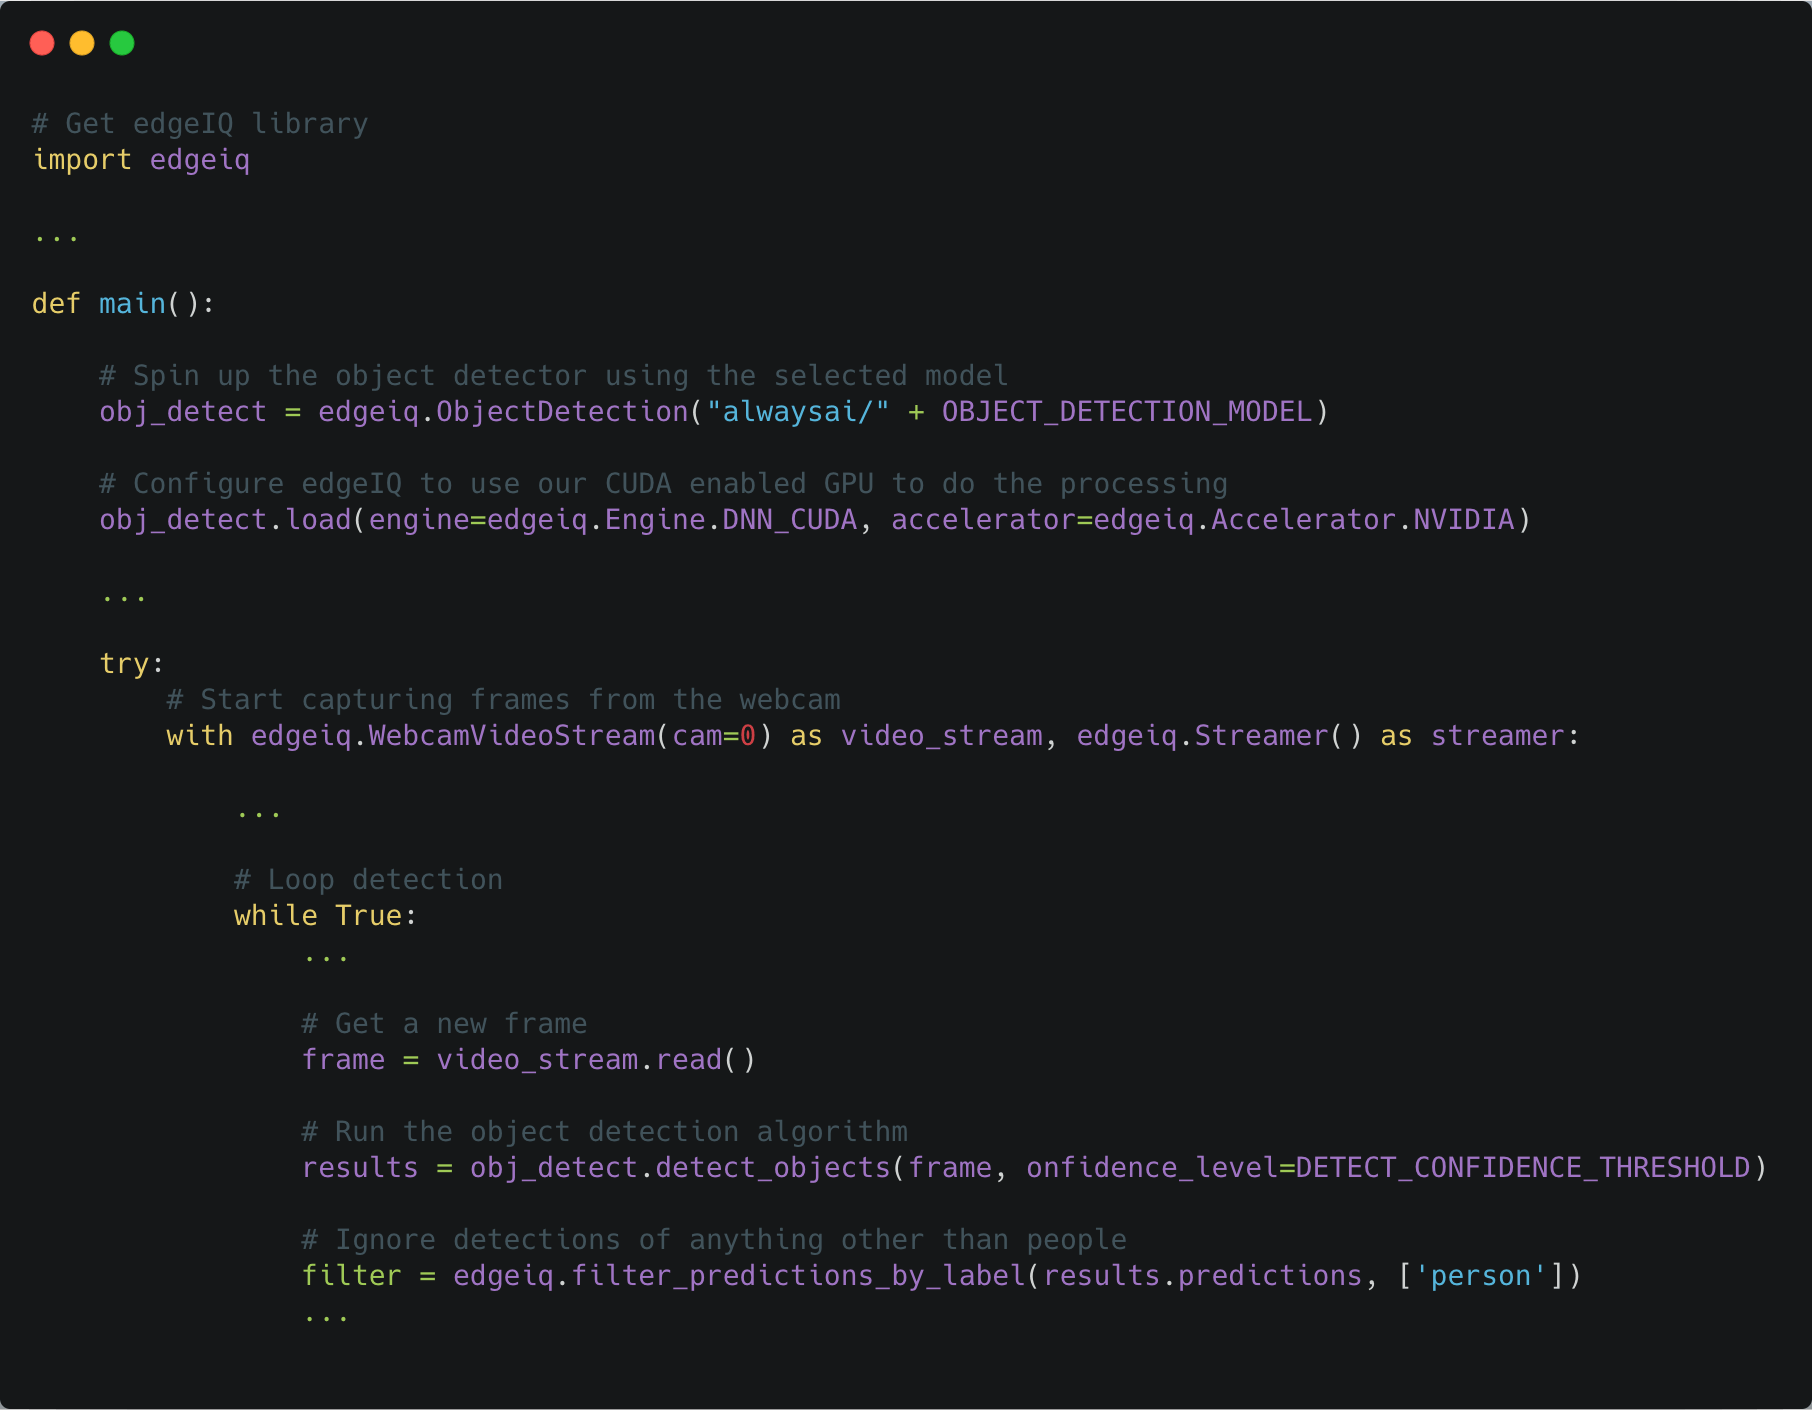
This snippet is a great example of how framework-agnostic the alwaysAI interface is. There is only one line of code that needs to be changed if you decide to switch, for example, from YoLo/Darknet to caffe/MobileNet:
python

  obj_detect = edgeiq.ObjectDetection("alwaysai/" + OBJECT_DETECTION_MODEL)
Give it a try
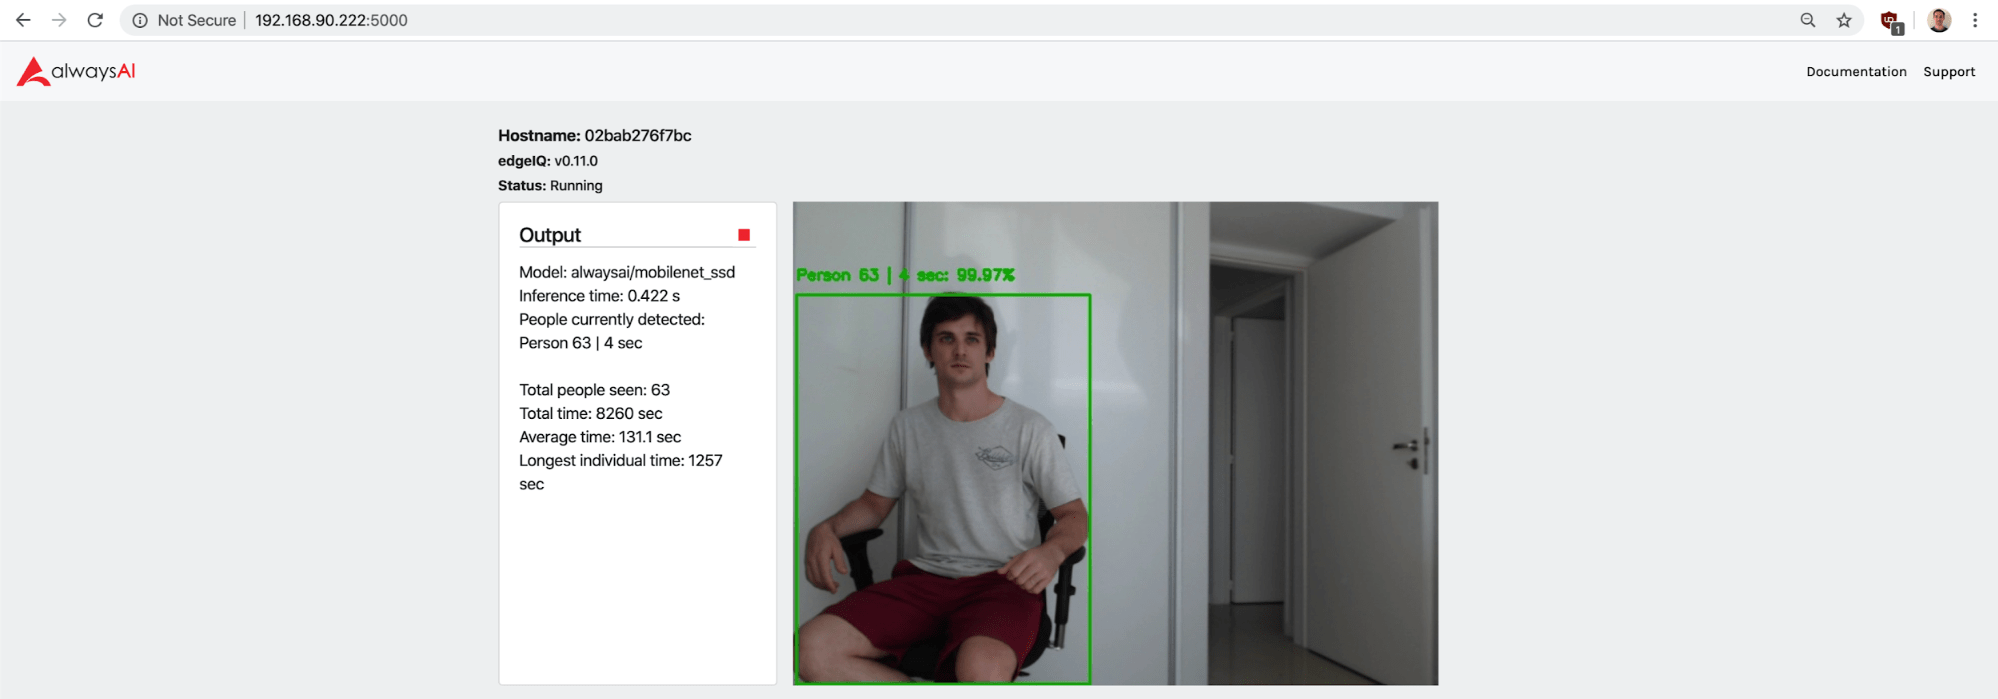
The project exposes two dashboards where we can visualize the inner workings of the algorithm. The first one is alwaysAI’s dashboard, it can be accessed on port 5000 (http://<device_ip>:5000) and shows a live video feed with bounding boxes overlayed on top of detected persons:
The second is Grafana’s dashboard, which shows historic people counts in various formats:

By default, the project will use mobilenet_ssd to perform object detection. You can change the model by creating an environment variable called OBJECT_DETECTION_MODEL either via the dashboard or the CLI (read more about it here). Here is a list of the models that are pre-installed on this project:
| Neural Network Framework | Dataset | Model | OBJECT_DETECTION_MODEL value | Reference inference time |
|---|---|---|---|---|
| caffe | COCO | MobileNet SSD | mobilenet_ssd (default) | 400 msec |
| darknet | COCO | Yolo v2 tiny | yolo_v2_tiny | 60 msec |
| darknet | VOC0712 | Yolo v2 tiny | yolo_v2_tiny_voc | 70 msec |
| darknet | COCO | Yolo v3 tiny | yolo_v3_tiny | 60 msec |
It’s worth noting the differences among them, specifically on the inference time. The inference time is the time that the neural network takes to process an image. Usually it’s a tradeoff– the more time it takes the more accurate the results are.
When processing a live video feed inference times matter since they directly impact FPS (Frames Per Second). For this particular use case, using MobileNet SSD (project’s default) yields 2.5FPS which is too low for video playback but enough for our purpose of counting people. Feel free to experiment with different models and see which fare better.
What next?
Model files can be quite large, it’s good practice not to store them on GitHub or similar repositories. We included some lightweight models in this project, but in case you want to try others here is how to do it.
First, make sure you have a working installation of the alwaysAI CLI, and that you registered for a free account on their site.
Before adding a new model we need to authenticate using the CLI. You can do so by running aai login and following the instructions. Make sure you run all the following commands inside the people-counter folder.
Next, we add the model to the project: aai app models add <modelName>. Note that this will only mark the model as available for usage, but it won’t download the required model files. To get the files we need to resort to a CLI hack, since currently there is no clean way of doing it (see this GitHub issue for more details).
We need to run the following command: ALWAYSAI_HOME=$(pwd) aai app install. This command will first download all the models marked as available, and then try to install python virtualenvs among other things: this last step will most likely error out. That is fine since we only needed to get the model files. We are now ready to re-deploy the app with balena CLI and try the new models!
To finish off, you could try building your own algorithms using edgeIQ’s building blocks, perhaps combining different types of models. For instance, you could run object detection on a video live stream and then run an object classification algorithm on the resulting object’s bounding box.
Until next time…
Have other interesting projects in mind? We would love to hear about them! If you decide to give it a go please share your results, you can find us at our forums, on Twitter, on Instagram or on Facebook.