


Do you want to be able to monitor your house, workplace, husband, wife, kids, pets, etc. when you are not there? Do you have a Raspberry Pi and a camera laying around? If you answered yes to at least one of these questions, keep reading!</span<

Updated 9th January 2020 – You can now add multiple projects to the same device. Try combining balenaCam with another project — oh the possibilities!
In this project, we’re going to build a network camera with a difference! This Raspberry Pi project uses WebRTC (more on that later) for communication between the camera and browser, and allows you to access a video feed from your device from anywhere in the world using the balenaCloud public URL feature.
We’ve taken care of the configuration and published our code on GitHub so let’s get down to business and setup your balenaCam!
Hardware required
- RaspberryPi (3 or other)
- RPi Supported camera module (recommended official v1, v2 camera module).
Tip: You don’t have the official RPi camera? No problem, you could try using a spare USB webcam.
Software required
Setting up the Raspberry Pi
We’re going to flash an SD card with balenaOS via a download from the balenaCloud dashboard. We can then add the device in order to push the project and set things up in such a way that it can easily be updated later.
The first thing to do is to get set up with a balenaCloud account; this means signing up if you haven’t already, adding an application and adding a device.
Step 1 – Sign up to balenaCloud
The first thing you’ll need to do is sign up for an account. If you’ve already got a GitHub or Google account you can use that to log in and bypass the signup process.
Step 2 – Create an application
Add an application selecting the correct device type for the device you’re using, choose Starter as the application type and then hit Create New Application. Using the starter application will provide you with all of the features of the Microservices application type and is free up to and including your tenth device.
This will take you to the dashboard for your newly created application, where you can move on to the next step and add your device. The name you give your application is up to you, but you’ll need it later on in the guide when you push your code.
Step 3 – Add a device and download the OS
Once your application has been created, you can set up and add a device within that application by clicking the blue ‘add device’ button. When you add a device you specify your device type, it is important that it matches the device you’re using. If you are connecting to a wireless network you will need to set your WiFI SSID and passphrase here too.

This process creates a customized image configured for your application and device type and includes your network settings if specified.
Note: When you’re first getting started, a development image will be most useful, as it permits a number of testing and troubleshooting features. More details on the differences between development and production images can be found here. If you’re confident you can go ahead and deploy the production image straight away — that’s what I’m running.
Step 4 – Flash your SD card and boot the device
Once the OS image has been downloaded, it’s time to flash your SD card. You can use balenaEtcher for this.

Once the flashing process has completed, insert your SD card into the Raspberry Pi and connect the power supply.

When the device boots for the first time, it connects to the balenaCloud dashboard, after which you’ll be able to see it listed as online and move onto the next step.

Troubleshooting: It should only take a few minutes for the new device to appear in your dashboard, If your device still hasn’t shown up on your dashboard after a few minutes, something has gone wrong. There’s an extensive troubleshooting guide in the documentation, with lots of information on why this could be, but if you still can’t get your device online, come on over to the forums where we’ll be able to help out.
Push the code to the device
The project code has been published on GitHub
We’ve produced a video to show you how to push the code to your device below. In case you can’t see the embedded video below, it’s also on YouTube or you can take a look at our deployment guide.
Configuration
Must-have fleet configuration variables:
| Name | Value |
|---|---|
| BALENA_HOST_CONFIG_start_x | 1 |
Set all of these, so your Pi can autoselect the gpu_mem allocation automatically depending on the amount of RAM available.
| Name | Value |
|---|---|
| BALENA_HOST_CONFIG_gpu_mem_256 | 192 |
| BALENA_HOST_CONFIG_gpu_mem_512 | 256 |
| BALENA_HOST_CONFIG_gpu_mem_1024 | 448 |
We’ve produced a video to show you how to set the required variables below. In case you can’t see the embedded video below, it’s also on YouTube or you can take a look at our docs.
And you will end up with:

🔒 Password Protect your balenaCam device 🔓
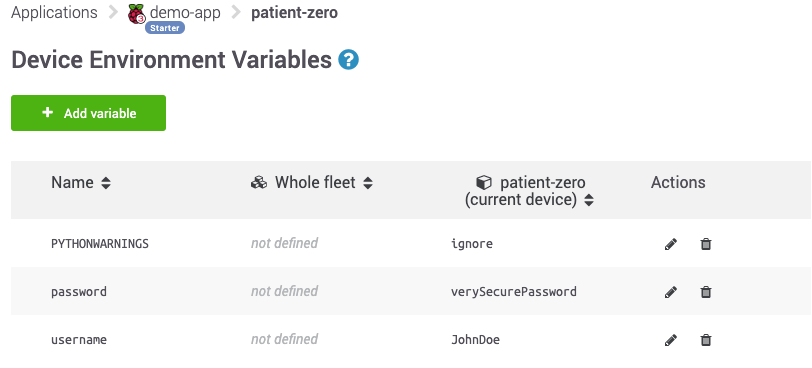
If you want to be the only one authorized to access your balenaCam video feed, you can do so just by setting the following username and password environment variables.
| Name | Value |
|---|---|
| username | yourUsernameOfChoice |
| password | yourPasswordOfChoice |
eg. my username and password:
Optional Device Variables
If your camera module is mounted upside down, you can rotate the video feed by 180 degrees just by setting the following environment variable.
| Name | Value |
|---|---|
| rotation | 1 |

To suppress python’s warnings set
| Name | Value |
|---|---|
| PYTHONWARNINGS | ignore |

Try your balenaCam!
If everything went well you should now have successfully deployed balenaCam to your device! Enable the public device URL on your device and you can use the provided URL to access the video stream.

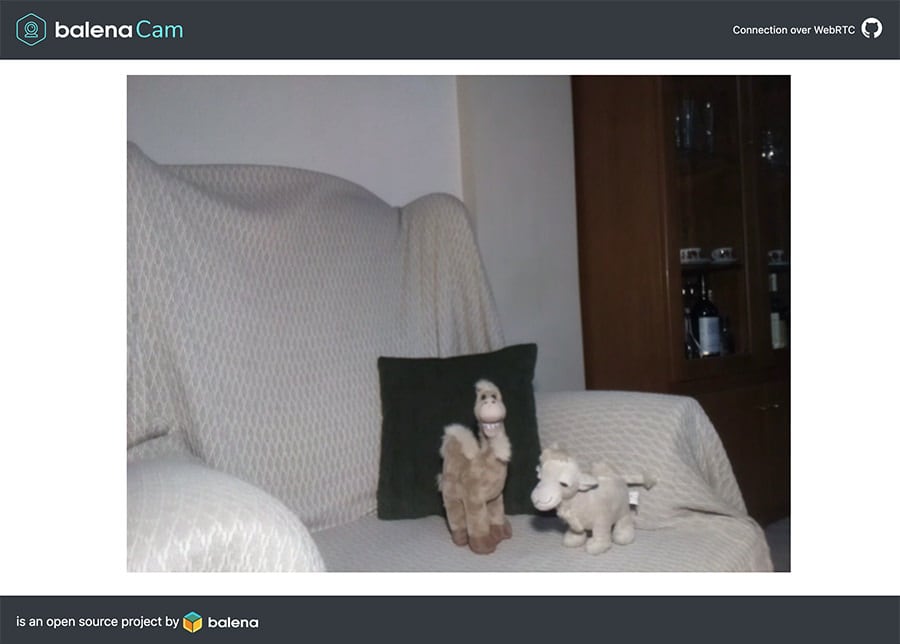
(balenaCam used here as a pet monitoring solution)
How does it work?
The majority of the Raspberry Pi based camera projects out there use MJPEG to transmit “video”, which is essentially a JPEG image overwritten by the next JPEG image, and so on…
MJPEG streams are generally characterized by low FPS and use less CPU and memory, this is why they are suitable candidates for streaming on weaker, low power devices.
But what if we wanted to use something other than MJPEG streaming? What options do we have?
We all use video streaming services every day, for example, Google Meet / Hangouts, Facebook Messenger, Discord, Jitsi Meet… but what do all of these services have in common?
The answer is WebRTC, a Real-Time Communication protocol.
Main idea: Two computers want to communicate with each other using the fastest and most direct way possible (Peer-to-Peer connection in real-time).
A few words about WebRTC
WebRTC describes a connection between two peers, to that end, it tries to traverse the NATs involved from Peer1 to Peer2 (using the stun protocol) and vice versa. If this traversal is successful, meaning that data can be sent between the 2 peers, we have a direct connection. In the real world, these direct connections fail in some cases. This is due to the topology and how restrictive the networks involved are. In these failed cases and in order to actually establish the connection, WebRTC introduces a type of server that acts as a data relay between the two peers, this is called a TURN server.

In conclusion, WebRTC is an awesome way to send video, audio or data, that’s why most of the big services we use to communicate choose it and the reason why it is going to be widely used in the years to come.
Even though there are some projects out there that can be used on a Raspberry Pi to stream video over WebRTC, they have their limitations. For example, they can’t stream video to more than one client at the same time, that’s why we decided to build balenaCam.
balenaCam uses WebRTC to stream the video from the device to more than one peer/client if needed.
As we mentioned earlier, a direct WebRTC connection fails in some cases.
Using balena-cloud you have access to your device using our VPN.
balenaCam makes use of this VPN to provide an MJPEG stream in the cases when WebRTC fails.
balenaCam works on all the popular browsers out there; Safari, Firefox, Chrome, and it immediately uses MJPEG streaming in order to work on Microsoft’s Edge (Soon to be based on Chromium, so in the future, there will be no need for special treatment).
So what happens when you hit your balena device’s public URL?
Your browser, at first, will try to establish a direct WebRTC connection to the device and show the device’s camera video feed, if this is successful you should be able to watch the device’s video feed. If for some reason your video feed is frozen, balenaCam will detect the video freeze and it will re-establish the connection automatically. In cases where the WebRTC fails, balenaCam will start an MJPEG stream that proxies the data through the balenaVPN. You can see if you are using WebRTC or balenaVPN using the indicator message on the top bar, next to the GitHub icon.
What’s next?
Now the technical build is complete, look out for more balenaCam projects coming soon.
Try building multiple projects on one device
If you’ve already built one of our projects and want to try this one too, good news! One of the great benefits of building with balena is that you can easily add more projects to the same device without needing to buy more hardware. This blog post that explains how to do just that: learn how to set up this project alongside what you’ve built already. Happy hacking!
We’d love to hear your questions, thoughts, ideas and see how you applied this project in your everyday life. Feel free to engage with us on our forums, on Twitter @balena_io, on Instagram @balena_io or on Facebook where we’d be more than happy to help!
Thanks for reading!
